Quick Start for Developers - OpenframeProject/Openframe-APIServer GitHub Wiki
Openframe Developers Quick Start Guide
Overview
This document outlines some basic info about the structure and code base of the Openframe project, and provides details about setting up for local development.
Design Notes
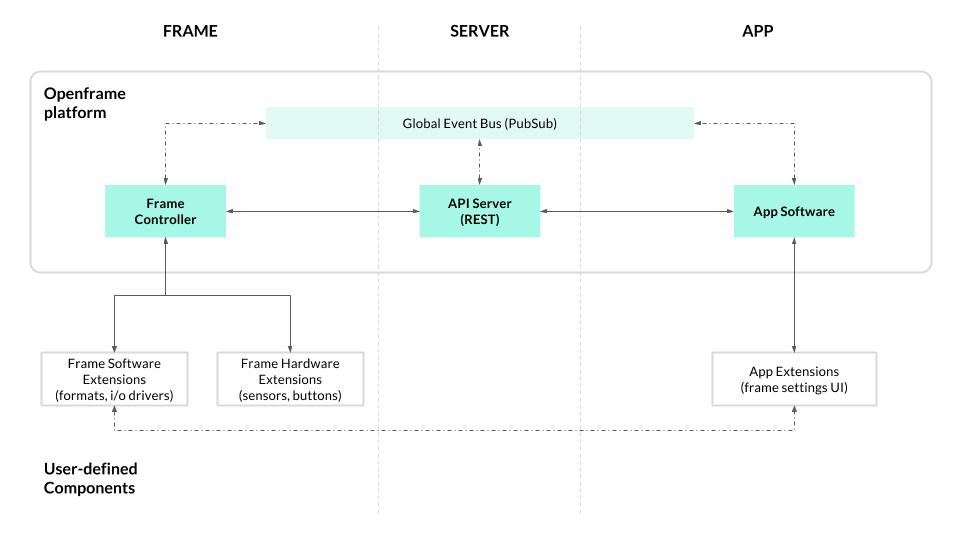
There are two main components to the Openframe code base — the API server and the frame controller. At present, the API server also serves the web app (though this is likely to change in the future) and by default starts up an instance of the global event bus which the app, server, and frame use to communicate.
The API Server is built on loopback, a node.js framework for building RESTful APIs. It represents the API Server (REST) in the diagram below. The Global Event Bus lives in a separate repository, Openframe-PubSubServer, though as mentioned it is included as a dependency in the API Server repo for simplicity during development.
Running the Server
The API Server code base was largely written following the loopback docs' recommendations and examples. To run locally, fork/clone the repo, install the npm dependencies, and run npm start.
# (you'll probably fork the repo, and clone your fork)
$ git clone https://github.com/OpenframeProject/Openframe-APIServer.git
$ cd Openframe-APIServer
$ npm install
$ npm start
This will start the server on localhost:8888 — visit this in your browser to see the fully functioning web app. In addition, the API Server repo includes the pubsub server as a dependency. Running npm start will spin up an instance of the PubSub server on port 8889. If you want to start only the API, run npm run start-api. Likewise, if you want to run only the pubsub server, run npm run start-pubsub.
By default the API server will use an in-memory data store. You can generate some dummy data at startup by adding a javascript file in /server/boot — an example file, create-sample-data.js.example is in that dir, so as a starting point you can copy that file and remove the .example suffix.
For DEBUG output, set the DEBUG env var:
# output ALL debug (includes a lot due to loopback)
$ DEBUG=* npm start

# output openframe-specific debug
$ DEBUG=openframe:* npm start
Environment Configuration
Various environment configuration options can be set using a .env file. An example .env file might specify the host and port on which to expose the API server, configure the datasource, and specify a host and port on which the API server can expect to find the PubSub server. Take a look at the .env.example file in the project root.
# in .env file...
PORT=1234

# indicate how the API server should connect to the pubsub server
PS_HOST='pubsub.openframe.io'
PS_PORT=2345
REST API Docs
Loopback provides auto-generated documentation (via swagger) based on the data model definitions. After starting up the server locally, visit localhost:8888/explorer/ to view the docs and test out the API.
Running the Frame Controller
Although the frame controller is developed with the Raspberry Pi in mind as a target platform, it is also written in node.js and can be run directly on your development machine. The limitation is that some extensions may not load or work as expected, since individual extensions might support only the RPi (or, in theory, some other specific platform). For example, the openframe-image extension installs and uses a commandline utility not available on mac.
To install the frame controller:
# (you'll probably fork the repo, and clone your fork)
$ git clone https://github.com/OpenframeProject/Openframe.git
$ cd Openframe
$ npm install
When the frame controller installs, it creates a hidden directory in your user's home folder, ~/.openframe, and adds a .ofrc file there which is used to configure the network location of the server. By default, it will point to the public openframe server, host openframe.io on port 80. For local development, you should edit this file to point to your local server:
{
  "network": {
    "api_protocol": "http",
    "api_domain": "localhost",
    "api_port": "8888"
  }
}
Once this file has been edited to point to your local server, you can start up the frame controller:
$ npm start
You'll be asked for your openframe username/password and a name for the frame — you can either use a user from your dummy data, or create a new account via the web app and use this user/pass.
As with the API Server, DEBUG output can be displayed by setting the DEBUG env var:
$ DEBUG=* npm start
Putting it Together
Once you've got your server and frame controller instances both running, you can push artwork to the frame controller. If you're developing on a mac, at the time of this writing only the Shaders will run, since the shader extension uses glslViewer which is available for linux or mac.
If you're interested in developing extensions, please take a look at the Extension Developers Quick Start Guide (coming soon!).