How to improve motor heat dissipation - OpenSourceEBike/TSDZ2_wiki GitHub Wiki
I installed a small 30mm tangential blower to circulate air inside the case. It fits with no modification blowing around the motor circumference.
The effect on power handling was measured by feeding DC through the windings on the bench, while blowing air on the outside of the case. Internal motor temperature can be measured by the change in winding resistance (V_at_windings/I) due to temperature (Copper is similar to PT100 RTD type sensor). By keeping R constant i.e the winding temperature , the amount of power for X degrees inside the windings, can be measured blower on and blower off.
I recently added cooling fins. It helps when riding up the hill. Before I installed these fins, the motor was heating to ~ 72 deg C and the motor powered down to ~ 300 Watt as shown above. I will study further, how much it enables one to use higher power when hill climbing. It cost ~ $20 and ~ 10 minutes to install. I used around 60 of 30mmx8mmx8mm Heat Sinks. Please see the photos under https://github.com/OpenSourceEBike/TSDZ2_wiki/wiki/roadbike

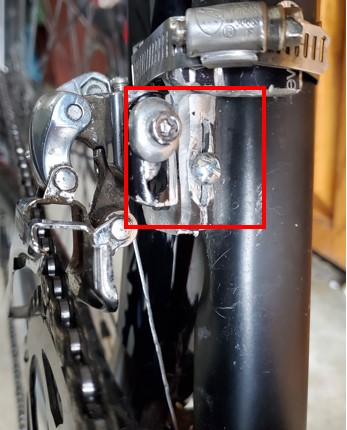
The motor heats up when climbing hills. I mounted both a 36 teeth chainring and the 52 teeth chainring. However since the chainrings are moved outwards, the front derailleur does not work anymore. There are 2 ways to handle it. Manually change the gear with your hand or feet, which I did for ~ 1000 miles. Then I did the modifications as shown in the picture. I made a modification so that the front derailleur is mounted more outwards. Please see the additional screws at the red square. This is the amount needed. It works fine now and I am very glad. 
More info under https://github.com/OpenSourceEBike/TSDZ2_wiki/wiki/roadbike
This guide is about improving the cooling of the TSDZ2 engine. It allows to use more continuous power. Reduces the risk of demagnetizing or even burning the engine, but does not prevent it. Installation of the temperature sensor is highly recommended.
This upgrade requires testing. It is suggested to perform a continuous power level test at the optimum, constant motor operating temperature (e.g. 70 C degrees) before and after the modification. Then share the results on the Endless Sphere forum thread Hardware temperature control tsdz2.
We will focus on modifying the heat flow from the motor windings, where heat is generated to the outer casing.
Elements needed to complete the upgrade:
- Heat conducting paste 5 W / mK or better - 2-3 g,
- AAB Cooling Thermopad 20x130x2 6 W / mK - 1 piece
- AAB Cooling Thermopad 20x130x3 6 W / mK - 1 piece
You can use any other thermal silicone pad with similar parameters with adhesive on both sides.
Remove the electric motor. Secure the chamber in which the blue rack and motor shaft work, e.g. with paper tissues. Carefully clean the seat in which the engine is mounted. Remove the old glue. In this step, you can check the condition of the blue gear and bearings, grease them.

Disassemble the motor. The flanges must be removed separately from the stator. A small bearing puller can be used. Apply thermal paste to the flange seats in which the stator is mounted. Assemble the electric motor together.

Stick the Thermopad strips to the gear housing in the place where the electric motor is (Thermopad contains adhesive on both sides). The gap between the motor and the housing is 1.5 mm thick. 2 mm thick Thermopads strips are enough. Remember to leave gaps between the strips, because when pressed they widen.

Apply thermal grease to the gearbox flange

Apply thermal grease to the motor flange

Put the electric motor in its place. Connect the cables.

Stick 3 mm thick Thermopad strips to the outer motor flange and controller housing. Put the outer cover in its place.

Cut the outer plastic cover under the sprocket. In this way you will open an unused chamber. This chamber works perfectly as a heat sink. Put some black Sugru (it can be molded like Pongo) or black silicone in the gap between the cut plastic cover and the gear housing. You can use black spray paint inside of the chamber for better look.
You can skip this step if you want to keep the factory appearance, but then you will get less continuous power.

