Project 2 Applied Research Project Remote Access - Oliver-Mustoe/Oliver-Mustoe-Tech-Journal GitHub Wiki
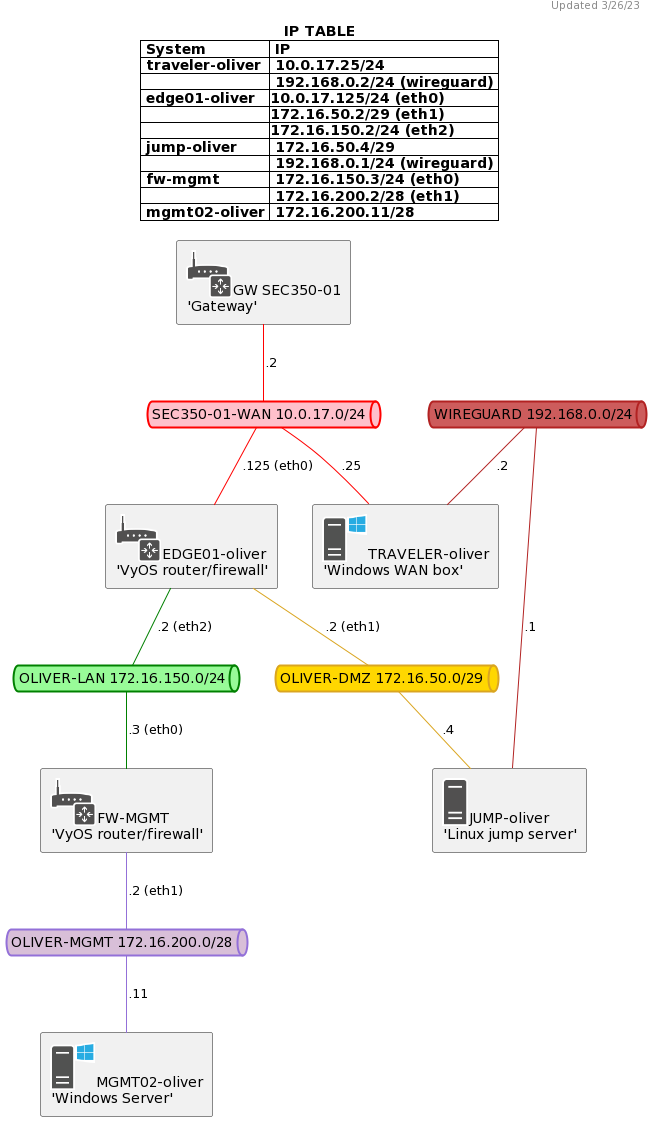
This document is a guide to fully installing/setting up Wireguard to allow a remote client (traveler) to RDP into a windows server (mgmt02.)
Table of contents:
- MGMT02 setup commands
- Firewall setup commands
- Jump setup
- Traveler setup
- Pros vs Cons of Wireguard
- Sources
First, on mgmt02, enable RDP on Windows with the following commands in an administrative Powershell session:
Set-ItemProperty -Path 'HKLM:\System\CurrentControlSet\Control\Terminal Server' -name "fDenyTSConnections" -value 0
Enable-NetFirewallRule -DisplayGroup "Remote Desktop"
Then run the following commands on each of the prescribed firewalls (recommended to copy and past over SSH, fully built Firewall configs here):
configure
# Configure the DMZ-to-LAN firewall to allow jump's IP to make requests to mgmt02 at the RDP port
set firewall name DMZ-to-LAN rule 20 action 'accept'
set firewall name DMZ-to-LAN rule 20 description 'Jump RDP to mgmt02'
set firewall name DMZ-to-LAN rule 20 destination address '172.16.200.11'
set firewall name DMZ-to-LAN rule 20 destination port '3389'
set firewall name DMZ-to-LAN rule 20 protocol 'tcp'
set firewall name DMZ-to-LAN rule 20 source address '172.16.50.4'
# Configure the WAN-to-DMZ firewall to allow any IP to access jump's IP on the Wireguard port
set firewall name WAN-to-DMZ rule 30 action 'accept'
set firewall name WAN-to-DMZ rule 30 description 'Allow Wireguard from WAN to JUMP'
set firewall name WAN-to-DMZ rule 30 destination address '172.16.50.4'
set firewall name WAN-to-DMZ rule 30 destination port '51820'
set firewall name WAN-to-DMZ rule 30 protocol 'udp'
# Configure port forwarding for the jump IP on the Wireguard port
set nat destination rule 30 destination port 51820
set nat destination rule 30 inbound-interface eth0
set nat destination rule 30 protocol udp
set nat destination rule 30 translation address 172.16.50.4
set nat destination rule 30 translation port 51820
set nat destination rule 30 description VPN->Jump
# Open the firewall to jump to access everything to download Wireguard, delete after Wireguard install
set firewall name DMZ-to-WAN rule 999 action accept
set firewall name DMZ-to-WAN rule 999 source address 172.16.50.4
# Delete after with 'delete firewall name DMZ-to-WAN rule 999'
commit
save
configure
# Configure the LAN-to-MGMT firewall to allow jump's IP to make requests to mgmt02 at the RDP port
set firewall name LAN-to-MGMT rule 40 action 'accept'
set firewall name LAN-to-MGMT rule 40 description 'LAN RDP to mgmt02'
set firewall name LAN-to-MGMT rule 40 destination address '172.16.200.11'
set firewall name LAN-to-MGMT rule 40 destination port '3389'
set firewall name LAN-to-MGMT rule 40 protocol 'tcp'
set firewall name LAN-to-MGMT rule 40 source address '172.16.50.4'
commit
save
Jump can be configured in one of 2 ways
In this method:
- Download the wireguard-setup.sh script:
wget https://raw.githubusercontent.com/Oliver-Mustoe/Oliver-Mustoe-Tech-Journal/main/SEC-350/PROJ_2/wireguard-setup.sh- Then from the directory you downloaded the script to, make the script executable with:
chmod +x wireguard-setup.sh- Run the script with a sudo user
./wireguard-setup.sh- REMEBER TO DELETE THE RULE rule 999 (SEE ABOVE)
- After the script has run, you should be met with a success message:
.png)
First, update jump and download Wireguard:
sudo apt update
sudo apt install wireguard -y
(REMEBER TO DELETE THE RULE rule 999 (SEE ABOVE))
Commands from here ARE run as root (sudo -i).
Then generate the private and public keys for the server:
wg genkey | tee /etc/wireguard/server_private_key | wg pubkey > /etc/wireguard/server_public_keyAnd generate the private and public keys for the client:
wg genkey | tee /etc/wireguard/client_private_key | wg pubkey > /etc/wireguard/client_public_keyAfter that, create the following server Wireguard configuration in /etc/wireguard/wg0.conf:
[Interface]
PrivateKey = {INSERT THE CONTENTS OF '/etc/wireguard/server_private_key'}
Address = 192.168.0.1/24
ListenPort = 51820
SaveConfig = true
PreUp = sysctl -w net.ipv4.ip_forward=1
PreUp = iptables -t nat -A PREROUTING -p tcp -d 192.168.0.1 --dport 3389 -j DNAT --to-destination 172.16.200.11:3389
PostDown = iptables -t nat -D PREROUTING -p tcp -d 192.168.0.1 --dport 3389 -j DNAT --to-destination 172.16.200.11:3389
PreUp = iptables -t nat -A POSTROUTING -o ens160 -j MASQUERADE
PostDown = iptables -t nat -D POSTROUTING -o ens160 -j MASQUERADE

[Peer]
PublicKey = {INSERT THE CONTENTS OF '/etc/wireguard/client_public_key'}
AllowedIPs = 192.168.0.2/32
^ Note for above: ens160 is the interface for the 172.16.50.4/29 address and is the IP/Interface that the packets will be masquerading as when accessing mgmt02
Then create the following client Wireguard configuration in /etc/wireguard/client.conf:
[Interface]
PrivateKey = {INSERT THE CONTENTS OF '/etc/wireguard/client_private_key'}
Address = 192.168.0.2/24
ListenPort = 51820

[Peer]
PublicKey = {INSERT THE CONTENTS OF '/etc/wireguard/server_public_key'}
AllowedIPs = 192.168.0.1/32
Endpoint = 10.0.17.125:51820
PersistentKeepalive = 25
Commands from here are NOT run as root!
After the configurations are made, you can enable the Wireguard interface on the server with the following command:
sudo wg-quick up wg0.png)
NOTE: Screenshots from this install are from doing a AUTOMATIC installation of Wireguard, should have NO difference when done manually!
The client.conf file must now be transfered from jump to traveler. From an SSH session, I copied the contents of client.conf from jump and pasted it into a local file on my system of the same name > Emailed the file to myself > Accessed it on traveler:
.png)
Then install Wireguard with the following command
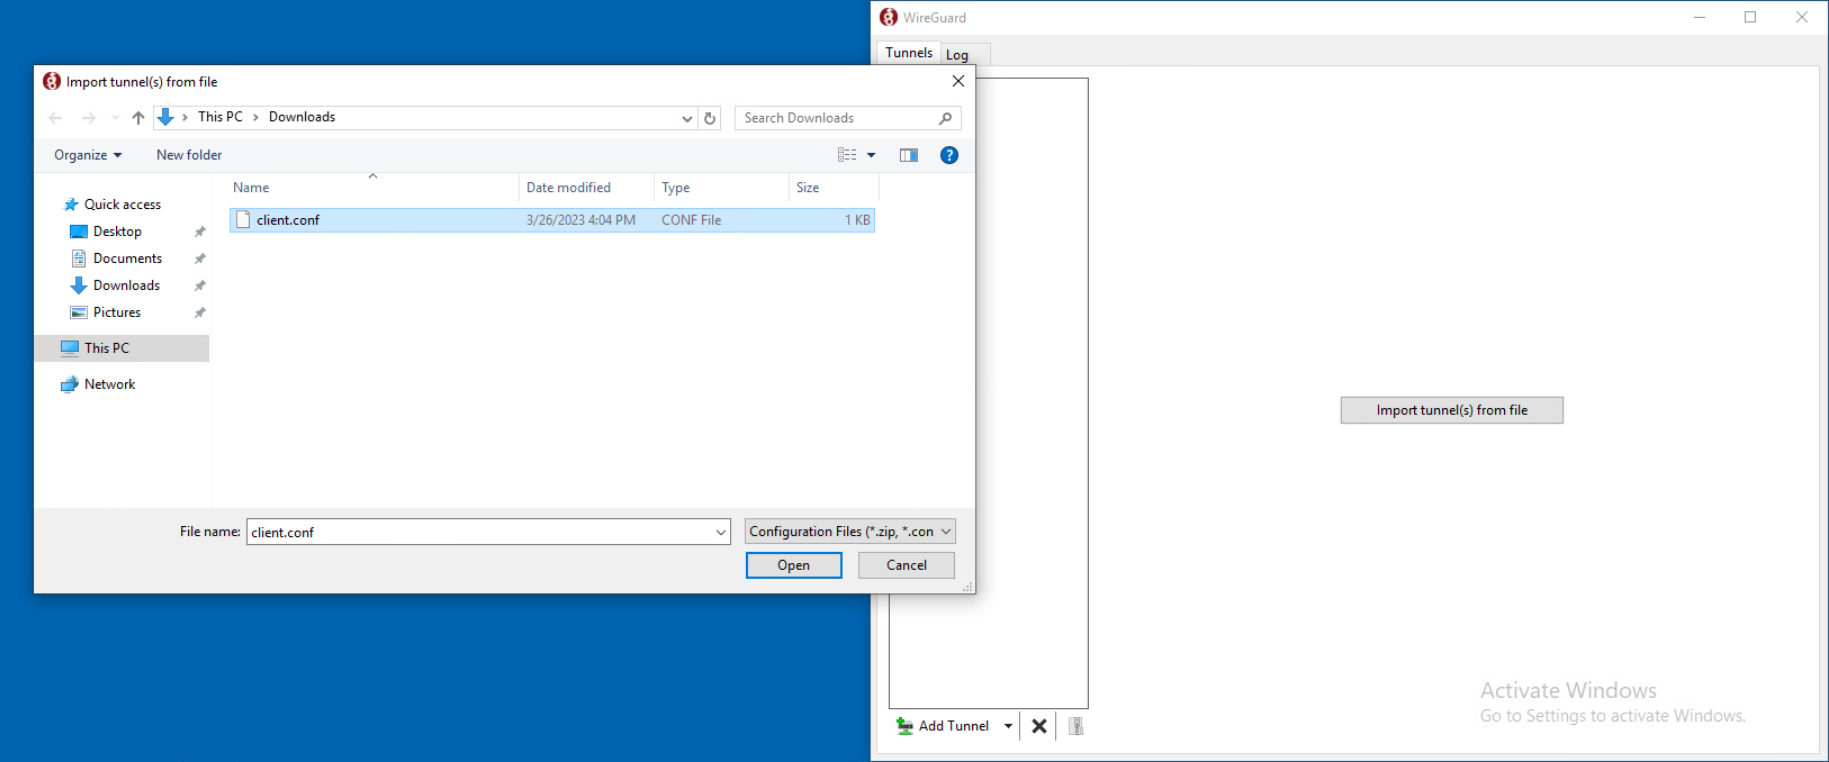
(New-Object Net.WebClient).DownloadFile("https://download.wireguard.com/windows-client/wireguard-installer.exe", "$env:temp\wireguard-installer.exe") | Start-Process "$env:temp\wireguard-installer.exe"Afterwards you can access the Wireguard GUI (search for "Wireguard" in the search bar):
.png)
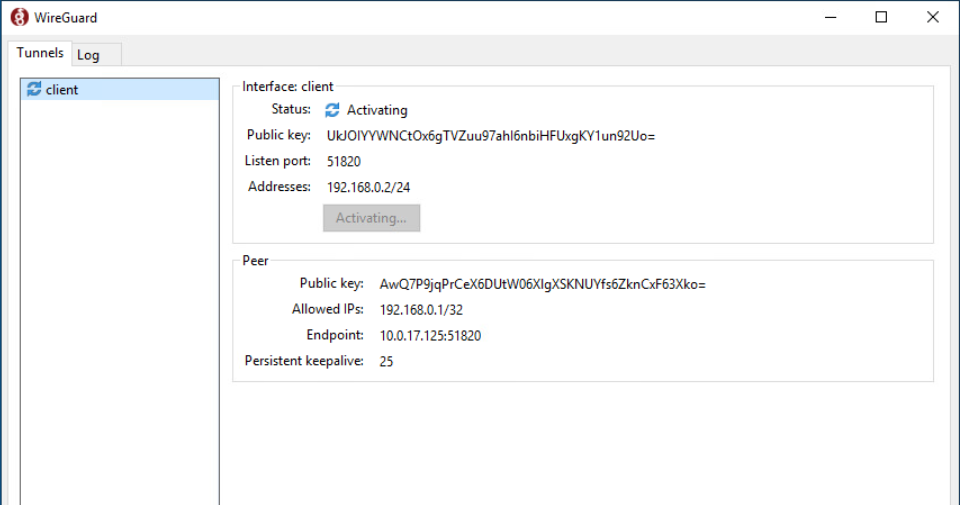
From the Wireguard GUI click "Add Tunnel" > Select the client.conf file > Open > Then activate the interface:
Selecting the tunnel:
Activating tunnel:
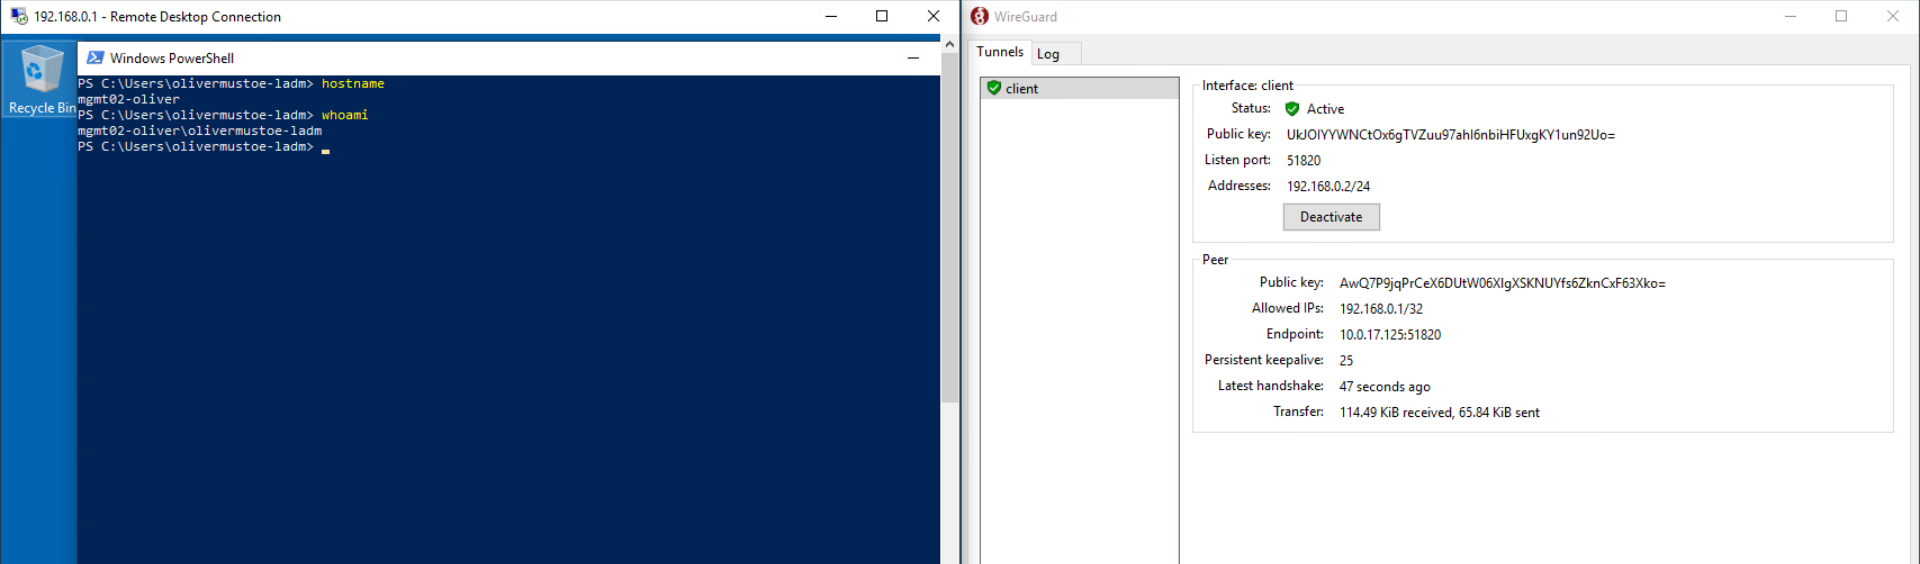
Then you can open an RDP session to 172.16.200.11 by setting the RDP client to the IP 192.168.0.1 (shown below is a RDP session into mgmt02):
| Pros | Cons |
|---|---|
| Simple to install | No great way to transfer a config |
| Easy/quick setup for basic usage | Advanced configuration relies upon knowledge of outside systems (iptables) |
| Easy to automate | |
| Expandable (easily could add more addresses to compensate for more services) |
- https://www.ckn.io/blog/2017/11/14/wireguard-vpn-typical-setup/
- https://www.baeldung.com/linux/cat-writing-file
- https://serverfault.com/questions/586486/how-to-do-the-port-forwarding-from-one-ip-to-another-ip-in-same-network
- https://www.procustodibus.com/blog/2022/09/wireguard-port-forward-from-internet/
- https://git.denkn.at/deac/osd-contiki/commit/8bfb8562202082b1acbf9684a7eb6ddeca20ffea
- https://www.procustodibus.com/blog/2021/04/wireguard-point-to-site-port-forwarding/
- https://docs.vyos.io/en/equuleus/configuration/interfaces/wireguard.html#firewall-exceptions
- https://stackoverflow.com/questions/65444747/what-is-the-difference-between-endpoint-and-allowedips-fields-in-wireguard-confi
- https://www.procustodibus.com/blog/2021/01/wireguard-endpoints-and-ip-addresses/
- http://linux-ip.net/html/nat-dnat.html