Milestone 4 VCenter AD Integration, PowerCLI and Linked Clones - Oliver-Mustoe/Oliver-Mustoe-Tech-Journal GitHub Wiki
This page journals content related to NET/SEC/SYS-480 milestone 4.
Table of contents
VM Inventory
Milestone 4.1 – Active Directory LDAPs SSO Provider
I powercycle'd my xubuntu-wan VM, as it was acting really funny with chrome remote desktop. After that it worked fine.
CA and SSO setup and initialization
Then I SSH’d into dc1 as my named administrative user and used the following powershell commands to install Certification Authority features and configure the Active Directory Certificate Services with an Enterprise Root CA (see Troubleshooting #1):
Install-WindowsFeature ADCS-Cert-Authority -IncludeManagementTools
Install-AdcsCertificationAuthority -CACommonName "oliver-DC1-CA" -CAType EnterpriseRootCa -CryptoProviderName "RSA#Microsoft Software Key Storage Provider" -KeyLength 2048 -credential (get-credential) -HashAlgorithmName SHA512
Then I rebooted the computer.
From a remmina connection in to show:
(For transparency, the order of operations in real-time was creating a bad CA, setting up vCenter in the active directory, setting up another bad CA, and then finally setting up a good CA. So in a perfect world, CA creation > vCenter AD setup)
Then from my vcenter instance at “vcenter.oliver.local”, I used the dropdown on the left > Administration > Single Sign on area > Configuration:
Then I navigate from Identity Sources down to Active Directory Domain:

Where I clicked to JOIN AD, where I entered in the following:
And then I pressed join, which gave the following:
(NOTE: I would repeat this process once as I, in finding how to reboot, pressed the refresh button which whipped away the settings :), above is from the last time entering!)
Then to restart the node I (still in Administration) navigated to the deployment section > System Configuration > selected vcenter and pressed “REBOOT NODE” (gave a popup that require a reason for rebooting, just answered “SSO” and pressed REBOOT):
Then I ran the following powershell commands in a SSH session to create the required OU structure and user:
New-ADOrganizationalUnit -Name "480" -Path "DC=oliver,DC=local"
New-ADOrganizationalUnit -Name "Accounts" -Path "OU=480,DC=oliver,DC=local"
New-ADOrganizationalUnit -Name "Services" -Path "OU=Accounts,OU=480,DC=oliver,DC=local"
$password = Read-Host "Please enter a password for the vcenterldap user" -AsSecureString
New-ADUser -Name vcenterldap -GivenName vcenterldap -AccountPassword $password -description "ldap binding for vcenter active directory sso" -DisplayName vcenterldap -Passwordneverexpires $true -Enabled $true -path "OU=Services,OU=Accounts,OU=480,DC=oliver,DC=local"
# Made a mistake of the ServiceAccount OU name, so I renamed it here
Rename-ADObject -Identity "OU=Services,OU=Accounts,OU=480,DC=oliver,DC=local" -NewName "ServiceAccount"
End result:
I then rebooted dc1
After the reboot, I used the following command on my xubuntu-wan box to grab the SSL certificate:
openssl s_client -connect dc1:636 -showcerts
I would save the certificate inside a folder on my desktop called “ldapcert.cert” (used SHIFT+INSERT in VI to copy and past the output):
I then ran the following powershell commands to move my named domain user to the correct OU, and created a group with my named domain admin user added:
Get-ADUser -Identity oliver-adm.mustoe | Move-ADObject -TargetPath "OU=Accounts,OU=480,DC=oliver,DC=local"
New-ADGroup -Name "vcenter-admins" -SamAccountName vcenter-admins -GroupCategory Security -GroupScope Global -DisplayName "vcenter-admins" -Path "OU=Accounts,OU=480,DC=oliver,DC=local" -Description "Members of this group are vcenter admins"
Add-ADGroupMember -Identity "vcenter-admins" -Members oliver-adm.mustoe
Following shows this completed:
Back in vCenter, I navigated back to the Administration area > Singe Sign On section > Configuration > Identity Sources where I chose to ADD an identity source (following shows the pop-up form filled out) then pressed ADD:

Tips:
- In active directory, can set advanced view, which means that you can right click on a folder > properties > Attribute Editor > see the path
It being set:

After its set, I navigated to Users and Groups in Single Sign On > Groups tab (left of Users tab, under heading):
Then I selected Administrators > ADD MEMBERS > filled in the following (enter “vcenter-admins” in the search, will then be added to the other groups) and pressed SAVE :
I then restarted the node like I did before, after the restart, I could sign in as my admin user:
I would also go back into the dropdown > Administration area > Singe Sign On section > Configuration > Identity Sources where I would set my AD as the default (OK at the popup) First pic shows before, second shows after:
Reflection for 4.1:
This part of milestone 4 was really cool, and I am really enjoying seeing the progression from nothing to mini cyber.local. I had a really big troubleshooting time with the CA, which ended up being that I didn’t include the credential flag in my powershell command. This I believe made it so that my certificate wasn’t being signed by the private key, so the certificate was essentially broken. From troubleshooting, I was able to fix this and successfully have a certificate. I also tried to use powershell commands to manage AD (including OU, users, and groups) and I actually find it to be about as fast if not faster than doing it by hand. I have found that it is especially easier to tech journal as I can just supply the commands. Overall, fun step, looking forward to .2 and .3 later.
Troubleshooting #1
Originally ran the following incorrect commands to setup the CA:
Install-WindowsFeature ADCS-Cert-Authority -IncludeManagementTools
Install-AdcsCertificationAuthority -CACommonName "oliver-DC1-CA" -CAType EnterpriseRootCa
Which I believe caused by CA certificates to not work correctly, so I ran the following to uninstall the certificate authority:
Uninstall-AdcsCertificationAuthority
And then used the following correct commands to setup the authority (what is prescribed above, changed name from “oliver” to “olivermustoe” as the private key was already made):
Install-WindowsFeature ADCS-Cert-Authority -IncludeManagementTools
Install-AdcsCertificationAuthority -CACommonName "olivermustoe-DC1-CA" -CAType EnterpriseRootCa -CryptoProviderName "RSA#Microsoft Software Key Storage Provider" -KeyLength 2048 -HashAlgorithmName SHA512
I would later find where the keys are (at least I believe):
I would then go down a very long road in which my CA still didn’t work, but I found the solution, which is that I need to add “-credential” to the install command for install an enterprise root CA. So I did the following to cleanup the other 2 CA’s and install another “oliver-DC1-CA:
Ran Uninstall-AdcsCertificationAuthority, rebooted, and deleted the certificates in “Manage computer certificates”. Following shows cleaned certificates folder, deleted 2 certificates named “oliver-DC1-CA” and “olivermustoe-DC1-CA” (essentially removed the old CA’s names):
Then I made sure the keys were deleted from “C:\ProgramData\Microsoft\Crypto\Keys” (deleted highlighted):

Then I ran the following commands to setup the CA correctly:
Install-WindowsFeature ADCS-Cert-Authority -IncludeManagementTools
Install-AdcsCertificationAuthority -CACommonName "oliver-DC1-CA" -CAType EnterpriseRootCa -CryptoProviderName "RSA#Microsoft Software Key Storage Provider" -KeyLength 2048 -credential (get-credential) -HashAlgorithmName SHA512
Then rebooted computer AND IT WORKS WOOOOOOOOOOOOOOOOOOO. Above, I corrected the main documentation to reflect the correct process :).
Sources for 4.1:
-
How to install Active Directory Certificate Services on Windows server 2012 | Dell Canada
-
Install-AdcsCertificationAuthority (ADCSDeployment) | Microsoft Learn
-
Create Bulk Organizational Units (OU) in Active Directory with PowerShell - Active Directory Pro
-
Zachary's Memo (IT Career): Windows -- How to enable LDAP over SSL on Windows 2012 or later
-
Get-Credential (Microsoft.PowerShell.Security) - PowerShell | Microsoft Learn
-
How to Add User to Group in PowerShell with Add-ADGroupMember.
Milestone 4.2 Powershell, PowerCLI and Our First Clone
Dependency installation:
I installed Ansible on my xubuntu-wan VM by running the following commands:
sudo apt update
sudo apt install sshpass python3-paramiko git -y
sudo apt-add-repository ppa:ansible/ansible
sudo apt update
sudo apt install ansible -y
Double checking the installation was a success with ansible –version:
The I installed powershell with the following command:
sudo snap install powershell --classic
Ensuring that I can access powershell with pwsh and that my versioning is correct with Write-Host $PSVersionTable:

Then I installed the needed dependencies/configured them for Powercli (answered “y” to all prompts):
Install-Module VMware.PowerCLI -Scope CurrentUser
Get-Module VMware.PowerCLI -ListAvailable
Set-PowerCLIConfiguration -InvalidCertificateAction Ignore
Set-PowerCLIConfiguration -Scope User -ParticipateInCEIP $false
Powercli
After entering my Powershell instance on xubuntu-wan with pwsh, I could connect to vcenter by entering the following:
$vcenter=”vcenter.oliver.local”
Connect-VIServer -Server $vcenter
I would then set:‘$vm’ to dc1 and set ‘$snapshot’ to the snapshot command for dc1, the ‘$vmhost’ variable to the host, ‘$ds’ to the designated datastore, $linkedClone to get the linked clone name for dc1:
# Use the command ‘Get-VM’ to see which host you should be selecting
$vm = Get-VM -Name dc1
$snapshot = Get-Snapshot -VM $vm -Name "Base"
# Use the command ‘Get-VMHost’ to see which host you should be selecting
$vmhost=Get-VMHost -Name "192.168.7.25"
# Use the command ‘Get-Datastore’ to get the datastore names
$ds = Get-DataStore -Name “datastore1-super15”
# “{0}” represents a placeholder for the first index, which the vm objects name attribute is being formatted (‘-f’) into
$linkedClone = “{0}.linked” -f $vm.name
See all set below:
I would then setup my ‘$linkedvm’ variable to create a linked clone with the following:
$linkedvm = New-VM -LinkedClone -Name $linkedClone -VM $vm -ReferenceSnapshot $snapshot -VMHost $vmhost -Datastore $ds
And then I created a new VM with the ‘$newvm’ clone:
$newvm = New-VM -Name “server.2019.gui.base” -VM $linkedvm -VMHost $vmhost -Datastore $ds
Results from above:
I then created a new snapshot on my new VM:
$newvm | New-Snapshot -Name “Base”
And removed the linked clone:
$linkedvm | Remove-VM
I would then create a script to automate this process. I would make use of Github, see setup below, for transporting my script between my main host and xubuntu-wan. With the script, I would create the following base VMs:
-
“desktop.xubuntu.gui.base” from xubuntu-wan
-
“server.vyos.base” from 480-wan
Test run:
./Oliver-Mustoe-Tech-Journal/SEC-480/Code/cloner.ps1 -VMName 480-wan -CloneVMName testforgithub
Github setup
For easy transportation, I decided to setup my Github repository on my xubuntu-wan management box. I first ran the following commands to create my keys:
# Made the key
ssh-keygen -t ed25519
# Add the key to the ssh-agent
ssh-add ~/.ssh/id_ed25519
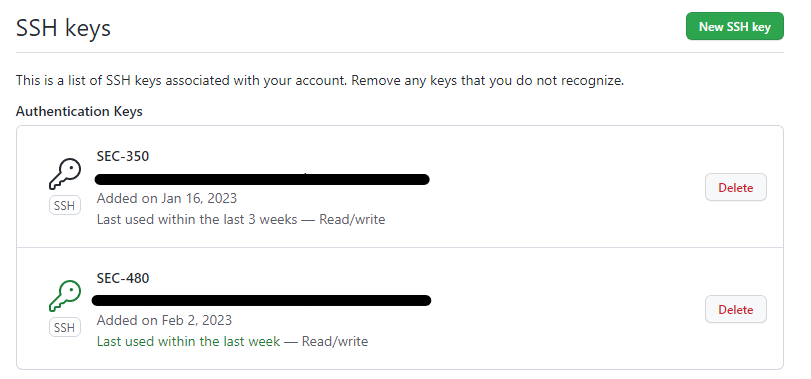
Then I went to my account on github > dropdown > Settings > SSH and GPG keys on the sidebar > New SSH key > where I would add my public key!
From there, I could use the Code dropdown > copy the SSH clone command > and use git clone {SSH_CODE} to access my repository!
Reflection for 4.2:
This was a really fun milestone, as it was a really good introduction to Powercli and a good place for me to flex my Powershell skills. I implemented both in script and flags for setting the name variables which was fun to learn/implement. I am really glad I did this, as in the future if I already know the names I want/need, I can directly deploy new Base clones. I also learned about using formatting in Powershell using -f, which was not something I was familiar with at all. Some of the output from the commands actually differs from flags/manual inputs, but that does not seem to have any effect on the output. I will monitor this and decide if it needs changing. I am very much enjoying Powercli at the moment, and I hope the final part of this milestone has a more left to do of it!
Sources for 4.2
-
https://groupe-sii.github.io/cheat-sheets/powercli/index.html
-
Understanding PowerShell and Basic String Formatting - Scripting Blog
Milestone 4.3 Ubuntu Server Base VM and Linked Clone
Folder management
In VSphere, I navigated to the VMs and templates area…
Then I right clicked “480-Devops” > New Folder > New VM and Template Folder > entered and made the following folders (first folder shown made below, second folder made in the same way!):
Result:
I then moved each of the VMs into the corresponding folders:
BASEVM:
-
desktop.xubuntu.gui.base
-
server.2019.gui.base
-
server.vyos.base
PROD
-
vcenter
-
xubuntu-wan
-
dc1
-
480-fw
This results in the following after the are moved (drag and drop into the folder):
I the used the process outlined in Milestone 1 to download ubuntu-22.04 (the only change is that I enabled SSH through clicking on the host > Configure > System > Services:)
Ubuntu server base installation
I then, in vCenter, right clicked the “BASEVM” folder > New Virtual Machine… > Set the following:
-
Default creation type
-
Placed in BASEVM, with the name “ubuntu22.04.1.base”
-
Default option (ESXi host)
-
Selected datastore1
- Set compatibility to ESXi 8.0
- Setup the guest OS
- Set the following settings (Thin provisioning the Hard disk, not shown in picture but set under the hard disk dropdown in “Disk Provisioning”. Also change the SCSI controller to “LSI Logic Parallel”. Picture below are in order and show all configured information)

- Finishing:
I then in vSphere right clicked the VM > Power > Power On > Launch it in a web console > followed the default installation except for the following:
(default installation means just pressing/giving the default option when presented in the installer)
Updated to the new installer:
Set up a rangeuser account like the following:
Installed OpenSSH server:
Then I rebooted the host:
(NOTE: BE CAREFUL ON WHICH BASE VM YOU ARE POWERING ON, I accidentally powered on the xubuntu based image, in which I used my script made from 4.2 to redeploy the base image. Also, the instructor's guide mentions “No Snaps”, but I saw no prompt that asked for that so I assume it was something I had to opt-in to.)
I would then reboot the machine from vSphere using the same process I used to power it on (see above) but selected reset instead of power on.
When the host was powered on, I signed in as the rangeuser (had to press Enter to get the prompt), I disabled IPv6:
sudo sysctl -w net.ipv6.conf.all.disable_ipv6=1
sudo sysctl -w net.ipv6.conf.default.disable_ipv6=1
sudo sysctl -w net.ipv6.conf.lo.disable_ipv6=1

Then I downloaded and ran the following the instructor provided script:
wget https://raw.githubusercontent.com/gmcyber/RangeControl/main/src/scripts/base-vms/ubuntu-server.sh && sudo bash ubuntu-server.sh
NOTE: Did once try to run the bash command as a non-root user, which resulted in a bunch of issues with permissions. Just stopped the command and added sudo to the command! Also, a screen pop-up came asking for restarting services, I just pressed enter and it worked fine.
Then I ran the following AS ROOT (originally ran after completion of the assignment, see troubleshooting #2):
echo -n > /etc/machine-id
rm /var/lib/dbus/machine-id
ln -s /etc/machine-id /var/lib/dbus/machine-id

Then I shutdown the host, shutdown -h now, then right clicked the VM in vSphere > Edit settings > set CD/DVD to Client Device, OK:
I would then right click the VM > Snapshots > Take Snapshots… > Name it “Base > Create:
Cloning
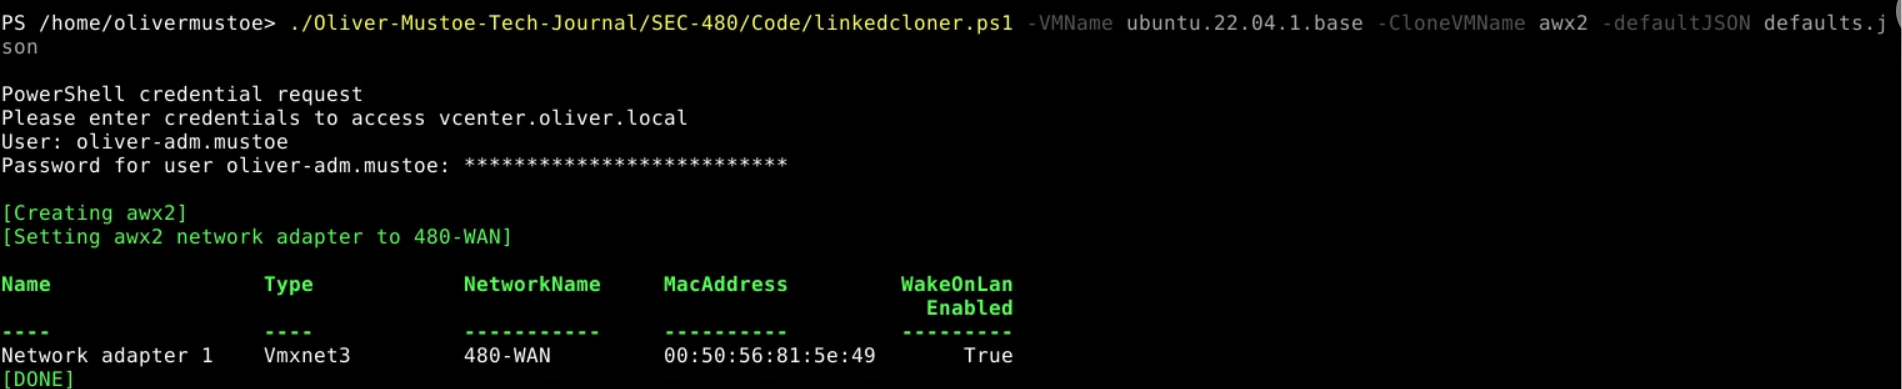
I then used my own script to create a linked clone named “awx”, LINK HERE. Ran like the following (see troubleshooting #2):
./linkedcloner.ps1 -VMName ubuntu.22.04.1.base -CloneVMName awx -defaultJSON defaults.json

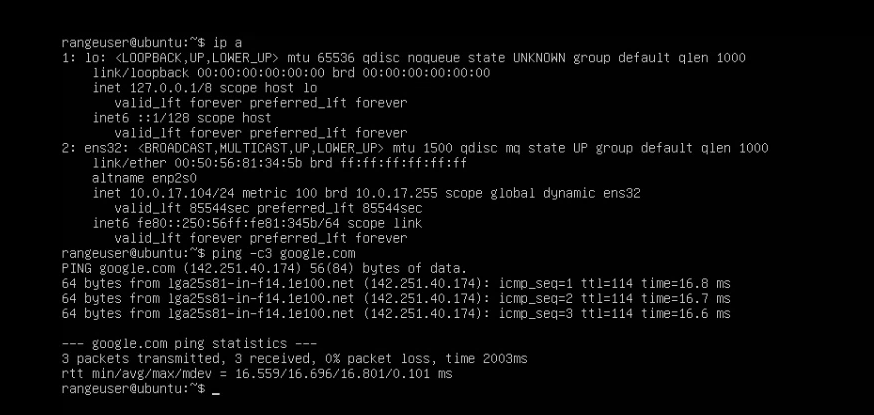
With the linked clone created, on the right network adapter, I booted it up, logged in as rangeuser, and saw that I gained an IP from DHCP:
Troubleshooting #2
After completing the Milestone, I went back to my VM and tested making a second linked clone. It worked successfully, but unfortunetly, I got the same DHCP address on the second linked clone. I, after researching, found that Ubuntu uses machine-id for DHCP, but I believed that it got trunacated in the instructors script. To try to get to the bottom of this, I powered on my base image and re-ran the instructors script from above/double-checked the machine-id was truncated (empty) with cat, then I shutdown the box.

Then I made another snapshot, named "Base2", same process as above, and made a temp .json file:
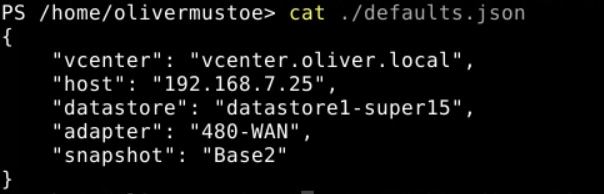
Then I ran an updated version of my script and created 2 linked clones like the following:
Unfortunelty the 2 linked clones had the same machine-id, so I deleted Base2 snapshot > reverted to Base > powered the machine back on and re-ran the instructor script and ran the following commands AS ROOT:
echo -n > /etc/machine-id
rm /var/lib/dbus/machine-id
ln -s /etc/machine-id /var/lib/dbus/machine-id
Shutdown > "Base2" snapshot > 2 more linked clones AND THIS FIXED IT. So I removed my "Base" snapshot > renamed "Base2" to "Base" and deleted all of my linked clones and recreated "awx" using the prescribed command. I updated the above documentation to reflect what the correct process for cloning would be.
Reflection for 4.3
This milestone was a fun learning experience that carried over a lot from the previous part of the milestone. The Powershell was mostly the same, and I was able to take my cloner.ps1 script and edit it slightly to accommodate linked clones. I also implemented using a json file to store “default” variables such as the vcenter address. As I explore more Powercli, I plan to make the script more robust/add in items to defaults.json. I did some independent testing for this milestone and actually experimented with creating another awx clone “awx2” to see the behavior of the networking.. I found that while the 2 clones had different MAC addresses, they would still get the same IP “.101”. Initially I thought this was related to hostname, but I found via research that to correct this behavior I had to run the commands designated in VMware documentation. I very much enjoyed having flags for my .ps1 files in this milestone, as it meant I could very quickly run a command to spin up a new base/linked clone when I wanted. Overall, a very interesting, learning heavy milestone with automation scripts that I will use/improve over the course.
Sources for 4.3
- VMware Knowledge Base
- https://manpages.ubuntu.com/manpages/bionic/man5/machine-id.5.html#:~:text=The%20%2Fetc%2Fmachine%2Did,may%20not%20be%20all%20zeros.
- https://greenmountaincyber.com/docs/topics/vmware/base-vms/ubuntu-server
Can't find something? Look in the backup Milestone 4