Creating a file server file shares Notes - Oliver-Mustoe/Oliver-Mustoe-Tech-Journal GitHub Wiki
In this page I describe how I setup a Server Core VM as a file server and used server manager to create file shares & Network Drives for different use cases (public drive and drive only accessible by a individual user).
Notes
File Server Setup
First I setup a Server Core VM using the following snippet from SYS255-Entry for: Week5 - Server Core (NOTE: Has been modified for the lab)
I first I changed its network adapter to LAN, then I booted up server core where I was met with a prompt to setup a password, This is for a local admin, NOT a domain admin, REMEBER THIS I maneuvered these prompts with the TAB key.
Then I entered the command "sconfig" to enter a selection screen where I first selected "8" to enter network settings. I then set the following information by selecting option "1":
- hostname = FS01
- Domain = firstname.local (FQDN = FS01.firstname.local)
- IP = 10.0.5.10
- netmask = 255.255.255.0
- gateway = 10.0.5.2
- DNS = 10.0.5.5
I then selected option "4" to exit, and then option "2" where I set the computer name to "FS01". This will then require a reboot which I did.
After this was all setup I switched to WKS02, where my server manager was already setup, and clicked "Manage" > Then "Add Servers" > where I sent to the DNS section and entered the IP of FS01 (10.0.5.10) > the server should pop up and I double clicked it and added it to my servers list.
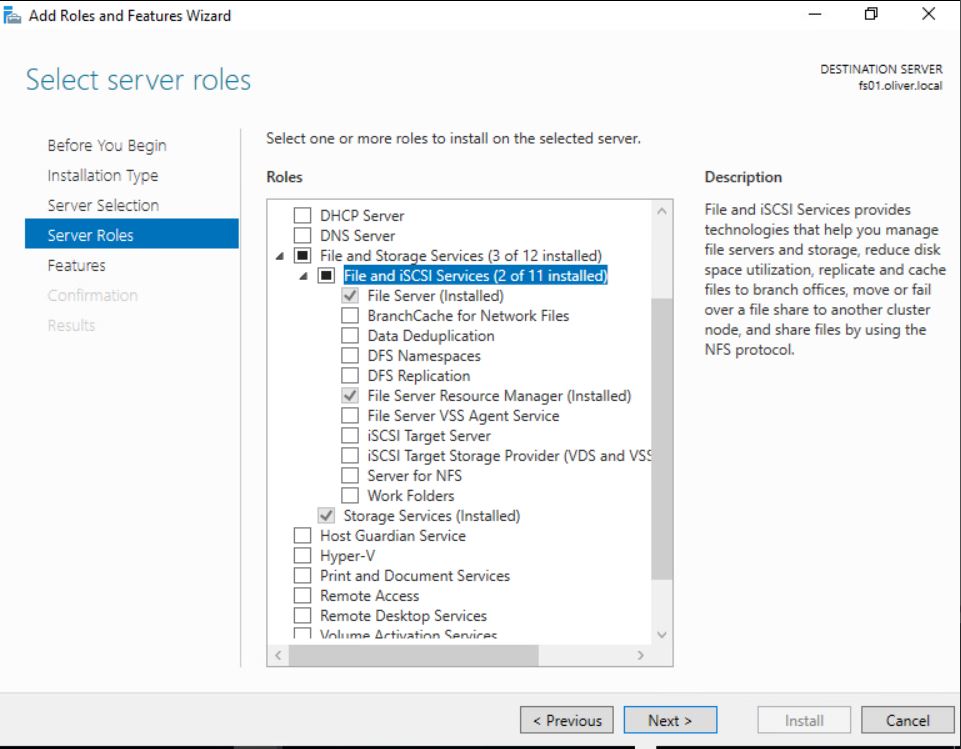
I then clicked "Manage" again > "Add Roles and Features" > I would then continue with the default settings until it asks for server selection which I chose "fs01.firstname.local" > in server roles section I would install "File Server" and "File Server Resource Manager" (NOTE: Refer to picture below:)
Then I continued on with the installation without changing anything else, then I got to the confirmation screen and made sure to tick the check mark to restart the destination if need be then started the installation.
File Share & Network Drive setup
After the installation was finished I went into Server Manager > clicked "File and Storage Services" > clicked "Volumes". Here I saw all my available servers, where I right clicked the "C:" drive of FS01 and clicked "New Share..."
(NOTE: Sign in and out of any hosts for GPO updates to occur, or run gpupdate /force on the host)
Example: Public drive
For this example I used the "SMB Share - Quick" profile > Share location being FS01 > Name the share whatever you want, recommended that it says something like "Public-share$", followed by a "$" (NOTE: In my research I have found no other benefit to the "$" besides making the share a hidden share) > continue with defaults until the Permissions section, where you want to click "Customize permissions" and at the top of the prompt change the owner to "Domain Admins" > Continue and confirm the creation of the share.
Then (ONLY DO IF YOU WANT A PUBLIC SHARE OF A SPECIFIC SIZE, IF NO LIMIT SKIP THIS) I right clicked on the share, in the "SHARES" tab, and created a new quota, where I selected a quota template and ticked the box to use that for all users. I then clicked Ok.
Next I went into my Group Policy Management > right clicked "firstname.local", in the forest, and created a new GPO, recommended that it says something like "public-share" > right click the newly created GPO and click edit.
From the new window I went into User Configuration > Preferences > and right clicked on "Drive Maps" > New > Mapped Drive > and I filled out the fields with the following information:
- Location: the remote folder of the share (EX.
\\fs01\public-share$) - Label : Whatever you want, will be what the user sees
- Drive Letter : Either let it be first available or set it in the dropdown to a specific one
Then I switched to the common tab > ticked "Run in logged-on user's security context" > Then tick "Item-level targeting" and clicked the targeting button.
In this new menu I clicked "New Item" > selected domain > clicked the "..." towards the left > I then selected my domain in the dropdown > Ok > and in the menu with the common tab press apply and ok.
Bonus:
If I wanted for only the drive to be read only for non-admin users, I could go into the "SHARES" tab > Properties > Permissions > click the customize permissions button > set the Access for "Everyone" to be "Read" in the share tab > apply and ok.
Now any user can read the files in the drive but not edit them.
Example: Individual drive
For this example I used the "SMB Share - Quick" profile > Share location being FS01 > Name the share whatever you want, recommended that it says something like "Individual-share$", followed by a "$" (NOTE: In my research I have found no other benefit to the "$" besides making the share a hidden share) > continue with defaults until the Permissions section, where you want to click "Customize permissions" and at the top of the prompt change the owner to "Domain Admins" > Continue and confirm the creation of the share.
Then I right clicked on the share, in the "SHARES" tab, and created a new quota, where I selected a quota template and ticked the box to use that for all users. I then clicked Ok.
Next I went into my Group Policy Management > right clicked "firstname.local", in the forest, and created a new GPO, recommended that it says something like "individual-share" > right click the newly created GPO and click edit.
From the new window I went into User Configuration > Preferences > and right clicked on "Drive Maps" > New > Mapped Drive > and I filled out the fields with the following information:
- Location: the remote folder of the share and the variable %LogonUser% - explained later (EX.
\\fs01\individual-share$\%LogonUser%) - Label : Whatever you want, will be what the user sees, recommended you use the variable %LogonUser% from above to differentiate drives (EX. %LogonUser% - Drive)
- Drive Letter : Either let it be first available or set it in the dropdown to a specific one
Then I switched to the common tab > ticked "Run in logged-on user's security context" > Then tick "Item-level targeting" and clicked the targeting button.
In this new menu I clicked "New Item" > selected domain > clicked the "..." towards the left > I then selected my domain in the dropdown > Ok > and in the menu with the common tab press apply and ok.
Now go back into the "SHARES" tab and right click the created share and select open share > in the folder create a folder with the name of a user on it > if you now login to that user you will see a drive with your name on it that is limited to the quota set above. This folder will be separate from other users folders.
Sources
https://www.manageengine.com/products/active-directory-audit/how-to/how-to-set-up-fsrm.html
https://www.terminalworks.com/blog/post/2017/12/28/windows-file-server-2016-map-network-drive-for-users-and-group-drive-using-gpo1
https://activedirectorypro.com/map-network-drives-with-group-policy/
http://woshub.com/map-network-drives-shared-folders-gpo/