Assignment F.1 Home Pentesting Lab - Oliver-Mustoe/Oliver-Mustoe-Tech-Journal GitHub Wiki
In this Lab, I used VMWare Workstation to create a controlled lab environment where I could investigate malware, vulnerabilities and practice penetration testing.
Notes
Milestone 1:
First I downloaded all of the required ISOs:
- CentOS 6.5 iso
- Xubuntu 20.04
- Vyos 1.4 VM
- Kali 2021-3 VM
Then I added the following networks in the network editor (Edit > Virtual Network Editor > Change Settings): (NOTE: My NAT space on VMnet8: 192.168.204.0/24 (.1 is host, .2 is gateway))
F.1 - VMnet4:
- Use vmnet 4
- Uncheck “Connect a host virtual adapter to this address”
- Uncheck “Use local DHCP service to distribute IP address to VMs”
- IP: 10.0.4.0/24
F.1 - VMnet5:
- Use vmnet 5
- Uncheck “Connect a host virtual adapter to this address”
- Uncheck “Use local DHCP service to distribute IP address to VMs”
- IP: 10.0.5.0/24
F.1 - VMnet6:
- Use vmnet 6
- Uncheck “Connect a host virtual adapter to this address”
- Uncheck “Use local DHCP service to distribute IP address to VMs”
- IP: 10.0.6.0/24
Then I clicked apply
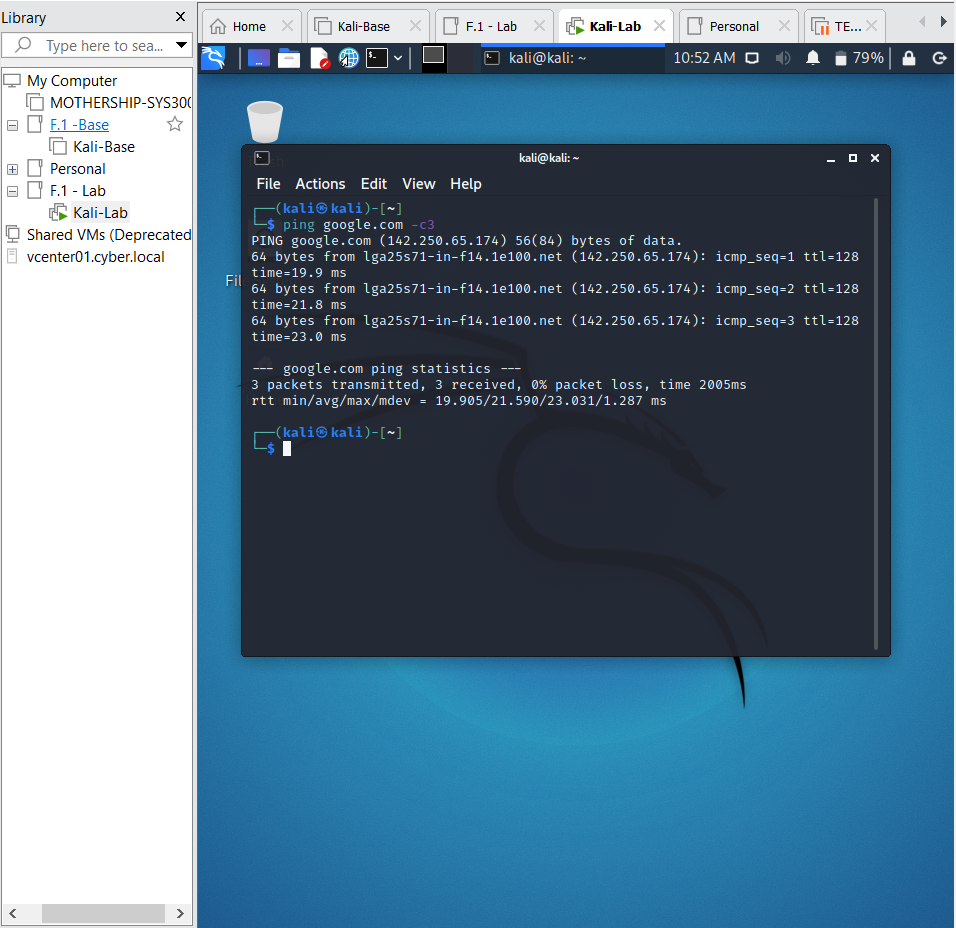
Then I used the Kali VM to create a VM named "Kali-Base" by just loading in the .ova. After that I used that Kali VM, while turned off, to create a linked clone (right click "Kali-Base" > Manage > Clone... > Current state > Create a linked clone > Name=Kali-Lab). I would at this point then create 2 folders "F.1 - Base" and "F.1 - Lab", I would then move "Kali-Base" to the Base folder and "Kali-Lab" to the Lab folder.
(NOTE: From here on, I would only boot "Kali-Lab". I would also move Base VMs into the Base folder and Lab VMs into the Lab folder, this was done for all milestones.)
I then booted "Kali-Lab" and pinged google to ensure network functionality:
Milestone reflection:
I have not worked that much more advanced VMware topics, such as linked clones. Whenever in the past I wanted to create multiple VMs, I have just have to make them individually. I will definitely be using/researching more about this in the future. I have worked with some of the networking functionality of VMware before, but this was deeper than I had gone before and it is definitely interesting to me.
Milestone 2:
I loaded the vyos .ova into a VM named "vyos-Base", where I would first removed the 3rd network interface as it was unneeded. I then loaded up the VM and used vyos/Ch@mpl@1n!22 username/password combination to login.
Logged in, the first thing I did was change the password with the commands({} was replaced with a password):
configure
set system login user vyos authentication plaintext-password {INSERT_PASS_HERE}
commit
save
I then deleted hw-id's with the commands:
configure
show interfaces
delete interfaces ethernet eth0 hw-id
delete interfaces ethernet eth1 hw-id
commit
save
After that, I turned "vyos-Base" off, took a snapshot, and created a link clone named "vyos-Lab"(only change from Kali is instead of "Current state" use the option under it and select the created snapshot.)
I then booted "vyos-lab", logged in with my credentials created above.
I then would edit "vyos-lab" to have its second network adapter be "F.1 - VMnet5" (right click VM, Settings..., Network Adapter 2, Network Connection=F.1 - VMnet5).
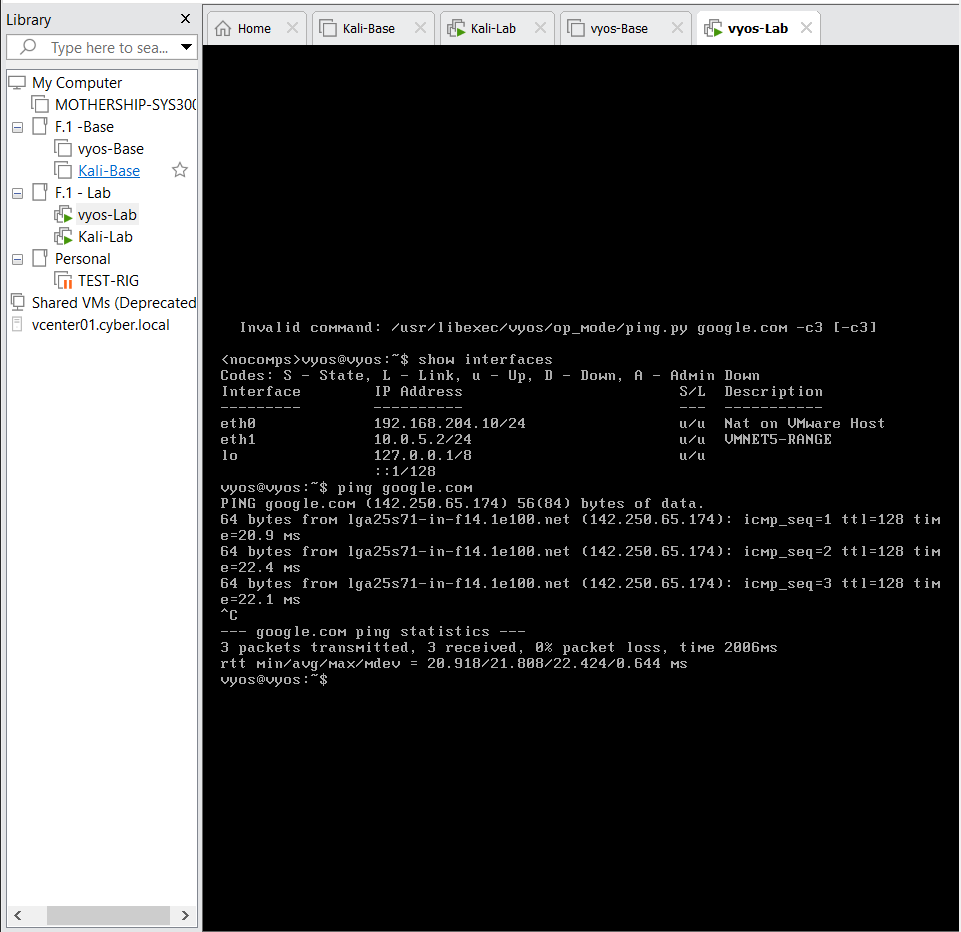
Afterwards I would run the following commands to configure the interfaces (IPs)/set the gateway address/where vyos should look for SSH connection/name server:
configure
delete interfaces ethernet eth0 address dhcp
set interfaces ethernet eth0 address '192.168.204.10/24'
set interfaces ethernet eth0 description 'Nat on VMware Host'
set interfaces ethernet eth1 address '10.0.5.2/24'
set interfaces ethernet eth1 description 'VMNET5-RANGE'
set protocols static route 0.0.0.0/0 next-hop 192.168.204.2
set service ssh listen-address '192.168.204.10'
set system name-server '192.168.204.2'
set service ssh listen-address 192.168.204.10
commit
save
And then exit
(NOTE: Not sure if repeated ssh listen-address command is needed, but it was in the lab so I decided that it probably couldn't hurt.)
After running these commands, I would successfully ping google to ensure proper functionality:
Milestone reflection:
Generalizing systems is something that I have never had to do before, so that is very interesting and I hope to research that in the future. It would seem that probably anything identifying a computer, such as a MAC address, must be cleaned in order to properly clone the VM. I also have never worked with vyos before, but its mannerisms are similar to Cisco, so my familiarity with Cisco was very useful.
Milestone 3:
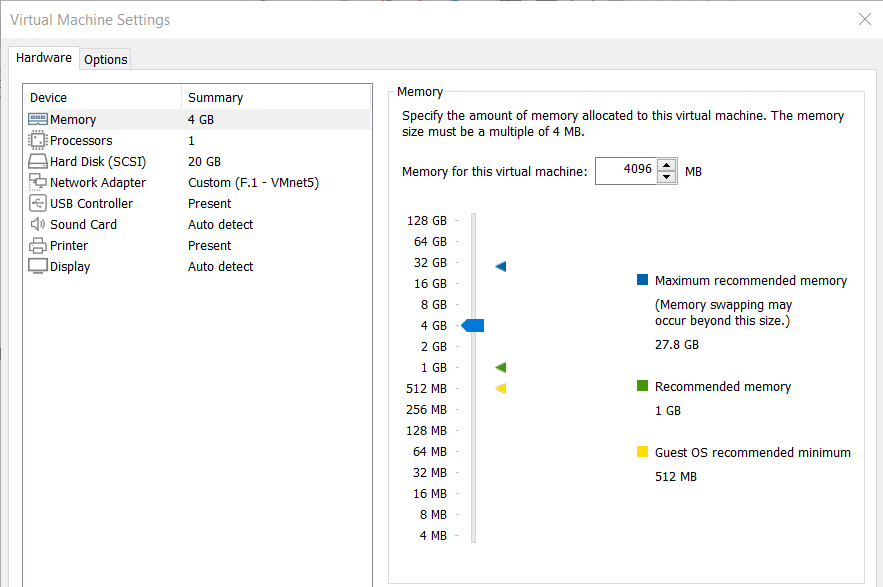
First in this milestone I would add a new VM using the CentOS 6.5 ISO from above. I would give the VM the following settings:
With a name of "centos6.5-Base". After booting, I would follow along with the default installation except for the following information:
- Give a root password
- Instead of "Desktop" for default install, chose "Web Server"
- Add Development > "Development tools" & "Server Platform Development"
After this I would reboot, and then perform the following to generalize the system (commands below each):
- Add a deployer user
-
useradd deployer&deployer passwd
- Add deployer to wheel group
-
usermod -aG wheel deployer
- Modift sudoers.d
-
- Uncomment line below "Allow people in group wheel to run all commands"
- Edited
/etc/sysconfig/network-scripts/ifcfg-eth0 -
- Remove the
HWADDRline entirely
- Remove the
-
- Remove the
UUIDline entirely
- Remove the
-
- Turn
ONBOOTto yes
- Turn
- Removed
/etc/udev/rules.d/70-persisten-net.rules
I would then install VMware tools (VM > Install VMWare Tools...) and perform the following commands:
- Mount the cd rom =
mount /dev/cdrom /mnt(andcd /mnt) - Copy VMware tools to temp =
cp VMwareTools-{NUMBERS}.tar.gz /tmp(andcd /tmp) - Extract VMware tools =
tar -xf VMwareTools-{NUMBERS}.tar.gz(andcd vmware-tools-distrib) - Run the install perl script =
chmod +x vmware-install.pland./vmware-install.pl -
- All default settings EXCEPT No shared folders and No copy paste
- Clean up temp =
cd /tmpandrm -rf vmware-tools-distribandrm -rf VMwareTools-{NUMBERS}.tar.gz
After running this I removed the CD-ROM, took a snapshot, and created a link clone named "cupcake" from that snapshot (same process as vyos).
I then booted cupcake, and signed in as deployer.
Back on "vyos-Lab", I setup DHCP on vmnet 5 with the commands:
configure
set service dhcp-server global-parameters 'local-address 10.0.5.2;'
set service dhcp-server shared-network-name DHCPPOOL authoritative
set service dhcp-server shared-network-name DHCPPOOL subnet 10.0.5.0/24 default-router '10.0.5.2'
set service dhcp-server shared-network-name DHCPPOOL subnet 10.0.5.0/24 domain-name 'range.local'
set service dhcp-server shared-network-name DHCPPOOL subnet 10.0.5.0/24 lease '86400'
set service dhcp-server shared-network-name DHCPPOOL subnet 10.0.5.0/24 range POOL1 start '10.0.5.50'
set service dhcp-server shared-network-name DHCPPOOL subnet 10.0.5.0/24 range POOL1 stop '10.0.5.100'
commit
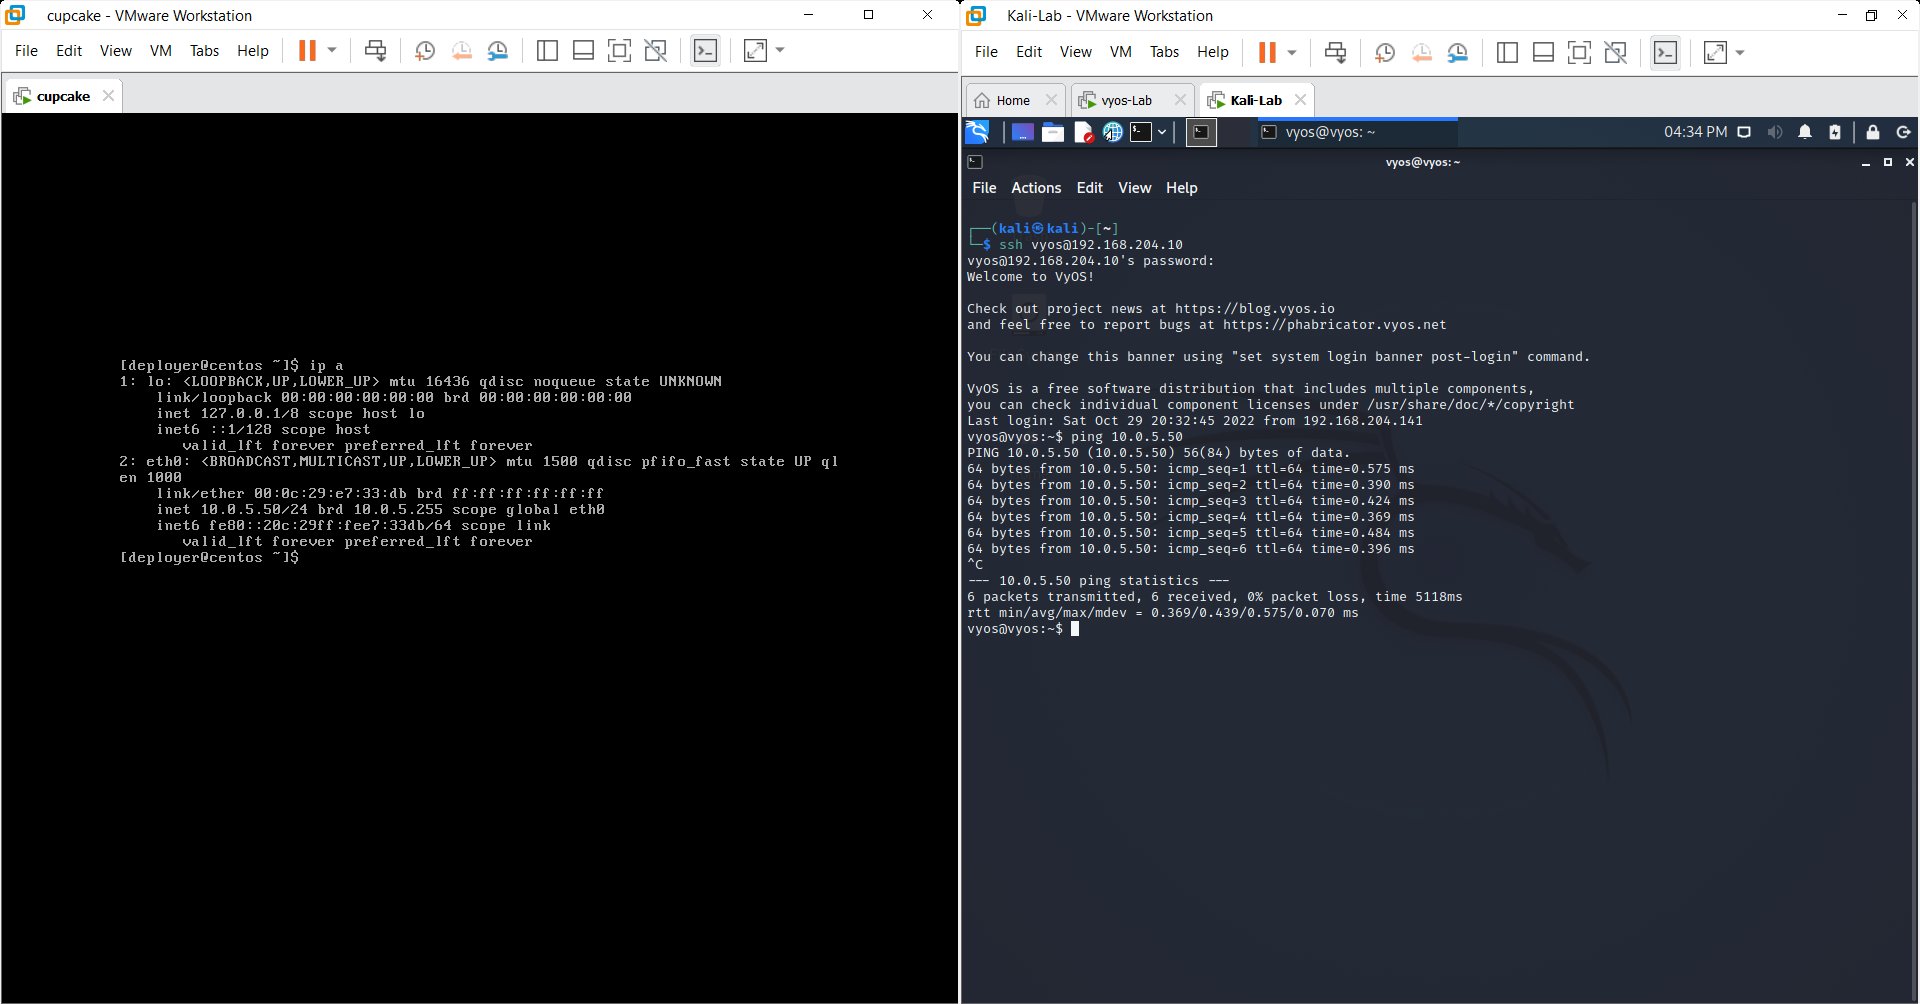
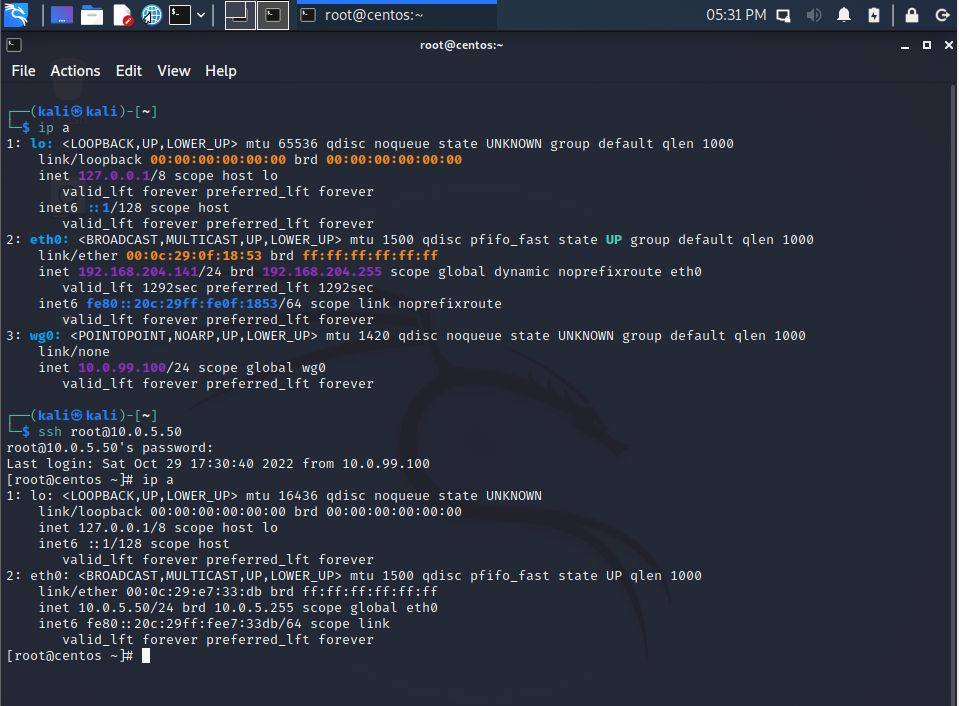
To assure that everything was working, I SSH'ed into "vyos-Lab" from "kali-Lab" and could ping "cupcake"!
(NOTE: Made sure to set cupcake to search for DHCP with the command sudo dhclient on cupcake once DHCP was setup.)
Milestone reflection:
More info about generalization is very appreciated, and I am now interested in what online resources are available for this (such as where to commonly find MAC addresses.) The ability to copy and paste into vyos is similar to Cisco, so very familiar and efficient.
Milestone 4:
First on "kali-Lab" I installed Wireguard/Created a keypair with the commands:
sudo apt update
sudo apt install wireguard
sudo -i
cd /etc/wireguard
umask 077
wg genkey | tee privatekey | wg pubkey > publickey
Then on "vyos-Lab" I ran the following commands (NOTE: {KEY_FROM_KALI_HERE} from cat /etc/wireguard/publickey on kali):
configure
run generate pki wireguard key-pair install interface wg0
set interfaces wireguard wg0 address '10.0.99.1/24'
set interfaces wireguard wg0 peer kali allowed-ips '10.0.99.100/32'
set interfaces wireguard wg0 peer kali public-key {KEY_FROM_KALI_HERE}
set interfaces wireguard wg0 port '51820'
commit
save
exit
And then show interfaces wireguard wg0 public-key (SAVE THIS!!!)
(NOTE: Use the compare command to see what the changes are.)
With this I went back to "kali-Lab" and edited /etc/wireguard to be the following:
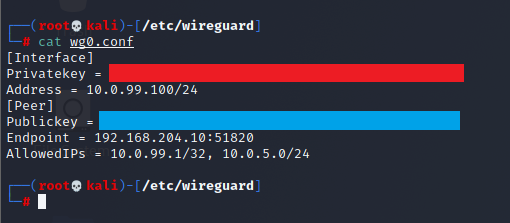
Where the first red box is kali private, and peer public is vyos public (show interfaces wireguard wg0 public-key)
Then I could could setup my Wireguard with sudo wg-quick up wg0 and could SSH into "cupcake"!!!
Milestone reflection:
Had to change the vyos Wireguard commands a bit, but documentation online was good so it wasn't too bad. Overall, I liked this lab a lot and hope to do more like it.