Deployment guide - OfficeDev/microsoft-teams-apps-visitormanagement GitHub Wiki
Prerequisites
To begin, you will need:
- Office 365
- Sign up for Power Apps
- Sign up Power Automate
- A valid SharePoint Online license and permission to create lists and store data
- A copy of the Visitor management app zip package
Step 1: Create a Visitor management admins/security group
Please ignore this step from 1-7 if you already have a team of admins(who have the privilege to manage approval and rejection of team creation requests) and continue with #8.
-
Open Teams desktop app or the web app
-
Click on the Teams tab in the left menu bar.
-
Click on Join or create team > click Create team button.
-
Select Build your team from scratch > Select Private .
-
Provide Team name and description > Click Next .
-
After that, a popup will open where you need to add members in your created team. Add all the members and then close the popup.
-
Confirm if a new team is created successfully.
-
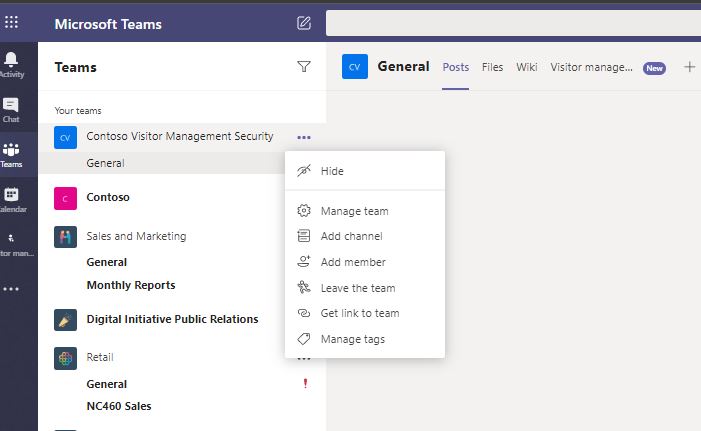
Next to the team name, click on the "..." and select "Get link to team".
-
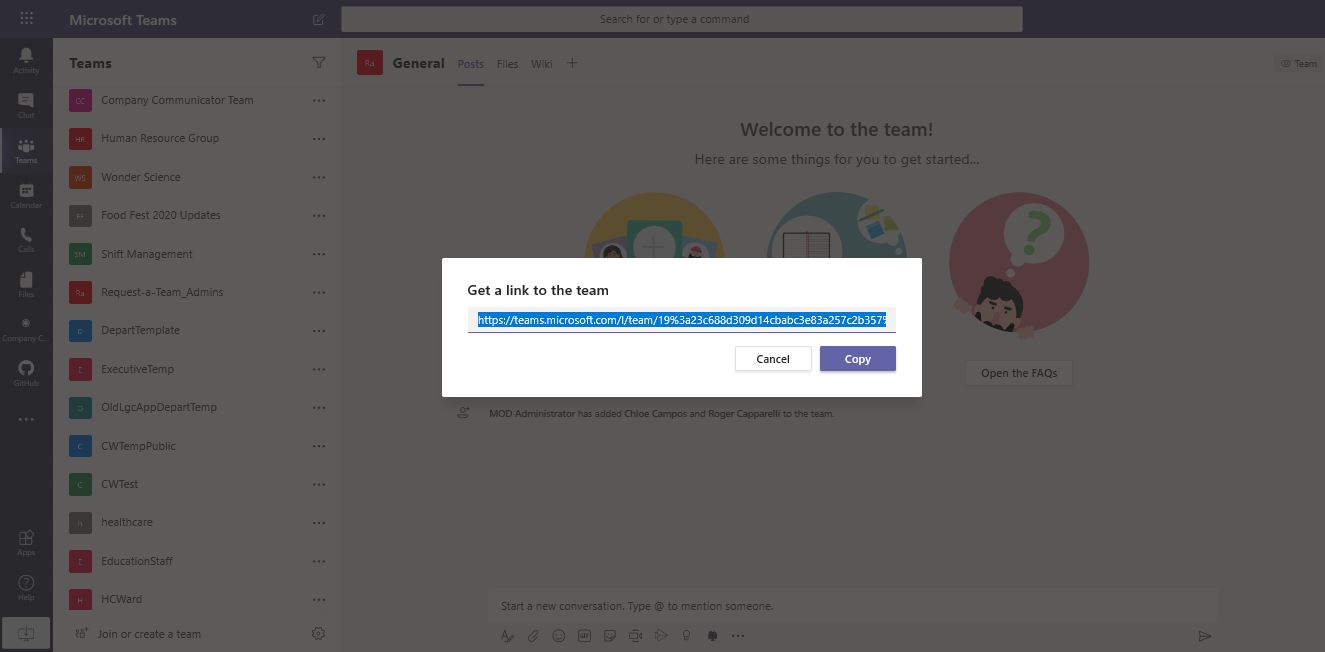
Click on "Copy" to copy the link to clipboard.
-
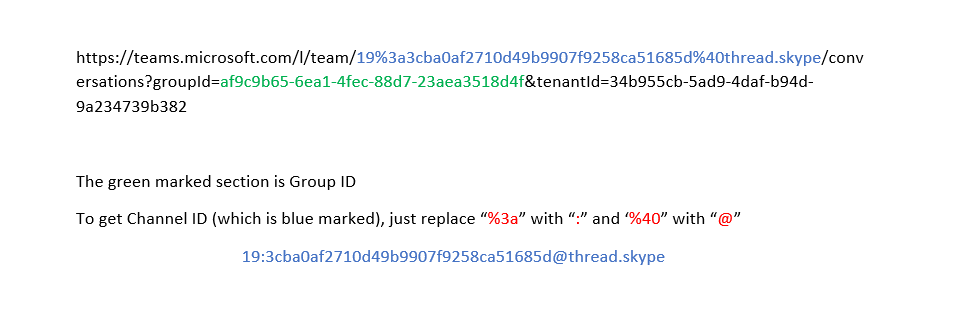
Get the groupID and channelID query string value as shown below:
-
Copy the groupId and channelId as it will be used in further steps.
Step 2: Create a SharePoint site
Please ignore this step if you already have a SharePoint site intended to use for the Visitor management application.
-
Login to SharePoint (i.e https://tenant-name.sharepoint.com/ ) and click on Create site.
-
Select teams site and provide appropriate site name and select privacy settings as Private and click next.
-
Add owners for the site and click Finish.
-
Keep the SharePoint site address handy as it will be needed multiple times in further steps.
Note: You can share SharePoint site to all intended users of Visitor management application once the application is set up completely
Step 3: Create SharePoint lists
-
Import the package zip file.
-
Click here to Signup/Login into Power Automate.
-
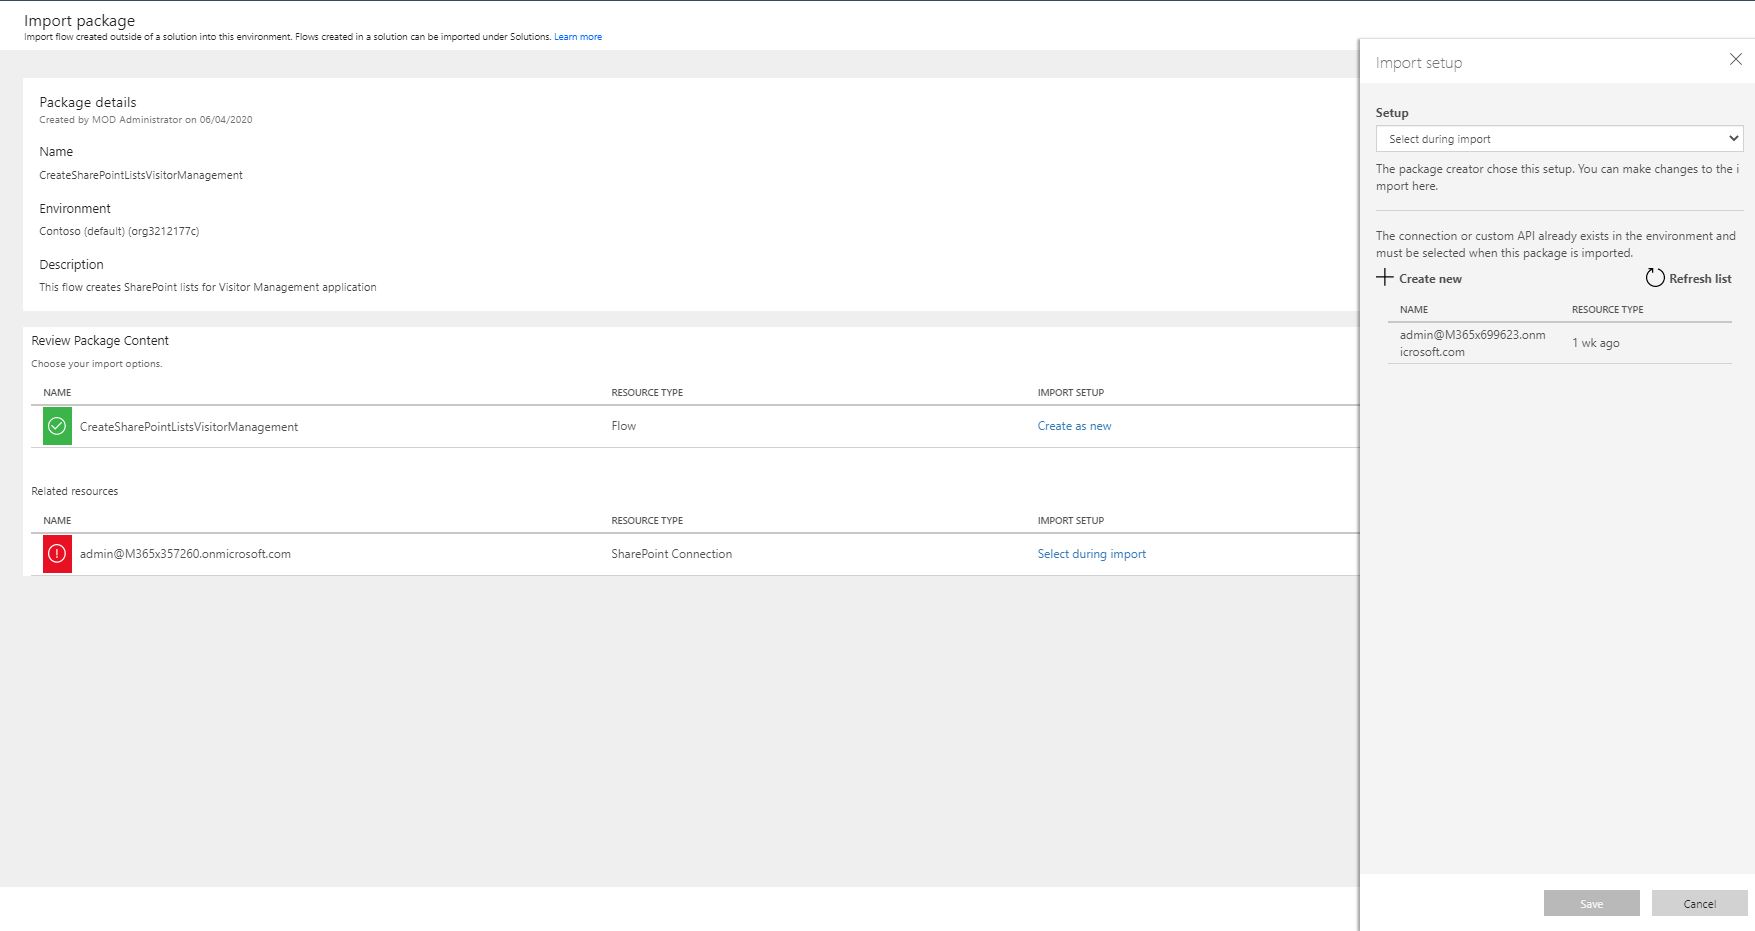
Click on Import at the top rail of the page and select CreateSharePointListsVisitorManagement zip package.
-
For SharePoint Connection resource type under related resources click on "Select during import" and select connection which appears on the right rail.
-
If there are no connections in the right rail click on Create new, it will redirect to a new page where you can add a new connection by searching for SharePoint and logging in.
-
Click on Refresh list, select name, and save.
-
Run the flow, click continue and SharePoint permissions and enter SharePoint site URL created in Step 2 under TeamSharePointUrl box and run flow.
-
You can verify SharePoint lists by clicking on Site contents present on the left rail of site.
Note: Populate the Branch List with names of branches under Title column before using the application
Step 4: Import and setup flow
-
Import VisitorManagementConfirmation flow.
-
Under related resources select Microsoft Teams connection and SharePoint connection by clicking on the wrench icon.
-
If Microsoft teams connection is not visible in the right rail, click on create new and add teams connection the same as SharePoint connection mentioned in step 2.
-
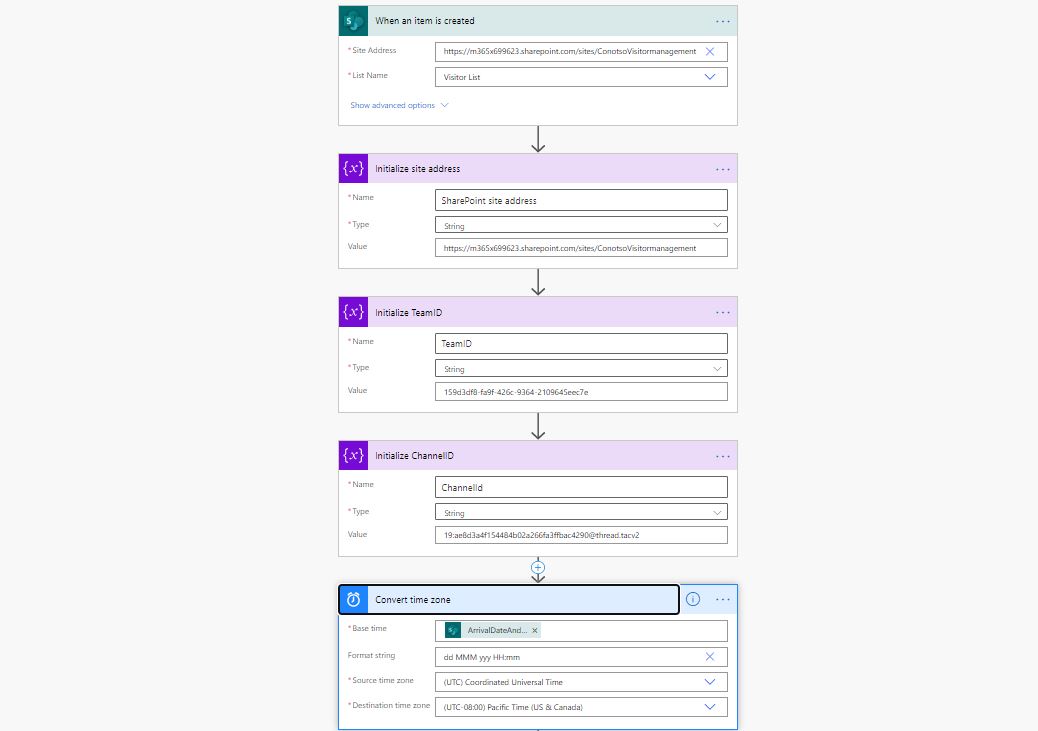
Once imported, click edit and enter SharePoint site address and select Visitor List in step "When an item is created" and Initialize site address step.
-
Enter groupId and ChannelId under TeamID and ChannelID steps.
-
Under the Convert time zone step, select the Destination time zone according to your local timezone and save.
Note: Power App automatically displays local time but Power Automate converts everything into UTC so we have to set it manually to show visitor arrival time in local timezone in adaptive card
-
Import Security Confirmation VSM flow.
-
Select SharePoint and Microsoft Teams connections by clicking on the wrench icon.
-
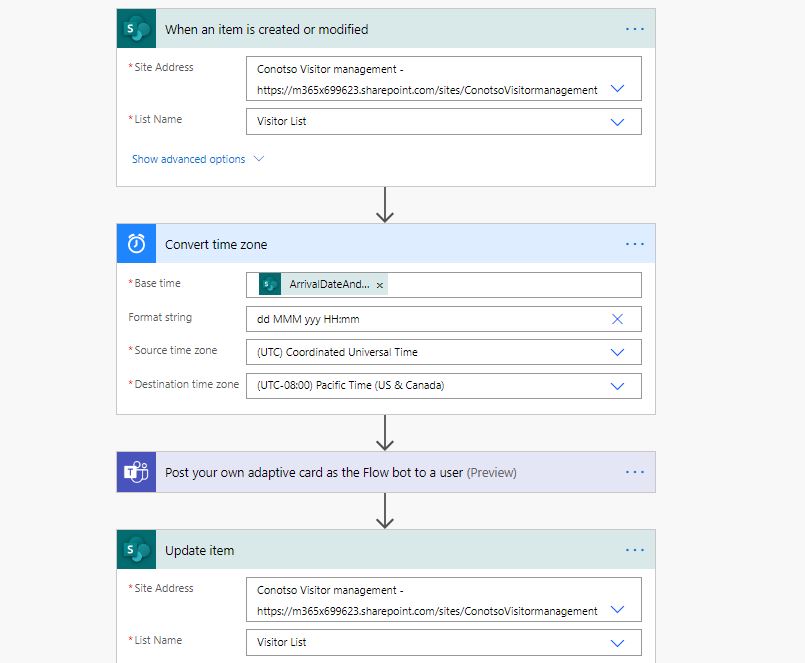
Edit flow select SharePoint site and Visitor List in steps "When an item is created or modified" and "Update item".
-
Select destination timezone in the Convert time zone step and save.
Step 5: Import Power Apps packages
-
Click here https://powerapps.microsoft.com/en-us/ Login/Signup into Power Apps.
-
Click on Apps on the left rail and click on "Import canvas app", visible at top of the page.
-
Select Visitor management zip package and select SharePoint connection by clicking on the wrench icon, same as steps 3 and 4.
-
Click Import and the app will be ready to open.
Note: You can change the name of Power App by clicking on the wrench icon while importing.
-
Click on Flows on the left rail and edit Visitor Management User Gallery.
-
Under "Get items" step paste or select the SharePoint site address from the dropdown.

-
Edit the Power App, Under Data sources, remove the demo Visitor List and Branch List by clicking on "...".
-
Search and select SharePoint connection under Data sources and on the right side enter the SharePoint site address and click on connect, select Visitor List, and Branch List.
-
Click "Import canvas app" Visitor management admins zip package.
-
Select SharePoint and Microsoft Teams Connection and import.
-
Click on Flows on the left rail and edit Visitor Management Security Team Gallery.
-
Under "Get items" step paste or select the SharePoint site address from dropdown, select Visitor List in List Name and save.
-
Edit NotifyHostOfVisitor flow and paste the SharePoint site in step "initialize and Set SharePoint Site Address" step.
-
Select the Destination time zone in step "Convert time zone" and save.

-
Edit the Power App, Under Data sources, remove the demo Visitor List and Branch List by clicking on "...".
-
Search and select SharePoint connection under Data sources and on the right side enter the SharePoint site address and click on connect, select Visitor List, and Branch List.
Note: Save and publish both the Power Apps once Data sources are added.
Step 6: Share Power Apps and SharePoint site
-
Admin needs to share the app with all individuals who will be using the app.
-
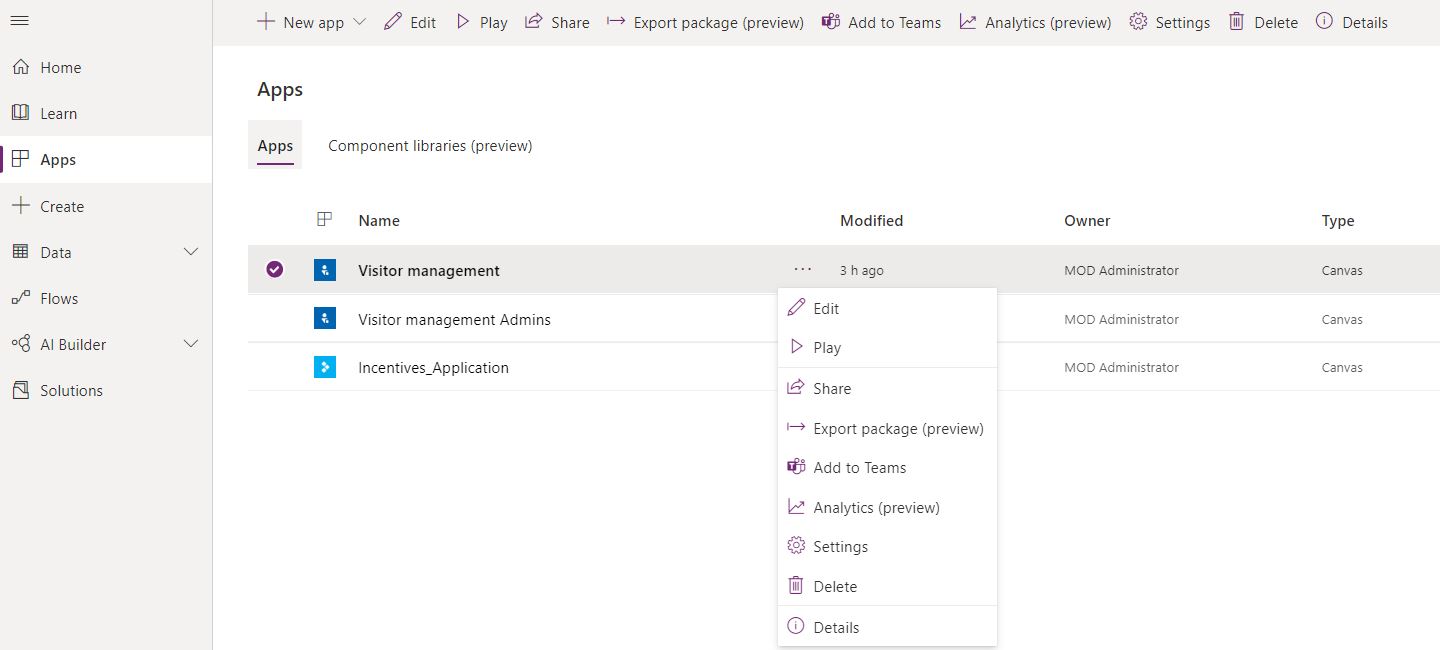
Go to Apps menu in the left menu bar and you will be able to see the app you have imported.
-
Click on 3 dots (Options) for your app and click on Share.
-
Enter the group name meant for users in the popup and click on Share. You can also add additional members if needed. This is required to allow members to access the Visitor management App.
-
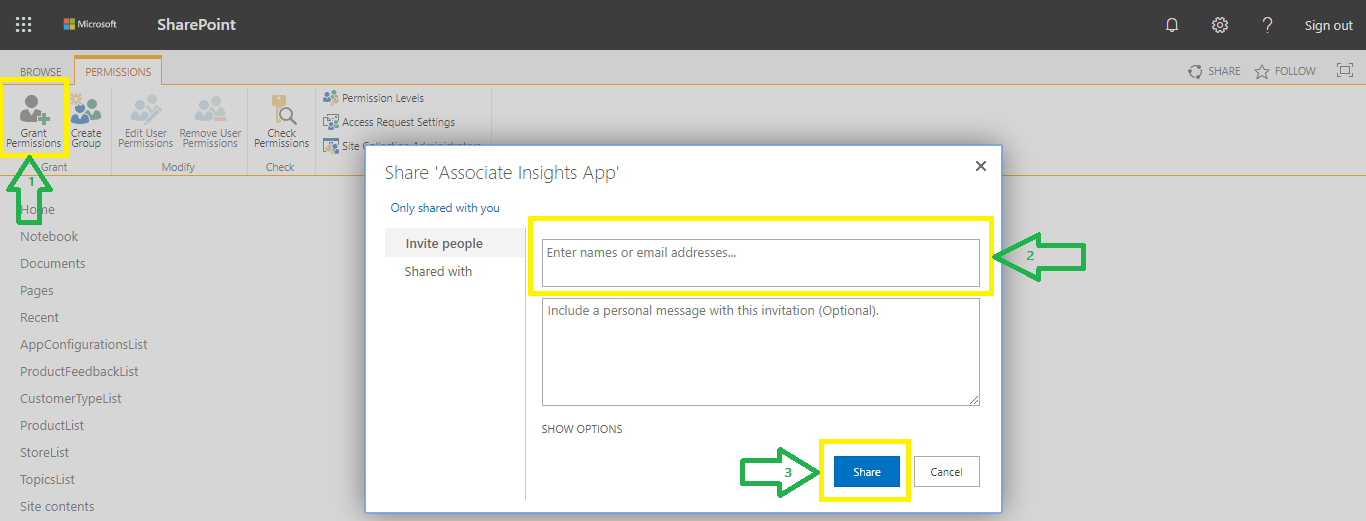
Admin also needs to share the SharePoint site to all individuals who will be using the app. To provide access to the SharePoint site, please follow the steps below:
-
Go to SharePoint site that is created during step 2 and click on Settings icon at top right corner and click on the "Site permission":

-
Click on "Advanced Permissions settings".
-
Click on the Grant Members option from the top menu bar and search the user name or type the email address of the user to whom you want to share the site.
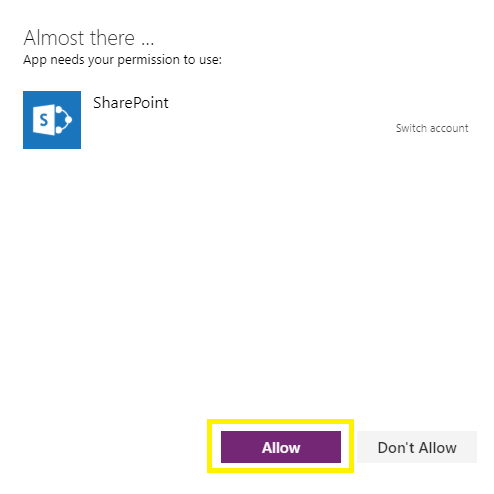
Note: Once Admin shares the app and SharePoint site and User/Co-owner access it for the first time it will ask for Allow/Deny SharePoint data source permission. Users/Co-owner should click on "Allow" to use the app.
Step 7: Export Teams Package
-
Go to Apps menu in the left menu bar and you will be able to see the app you have imported.
-
Click on 3 dots (Options) for your app and click on Add to Teams.

-
Click on Download App in the popup to download a zip package.
Step 8: Adding the app to teams
-
Go to Teams > Apps (in the left menu) > Upload a Custom App.
-
Select the downloaded zip package from the previous step.
-
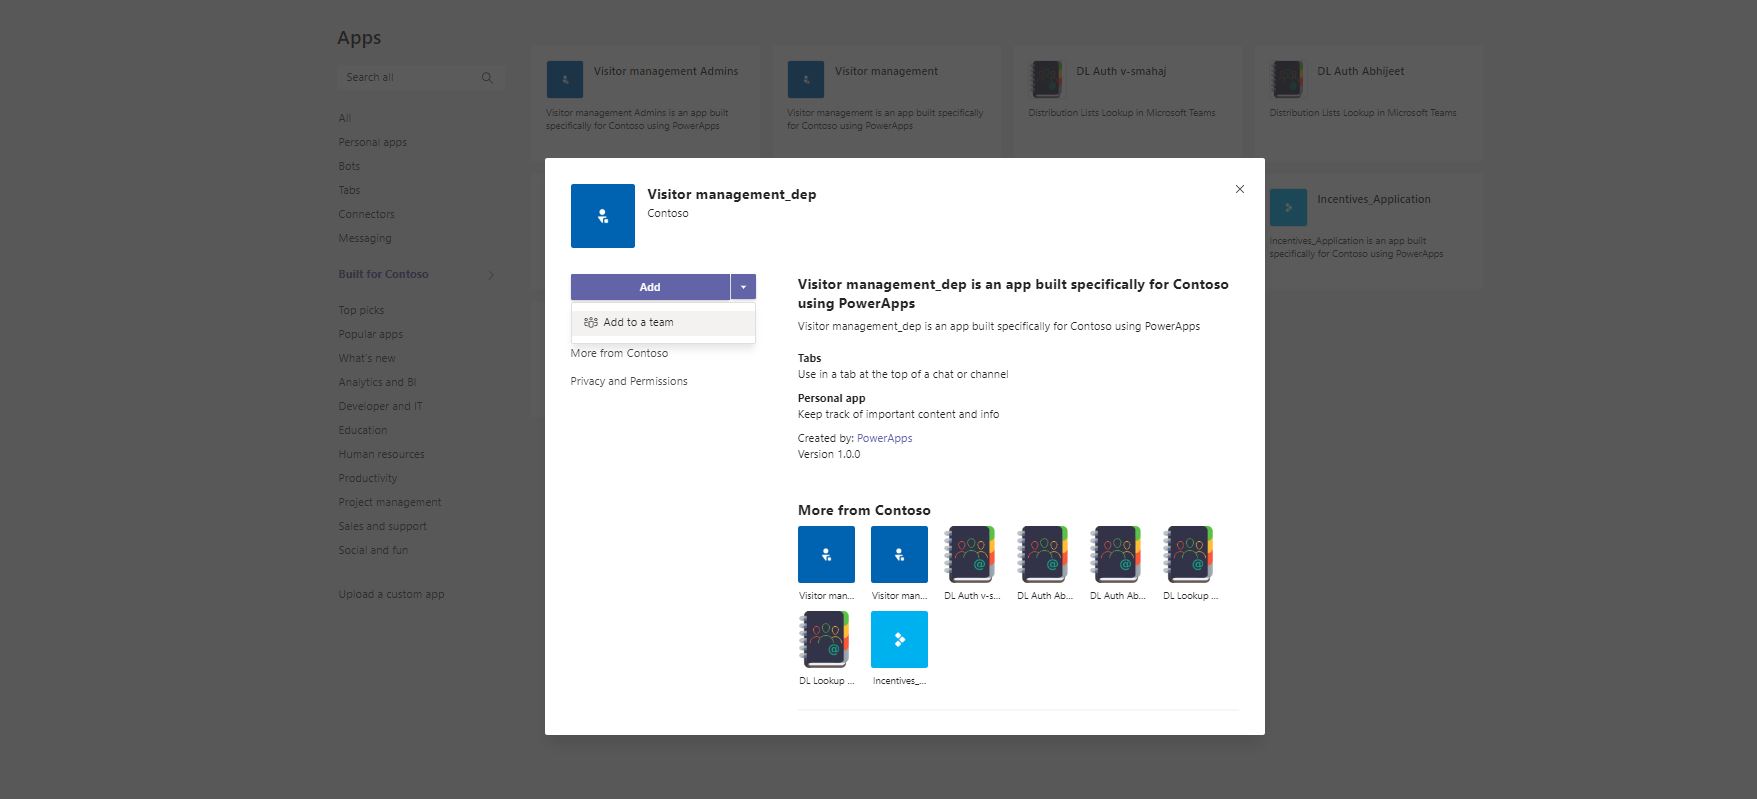
Click on Add > Add to a team in the popup.
Note: We recommend adding Visitor management admins package as a tab in Team meant for admins and just click on add for users package and users will be able to access/pin this app by visiting Apps-->Built for Contoso .
-
Select a team or channel name.
-
Click on Setup a tab.
-
The description for the app will be shown in the popup, click on Save.
-
You will be able to see the app in the tab.