Deployment guide for GCC - OfficeDev/microsoft-teams-apps-company-communicator GitHub Wiki
Note : This guide is intended for customers requiring the deployment of Company Communicator of Office 365 Government Community Cloud (aka GCC) only - The standard deployment for Azure AD Commercial tenant is located here
Microsoft provides different cloud offering across Office 365, Azure or the Power Platform to meet customers compliance and regulation requirements. While the global Office 365 and Azure flavors, referred as “Commercial” cloud, are the default and most used environments, customers can choose other alternatives that we’ll refer as Microsoft Cloud for Government.
Microsoft Cloud for Government provides a comprehensive cloud platform designed expressly for U.S. Federal, State, and Local Governments to meet the U.S. Government’s thorough security and compliance regulations. Microsoft Cloud for Government meets the standards of many government agencies, including FedRAMP, HIPAA, and CJIS, to name a few.
Depending on the cloud offerings that are used, there are differences to consider in terms of service availability and URLs to access and manage those services. Here is a global representation of these different configuration across Office 365, Azure and Power Platform for Commercial and US Gov cloud offerings.

If you need more information on these offerings for US Sovereign Cloud, please refer to the following article - https://aka.ms/AA632wo
- From a web browser, go to https://gettenantpartitionweb.azurewebsites.net/
- Enter the name of your Azure AD tenant – e.g. contoso.onmicrosoft.com.
- Press “Lookup tenant” and check the results.
| Lookup Results | Mapping |
|---|---|
| Azure AD Instance: Azure AD Global, Tenant Scope: Not applicable | O365 Commercial |
| Azure AD Instance: Azure AD Global, Tenant Scope: GCC (Moderate) | O365 GCC |
| Azure AD Instance: Azure AD Government, Tenant Scope: GCC High | O365 GCC-H |
Save this value as the result for Check 1
There are only two options here based on the URL used to access the Azure portal and deploy your resources.
| Azure portal URL | Mapping |
|---|---|
| https://portal.azure.com | Azure Commercial |
| https://portal.azure.us | Azure Government |
Save this value as the result for Check 2a
More info on Azure services and URL patterns for Commercial vs Gov clouds
Compare Azure Government and global Azure - Azure Government | Microsoft Docs
Here are the URL patterns for Power Platform to determine the cloud environment.
| Power App portal URL | Mapping |
|---|---|
| https://*.powerapps.com | Power App Commercial |
| https://*.gov.powerapps.us | Power App GCC |
| https://*.high.powerapps.us | Power App GCC-H |
| Not supported | Power App DoD |
Save this value as the result for Check 2b
More info on Power Platform services and URL patterns for Commercial vs Gov clouds
Microsoft Power Apps US Government - Power Platform | Microsoft Docs
Check 3 - Are you running in multi or single-tenancy mode (for templates based on Azure resources only)?
This question is to determine if your Azure subscription is linked to the same Azure AD as the one where your Office 365 users are deployed.
If you use the same domain to access the Azure portal than your O365 services, the answer is single-tenancy. e.g. you use your O365 credentials to access the Azure portal.
Otherwise, the answer is multi-tenancy. e.g. you have different email addresses or use different Azure AD to access O365 and the Azure.
Based on these different checks, you can determine your configuration and which deployment model to use.
Save this value as the result for Check 3
| Check 1 | Check 2a | Check 3 | Supported | Deployment scenario |
|---|---|---|---|---|
| O365 Commercial | Azure Commercial | Single | Yes | Standard |
| O365 Commercial | Azure Commercial | Multi | Yes | Standard (1) |
| O365 GCC | Azure Commercial | Single | Yes | Standard (2) |
| O365 GCC | Azure Commercial | Multi | Yes | Standard (1) (2) |
| O365 GCC | Azure Government | Single | Not Supported | Not Available (3) |
| O365 GCC | Azure Government | Multi | Yes | Hybrid |
| O365 GCC-H/DoD | Any | Any | Not Supported | Not Available (4) |
(1) Use the standard deployment procedure – Pay attention to the tenantID provided in the input parameters of the ARM template: you should change the default value (the Azure AD linked to your Azure subscription) to the Azure AD tenantID where your O365 users and services are located.
(2) Use the standard deployment procedure – Microsoft Teams admin portal for GCC now supports “Manage Apps” as well as “App setup policies” – Also, Teams for GCC now supports “Message Extensions” so there is nothing specific to do to deploy on O365 GCC compared to O365 Commercial with Azure Commercial.
(3) By design, O365 GCC and Azure Gov are connected to different Azure AD tenants – It’s not possible to be in a single tenant configuration with this setup.
(4) Most the Microsoft App templates rely on the Azure Bot Service to enable bot / Message Extensions in Teams. Microsoft Teams channel is not yet enabled for Azure Bot Service on Azure Government.
Before deploying a Teams app template to your Azure Government subscription, make sure that all the required services and pre-requisites are met. This means that the list of required Azure services are available and registered on the targeted region. This page explains how to verify that a resource provider is available and how to register it for your subscription -
Resource providers and resource types - Azure Resource Manager | Microsoft Docs
| Check 1 | Check 2b | Supported | Deployment scenario |
|---|---|---|---|
| O365 Commercial | Power Platform Commercial | Yes | Standard |
| O365 GCC | Power Platform GCC | Yes | Standard (5) (6) |
| O365 GCC-H | Power Platform GCC-H | Yes | Standard (5) (6) |
| O365 DoD | Power Platform DoD | Not Supported | Not Available (7) |
(5) Use the standard deployment procedure – Depending on the pre-requisites and services used on the Power Platform, some Teams app template may not be available for O365 GCC/GCC-H. A complete list of O365 and Power Platform services available on Office 365 Gov and service plan is available here -
Office 365 US Government - Service Descriptions | Microsoft Docs
(6) For Teams app templates that require Dataverse for Teams in GCC/GCC-H, you will need an additional stand-alone license for Power Apps. This is a current limit.
(7) Power Platform is not available on O365 DoD and is therefore out of scope.
# What is “hybrid deployment”?
In this setup, the Office 365 users and Microsoft Teams service are hosted in a different Azure AD tenant as the Azure resources. Also, both O365 and Azure use a Government Cloud:
- Office 365 with a GCC Azure AD tenant
- Azure Government (https://portal.azure.us) associated to its GCC-H Azure AD tenant
To register a bot as an application in Microsoft Teams, the bot needs to be registered on the Azure Bot Service. This Azure Bot Service also needs to be deployed on an Azure subscription that is linked to the Azure AD tenant where your O365 users and Microsoft Teams service are. This is what we call the hybrid deployment.
Here is a high-level representation for the hybrid deployment.

The hybrid deployment guide considers these multiple Azure subscriptions and Azure AD tenant. It also details the sequence and order of deployment of these resources.
Note : Azure Bot Service is only here to register your application as a bot in your Microsoft Teams environment. It is also used to activate SSO when needed, using the same Azure AD tenant where your O365 users are. There is no conversation data or attachments that transit via the Azure Bot Service deployed on Azure Commercial: all communications are in direct transit (https) between your Microsoft Teams service in GCC and the application bot hosted on Azure Government.
For O365 GCC deployment and Azure Commercial, the same deployment guide (available on Company Communicator GitHub repo) can be followed. Use O365 GCC tenant for App registration (Step 1 in deployment guide) and Azure commercial subscription for ARM deployment (Step 2 in deployment guide). Make sure tenant Id of O365 GCC tenant is added during ARM deployment.
For hybrid deployment, follow these deployment guide steps.
To begin, you will need:
- An Azure Government subscription where you can create the following resources:
- App Service
- App Service Plan
- Azure Function
- Azure Storage Account
- Service Bus
- Application Insights
- An Azure Commercial subscription where you can create the following resources:
- Bot Channels Registration
- A team with the users who will be sending messages with this app. (You can add or remove team members later!)
- A copy of the Company Communicator app GitHub repo
Register two Azure AD application in directory where the Team's users are homed (Office 365 GCC + Azure Commercial): one for author bot, and another for user bot.
-
Log in to the Azure Portal for your Azure Commerical subscription, and go to the App registrations blade. Verify that you are on the same Azure AD tenant than your O365 users and where Microsoft Teams is deployed.
-
Click New registration to create an Azure AD application.
- Name: Name of your Teams App - if you are following the template for a default deployment, we recommend "Company Communicator".
- Supported account types: Select "Accounts in any organizational directory" (refer image below).
- Leave the "Redirect URI" field blank for now.

-
Click Register to complete the registration.
-
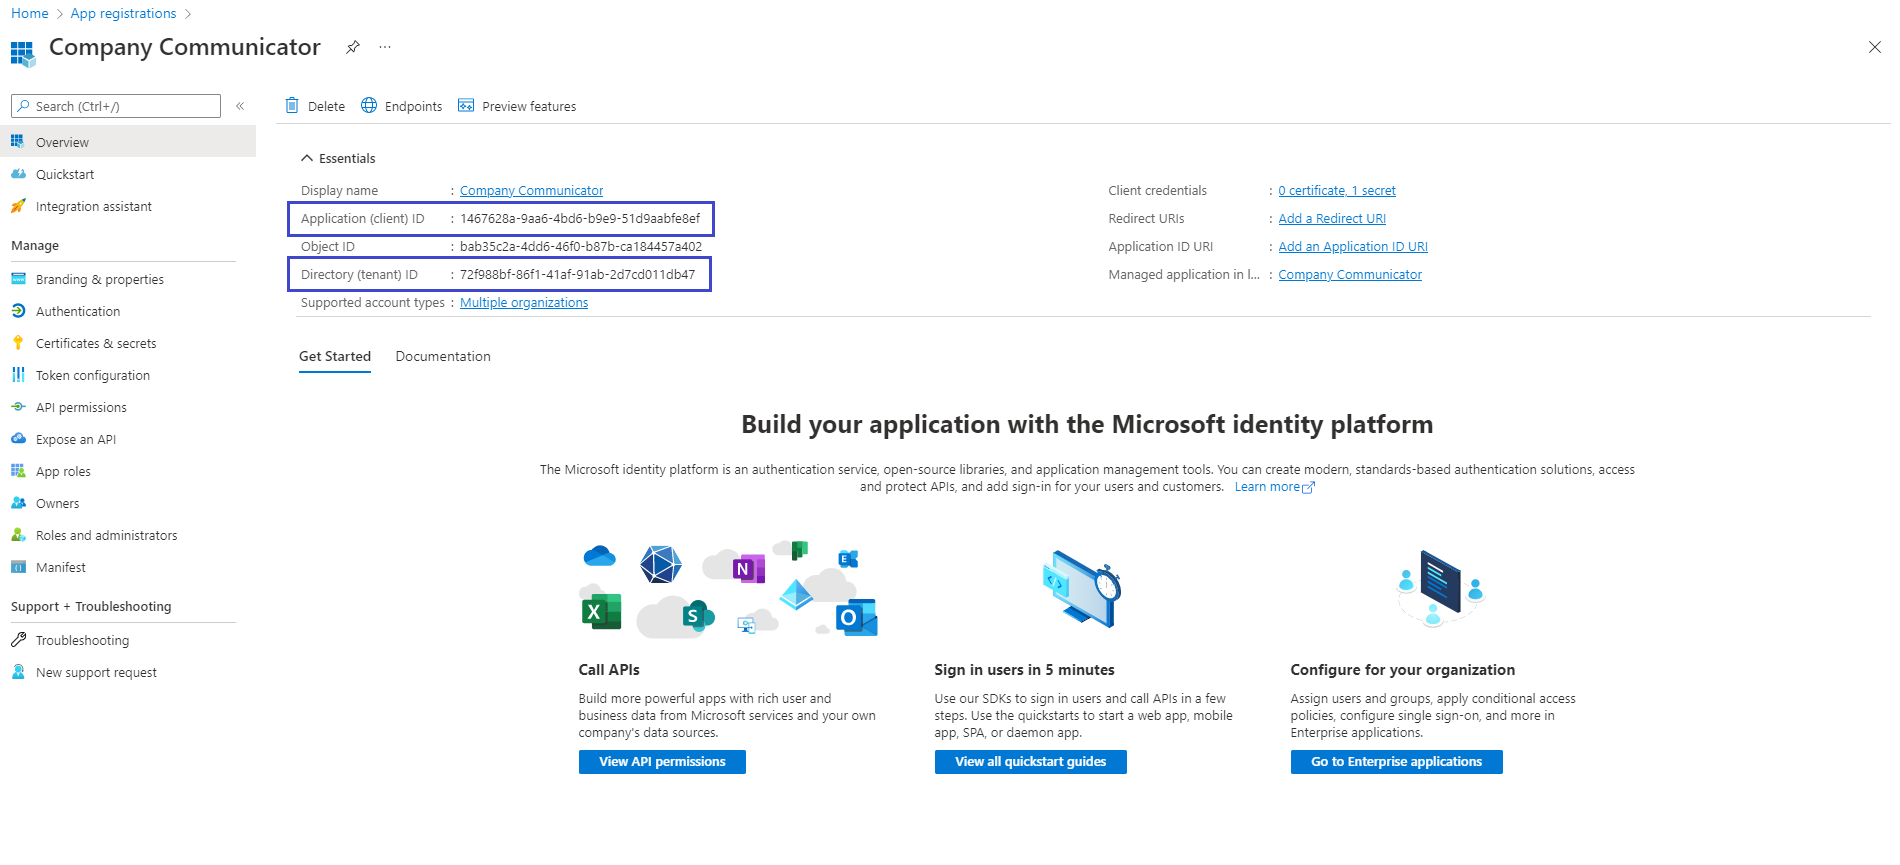
When the app is registered, you'll be taken to the app's "Overview" page. Copy the Application (client) ID and Directory (tenant) ID; we will need it later. Verify that the "Supported account types" is set to Multiple organizations.

-
On the side rail in the Manage section, navigate to the "Certificates & secrets" section. In the Client secrets section, click on "+ New client secret". Add a description for the secret, and choose when the secret will expire. Click "Add".

-
Once the client secret is created, copy its Value; we will need it later.
-
Go back to "App registrations", then repeat steps 2-6 to create another Azure AD application for the author bot.
- Name: Name of your Teams App - if you are following the template for a default deployment, we recommend "Company Communicator Author".
- Supported account types: Select "Accounts in any organizational directory".
- Leave the "Redirect URI" field blank for now.
At this point you should have the following 5 values:
- Application (client) ID for the user bot.
- Client secret for the user bot.
- Directory (tenant) ID.
- Application (client) Id for the author bot.
- Client secret for the author bot.
We recommend that you copy the values, we will need them later.
-
Click on the Deploy to Azure button below.

-
When prompted, log in to your Azure Commercial subscription.
-
Azure will create a "Custom deployment" based on the Company Communicator ARM template and ask you to fill in the template parameters.
Note: Please ensure that you don't use underscore (_) or space in any of the field values otherwise the deployment may fail.
-
Select a subscription and a resource group.
- We recommend creating a new resource group.
- The resource group location MUST be in a datacenter that supports Application Insights.
-
Enter a Base Resource Name, which the template uses to generate names for the other resources.
- The
[Base Resource Name]must be available. For example, if you selectcontosocommunicatoras the base name, the namecontosocommunicatormust be available (not taken); otherwise, the deployment will fail with a Conflict error. - Remember the base resource name that you selected. We will need it later.
- The
-
Update the following fields in the template:
- User Client ID: The application (client) ID of the Microsoft Teams user bot app. (from Step 1)
- Author Client ID: The application (client) ID of the Microsoft Teams author bot app. (from Step 1)
Note: Make sure that the values are copied as-is, with no extra spaces. The template checks that GUIDs are exactly 36 characters.
-
If you wish to change the app name, description, and icon from the defaults, modify the corresponding template parameters.
-
Click on "Review + create" to start the deployment. It will validate the parameters provided in the template. Once the validation is passed, click on "Create" to start the deployment.
-
Wait for the deployment to finish. You can check the progress of the deployment from the "Notifications" pane of the Azure Portal.
If the deployment fails, see this section of the Troubleshooting guide.
-
Search for Bot Service created by ARM template. Name of Bot Service will be base resource name which was provided earlier.
-
Click on Channels in Settings section of Bot Services and click on "Edit" button for Microsoft Teams Channel. Click on Delete Channel.
-
Once deleted, click on "Configure Microsoft Teams Channel" icon inside "Add a featured Channel". Select "Microsoft Teams for Government" and click on Save.

-
Click on the Deploy to Azure button below.
-
When prompted, log in to your Azure Government subscription.
-
Azure will create a "Custom deployment" based on the Company Communicator ARM template and ask you to fill in the template parameters.
Note: Please ensure that you don't use underscore (_) or space in any of the field values otherwise the deployment may fail.
-
Select a subscription and a resource group.
- We recommend creating a new resource group.
- The resource group location MUST be in a datacenter that supports all the following:
- Storage Accounts
- Application Insights
- Azure Functions
- Service Bus
- App Service
For an up-to-date list of datacenters that support the above, click here
-
Enter and reuse the same Base Resource Name, that you gave for bots deployment in your Azure commercial.
- The
[Base Resource Name]must be available. For example, if you selectcontosocommunicatoras the base name, the namecontosocommunicatormust be available (not taken); otherwise, the deployment will fail with a Conflict error. - Remember the base resource name that you selected. We will need it later.
- The
-
Update the following fields in the template:
- User Client ID: The application (client) ID of the Microsoft Teams user bot app. (from Step 1)
- User Client Secret: The client secret of the Microsoft Teams user bot app. (from Step 1)
- Author Client ID: The application (client) ID of the Microsoft Teams author bot app. (from Step 1)
- Author Client Secret: The client secret of the Microsoft Teams author bot app. (from Step 1)
-
Sender UPN List: A semicolon-delimited list of users (Authors) who will be allowed to send messages using the Company Communicator.
- For example, to allow Megan Bowen ([email protected]) and Adele Vance ([email protected]) to send messages, set this parameter to
[email protected];[email protected]. - You can change this list later by going to the App Service's "Configuration" blade.
- For example, to allow Megan Bowen ([email protected]) and Adele Vance ([email protected]) to send messages, set this parameter to
-
Proactively Install User App: Default value is
true. You may set it tofalseif you want to disable the feature. -
User App ExternalId: This MUST be the same
idthat is in the Teams app manifest for the user app. -
DefaultCulture, SupportedCultures [Optional]: By default the application contains
en-USresources. You may add/update the resources for other locales and update this configuration if desired. - Tenant Id: The tenant ID where you want to install the Teams App. (from Step 1)
-
Bot App Insights Key: Navigate to App Insights of bot deployed in azure commercial. Under left menu, select Properties under Configure. Copy the instrumentation key

Note: Make sure that the values are copied as-is, with no extra spaces. The template checks that GUIDs are exactly 36 characters.
Note: If your Azure subscription is in a different tenant than the tenant where you want to install the Teams App, please update the
Tenant Idfield with the tenant where you want to install the Teams App. -
If you wish to change Location, Git Repo Url from the defaults, modify the corresponding template parameters.
-
Click on "Review + create" to start the deployment. It will validate the parameters provided in the template. Once the validation is passed, click on "Create" to start the deployment.
-
Wait for the deployment to finish. You can check the progress of the deployment from the "Notifications" pane of the Azure Portal. It may take 30 mins for the deployment to finish.
If the deployment fails, see this section of the Troubleshooting guide.
-
Once the deployment is successfully completed, go to the deployment's "Outputs" tab, and note down the follwing values. We will need them later.
-
authorBotId: This is the Microsoft Application ID for the Company Communicator app. For the following steps, it will be referred to as
%authorBotId%. -
userBotId: This is the Microsoft Application ID for the Company Communicator app. For the following steps, it will be referred to as
%userBotId%. -
appDomain: This is the base domain for the Company Communicator app. For the following steps, it will be referred to as
%appDomain%.
-
authorBotId: This is the Microsoft Application ID for the Company Communicator app. For the following steps, it will be referred to as
-
Note that you have the
%authorBotId%,%userBotId%and%appDomain%values from the previous step (Step 3).If do not have these values, refer this section of the Troubleshooting guide for steps to get these values.
-
Go to App Registrations page here and open the author app you created (in Step 1) from the application list.
-
Under Manage, click on Authentication to bring up authentication settings.
-
Click on "Add a platform" and select Web. Add a new entry to Redirect URIs:
-
Redirect URI: Enter
https://%appDomain%/signin-simple-endfor the URL. e.g.https://appName.azurewebsites.us/signin-simple-end
-
Redirect URI: Enter
-
Under Implicit grant, check ID tokens.
-
Click Configure to commit your changes.
-
-
Back under Manage, click on Expose an API.
-
Click on the Set link next to Application ID URI, and change the value to
api://%appDomain%e.g.api://appName.azurewebsites.us. -
Click Save to commit your changes.
-
Click on Add a scope, under Scopes defined by this API. In the flyout that appears, enter the following values:
- Scope name: access_as_user
- Who can consent?: Admins and users
- Admin and user consent display name: Access the API as the current logged-in user
- Admin and user consent description: Access the API as the current logged-in user
-
Click Add scope to commit your changes.
-
Click Add a client application, under Authorized client applications. In the flyout that appears, enter the following values:
-
Client ID:
5e3ce6c0-2b1f-4285-8d4b-75ee78787346 -
Authorized scopes: Select the scope that ends with
access_as_user. (There should only be 1 scope in this list.)
-
Client ID:
-
Click Add application to commit your changes.
-
Repeat the previous two steps, but with client ID =
1fec8e78-bce4-4aaf-ab1b-5451cc387264. After this step you should have two client applications (5e3ce6c0-2b1f-4285-8d4b-75ee78787346and1fec8e78-bce4-4aaf-ab1b-5451cc387264) listed under Authorized client applications.
-
-
Back under Manage, click on Manifest.
- In the editor that appears, find the
optionalClaimsproperty in the JSON Azure AD application manifest, and replace it with the following block:
"optionalClaims": { "idToken": [], "accessToken": [ { "name": "upn", "source": null, "essential": false, "additionalProperties": [] } ], "saml2Token": [] },- Click Save to commit your changes.
- In the editor that appears, find the
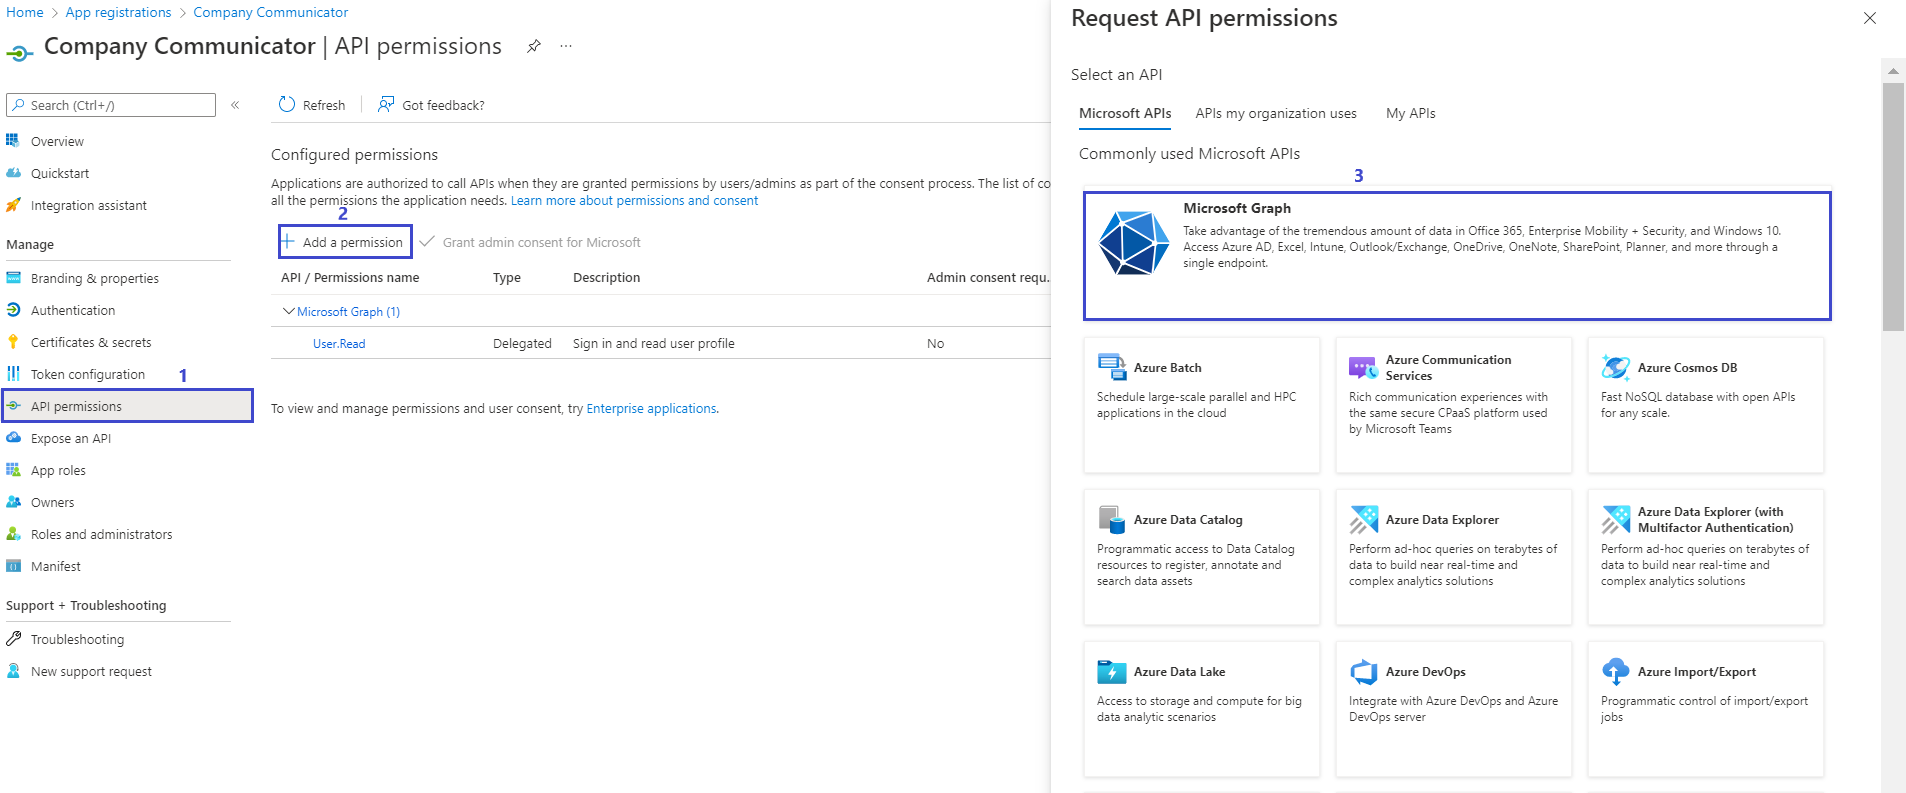
Continuing from the Azure AD app registration page where we ended Step 4.
-
Select API Permissions blade from the left hand side.
-
Click on Add a permission button to add permission to your app.
-
In Microsoft APIs under Select an API label, select the particular service and give the following permissions,
-
Under Commonly used Microsoft APIs,
-
Select “Microsoft Graph”, then select Delegated permissions and check the following permissions,
- Group.Read.All
- AppCatalog.Read.All
-
then select Application permissions and check the following permissions,
- Group.Read.All
- User.Read.All
- TeamsAppInstallation.ReadWriteForUser.All
-
Click on Add Permissions to commit your changes.

Please refer to Solution overview for more details about the above permissions.
-
-
If you are logged in as the Global Administrator, click on the “Grant admin consent for %tenant-name%” button to grant admin consent, else inform your Admin to do the same through the portal.
Alternatively you may follow the steps below:- Prepare link - https://login.microsoftonline.com/common/adminconsent?client_id=%appId%. Replace the
%appId%with theApplication (client) IDof Microsoft Teams author bot app (from above). - Global Administrator can grant consent using the link above.
- Prepare link - https://login.microsoftonline.com/common/adminconsent?client_id=%appId%. Replace the
Company communicator app comes with 2 applications – Author, User. The Author application is intended for employees who create and send messages in the organization, and the User application is intended for employees who receive the messages.
Create two Teams app packages: one to be installed to an Authors team and other for recipients to install personally and/or to teams.
-
Make sure you have cloned the app repository locally.
-
Open the
Manifest\manifest_authors.jsonfile in a text editor. -
Change the placeholder fields in the manifest to values appropriate for your organization.
-
developer.name(What's this?) developer.websiteUrldeveloper.privacyUrldeveloper.termsOfUseUrl
-
-
Change the
<<appDomain>>placholder in the configurationUrl setting to be the%appDomain%value e.g. "https://appName.azurewebsites.us/configtab". -
Change the
<<botId>>placeholder in the botId setting to be the%authorBotId%value - this is your author Azure AD application's ID from above. This is the same GUID that you entered in the template under "Author Client ID". Please note that there are two places in the manifest (for authors) where you will need to update Bot ID. -
Change the
<<appDomain>>placeholder in the validDomains setting to be the%appDomain%value e.g. "appName.azurewebsites.us". -
Change the
<<botId>>placeholder in the id setting of the webApplicationInfo section to be the%authorBotId%value. Change the<<appDomain>>placeholder in the resource setting of the webApplicationInfo section to be the%appDomain%value e.g. "api://appName.azurewebsites.us". -
Copy the
manifest_authors.jsonfile to a file namedmanifest.json. -
Create a ZIP package with the
manifest.json,color.png, andoutline.png. The two image files are the icons for your app in Teams.- Name this package
company-communicator-authors.zip, so you know that this is the app for the author teams. - Make sure that the 3 files are the top level of the ZIP package, with no nested folders.
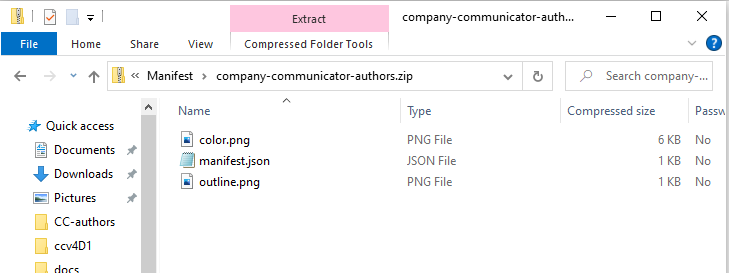
- Name this package
-
Delete the
manifest.jsonfile.
Repeat the steps above but with the file Manifest\manifest_users.json and use %userBotId% for <<botId>> placeholder. Note: you will not need to change anything for the configurationUrl or webApplicationInfo section because the recipients app does not have the configurable tab. Name the resulting package company-communicator-users.zip, so you know that this is the app for the recipients.
-
Install the authors app (the
company-communicator-authors.zippackage) to your team of message authors.- Note that even if non-authors install the app, the UPN list in the app configuration will prevent them from accessing the message authoring experience. Only the users in the sender UPN list will be able to compose and send messages.
- If your tenant has sideloading apps enabled, you can install your app by following the instructions here.
-
Add the configurable tab to the team of authors, so that they can compose and send messages.
-
Upload the User app to your tenant's app catalog so that it is available for everyone in your tenant to install.
IMPORTANT: Proactive app installation will work only if you upload the User app to your tenant's app catalog.
- Install the User app (the
company-communicator-users.zippackage) to the users and teams that will be the target audience.
If
proactiveAppInstallationis enabled, you may skip this step. The service will install the app for all the recipients when authors send a message.
Please check the Troubleshooting guide.