Getting started - OfficeDev/microsoft-teams-apps-classroom-dropin GitHub Wiki
The Classroom Drop-in applications provide an easy way for System leaders who can find classrooms and add themselves to it with a specified drop-in period. This will add them to corresponding team or class. They can also assign others (substitute teachers, evaluators etc.) to a class for a short period, as needed. This walkthrough includes:
- Classroom Drop-in : System leaders (Principals, Board directors, HODs)
- Classroom Drop-in : Substitute teachers, evaluators
Architecture Model
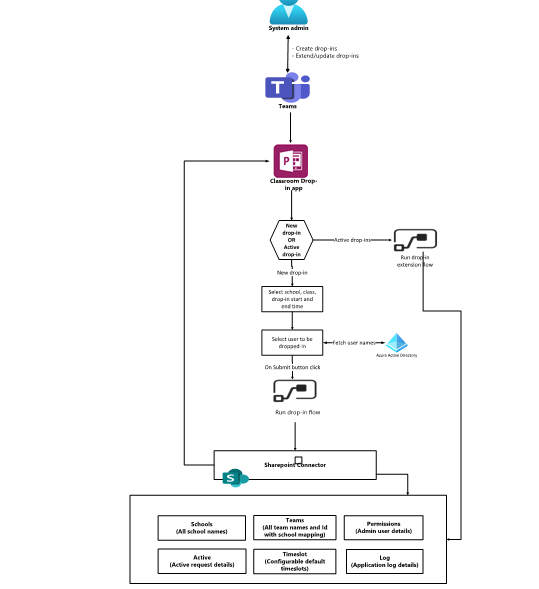
Reference Data
The application can be tailored by System leaders (Principals, Board directors, HODs) for your organization using the Classroom Drop-in app.
Settings
It is important that System leaders configure key settings using the Classroom Drop-in App. To configure settings: In Timeslot SharePoint list, user will have to add default time periods Like 1, 2, 3 etc. (hours). Only numeric values will be allowed. Values entered in this list will be shown as default time for drop-in time selection.

Indexing in SharePoint List for better performance Please follow below instructions for Indexing.
- Navigate to your SharePoint List (URL looks like https://m365edu748418.sharepoint.com/sites/Classroom_DropIn).
- Select Schools list and click on List settings (Right hand side of the screen).

- After clicking on List Setting option, it navigates to the setting screen. Scroll down and select "Indexed Columns".

- New screen will open for Creating Indexes.

- Select Primary column (Title) for Indexing and click on Create button.

- SharePoint will create index for selected column, looks like

- There are option to create up to 20 indexes for each List.

For every list, select Title column for Indexing. Repeat same process for remaining lists.
Create Classroom Drop-in
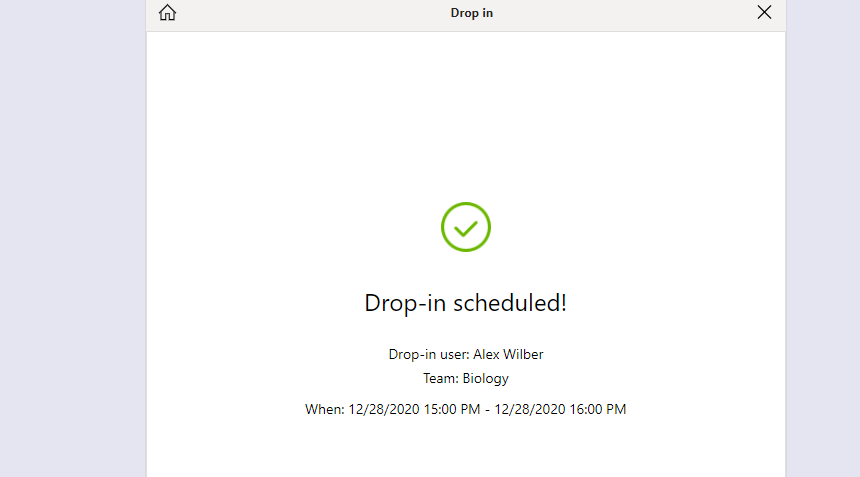
To create new classroom drop-in,
- Navigate to Classroom Drop-in App.
- Click on New Drop-in

- Select School for drop-in

- Select Team for drop-in

- Select drop-in duration (Start and end time) and assigned Teacher

- Click on "Schedule drop-in Button"
- After click on Drop-in button ,success message and flow notification will be sent to dropped-in teacher.
- After successful notification, system leaders can message to dropped-in user or go back to the welcome screen of app.

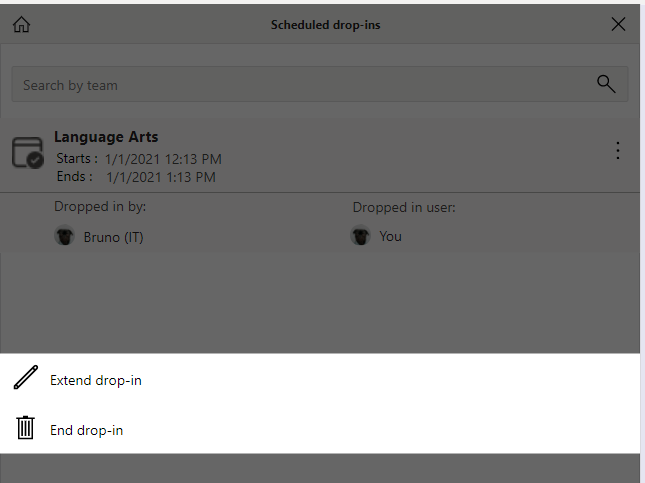
View/Extend/Delete Classroom Drop-ins
- Navigate to Classroom Drop-in app.
- Click on "Scheduled drop-in" button.
- All the scheduled drop-in will be listed here.

- To extend drop-in, click on 3 dots at right hand side in the screen and click on "Extend Drop-in".

- Enter time and notes if any, then click on "Extend" Button.

- After click on Extend button, success message and flow notification will be sent to teacher.


- To delete the drop-in, navigate to Classroom Drop-in App
- Click on "Scheduled drop-in"
- All the scheduled drop-ins are listed here.
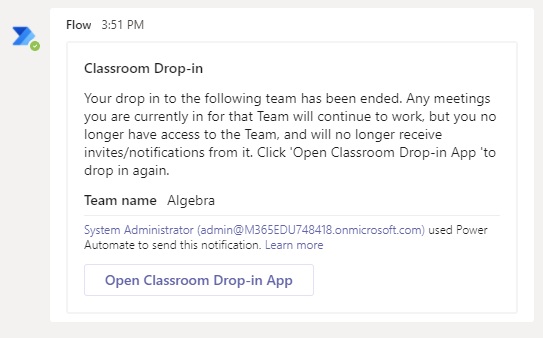
- To delete drop-in, click on 3 dots at right hand side in the screen and click on "End drop-in" option.
- After click on End drop-in option, a success floater message is shown to teacher.

- A flow notification is also sent to Teacher and access from the class is revoked.
Updating the Applications
If you have already completed the steps for installing the apps, it is not necessary to redo every step again. Follow these steps to import the individual app or flow which you would like to update. Start by downloading the new Classroom Drop-in.zip file from this GitHub repository. See the Latest Update section for a table of the latest versions. Important: Updating an app will replace any customizations you have made to the template. Please document any revisions to menus and formulas separately before proceeding. You can also save the original app to your computer as an .msapp file and open it in another browser tab to copy content over to the new version. Note that you can always revert to a previous version by accessing the version history of an app.
To update the app:
- Extract an app you would like to update. For example, if you want to update the Classroom Drop-in app.
- Go to make.powerapps.com
- From the left pane, click Apps.
- From the top menu, click Import canvas app.
- In the Import package screen, click on Upload and browse for Classroom DropIn.zip.
- Once you have selected the file, the screen will change to the import experience.
- Instead of creating a new app as done in the deployment instructions, click Create new to reveal more options.
- Change the setup dropdown to Update.
- Select the existing app that you want to update. In this case Classroom DropIn App.
- Click Save.
- Within related resources if you have any associated flow. Click Create as new to reveal more options.
- Change the setup dropdown to Update.
- Select from the existing flows the flow to update. In this case, BARCreateRequests.
- Click import and wait for the import to complete.
- When the import is complete, open the app in PowerApps studio.
- Click Save.
- From the ribbon, click View > Data sources. In the left pane for Data sources, remove the existing connections to SharePoint.
- In the same left pane for Data sources, type 'SharePoint' into the search bar at the top.
- Select SharePoint and your connection. A pane will appear on the right to browse for the exact site and lists.
- In the right pane, select the SharePoint site where your lists for Classroom Drop-in are located. If the site does not appear in this list, type its URL in the field at the top of the pane.
- Click Connect.
- Save and publish the app: File > Save. Publish.
To update a flow:
- Extract the flow you would like to update. Note that if you have already deployed the SharePoint lists using the DeployDropInLists flow, it is not necessary nor possible to create them again in the same site as they already exist.
- Go to flow.microsoft.com
- Sign in.
- From the left pane, click 'My flows.'
- From the top menu, click Import.
- Browse for the zip file you extracted. The page will change to the import experience.
- Instead of creating a new flow as done in the original setup instructions, click "Create new" to reveal more options.
- A pane appears on the right. Below Setup, change the drop down menu to "Update."
- A list of flows in the environment appears in the right pane. Select the flow which you would like to update.
- Select a connection for each connection required.
- Click import and wait for the import to complete.
- Flows that are imported for the first time may be disabled. It may be necessary to edit the flow and in its details page, click Turn on from the top menu.
- Follow the steps in the deployment guide to update triggers and Site Url variables to the Url of the SharePoint site where your lists for Classroom Drop-in are located.
Import and set up the 'ImportingDatas Flow' Power Automate (Optional)
Create Excel with proper data and save it in OneDrive. Refer for sample (Download the excel file DropIn_ListData.xlsx. it is available under /Deployment/Power Apps.)
Import the 'ImportingDatas Flow' Power Automate
- Go to https://flow.microsoft.com.
- Select My flows from the left navigation pane.
- Select Import on the command bar.
- Upload the ImportingDatasFlow.zip package - this is available under /Deployment/Flows.
- Add a SharePoint connection for the new flow by selecting the Select during import link and completing the form.
- If you need to create a new SharePoint connection, select Create new in the Import setup pane and follow the instructions as before.
Edit the 'ImportingDatas Flow' Power Automate
- After the import is done, go to My flows and refresh the list of flows.
- Select the newly imported flow, ImportingDatas Flow
- Select Edit on the command bar.
- Select the trigger "List rows present in a table School" step card.
- Change the File with your data Excel
- Change the table with your data Excel table(schools) name
Repeat above step for Teams and Permissions List.
Language translations
The application have been designed to be translated to a language of choice. All the language translations are managed using the colTranslations.xlsx file that can be downloaded from the GitHub repository.
Understanding translations
Here is some key information about the translation file
- Download and extract the ClassroomDrop-inApp.zip.
- And open the ClassroomDropin.xlsx file.
- The file contains a sheet which in turn constitutes of translation table.
- Each table is made up of 2 key columns i.e. Locale and IsSupported. PowerApps rely on these columns to decide which language to use.
- Rest of the columns are labels that are translated.
PowerApp translation formulas
- All PowerApps manage translation on App start using the Language() function.

- The excel table data sources are then filtered using the language detected.

Updating the translations
Some of the translations might not be accurate, as they have been generated using an automated process. In this case, you can choose to update them. To update:
- Download and extract the ClassroomDrop-in App.zip.
- And open the ClassroomDropin.xlsx file.
- Open the PowerApp (Classroom Drop-in app) where the translation for the label needs to be updated.
- Select the component label for which needs to be updated.

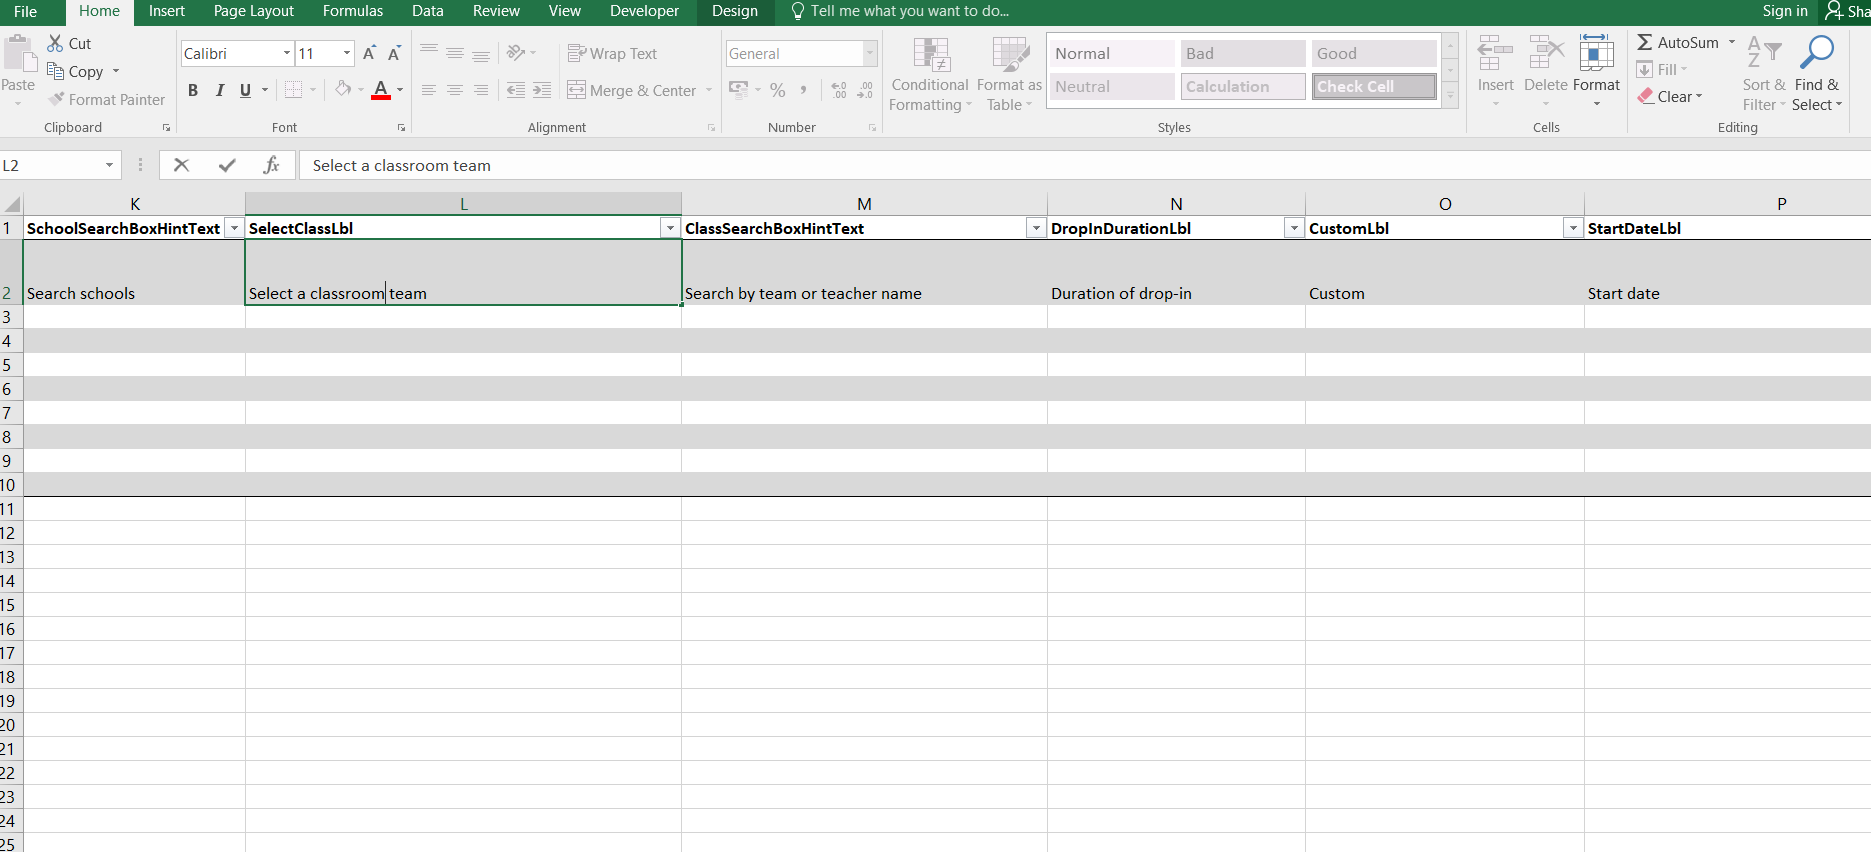
- In the image above lblSelectTeam has been selected.
- The text property states column name to be updated within the excel file. In this case SelectClassLbl.
- Search for SelectClassLbl within the colTranslation table in the excel file.
- Update the column value for your locale row.
- Save the file.
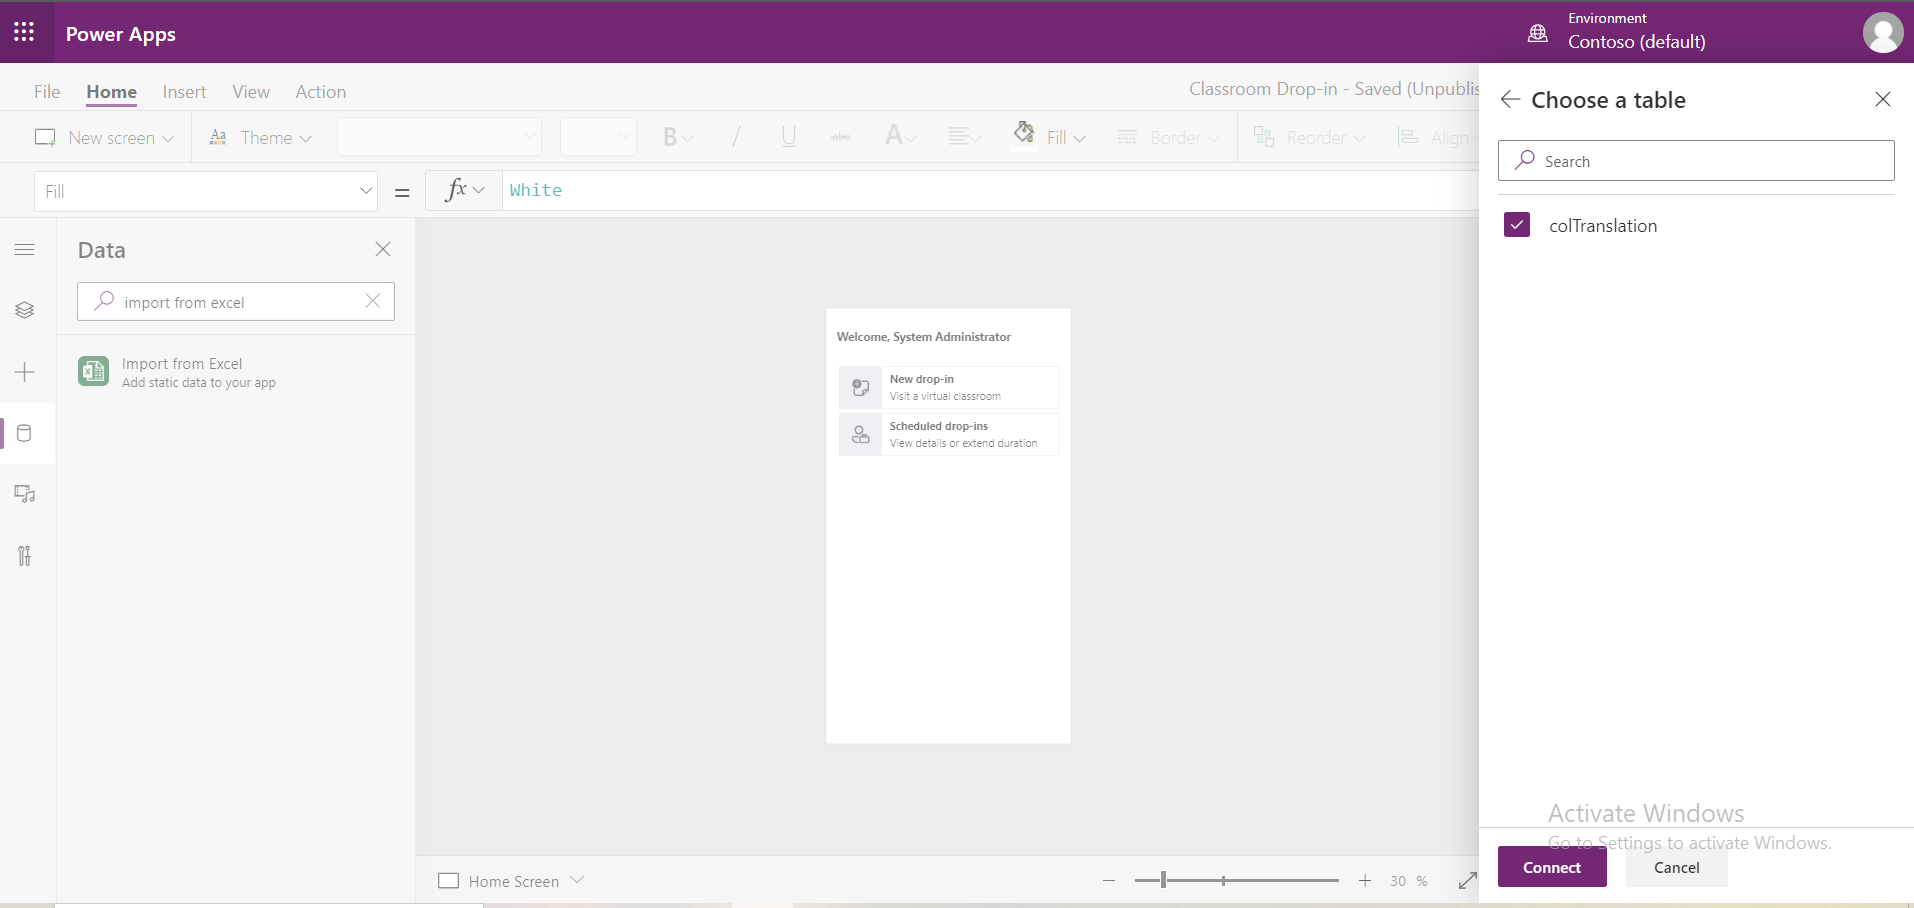
- Switch to the data sources section of the Classroom Drop-in App.
- Remove colTranslation excel data source.
- In the data source section search for excel and select Import from Excel.

- Browse and select the excel file you modified.
- Once selected, you will be asked to select the table to import the data from.

- Select colTranslation
- Press Connect.
- New Data source appears.
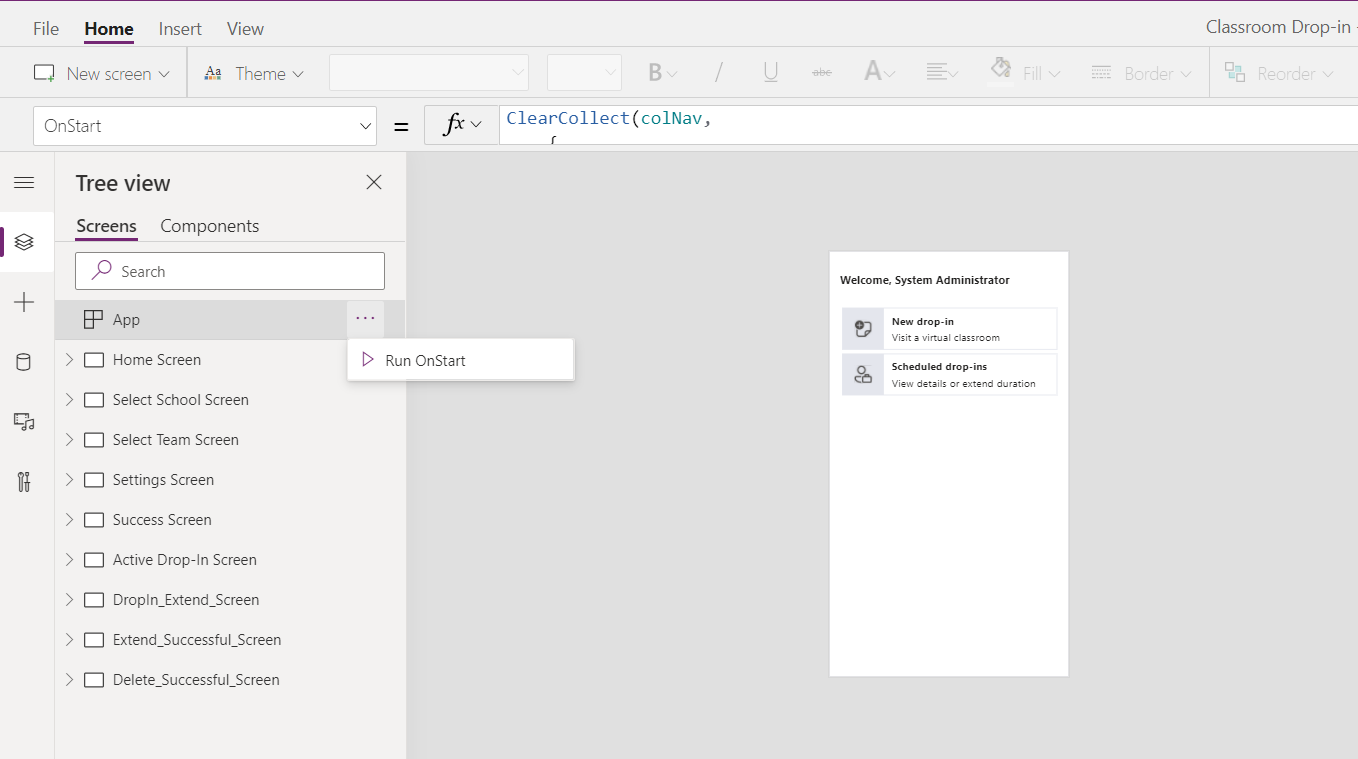
- Switch to Tree View section.
- Click Run on Start to run formulas on App Start and load the labels.
- Save and Publish Note
- Currently excel data source can read first 100 columns from the excel table.
- If your translation table exceeds 100 columns, your Power App might not be able to read the column value.
Testing Translations
Once the translations have been configured, you can validate this by configuring browser language or changing app language within Microsoft Teams client application.
Changing Browser Language
- Open Microsoft teams within Microsoft Edge.
- Navigate to Classroom Drop-in App.
- Click on elipisis(…) on the top right corner of the browser and click on Settings.
- Click on Languages on the left-hand side menu.

- Click Add Languages and Select Language of your choice and Click Add.

- Once language has been added, click ellipsis(…) next to the Language.
- Select Move on the top.

- Once you see the language on top, click ellipsis(…) next to the Language and select the option to make this the default language in the browser
- Restart the browser. It should now be translated to the selected language.

Change Microsoft teams App language
To test app translations within Microsoft Teams client app:
- Click on your photo on the top right of the Teams application and click settings.

- Under General Settings, change the App language to language of your choice.
- Click Save and Restart.

- The App will load in the language selected.