IAP Developer Guide - ONE-store/inapp-sdk-eng GitHub Wiki
< NOTE >
This documents are for ONE store IAP SDK v16(API v4). If you are looking for the latest version of ONE store IAP SDK v17(API v5), please refer to the url below:
URL for the latest documents and downloads of ONE store IAP SDK v17(API v5) : https://dev.onestore.co.kr/devpoc/reference/view/IAP_v17
You can download Library/ Source Code / Test APK, which are provided by ONE store
You can find the guide on the website, and such guide file is not distributed separately. The sample code is shared at GitHub, and such code is not distributed separately.
Sample codes are divided into the branches of the GitHub*. The branch details are as follows;
- master : Basic description
- iap_sample_dev : Application project implemented with IAP
- unity_adaptor : Library project for the implementation of IAP in the Unity environment
- unity_sample : Unity Application project implemented with unity_adaptor
*GitHub is the name of the program (website) that provides the guide.
The IAP library can be occasionally updated for the purpose of changing service policies, adding features or bug patch. Once the IAP library is updated, the relevant notice is posted on ONE store developer center and the emails are sent to the developer who has been registered at ONE store developer center.
App developers are required to apply the latest IAP SDK, which is registered at the developer center. If the previous version SDK is applied, it may make it impossible to normally purchase products, and the registration of an App may be rejected by the developer center.
The application ID(AID) and product ID of an In-App is necessary to use the IAP. That means you are required to register in advance the Apps and In-App products that you will publish in the developer center. The types of In-App products are as below.
You don’t have to upload APK file while registering an In-App.
ONE store IAP requires you to decide the In-App type in advance. The API 'consume' related to product consumption does not exist in the IAP.
| Type of In-App | Description | Remarks |
|---|---|---|
| Consumable | Repurchase/Repeat purchase is allowed at any time | Even if not consumed, this type of product can be repurchased and purchased repeatedly. |
| Non-consumable | Once purchased, this type of In-App cannot be repurchased | |
| Subscription | Once purchased, this type of In-App cannot be repurchased for a certain period of time | You can check the remaining period through query in the SDK |
| Monthly Auto Renewable Subscription | A certain amount of money is automatically paid every month for up to one year | You can cancel the auto renewal through query in the SDK |
The use of Trial Version In-App is not recommended.
In-App registration takes two forms – Bulk registration & individual registration
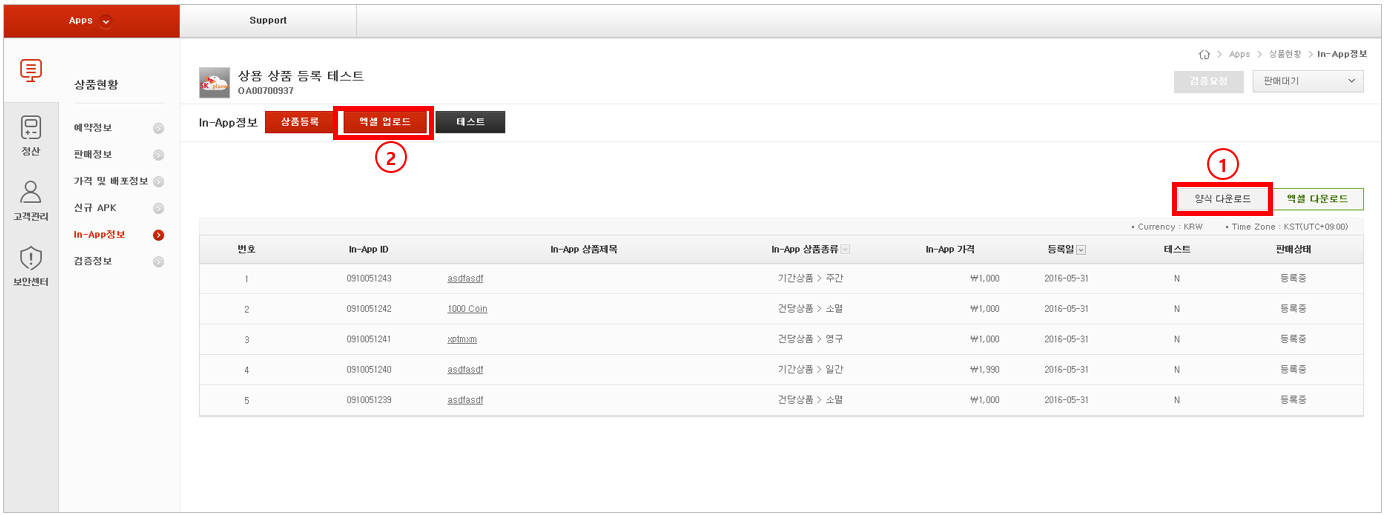
This feature allows you to easily edit and upload in bulk In-App product lists (CSV) that you downloaded from Google Play Developer Console, Naver Appstore Developer Center, etc.
- Download In-App product lists from other developer consoles in the csv format.
- Download ONE store developer center’s upload form or click this link. (Refer to ① in the picture)
- Copy/Paste the csv files that you downloaded from other developer centers in the ONE store developer center’s upload form.
- Upload the completed file (xls) on ONE store developer center. (Refer to ② in the picture)
- Check the uploaded In-App, AID and product ID.
Log in to ONE store developer center, go to [Apps] menu, and register an In-App by clicking [Register App].

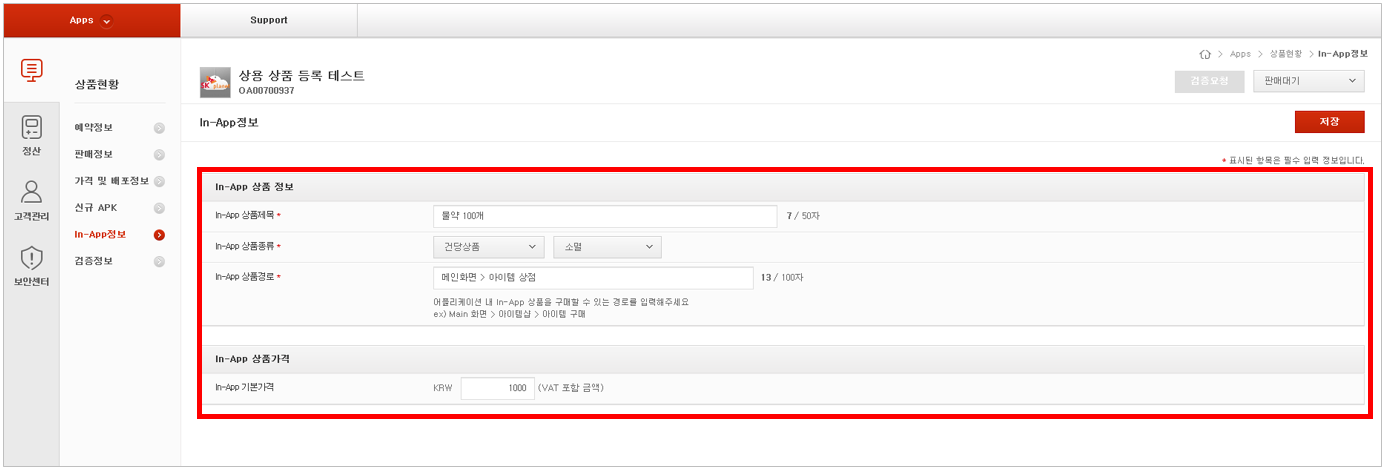
Register an In-App product at [In-App]
Before registering an In-App product, you are required to register payment and financial information, including bank account information

Click [Register In-App] to enter In-App information.
- Enter In-App product title in [In-App Title] and select the type of the In-App.
- The In-App path is used later for review by ONE store developer center. Type in the path where the corresponding product is located.
- Enter the product price including VAT in [Basic Price] of In-App.
- When all inputs are complete, click [Save] button.
Check the registered In-App item, "AID" and "product ID".

ONE store IAP vesion 4 works normally when the latest versions of ONE store App and ONE store service are installed on the user’s mobile device.
Once ONE store app is executed, ONE store service is automatically downloaded.
If the ONE store app is not installed on the Android device for development, you can download the app at: http://m.onestore.co.kr/mobilepoc/main/main.omp
You need to consider model before using IAP SDK. Here, the model means a whole flow taking into account the items below:
- Purchase (payment) through the IAP SDK
- Authentication for purchase (payment)
- How to get permissions within an App
The built-in model is used to immediately deliver an In-App product through an App alone installed on the Smartphone without connecting to the App server.
This model unlocks the In-App embedded in and purchased through the App once the payment is completed.
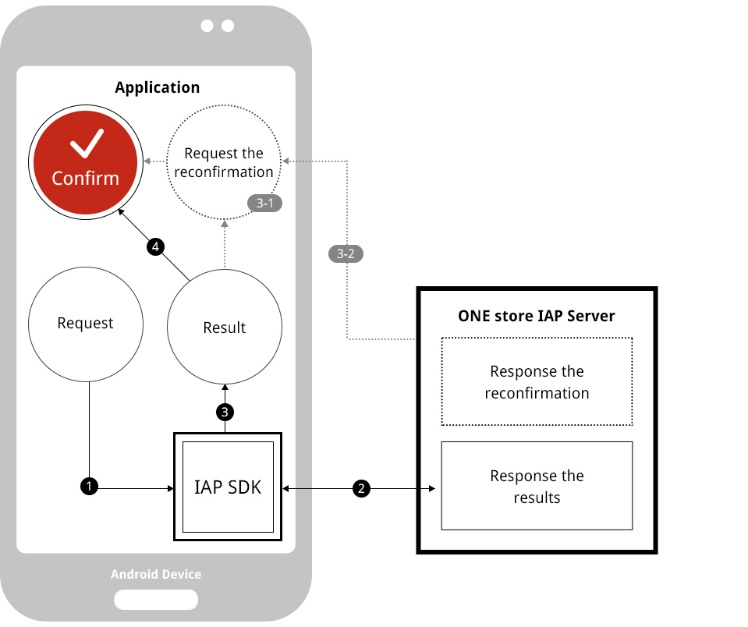
Flow
- An App calls the IAP API to request a payment
- IAP Plug-in sends a payment request to IAP server, and the IAP server processes the request and delivers the payment result.
- The IAP Plug-in passes the payment result to the App.
- The purchased In-App product is approved to be used
[caution]
Flows of 3-1 and 3-2 are strongly recommended where the App approves the In-App to be used after receiving the payment result and verifying TxID (Transaction Identifier) e-Receipt.
The server model allows an App to connect to the App server after the payment for an In-App purchase is completed. The model is used either to request and receive permission for the use of the In-App product or to download the corresponding product.
ONE store provides TID Purchase History API and TxID e-Receipt Verification API for you to identify the permission in the App server in real-time by checking the purchase history in the IAP server in real-time.
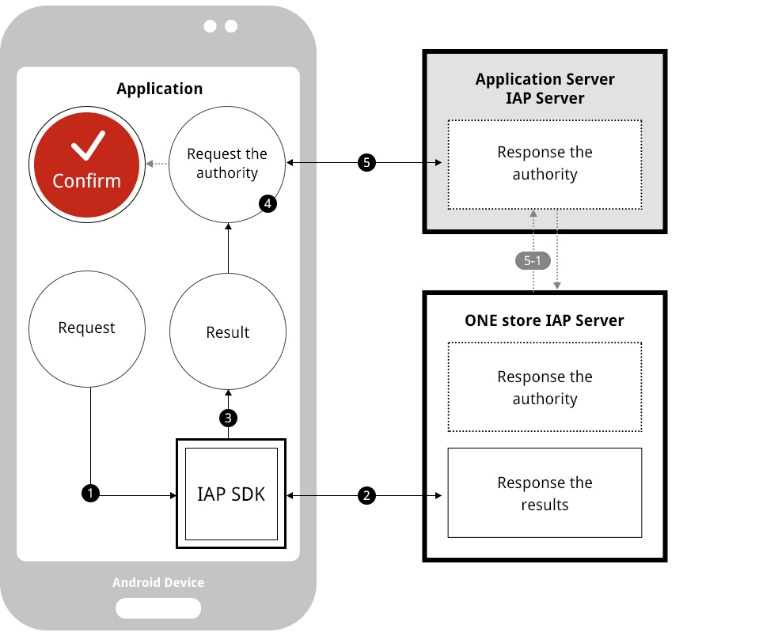
Flow
- An App calls the IAP API to request a payment.
- IAP Plug-in sends a payment request to IAP server, and the IAP server processes the request and delivers the payment result.
- The IAP Plug-in passes the payment result to the App.
- The App sends a request to the App server to confirm permission to use the purchased In-App
- The App server confirms the permission.
- The use of the In-App item is approved according to the confirmation made by the App server.
[caution]
Flow of 5.1 is strongly recommended where the App server approves the use of the In-App product after sending a request to the IAP server to re-confirm the purchase.
The IAP SDK is a development tool to support ONE store payment feature for an App.
Library is provided in two types as seen below (currently, providing ‘. aar’ is under consideration).
- Android Library (.aar)
- Java Library (.jar)
The IAP SDK is provided in .jar for Android and structured as follows:
iap_plugin folder
    L iap_plugin_[version].aar
    L iap_plugin_[version].jar
For more detail, refer to Reference and Sample Code
Locate the library included in the IAP SDK in a proper position as seen below:
ex: [Project folder]/app/libs/
Set up Build Script(ex: app/build.gradle) file to include the library.
- Java Library (.jar)
dependencies {
    compile files('libs/iap_plugin_[version]_[build date].jar')
}
- Android Library (.aar)
allprojects {
    repositories {
        flatDir {
            dirs 'libs'
        }
    }
}

dependencies {
    compile(name:'iap_plugin_[version]_[build date]', ext:'aar')
}
IAP version information must be set up in AndroidManifest.xml file for the normal operation of the IAP module. If the information below is not set, normal operation will not work and App uploading will fail. From version 16.XX onward, you don’t have to declare permissions related to the IAP SDK in AndroidManifest.xml..
In addition, you will also no longer need to implement runtime permissions for the SDK since the SDK processes response to the runtime permissions.
The App must set up all listed meta data. The value of name is fixed, however the value of value changes according to the API version.
As for version 16.XX.XX, enter the meta data as seen below.
<application ...... >
   <meta-data
      android:name="iap:api_version"
      android:value="4" />
At the time when requests for payment or query (if UI is exposed) are made, Payment Activity with the portrait attribute is shown.
If the Payment Request Activity has the landscape attribute, the event that fetches changes to the system environment will take place. If there are no special settings, lifecycle functions (ex: onDestroy) can be called.
If IapPlugin instance and callback instance are regenerated in the Activity, a problem could occur where the callback is not received.
You can easily solve the problem by setting the value of configChanges as seen below in the Activity, which uses IapPlugin
<activity
    ...
    android:configChanges="orientation|screenSize" />
The IAP SDK provides three main packages. All can be implemented by using the com.skplanet.dodo package alone.
In the previous versions, helper and pdu packages were separately provided to help the implementation. API_VERSION 4 does not require the use of these packages. However, the packages with enhanced reliability are included in the SDK to take into account backward compatibility.
| Component | Description |
|---|---|
| com.skplanet.dodo | This has a class required for implementation |
| com.skplanet.dodo.helper | This is provided for the previous versions |
| com.skplanet.dodo.pdu | This is provided for the previous versions |
The IAP SDK uses an asynchronous method where requests are made to IapPlugin and results are delivered through listener.
The developer has to define and implement proper processing depending on the In-App purchase request/callback result.
Requests can be made via this IapPlugin Class. The Class can have duplicate objects, and each object is set up with Development/Release.
When it is finished, exit() method must be called. If requests are made to IapPlugin after the exit() method is called, runtime exception occurs.
/**
 * Create IapPlugin objects for requests
 */
IapPlugin getPlugin(Context context, String pluginmMode)

...

// For debug
//mPlugin = IapPlugin.getPlugin(activity, IapPlugin.DEVELOPMENT_MODE);

// For commercialize
mPlugin = IapPlugin.getPlugin(activity, IapPlugin.RELEASE_MODE);
/**
 * Payment request (recommended)
 */
String sendPaymentRequest(IapPlugin.RequestCallback requestCallback, PaymentParams params)


/**
 * Payment request
 */
Bundle sendPaymentRequest(String appId, String pId, String productName, String tId, String bpInfo, IapPlugin.RequestCallback requestCallback)
/**
 * Check purchase history
 * Checking single and multi products is allowed
 */
String sendCommandPurchaseHistory(IapPlugin.RequestCallback requestCallback, ProcessType type, String appId, String... productIds)
/**
 * Get title/description
 */
String sendCommandProductInfo(IapPlugin.RequestCallback requestCallback, ProcessType type, String appId)
/**
 * Check purchase availability
 * Checking single and multi products is allowed
 */
String sendCommandCheckPurchasability(IapPlugin.RequestCallback requestCallback, ProcessType type, String appId, String... productIds)
/**
 * Change the status of purchased product
 * Request to cancel subscription and deduct the points of consumable products
 */
String sendCommandChangeProductProperties(IapPlugin.RequestCallback requestCallback, ProcessType type, String appId, String action, String... productIds)
/**
 * Function for e-receipt verification
 */
void sendReceiptVerificationRequest(String appId, String txId, String signData, ReceiptVerificationTask.RequestCallback callback)
/**
 * Termination function
 * After that, send(request) is unavailable (IllegalStateException occurs)
 */
void exit()
public interface RequestCallback {
    void onResponse(IapResponse data);
    void onError(String reqid, String errcode, String errmsg);
}
Callback for requests (query/payment) must implement the corresponding interface.
The use of IapPlugin.AbsRequestCallback is recommended instead of the direct implementation of the interface.
This abstract class implements IapPlugin.RequestCallback interface and receives request results. If the interface is directly implemented, JSON results can be acquired in the full string text, and parsing must be implemented separately.
If IapPlugin.AbsRequestCallback abstract class is implemented as seen below and passed as parameters at the time of request (query, payment), the request results can be received in the type of Data Class.
Listener is managed as WeakReference, so a listener must not be created and passed as an anonymous class within method. (As of SDK v16.03.00 release, the listener is managed as StrongReference. So the mentioned above is not applicable)
private IapPlugin.AbsRequestCallback mAbsRequestCallback = new IapPlugin.AbsRequestCallback() {
        @Override
        protected void onResponse(Response response) {
            // Receive normal responses
        }

        @Override
        public void onError(String reqid, String errcode, String errmsg) {
            // Error occurs
        }
    };
Error codes and messages are passed through onError() method in RequestCallback interface.
Refer to Reference for onError codes and the definition of messages.
- reqid : request ID
- errcode: error code
- errmsg: error message
This class has the response to your request. The response result includes object-type values. It is sent as parameters on the onResponse call (callback) of IapPlugin.AbsRequestCallback. This class converts the string-type results received from the server into the type of data class.
In the previous versions, developers directly convert the results through the helper package in the sample project. However, a modification is made in the version (16.xx.xx) onward to pass the converted results to the developer. All the fields allow direct access as public.
All the fields could be null. If information is not received from the server, the default value will be null.
public class Response {
    public final String api_version;
    public final String identifier;
    public final String method;
    public final Result result;
    ...
}
public static class Result {
    public final String message;
    public final String code;
    public final String txid;
    public final String receipt;
    public final Integer count;
    public final List<Product> product;
    ...
}
public static class Product {
    public String appid;
    public String id;
    public String name;
    public String type;
    public String kind;
    public Integer validity;
    public Double price;
    public String startDate;
    public String endDate;
    public Boolean purchasability;
    public Status status;
    ...
}
public static class Status {
    public String code;
    public String message;
    ...
}
This enum defines the type of request processing.
public enum ProcessType {
    BACKGROUND_ONLY,
    FOREGROUND_IF_NEEDED,
}
It is recommended to set FOREGROUND_IF_NEEDED by default. In some cases, UI exposure is requested in the processing of request. For instance:
- Permission request screen
- ONE store service(OSS) installation request screen The cases mentioned above exist. If you want stop the request in these cases and receive error, request BACKGROUND_ONLY.
- Initialization
// Declare IapPlugin reference
private IapPlugin mPlugin;

// Declare and create class to receive request results (query/payment)
private IapPlugin.AbsRequestCallback mAbsRequestCallback = new IapPlugin.AbsRequestCallback() {
	@Override
	protected void onResponse(Response response) {
		// Callback
	}

	@Override
	public void onError(String reqid, String errcode, String errmsg) {
		// Error
	}
};

...

// Create object and save reference for requests
mPlugin = IapPlugin.getPlugin(activity, IapPlugin.RELEASE_MODE);
- Payment Request
// Create PaymentParams object for payment
PaymentParams params = new PaymentParams.Builder("OA00123456", "0910012345").build();

...

// Payment request
mPlugin.sendPaymentRequest(mAbsRequestCallback, params);
- Check Purchase History
mPlugin.sendCommandPurchaseHistory(mAbsRequestCallback, ProcessType.FOREGROUND_IF_NEEDED, "OA00123456", "0910012345");
- Get Title/Description
mPlugin.sendCommandProductInfo(mAbsRequestCallback, ProcessType.FOREGROUND_IF_NEEDED, "OA00123456");
- Check Purchase Availability
mPlugin.sendCommandCheckPurchasability(mAbsRequestCallback, ProcessType.FOREGROUND_IF_NEEDED, "OA00123456", "0910012345");
- Change the Status of Purchased Product
mPlugin.sendCommandChangeProductProperties(mAbsRequestCallback, ProcessType.FOREGROUND_IF_NEEDED, "OA00123456", Action.cancel_subscription.action(), "0910012345");
- Function for e-Receipt Verification
//Declare and create class to receive request results (e-receipt verification)
private ReceiptVerificationTask.AbsRequestCallback mRvRequestCallback = new ReceiptVerificationTask.AbsRequestCallback {

    @Override
    protected void onResponse(VerifyReceipt response) {
    	// Callback
    }

    @Override
    public void onError(int code) {
    	// Error
    }
};

...

// Request e-receipt verification
mPlugin.sendVerifyReceiptRequest(mRvRequestCallback, response.result.txid, "OA00123456", response.result.receipt);
- Payment Callback
@Override
protected void onResponse(Response response) {
	// Success code
	final String successCode = "0000";

	// Success confirm
	if (successCode.equals(response.result.code)) {
		// Payment success
	}
}
- • Check Purchase History
@Override
protected void onResponse(Response response) {
	final String successCode = "0000"; // Check success code
	if (successCode.equals(response.result.code)) {
		// Confirm the purchase history of specific product
		// Get the desired product since there are multiple products in the result
        for (Response.Product p : response.result.product) {
            // Check product verification success
            final String successStatusCode = "PH00";
            if (successStatusCode.equals(p.status.code)) {
                //Get the information you want from Product p
            }
        }
	}
}
- • Get Title/Description
@Override
protected void onResponse(Response response) {
	final String successCode = "0000"; // Check success code
	if (successCode.equals(response.result.code)) {
		// Confirm specific product information
		// Get the desired product since there are multiple products in the result
        for (Response.Product p : response.result.product) {
	        // Get the information you want from Product p
        }
	}
}
- Check Purchase Availability
@Override
protected void onResponse(Response response) {
	final String successCode = "0000"; // Check success code
	if (successCode.equals(response.result.code)) {
		if (response.result.product != null && response.result.product.size() > 0) {
            Response.Product p = response.result.product.get(0);
			if (p.purchasability) {
				// Purchase is available
            }
        }
	}
}
- Change the Status of Purchased Product
@Override
protected void onResponse(Response response) {
	final String successCode = "0000"; // Check success code
    if (successCode.equals(response.result.code)) {
        if (response.result.product != null && response.result.product.size() > 0) {
            Response.Product p = response.result.product.get(0);
            final String successStatusCode = "CS00"; // Success result code that indicates the product status is changed
            if (successStatusCode.equals(p.status)) {
                // Cancel auto renewal subscription
            }
        }
    }
}
@Override
protected void onResponse(Response response) {
	final String successCode = "0000"; // Check success code
    if (successCode.equals(response.result.code)) {
        if (response.result.product != null && response.result.product.size() > 0) {
            Response.Product p = response.result.product.get(0);
            final String successStatusCode = "SP00"; // Success result code that indicates the product status is changed
            if (successStatusCode.equals(p.status)) {
                // Success in the deduction of the item
            }
        }
    }
}
- Function for e-Receipt Verificaiton
@Override
public void onResponse(final VerifyReceipt verifyReceipt) {
    // Success code
    final Integer successStatusCode = 0;
    final String successDetailCode = "0000";
    if (successStatusCode == verifyReceipt.status && successDetailCode.equals(verifyReceipt.detail)) {
        if (verifyReceipt.product != null && verifyReceipt.product.size() > 0) {
            VerifyReceipt.Product p = verifyReceipt.product.get(0);
            // Get the information you want from Product p
        }
    }
}
Once the IAP SDK is applied to an App, the App must undergo Self Test before a review request for the App is made. Without the billing log and purchase history generated as a result of normal Self Test (developer center), the App cannot go through the inspection procedure and cannot be published.
Additional tests on the commercial server have a range of restrictions. Therefore, once the Self Test is completed, the inspection request can be made after just switching to commercial server settings.
Select [In-App] tap and click [Test] botton at [My Applications] page

Once [Test] button is clicked, the Self Test window pops up as seen below. Register information to be used for the Self Test, including the MDN (Mobile Device Number) of the test device, T-store Cash, etc. in [Test] tap.
The Self Test is available only when the test phone number registered in the test device is used.
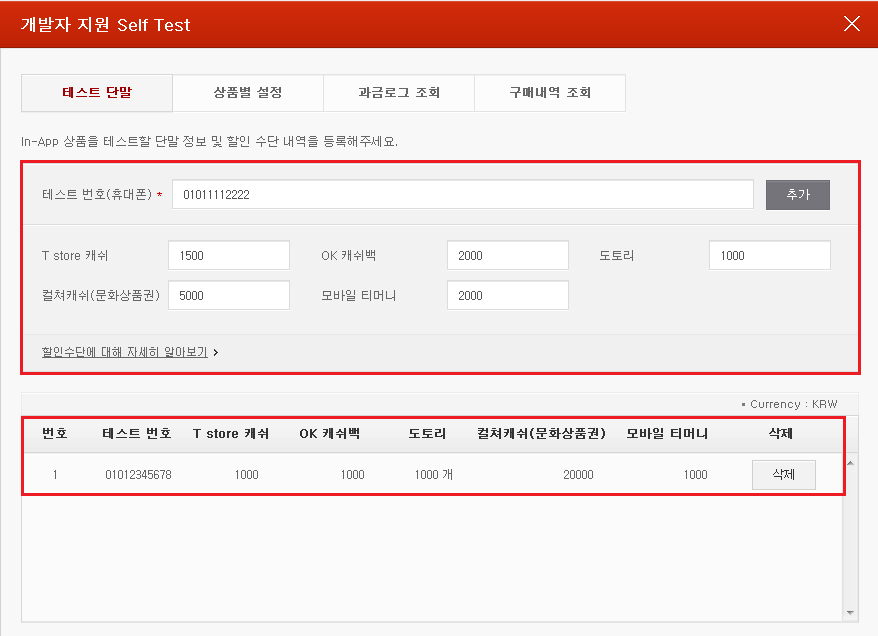
Set Required Self Test
If you have difficulty in performing the Self Test as a foreign developer or you use the devices that are not supported by ONE store, use “IAP Setting App”, and you can run a normal test. Download the App above, and set up the App following the instructions below.
- Check "Enable Setting".
- Set up "Mobile Operator (Carrier)"and enter "Mobile Phone Number(MDN)".
- Click "Save" button and save the setting.
- Set "Foreign dev mode" to "true" at "Setup State".
- Turn off Settings App and test the App
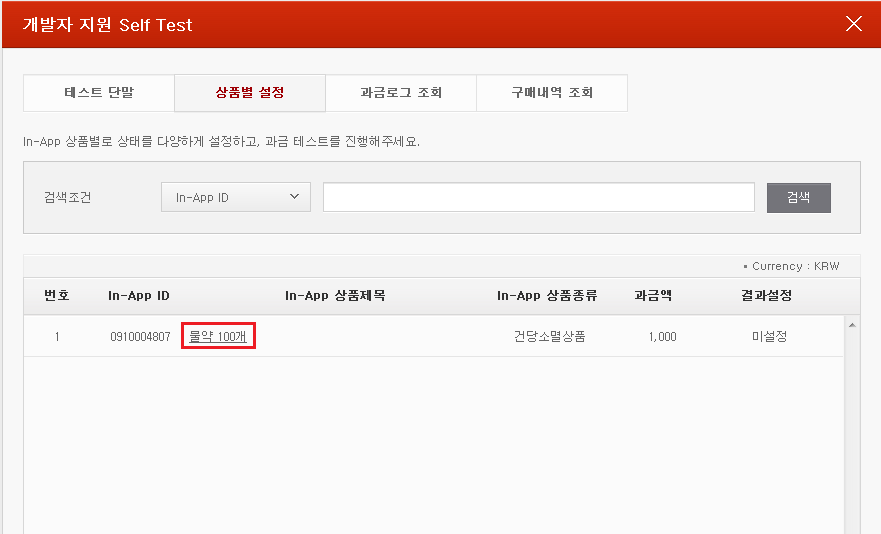
[Settgin per In-App] tap in the Self Test pop-up window shows a list of In-App products for an App you want to test. Select any In-App products in the list that you want to test and move to the page to configure the test environment for indicidual In-App products. If you click [In-App Title], you can move to the test configuration page.
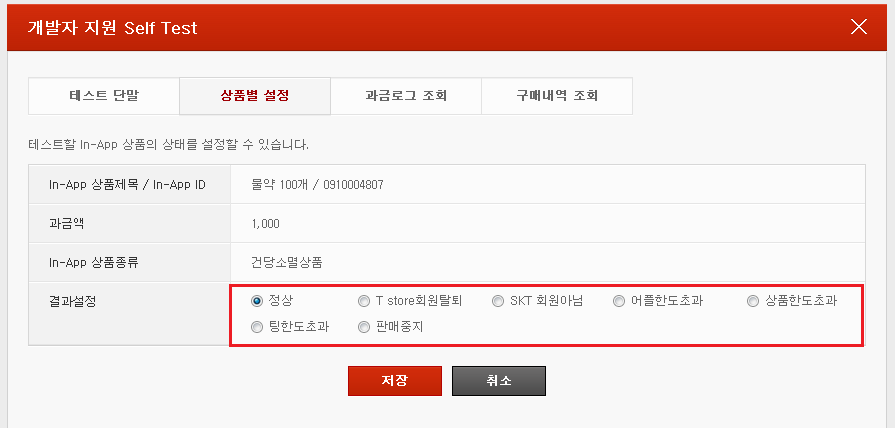
You can test various situations in the test configuration page for In-App products. If you choose one of the values shown in [Customized Result] and click [Save] button, you can move to the previous In-App product list.
Billing can be made only when “Normal” is selected in [Customized Result]. Billing cannot be made when the rest of the values are chosen.
Run a completely-developed App, and then purchase/test an In-App for which Customized Result is already set. Once the payment is successful, the test result of the corresponding In-App product is changed to Y as seen below.

In [Billing Logs] tap in the Self Test pop-up window, you can confirm the test result according to the test configuration, which was set in the previous stage. [Customized Result Billing Test Result] row shows the value of “Customized Result”set in the previous stage and the “Succes” or “Failure” of the billing test.
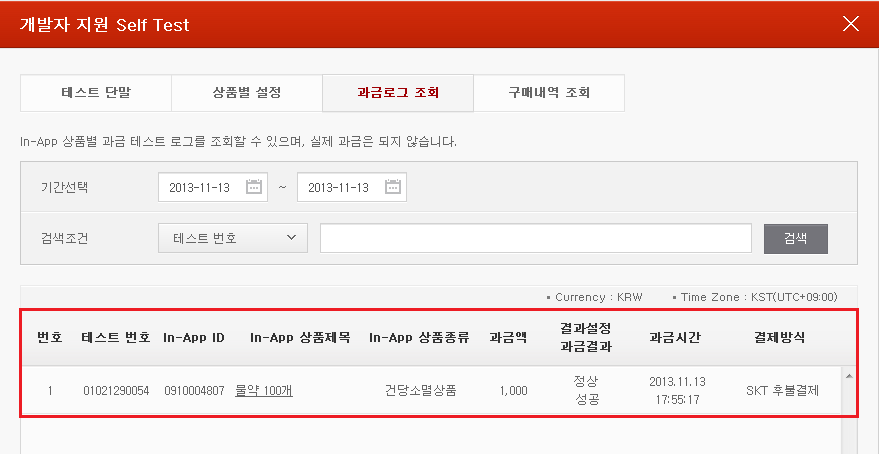
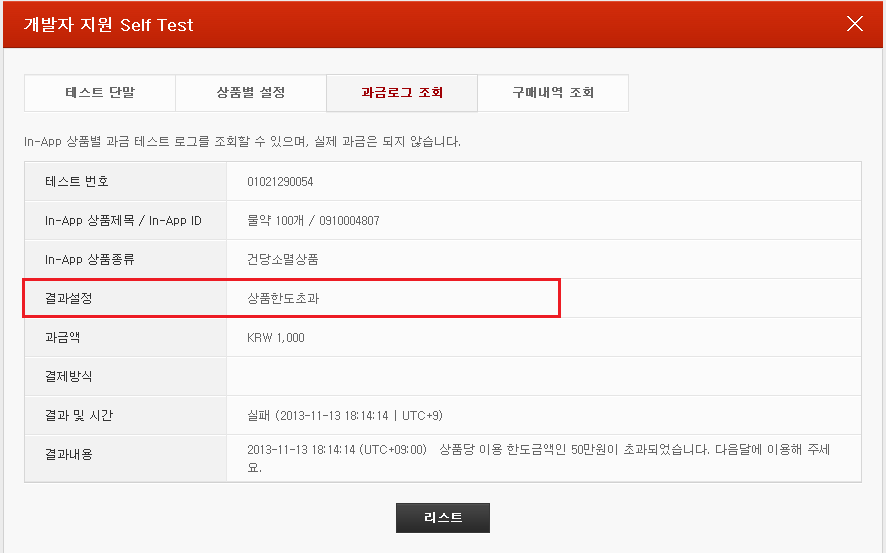
If you want to check the details of billing failure log, please select a billing log, which has a billing test result of “Failure”. You will be moved to the detailed information log tab and can identify the cause of error as seen below.
The status of App determines if the commercial test is available or not.
- Draft : the test is not available. -1001 error occurs in the process of connecting to the IAP SDK refer to IAP Reference Result Code
-
In Review
- As for reviewing a new App: the test is not available (no App is published)
- As for reviewing an App update: the test is available only for Published App
- Published : the test is available
You can distribute and publish Apps after completing the commercial payment test through App Review in ONE store developer center. Once the Self Test is completed, the developer is required to build the App and request review after changing the development server settings applied to the App into the commercial server settings.
[Request for Review] button is activated only when the test results of ALL In-App products are “Y”. Otherwise, the button is not activated.
For more detail, refer to IAP Developer Guide
// For debug
//mPlugin = IapPlugin.getPlugin(activity, IapPlugin.DEVELOPMENT_MODE);

// For commercialize
mPlugin = IapPlugin.getPlugin(activity, IapPlugin.RELEASE_MODE);
For the user who requests purchase cancellation for reasons, such as the items not provided in the App that he/she purchased, the cancellation procedure is as follows:
- The user sends a purchase cancellation request to the developer or ONE store customer center.
- The developer identifies the purchase history at the developer center and makes a request to cancel the purchase.
- ONE store’s department in charge confirms the request and addresses the cancellation of the purchase.
You can identify the customer’s purchase history as follows:
- Developer Center > Customer Support > Manage TxID Purchase History
- Developer Center > Directly Inquire > Voice of Customer (VOC)> See Details (pop-up)
Fore more detail, refer to CS Developer Guide