3 Create a virtual layout - Novakasa/brickrail GitHub Wiki
Layout Modes
Brickrail has two main layout modes. You can change modes by switching between the center tabs on the top of the viewport.
- "edit" mode is for editing the layout, adding trains or changing some block settings.
- "run" mode is for actually running your trains or manually switching switches. While trains are currently navigating the virtual layout, you won't be able to switch to "edit" mode.
To create your layout, make sure that you are in "edit" mode.

Drawing track
You first start to create your layout by creating some track. In "edit" mode, right click and hold, then dragging the mouse over some cells will draw connected track. What tracks are drawn depends on which cells you move your mouse over. If you right click and hold over existing track, you will connect your new track to this track, which automatically creates switches.
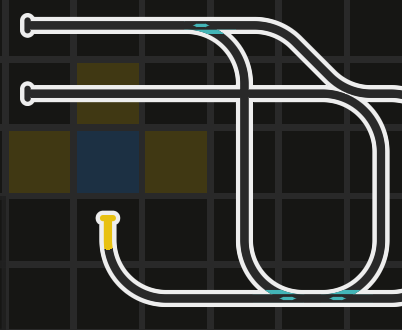
You can also cross existing track using new tracks. Note that as long as one train reserves its track running over this crossing, no other trains will be able to run through the crossing. If you have bridges or tunnels in your layout, you may want to use different layers.
Layers
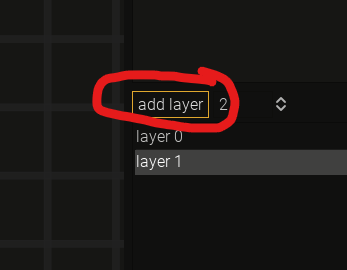
At the lower right panel, you can add a new layer to your layout. This feature is intended to be used with multi-layered layouts. This can also help with modeling bridges or tunnels in the layout.
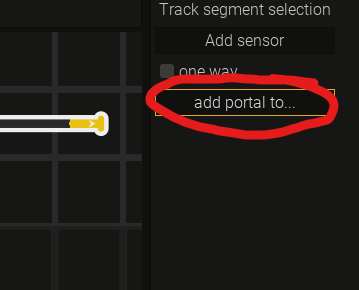
To connect track between layers, you will need to create a "portal". A portal can connect any two loose track ends with each other. To create a portal, left click on a loose track-end you want to connect, then click the "add portal to..." button in the inspector panel to the right. Then, click on another loose end track to create the portal. To create a portal to another layer, you need to switch layers after clicking "add portal to...", then click the other loose end.
Creating blocks
Blocks are essential for train automation in brickrail. Only in a block, a train is able to stop or switch directions. While in a block, a train does not block track between blocks, which enables other trains to navigate these sections. Generally, for flexible operations you want to have as many blocks as you can fit your layout.
However, when planning your layout make sure that you can guarantee that all your LEGO trains will fit entirely within a block and that they are not too close to switches, so that a parked train will not interfere with other train routes.
To create a block, you first need to select a section of track that will be the basis of your block. To do that, left click and hold on a track segment, then drag the mouse over connected track until you have selected the section you want. Then release the left mouse button. You will notice the "create block" button in the inspector panel to the right of the viewport. Click this button, type in a name and click OK to create the block.
Logical blocks
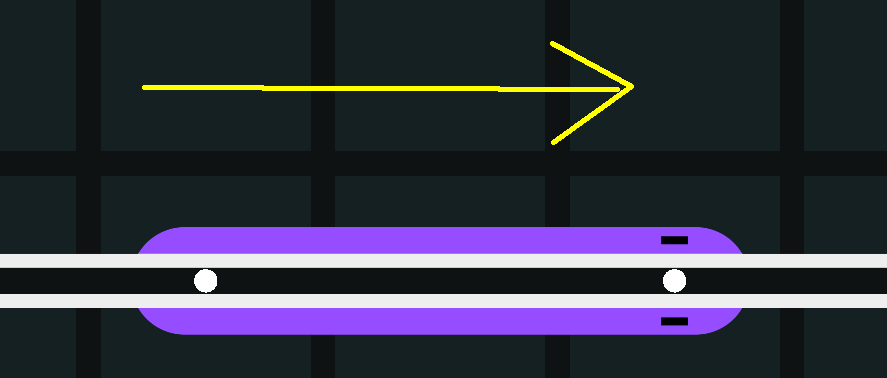
Every block consists of two different versions of itself, representing the two different possible direction a train can enter. Which block you selected is evident by the "plus" or "minus" symbols rendered on the end of the block.
These screenshots illustrate how the location of the +/- marker coincides with which train direction this logical block is responsible for:
If the +/- sign is on the left, this logical block applies its settings to all trains that will arrive from the right and leave to the left:
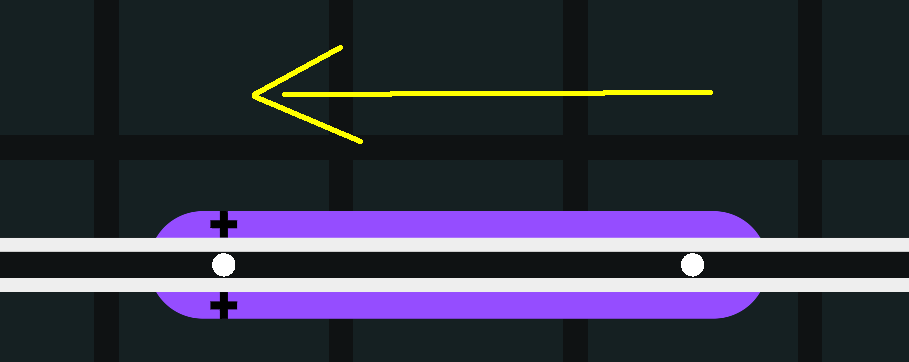
Whereas if the +/- label is on the right, this logical block applies its settings to all trains that will arrive from the left and leave to the right:
If a train changes directions after arriving in a block, it will switch to the opposite logical block. For the block in the screenshots, if a train arrived from the left, it's current block is the "-" logical block. After the train reverses, it's current block is the "+" logical block.
Block settings
To change the block settings, left click the block. Note that depending on which side of the block you click, you will select a different logical block.
There are two checkboxes in the logical block inspector, "can stop" and "can flip".
Disabling "can stop" will disallow any train to stop in this logical block from this direction. This can be useful in automated operation when certain blocks represent bottlenecks in your layout. If a train were to stop there, many routes would be blocked for other trains, so to prevent that we can disable "can stop" on this block, thus only allowing trains to enter if they pass this block or immediately change the direction after entering. This setting, as any block related setting only applies to this logical block, so if the train enters from the other direction, it may still be allowed to stop.
Disabling "can flip" disallows a train to change direction in this logical block. This is intended to be used in combination with "can_stop" with blocks that are on a gradient, where it is important that the train never slows down in this block, making climbing gradients easier. Once again, this setting only applies to this logical block, so if a train enters from the other direction it may still be allowed to change direction.
Trains
You can create a virtual train by clicking on a block and clicking "add train" in the inspector to the right. After entering a name for this train, the train will be created. Which logical block you selected will determine which orientation the new train will have.
You can left-click the train to change its various settings.
Note: At the time of writing this, physical layouts were tested mostly with trains that had the "Only forward" setting turned on. This means, that leaving "Only forward" off, allowing trains to change directions, is considered an experimental setting and it is quite likely that you might encounter bugs and unintended behavior. This will improve in the future.
Layout sensors
Layout sensors, while having sensors in the name, actually are not sensors in the classical sense. They represent locations on the track which are reported when a train passes this location. In real life train operations and model train layouts, these usually are physical sensors that are situated on the track. However in brickrail the physical sensors are mounted on the trains and detect color markers on the track. Since in the future we may support also mounting stationary sensors on the track, these locations are called sensors, while in reality they are only colored markers on the track.
Sensors are automatically created in the layout when you create a block. The two white circles at each end of the block represent these sensors. Depending on which direction the train enters from, the first sensor will signal the train that it has "entered" this block, while the second one will signal that the train is "in" the block. If the train plans to stop within this block, it will slow down after the "entered" sensor and will stop after the "in" sensor.
You can also manually create a sensor by clicking on a track segment and clicking the "add sensor" button in the inspector. The purpose of additional sensors will become clear below.
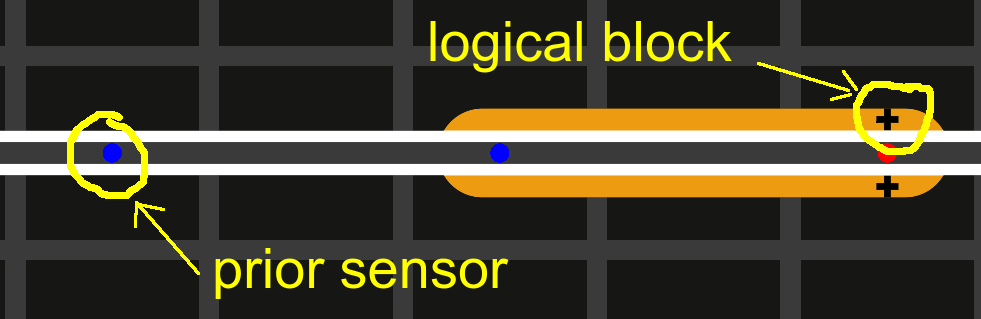
Prior sensors
If a train runs backwards, its sensor is positioned at the back of the train relative to its heading. This means that already the first sensor of a block will signal that the train is "in". This means that a "enter" sensor was never triggered, and the train never slowed down before it is supposed to stop. This still works well enough in a lot of cases, but if that is a problem for you, you may want to use a "prior sensor". A prior sensor is a sensor that is positioned before a block, to make a early "enter" signal possible when a train is diving backwards. When a train is driving forwards, it will simply ignore this "prior sensor".
To create a prior sensor, click on a logical block and click the "add prior sensor" button in the inspector. Then click on a track segment, which will create the prior sensor. This will associate this sensor only with this logical block, so if you want to add a prior sensor when entering from the other direction, make sure to click the other logical block and add a prior sensor there as well.
For example, in this screenshot the proper location for the prior sensor for the "+" logical block is shown:
On the same block, this would be the proper location for the "-" logical block:
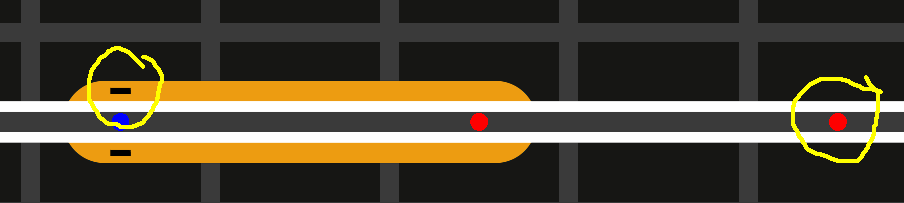
The labels of "+" and "-" might be flipped for your block, it is only important that the prior sensor is on the opposite side of the block compared to the logical block label.
Sensor speed
Sensors also can help you control the speed your train will use after passing this sensor. Clicking a track segment that has a sensor on it will reveal some settings associated with the sensor. Depending on which logical track you selected, these values are also direction-dependent. You can select a different sensor speed depending on which direction the train is passing from. This especially helps with navigating gradients. If you have a marker on a gradient in your layout, make sure that you select the "fast" sensor speed in the direction of going up the gradient, while setting the speed to "slow" in the other direction, which will help the train not derail on curves after going down the gradient.
Note that sensor speed only applies when the train is passing this location. If the sensor is part of a block or is a prior sensor of a block, the train will still slow down or stop after this sensor depending on whether it is a "enter" or "in" sensor of the block it plans to stop at.
Sensor color
You may also have noticed that you can select different colors on a sensor. This is the color that the train expects the marker to be. If you leave the color at "None", the train will not care which color the marker is and only detect the marker using it's high chroma value (bright and saturated). If you select a color for this sensor, the train will confirm whether it sees the correct marker. If the marker it sees doesn't agree with the sensor color you select in brickrail, something has gone wrong. In the future, the layout will trigger an emergency stop for all trains, as this situation may mean that the trains are not in the locations where the PC thinks they are.