How To's - Nick-1979/polkadot-Js-Plus-extension GitHub Wiki
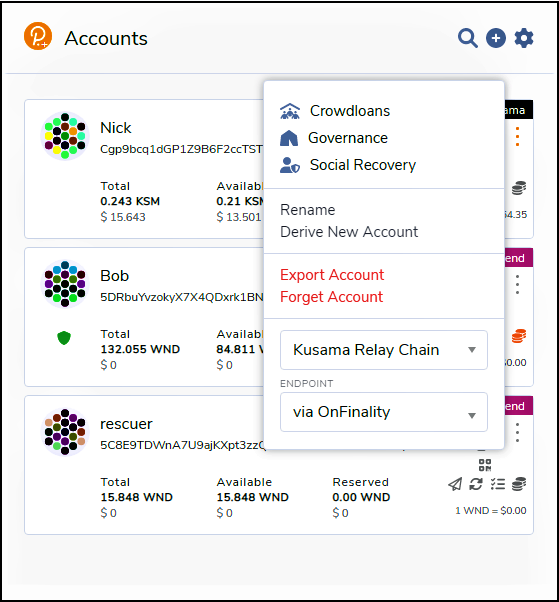
Accounts page
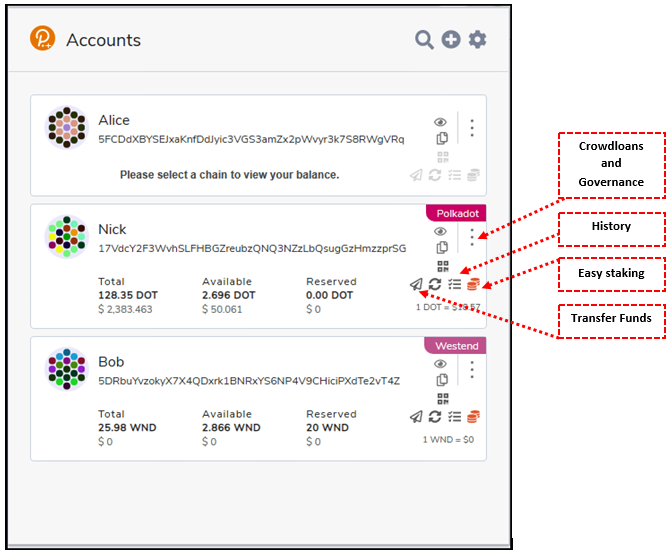
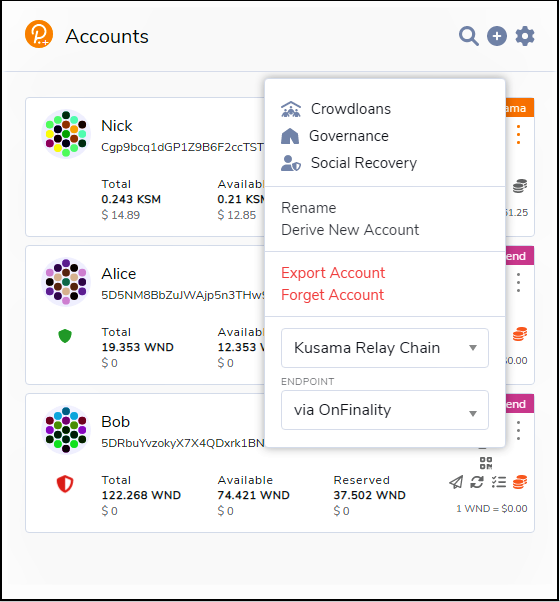
It shows the list of all accounts and their balances (total, available, reserved and USD equivalents), which you have created/imported on Polkadot/Kusama blockchain and parachains. Moreover the transfer, refresh, QRcode and staking icon buttons allow to a user to easily access these new features. The orange staking button indicates that the account has some coins staked.
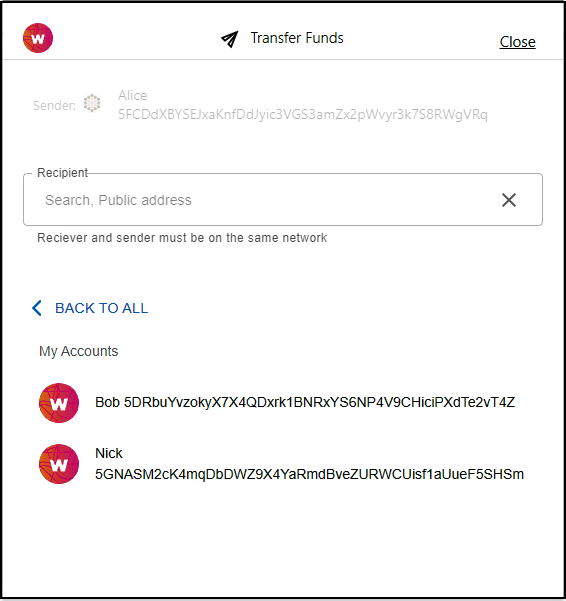
Transfer funds
Add a recipient, can be chosen from local accounts to transfer between your accounts or enter a recipient on the same chain manually:
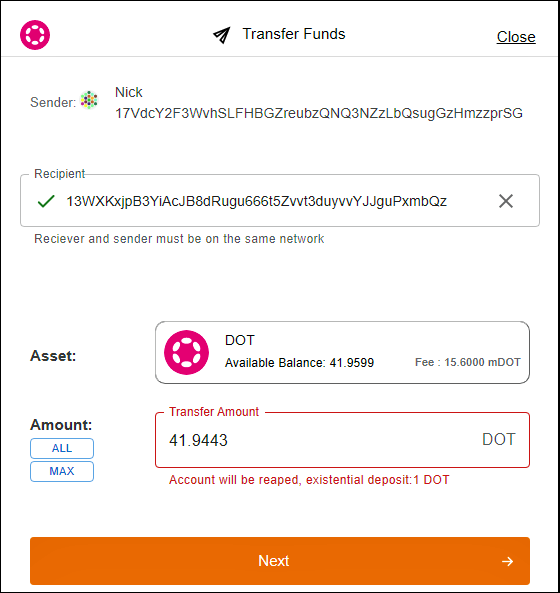
While Choosing an amount to transfer, the extension shows appropriate alerts based on your input. Max and All buttons are available to withdraw Max/All amounts from your account.
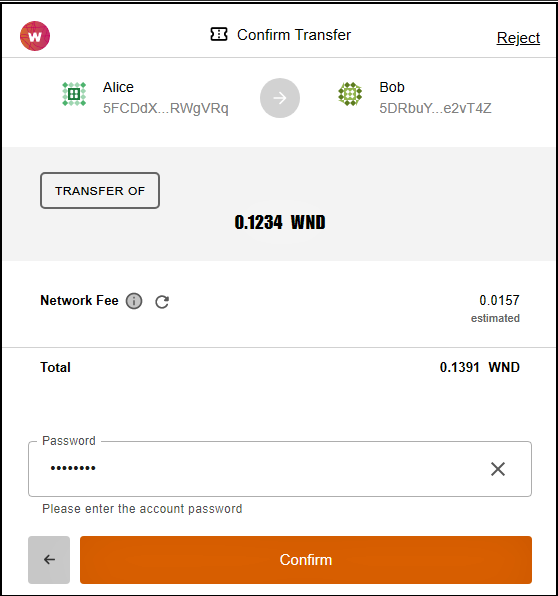
In transaction confirmation page, confirm the transaction to broadcast it on the blockchain by entering your sending account's password.
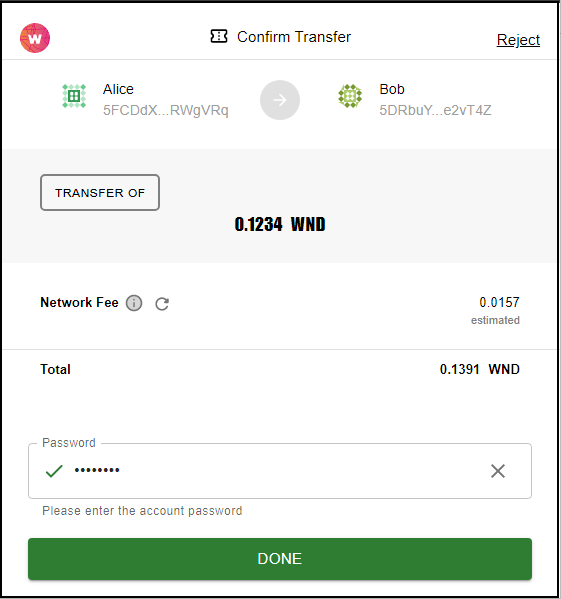
After a little while, depending on the network response time, transaction will be done, you see the following page and your balance(s) are updated.
Transactions' history
It can be accessed from the account page, which shows transactions history including transaction type, status, failure reason, time and date and a link to each transaction detail, as well as a Subscan link for more info.


QR code
Entering the crypto address is error prone, so it is useful to use the QR code for scanning by a mobile wallet.

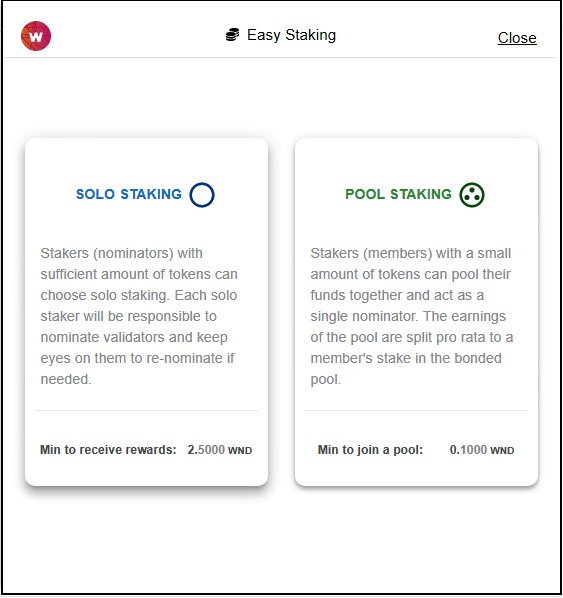
Easy staking
Now, you can easily stake using the Polkadot JS Plus extension. There are two options for staking, solo and pool staking:
Solo Staking
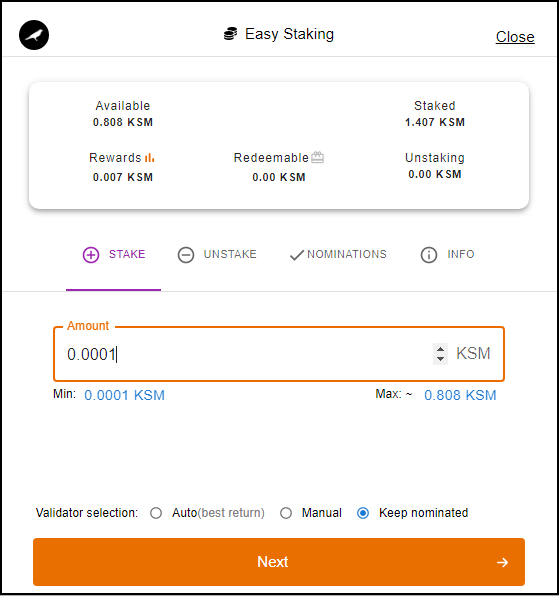
Stake solo
For solo staking, you just need enter the amount you want to stake and choose auto mode, it will do the rest.
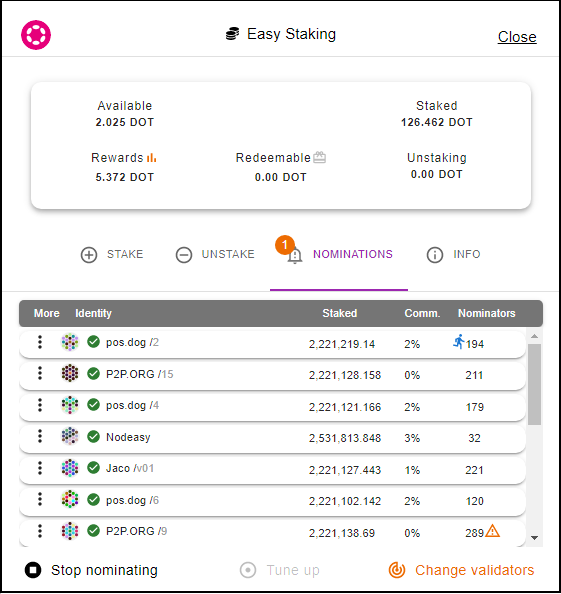
Nominations
View your nominated validators info, even edit the list of the validators or stop nominations. helpful notifications are also available such as oversubscriptions, no active nomination, etc.
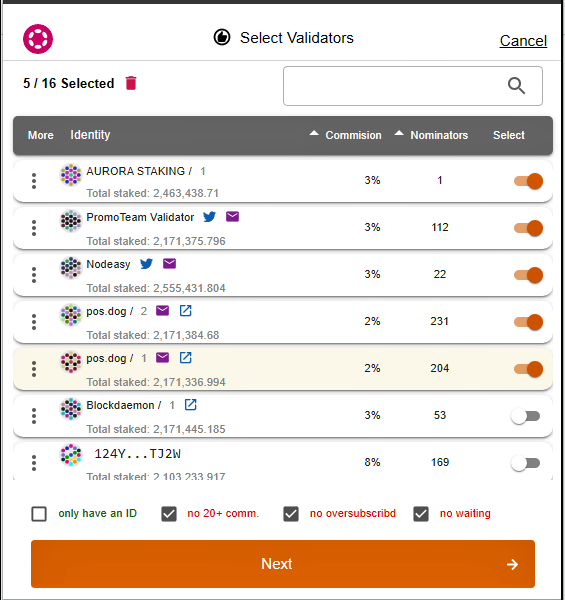
Validator selection
Nominate validators automatically or select them yourself.
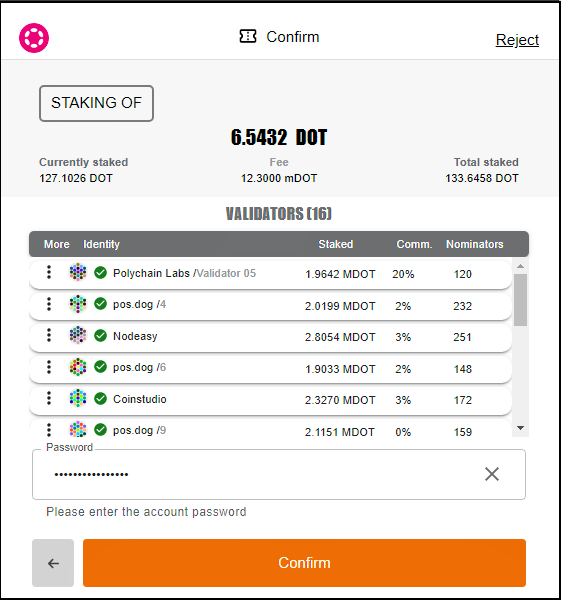
Confirm staking
Finally confirm staking/unstaking/redeem/nominations or TUNE UP similarly.
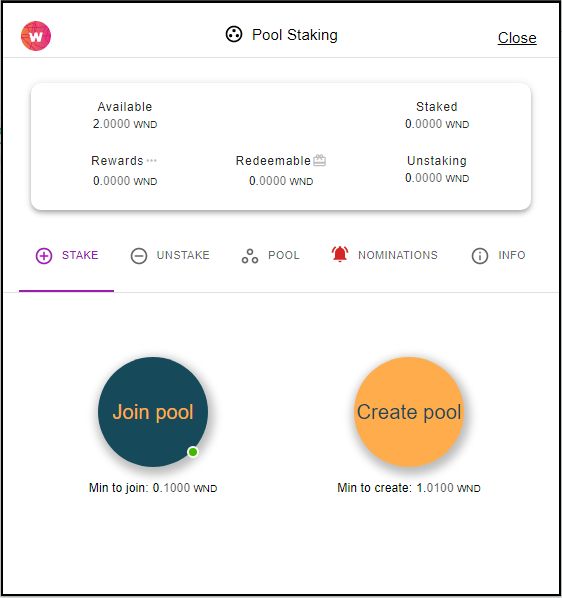
Pool staking
Stake
In pool staking, at the first time you have two options, joining an existing pool or creating a new pool:
Join a pool
To join a pool, enter the stake amount and select a pool to join, hit next, confirm your choice in the confirmation page.

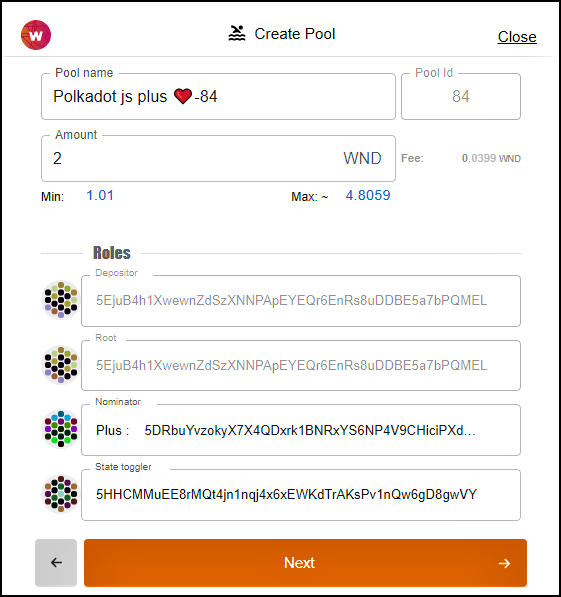
Create a pool
To create a pool, enter a pool name and stake amount. Some roles can also be defined such as pool nominator, or state toggler, then click next and go to confirm page.
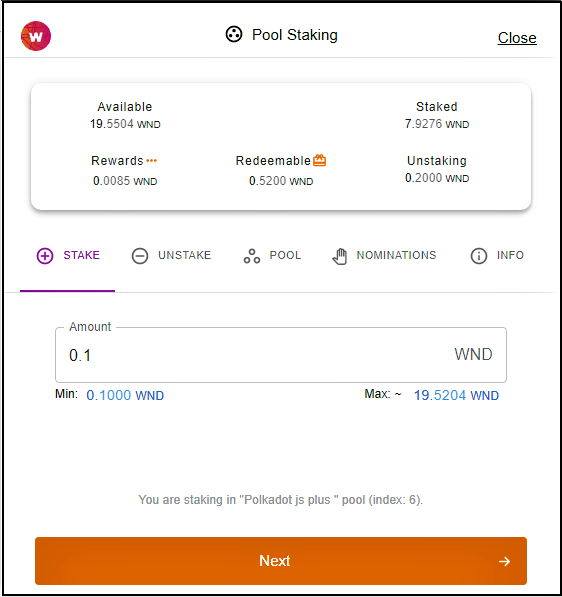
Stake in pool
After the first selection between joining and creating a pool, you will be a member of the pool. Afterwards, when you want to increase your stake amount, you can go to the stake tab:
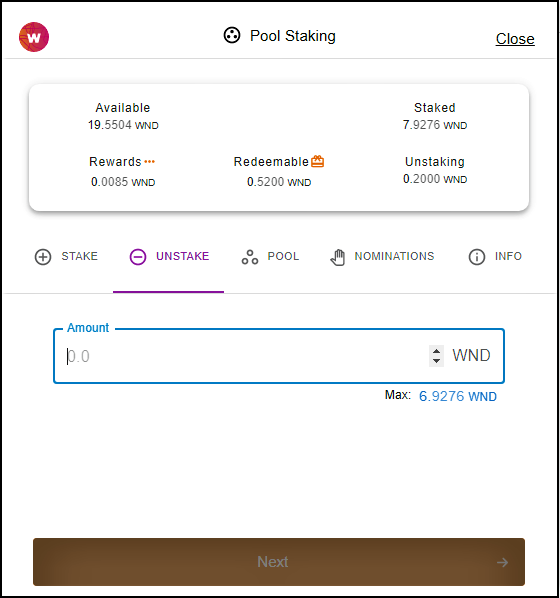
Unstake from pool
To unstake some of already staked amount, just enter an amount and go to the confirm page:
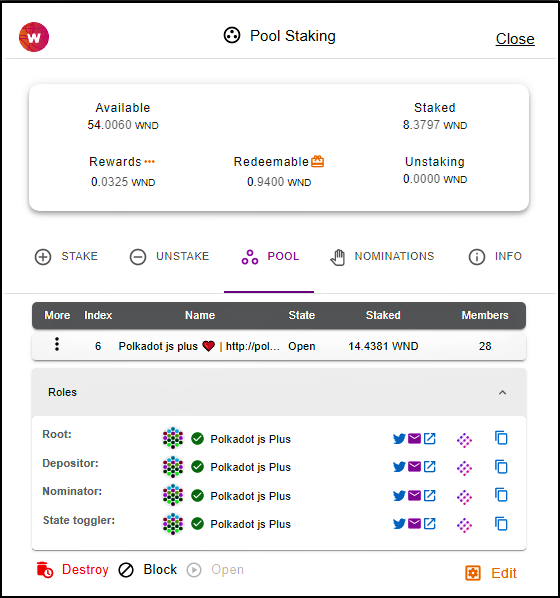
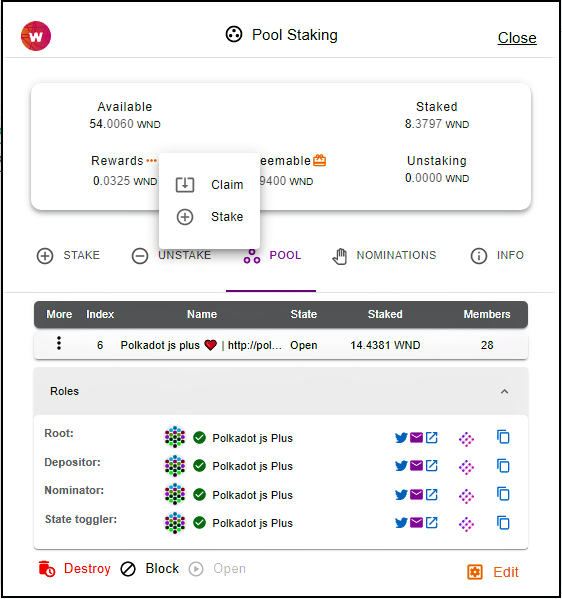
Pool Tab
The pool tab shows the pool in which the account is a member, where an authorized pool member can change the status of the pool.
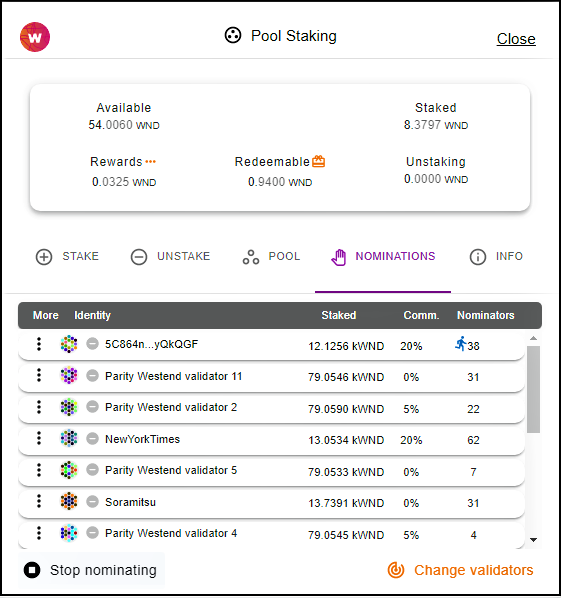
Pool nominations
The selected validators of a pool is depicted here, where the pool's root and nominator roles can change/set those nominations.
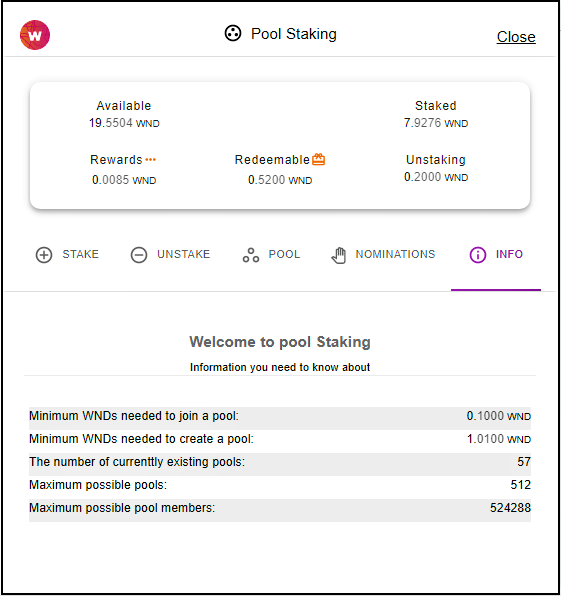
Pool info
Some useful information about pool staking is summarized in the tab such as minimum to join a pool and minimum to create a pool.
Reward decision
your claimable rewards, can be claimed or staked again. By clicking on the dots near the "rewards" label, which shows your already claimable amount, you can choose what you want to do with your claimable.
Confirm page
Any actions which needs to be applied on-chain needs users' confirmation. Fore example in the following photo you see the confirmation page of pool state changing to destroying.

How can leave a pool
To completely leave a pool, if you are just a member (not root) of a pool, you need to unstake all of your amounts first, then wait for unlocking period which is 7 days on Kusama and 28 days on Polkadot. After that your tokens will be redeemable. Redeem your tokens using the button next to the Redeemable label, and confirm it. Finally, you left the pool.
Notice, if you are the root of a pool, you need to change the state of the pool to destroying first, then after leaving all the members, the root can leave the pool too, by unstaking and then redeeming.
Crowdloans
Contribution in crowd loans now is possible via the extension, go to 'crowdloan' menu:
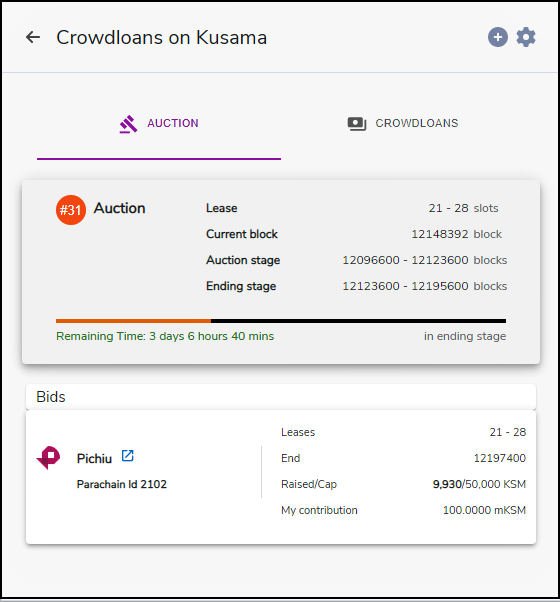
Auction
Auction information and the bids if there is one will be shown.
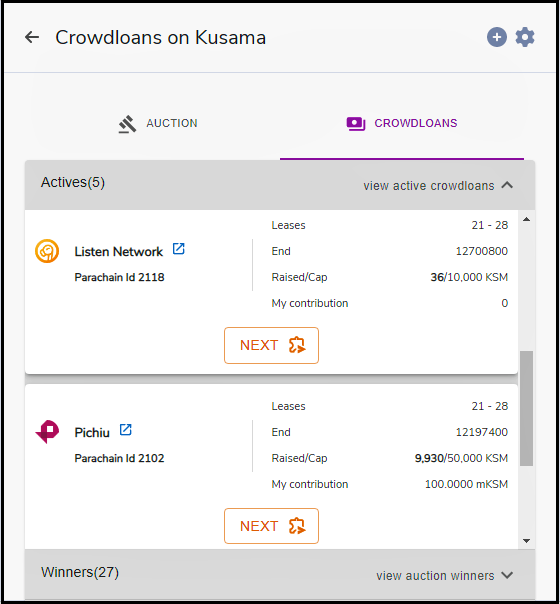
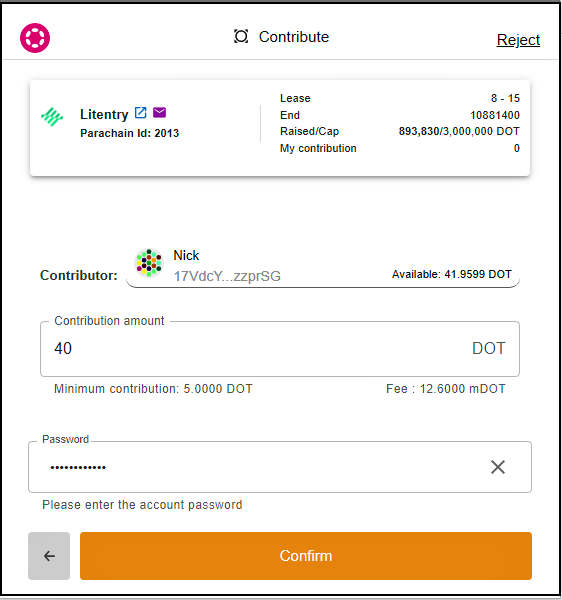
Contribute to crowdloans
Choose an active crowdloan and hit next button.
Enter the contribution amount, consider the minimum, and confirm it.
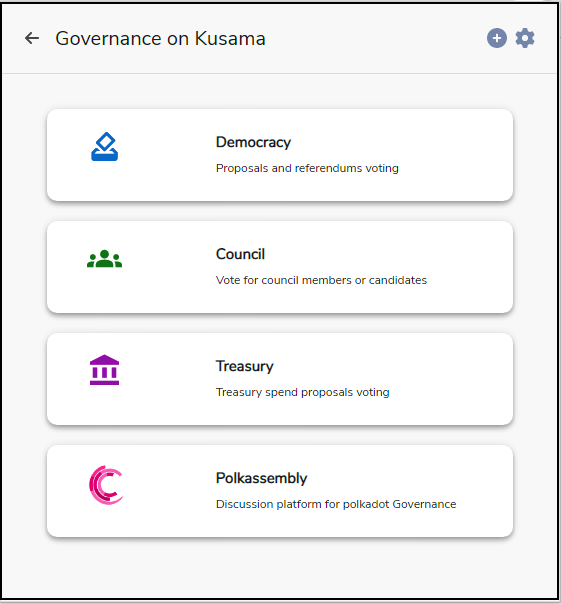
Governance
Kusama/Polkadot governance is accessible via account menu.

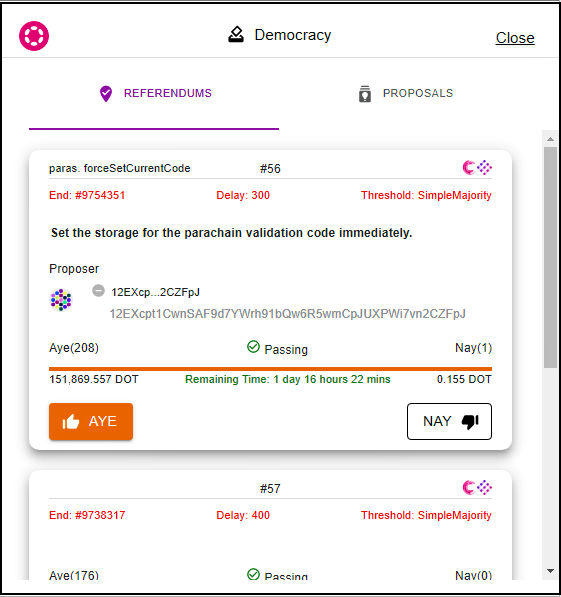
Referendums
All active referendums listed with useful information are available via Democracy menu, where every token holder can vote.
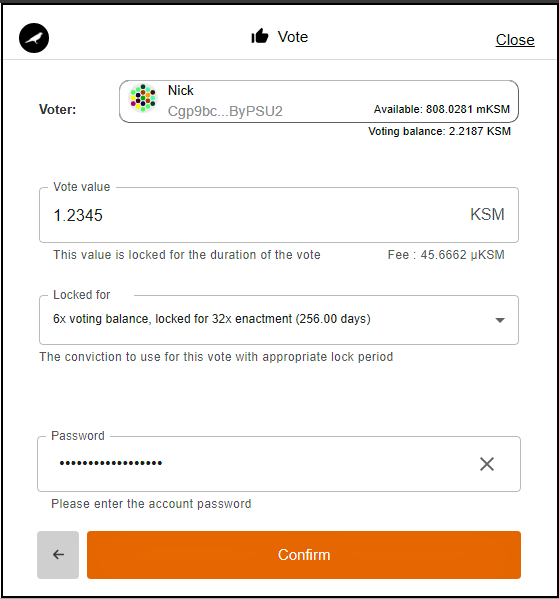
Vote a referendum
Enter a vote value and determine the lock period for that amount, then enter the password to confirm your vote.
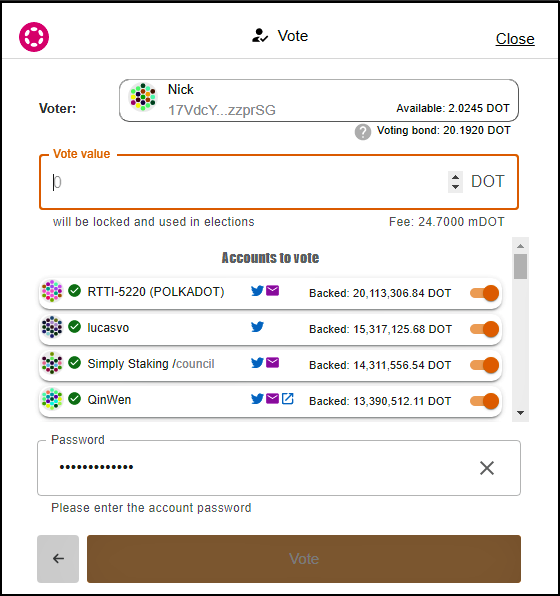
Councils
viewing council members/runners-up/candidates information, and voting them.
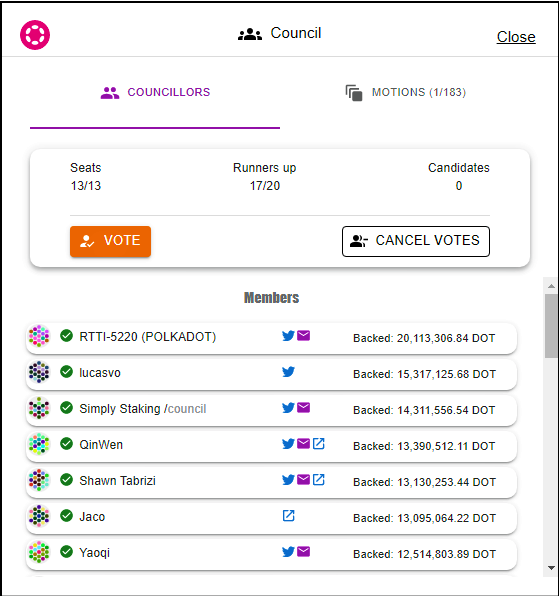
Enter a vote value, and select the members, note the order is important, also consider the voting bond.
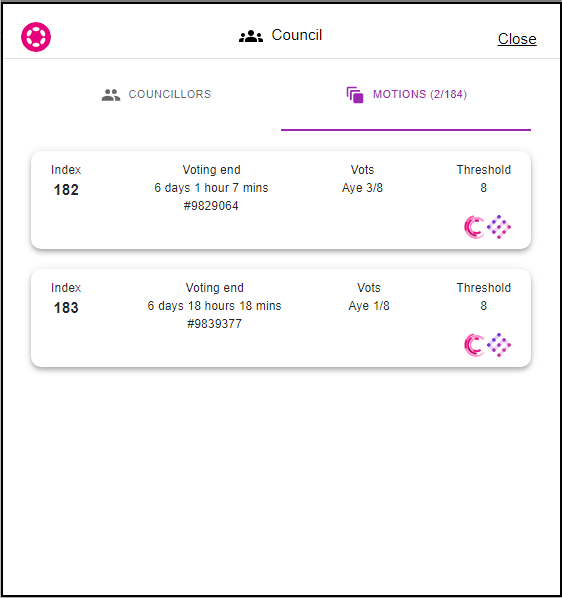
Motions
viewing council motions information and links for more information.
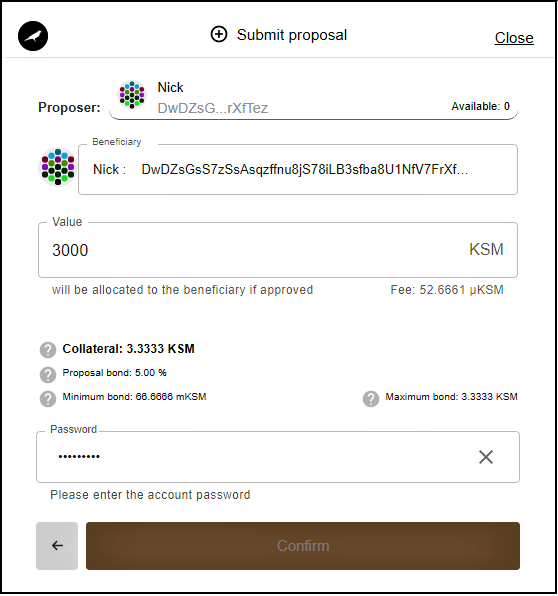
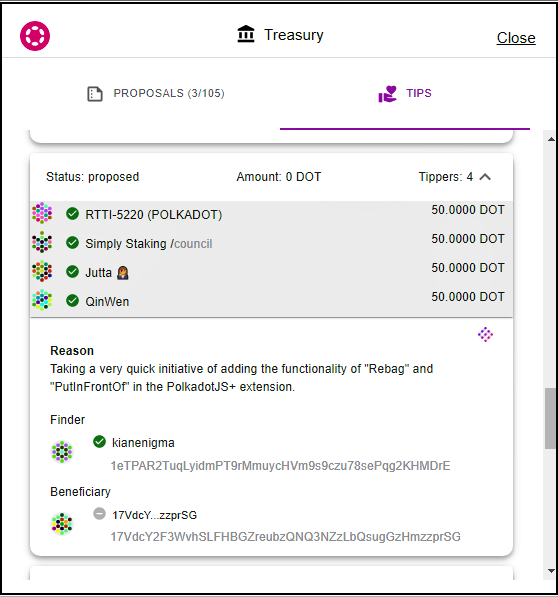
Treasury proposals
viewing proposed proposals information and able to submit a new treasury proposal.
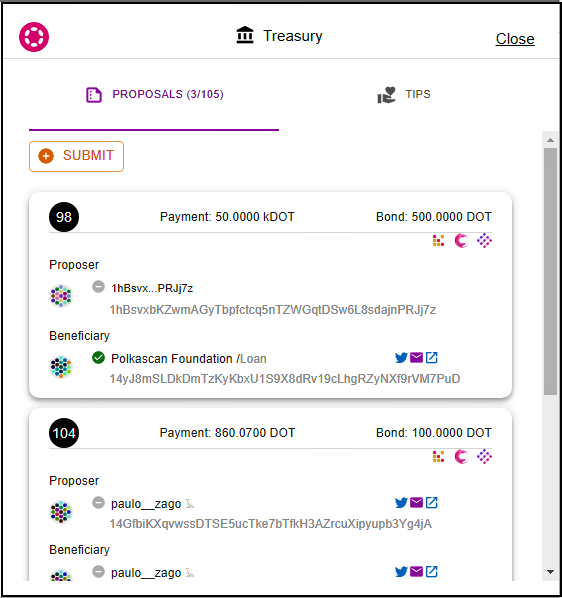
Determine a beneficiary account and enter the requested amount, consider the collateral to submit a treasury proposal.
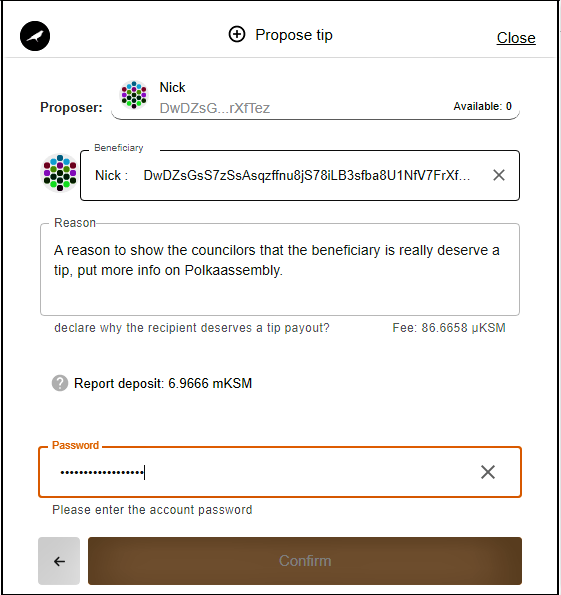
Tips
viewing treasury tips information and able to propose a new tip.
Proposing a new tip, by determining the beneficiary address and set a reason, while considering report deposit.
Social recovery
Managing your own private keys is a difficult task. The average person doesn’t want to spend multiple hours to ensure the security of their keys. This leads to people having difficulties to join the blockchain space or even worse leads to the loss of funds. Social recovery is the solution. It allows users to recover their accounts if their key or other authentication mechanism has been lost.
To be able to recover your lost account, the account should be a recoverable account.
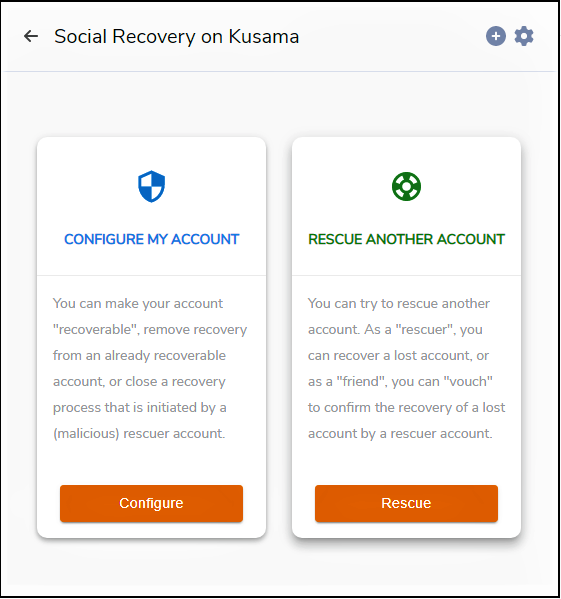
To make your account recoverable, go to social recovery menu for your account:
As you can see, you have two options, configure your account or Rescue another account, now select "Configure my account" to make your account recoverable. A recoverable account can be recovered whenever you lose it with the help of your social friends.
Configure My Account
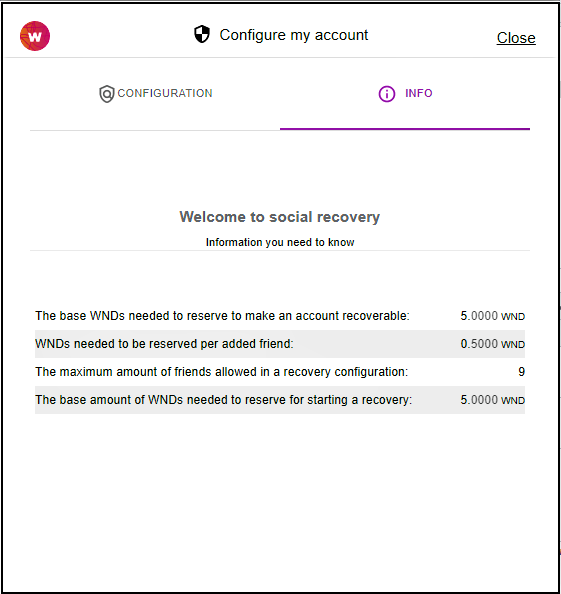
Info tab
Here you can find some useful information about the social recovery, like "The maximum amount of friends allowed in a recovery configuration".
Configuration tab
Make Recoverable
In configuration tab, you can configure your account to be recoverable by:
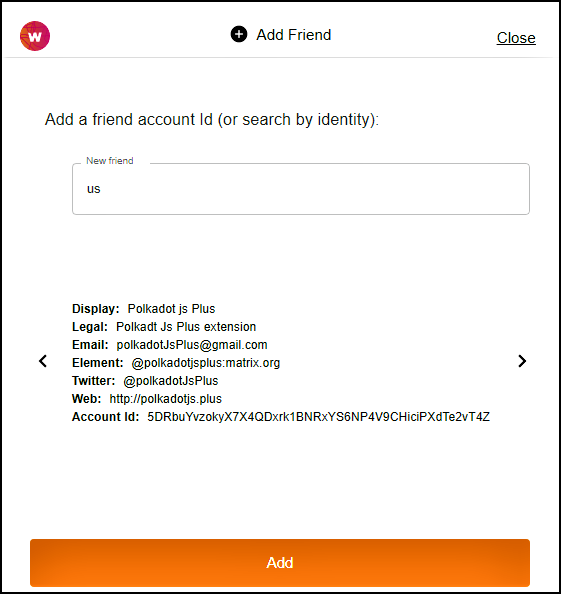
- adding some friends' accounts, which will help to recover the account when needed
- set a threshold for friend's vouch, which is the number of vouches that is to be reached to recover the account
- set a delay period, the days after a recovery attempt is initialized that needs to pass before the account can be recovered
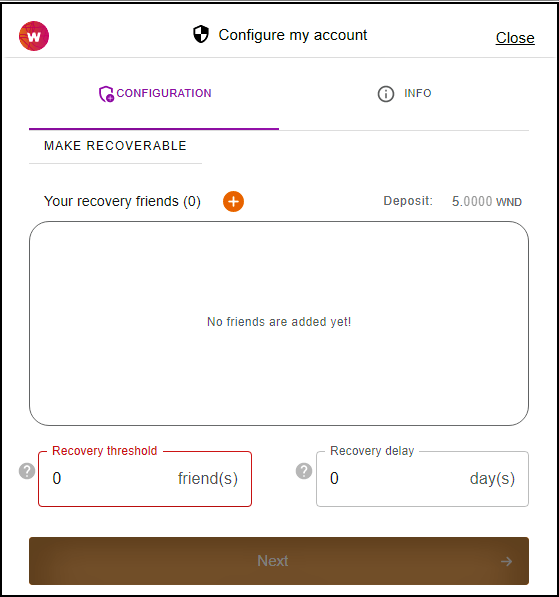
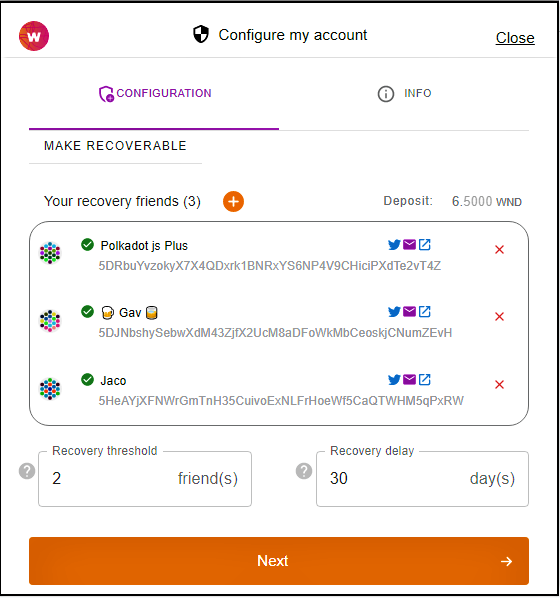
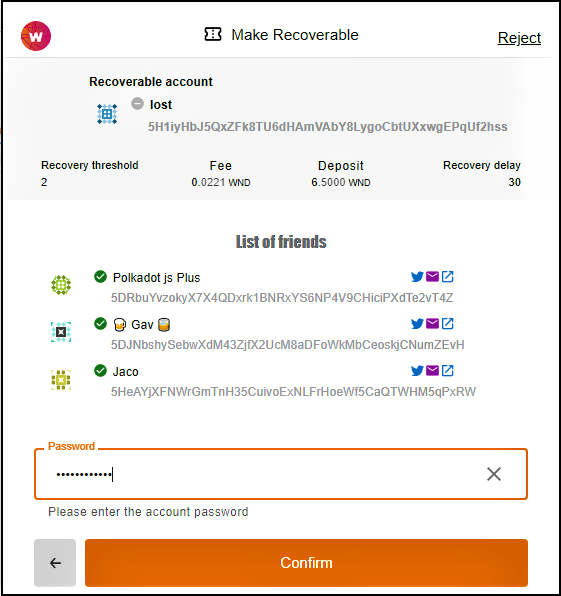
when you have completed the make recoverable form you can submit it by entering your password and hit the confirm button. Some tokens will be deposited to make your account recoverable, the amount of deposit depends on the number of friends you have selected.
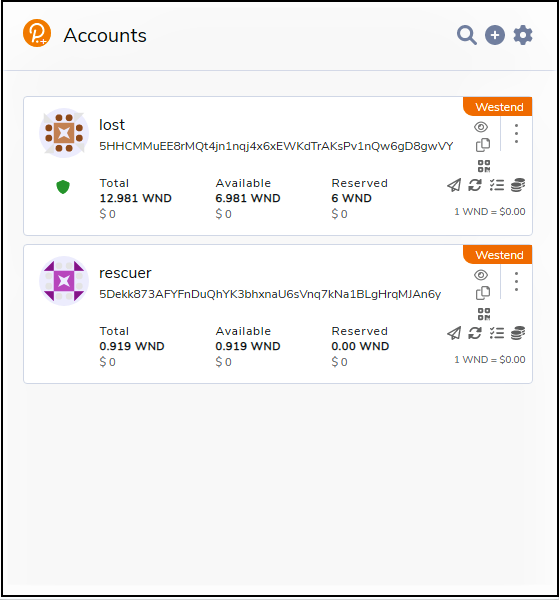
When an account is recoverable, we show a green shield icon next to that account on the Accounts page:
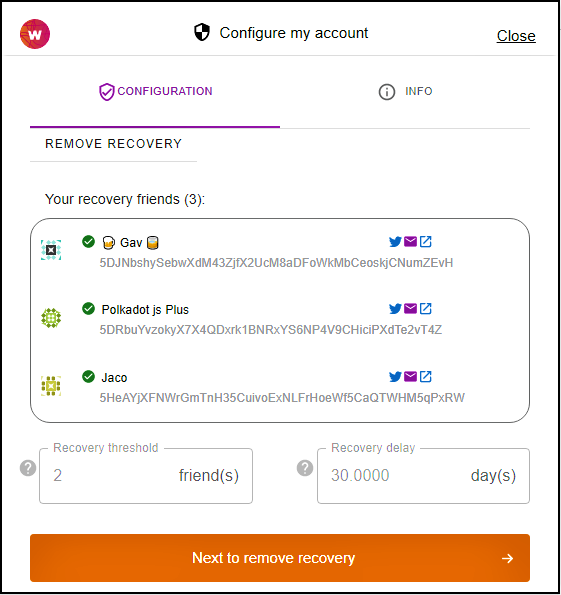
Remove Recovery
For whatever reason, if you don't want your account to be recoverable, you can go to the configuration tab and remove recovery, which will unlock your deposit.
Rescue another account
If you lost your account, you need to create a new account, which we call rescuer, and choose "Rescue another account" option in social recovery. Here you see two options, as a rescuer you have to do some steps to recover a lost account, and as a friend you can vouch for a recovery.
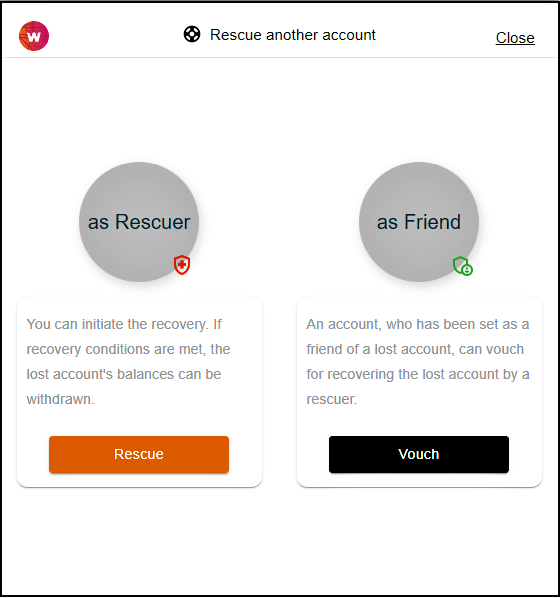
As a Rescuer
A rescuer is who wants to recover a lost account. He needs to follows 3 steps as described below to rescue a lost account.
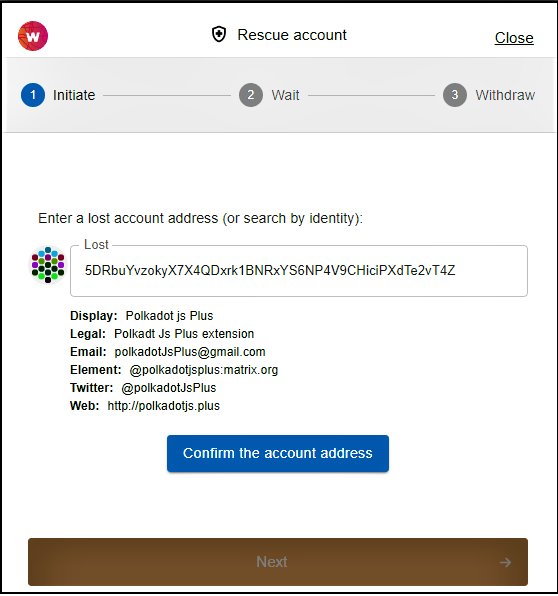
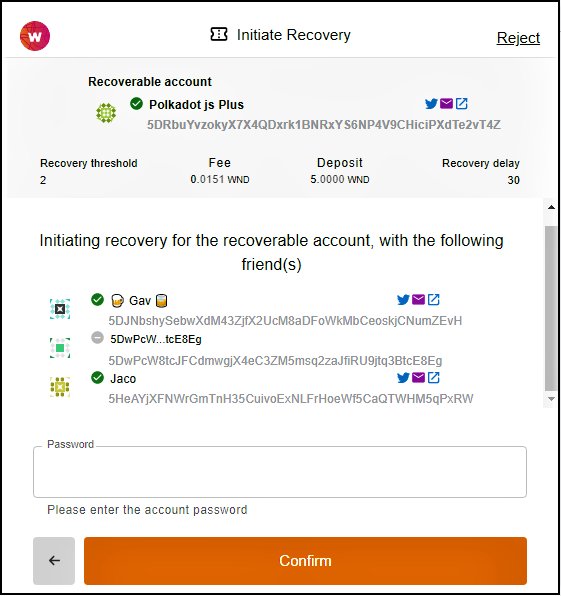
Step 1: Initiate Recovery Process
As a rescuer, at the first step, you need to initiate the recovery process for the lost account, and confirm it. The rescuer needs to deposit some tokens, and in a successful recovery process, these tokens will be transferred to the lost account and can be withdrawn by the rescuer..
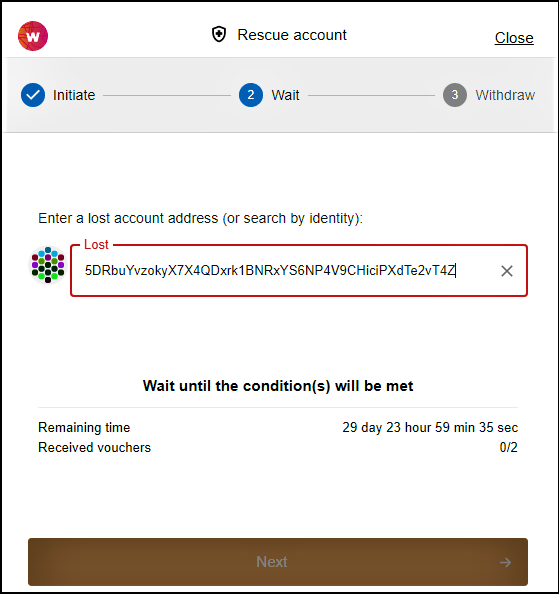
Step 2: Wait for Conditions
After confirming the initiation of the recovery process, you need to wait until the recovery condition(s) will be met. You need to wait for the delay period to be passed and also to receive enough vouches from the friends of the lost account.
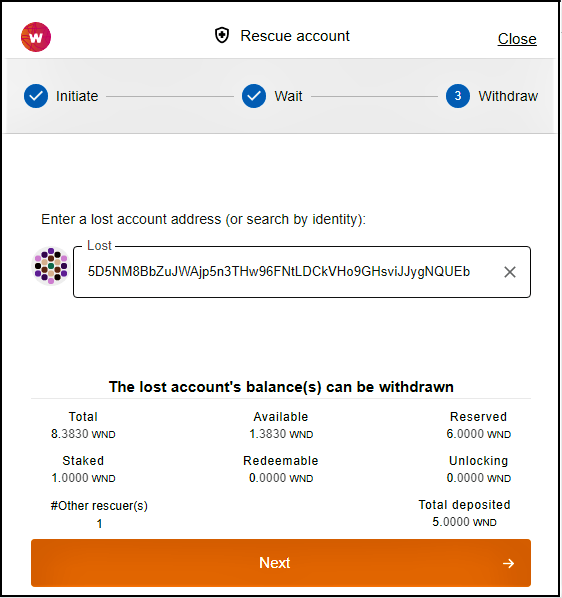
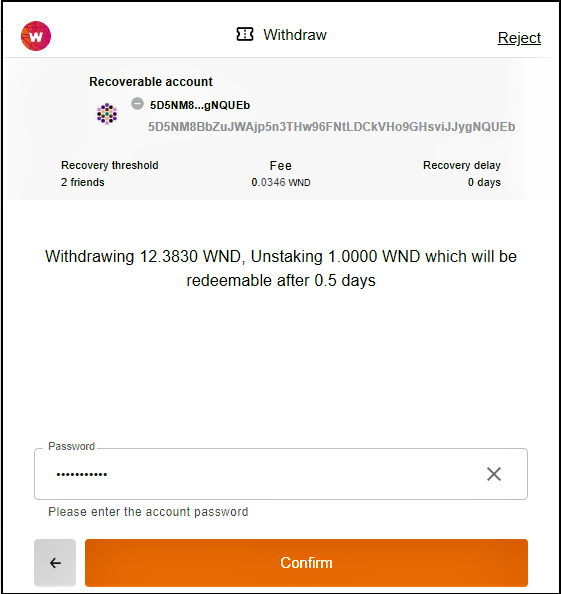
Step 3: Withdraw from lost account
After the waiting conditions are met, the rescuer account become the proxy of the lost account, hence can withdraw all the lost account's balances. If there are any malicious rescuers that started a recovery for the lost account, you will withdraw their deposits too.
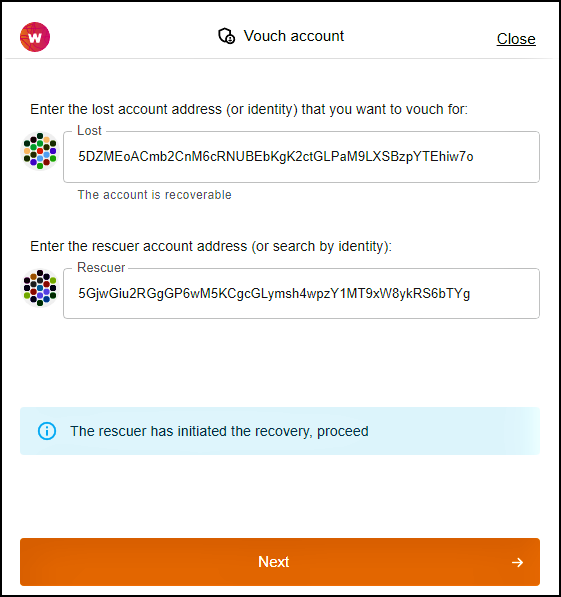
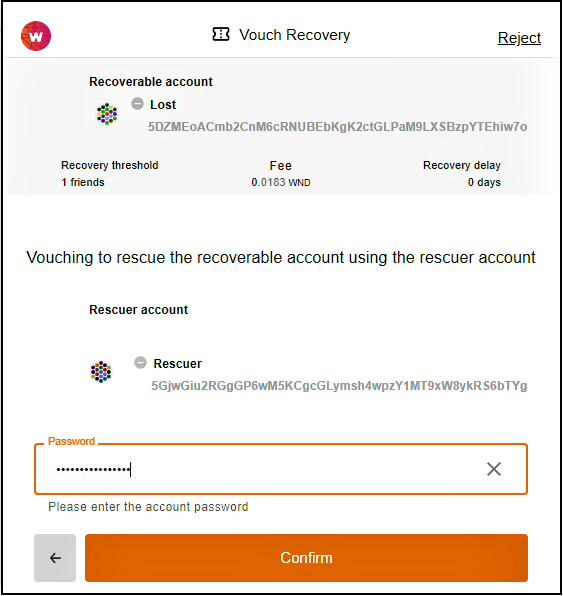
As a Friend
When a rescuer begins the process of recovering a lost account, some vouches are required by the friends of the lost account before the rescuer can take over the lost account. As a friend of a lost account, you can vouch that the lost account's address actually belongs to the rescuer account holder. Therefore, a friend needs to go to social recovery menu, select "Rescue another account", and as a Friend clicks on the "Vouch" button to view the following page:
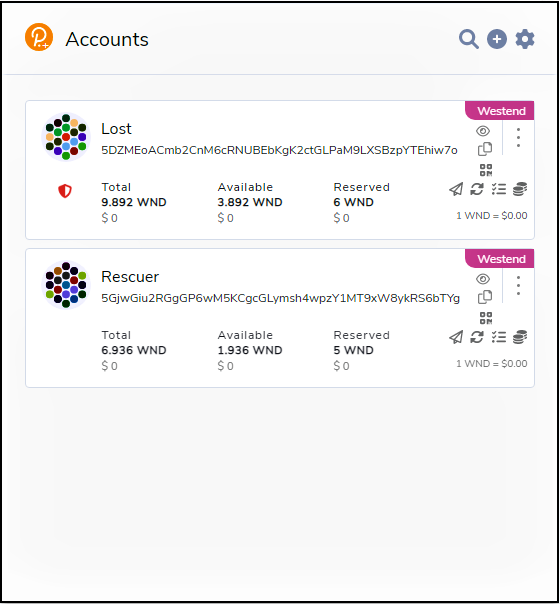
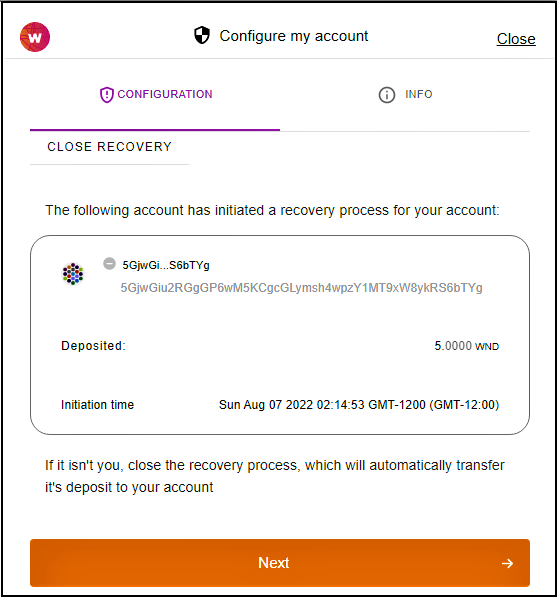
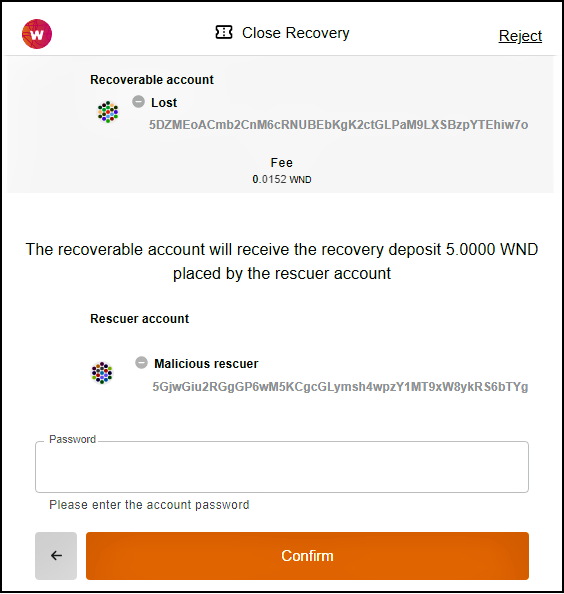
Notice
When a (Malicious) rescuer initiates a recovery process for a (possibly lost) account we show a red beating shield alert besides that (lost) account in the accounts page. The owner of that account can easily close the recovery process by clicking on that red alert button, and WITHDRAW the malicious rescuers deposit and kind of punish them.