Gen3 Type and Status Tiles - Nayru62/Nayru62-Pokecrystal-Tutorials GitHub Wiki
Co-authored by Idain and Nayru62
The code for this feature was adapted from Polished Crystal by Rangi.
-
This will change all instances of menus using Pokemon's Types, Pokemon's Statuses (Burn, Poison, Toxic, Sleep, Paralyze, Freeze, Faint), and Pokemon Move's attack Types and Category.
-
The menus affected are: Battle Menu, Party Menu, Stats Menu, and Move Management Menu.
-
Type, Move Category, and Status Condition Text will change to Custom GFX Tiles made by Rangi featured in Polished Crystal.
This code should be compatible with any other features.
Small edits will need to be made for using Physical/Special Split and 4th Stats Page. Short Follow-on Tutorials will be linked at the end of the relevant sections to provide these compatability edits.
For Fairy Type (or any other custom Types), one only needs to edit the palette file gfx\types_cats_status_pals.asm which will be indicated in the appropiate step.
Table of Contents
-
5.1 Pokedex: Setup
-
Move Mangement Menu (Phys/Spec Split)
7.1 Move Mangement Menu: Set-Up
-
8.2 Stats Screen: Palette Set Up
-
9.1 Battle: Preparation in engine\battle\
9.2 Battle: Preparation in engine\gfx\colors.asm
9.3 Battle: Main Code in engine\pokemon\mon_stats.asm
9.4 Battle: Main Code for Status Condition Tiles in engine\battle\core.asm
9.5 Battle: Main Code for MoveInfoBox in engine\battle\core.asm
If you follow this tutorial closely, you do not really need to bother to learn how to use custom GFX. However, if you pay attention to the step-by-step explanations, you'll have an invaluable skill you'll be able to use for any future custom GFX in any other endeavor you might want to do.
Baseline GFX Information
-
To start, it's highly reccomended to become familiar with the emulator/debugger BGB as it has a robust VRAM viewer that helps you properly visualize each tile, where it's coming from, and what the address of the space of the screen its on, and which palette that screen area is currently using, as well as the palettes themselves, and the RBG color values for when you want to match colors but dont know the values. You don't need to do or know any debugging to get the benefits of having the VRAM viewer when using BGB as a normal emulator.
-
Open the VRAM viewer in BGB by selecting "Window" in the top bar, then selecting "VRAM Viewer." A new window showing a grid should pop up. NOTE: Keep in mind, BGB shows all values in HEX. It's easy to get confused if you don't remember this when looking at the coordinates or other parts of the VRAM Viwerer.
-
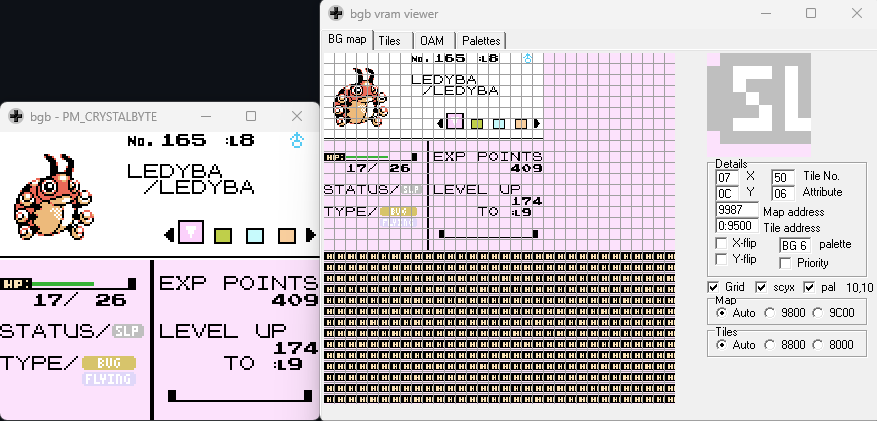
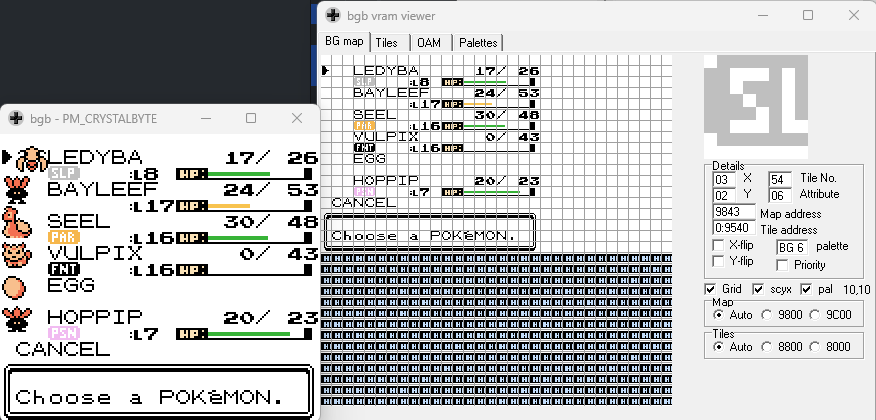
Under the tab "BG map", The game's Screen display is broken down into a Grid, a 20x18 grid of 8x8 pixel Tiles. When referred to in grid coordinates, it's read horizontally from left to right, and from the top row down.
-
To avoid confusion,individual tile locations will be referred to in the Screen's Grid as
Squares. The upper-left Square is 0,0 and the bottom-right Square is 19, 17. You can see an example below, the current tile highlighted is 7,C which is 7,12 in decimal. Remember, BGB shows everything in Hex!
-
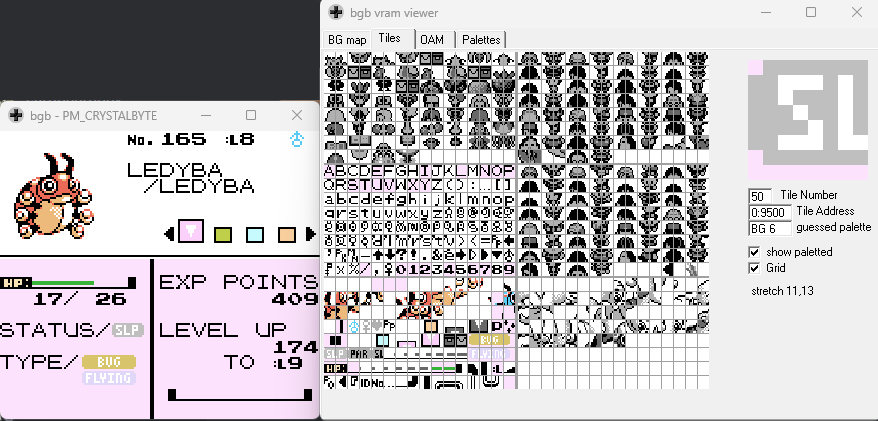
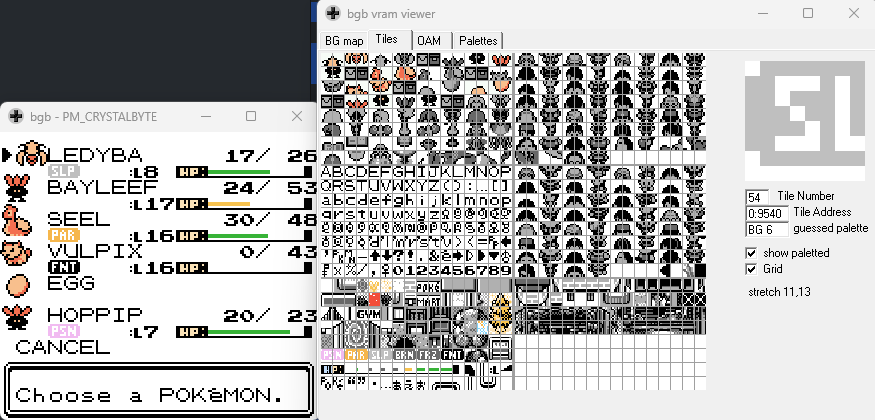
GFX files are made as PNGs, and then during compiling, are transformed into .1bpp or .2bpp files (depending on how many colors there are in the Tiles) which are then loaded by the game. When the tiles are loaded into VRAM, they are represented visually by the Tiles page, which you can see below, by selecting the "Tiles" tab in the VRAM viewer.
-
To avoid confusion,
Tilesare going to refer to the actual GFX Tiles loaded here, and the location on the Screen's Grid isSquares. So, Tiles are loaded into Squares on the Screen using the Tile's Value (from $00 to $7F) and the Square's X,Y coordinates. The example Tile being highlighted is Tile $50, you can see it towards the bottom-right of the window, and its accompanying 2nd Tile is right next to it, Tile $51. Together they make the new GFX for the Sleep Status! -
In order to load a Tile into a Square, the Square's Map Address must be in
hl, which usually accomplished withhlcoord X, Y. Oncehlis correct, the Map Address can be dereferenced with brackets, and loaded with the desired Tile value, for exampleld [hl], $50. -
There are helpful functions for manipulating the Screen such as
PlaceStringwherehldoesn't need to be dereferenced explicitly, and this tutorial will cover how to use quite a few of these functions, includingPrintNumandByteFill.
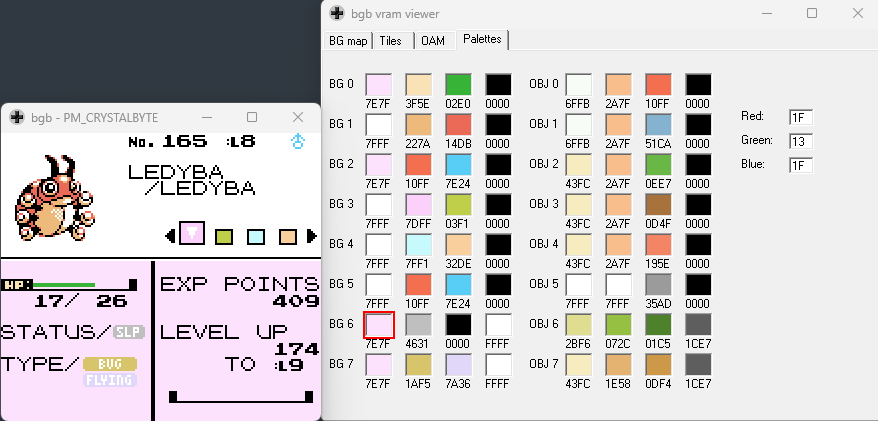
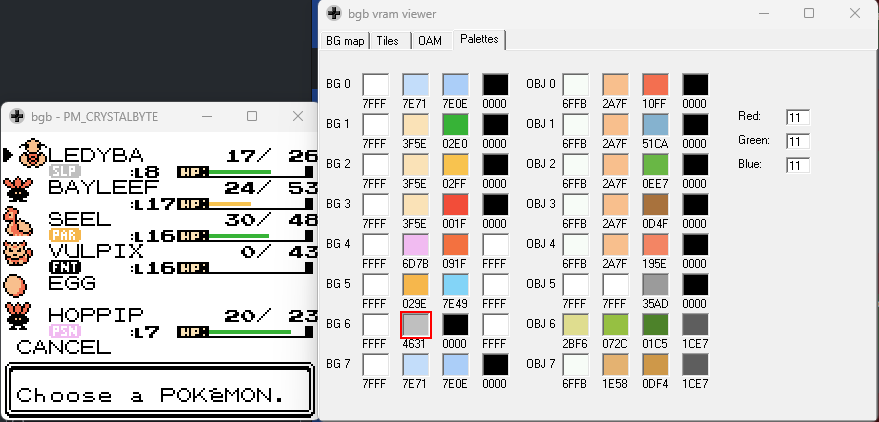
- Palettes contain 4 colors each, and there are eight Palettes used by the main Screen. They're shown in the left-side of the Palette Tab in the VRAM viewer, as shown below. The first first Palette is referred to as Palette 0. There is second set of 8 Palettes on the right-side. Those are palettes used by animated sprites, which are referred to as OAM/OBJ. There is also an OAM tab in the VRAM viewer. This tutorial will not be using it or the OAM palettes.
-
Depending on how many colors are needed in the Tile, there will be different colors in the PNG files located in
\gfx\folders. -
.1bpp stands for "1 bit per pixel" and these are GFX Tiles with only two colors. Remember, a single bit can only be one of two possible values: 0 or 1. That's only two options. Which is why only 1 bit is needed per pixel when only 2 different colors in the Tile are needed.
-
Any White pixels in the PNG file will be filled by the 1st color Slot in the Palette, and Black pixels will be filled by the 4th color Slot in the Palette. This goes for both .1bpp GFX and .2bpp GFX.
-
.2bpp means 2 bits per pixel. 2 bits can make 4 different numbers, that's why there are 4 possible color options in these files. Again, White pixels indicates Color 1, and Black pixels are Color 4.
-
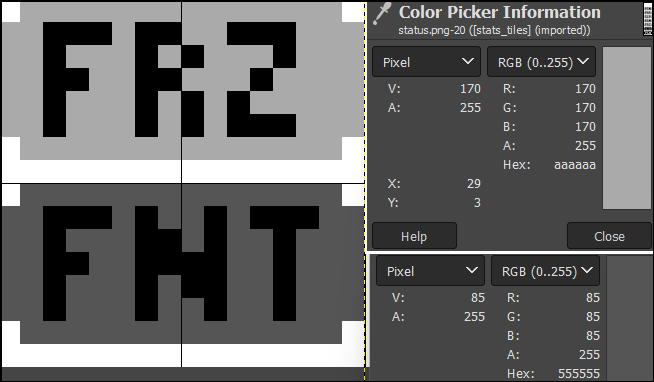
Light Gray pixels will be Color 2, and Dark Gray pixels will become Color 3.
-
In the image below, the different Gray shades can be seen more closely. The different RGB values for the different Gray Shades are also included on the right-side of the image. The "eyedropper" tool can also be used on example PNG from the game when making new custom GFX files (also remeber, each Tile is 8x8 pixels). If the right shades aren't used, the game will be unable to compile. The python script
\tools\palfix.pycan be run to fix this, if that happens.
-
After Tiles are loaded into VRAM, it must then be decided where they go on the Screen, and when they should be loaded into the Screen. This is usually done in
\engine\code via .asm files.Engine\gfx\files are where the colors are applied or changed by choosing one of eight Palettes (Pals 0 - 7). -
This is done by calling a CGB Layout to be applied, from
engine\gfx\cgb_layouts.asm. CGB Layouts load colors into the Palettes by calling functions fromengine\gfx\colors.asm(although technically, editing the Palettes can be done almost anywhere/anytime if needed, but it's a poor code style choicee). The CGB Layouts use given Grid coordinates to select areas of the Screen to apply a designated Palette to that area, like an overlay. -
By default, the entire Screen uses Palette 0. To have an area of the screen use a different Palette, usually the function
FillBoxCGB. The Grid coordinate Square that will be the upper-left of a rectangular area is designated withhlcoord X, Y, wAttrmap. The height and width of the rectangle is specified withbc, the height goes inband the width inc. The chosen Palette is loaded ina. -
The function
ByteFillcan also be used in a similar way, although it also used in many other ways besides in the CGB Layout. The Map Attribute address is also determined withhlcoord X, Y, wAttrmapandbcis loaded with the number of horizontal Squares the Palette loaded inawill be applied to. So essentially,ByteFillmakes a rectangle 1 Tile in height, but can wrap down to the next row if the Width specified is long enough. -
For each Square on the Screen, the Square individually has Attributes in addition to its Map Address, and the Tile Value currently inside the Square. The Attributes are where the Palette chosen is stored in Memory, and this Attribute Table is stored in WRAM (wAttrmap). Which is why
wAttrmapis tacked ontohlcoord X, Ywhen applying the Palettes. -
By changing the Attributes for a Square, or a designated rectangle/area of the Screen (via the CGB Layout), the Tile's orientation can also flipped or rotated. When loading the Palette into
a, afterwards, set a certain bit ofadepending on what axis of flipping needs to be done. Flipping in the X direction and the Y direction can both be done on a signle Square at the same time. -
For example, to flip the Tile on the X-axis, use
set 5, ato set the 5th bit ina, which already has already been set to the palette number. To flip on the Y axis, the 6th bit is set. This technique will be used later for the Stats and Battle Screen, as well as the Move Management Menu. So if this doesn't make sense right now, don't panic. -
By hovering over a Square on the BGB VRAM Viewer Grid, it will show, on the right-hand side of the window, the current Palette and Tile the Square is using, and any special Attributes like if the Square is flipped or rotated. But remember, the attributes are only associated with the Square, not the Tile. The Tile is simply the GFX loaded into the Square.
-
In the BGB VRAM viewer, when you select the Tiles tab, there's two equal columns. This tutorial will only be using the left side, so don't worry about anything on the right side. These columns represent VRAM memory, and each column is a different Bank. But in this tutorial and in most cases, only VRAM0 (the column on the left-side) is needed; it's the default Bank.
This is a lot of information, so DON'T BE ALARMED IF IT DOESN'T IMMEDIATLEY MAKE SENSE!!!!!!!!
Now that the basic foundational information about GFX has been covered, the tutorial can begin.
1. Add the GFX Files
-
Replace gfx\stats\stats_tiles.png
-
Replace gfx\fonts\font.png and also
gfx\fonts\english.asm.- They are identical files in English versions of the game. NOTE: If a different language or font PNG file is being used, just add the Percent Tile (%) added in this PNG, and put it in the same spot in the correct font PNG file and it should be loaded normally. The percent symbol is not in the Vanilla game for some reason, and it's going to be used when displaying chance-related data like Move Accuracy and Move Effect Chance. If you want matching files for Overworld and Inverted Fonts with the Percent Symbol.
-
Edit
charmap.asm(it's in the root directory) so that the new % symbol can be referred to with "<%>" and in strings:
	...
	charmap "-",         $e3
+	charmap "<%>",       $e5
	charmap "?",         $e6
	...
- Create or download
gfx\rangi_gfx.asm:
TypeIconGFX::
INCBIN "gfx/battle/types.1bpp"

CategoryIconGFX::
INCBIN "gfx/battle/categories.2bpp"

StatusIconGFX:
INCBIN "gfx/battle/status.2bpp"

EnemyStatusIconGFX:
INCBIN "gfx/battle/status-enemy.2bpp"

TypeLightIconGFX::
INCBIN "gfx/stats/types_light.2bpp"

TypeDarkIconGFX::
INCBIN "gfx/stats/types_dark.2bpp"
- Create or download
gfx\types_cats_status_pals.asm:
NOTE: Remove the Palette for FAIRY if you're not using Fairy Type.
+StatusIconPals:
; OK
	RGB 31, 31, 31
; PSN
	RGB 27, 11, 27
; PAR
	RGB 30, 20, 00
; SLP
	RGB 17, 17, 17
; BRN
	RGB 31, 08, 02
; FRZ
	RGB 09, 18, 31
; FNT
	RGB 31, 31, 31
; TOX
	RGB 27, 06, 28

CategoryIconPals:
; PHYSICAL
	RGB 31, 28, 00
	RGB 27, 04, 02
; SPECIAL
	RGB 27, 31, 31
	RGB 00, 14, 29
; STATUS
	RGB 31, 31, 31
	RGB 21, 21, 14

TypeIconPals:
; NORMAL
	RGB 21, 21, 14
; FIGHTING
	RGB 27, 04, 02
; FLYING
	RGB 22, 17, 30
; POISON
	RGB 22, 07, 19
; GROUND
	RGB 29, 24, 12
; ROCK
	RGB 24, 20, 07
; BUG
	RGB 21, 23, 06
; GHOST
	RGB 15, 11, 18
; STEEL
	RGB 23, 23, 25
; FIRE
	RGB 31, 15, 04
; WATER
	RGB 11, 18, 30
; GRASS
	RGB 11, 25, 11
; ELECTRIC
	RGB 31, 24, 06
; PSYCHIC
	RGB 31, 09, 15
; ICE
	RGB 16, 27, 27
; DRAGON
	RGB 15, 07, 31
; DARK
	RGB 15, 11, 09
; FAIRY
	RGB 31, 20, 29
; UNKNOWN T
	RGB 13, 19, 19
2. Load Custom Tiles
This is what gfx\rangi_gfx.asm is for. Edit main.asm so everything is loaded when during compiling. GFX files can be bulky so it can be a challenge to load all of them into a single Bank, which can limit the effectiveness of using a single file to load all GFX at once together. But the "Print Party" Bank has enough room, so that's why gfx\rangi_gfx.asm can be used, loading all GFX files together.
- Edit
main.asm:
SECTION "Print Party", ROMX

INCLUDE "engine/printer/print_party.asm"
+INCLUDE "gfx/rangi_gfx.asm"
3. Set Up Utility Functions
- Edit
home\copy.asmand addFarCopyColorWRAMright aboveFarCopyWRAMso that it falls through:
(This function is from Polished Crystal, and it's often used when setting up Palettes for our CGB Layouts.)
	...
	pop af
	rst Bankswitch
	ret

+FarCopyColorWRAM::
+	ld a, BANK("GBC Video")
FarCopyWRAM::
	ldh [hTempBank], a
	ldh a, [rSVBK]
	...
4. Edit engine\gfx\color.asm
WARNING: This file is going to seem complicated, but for now just trust the process. Each Function will be explained as it comes up.
- Add these Utility Functions in
engine\gfx\color.asm:
Add them together as shown, somewhere in the middle of the file.
LoadCPaletteBytesFromHLIntoDE:
	; Loads the number of Palettes passed in 'c' when called
	; Source address is 'hl'
	; Destination address is 'de'
	ldh a, [rSVBK]
	push af
	ld a, BANK("GBC Video")
	ldh [rSVBK], a
.loop
	ld a, [hli]
	ld [de], a
	inc de
	dec c
	jr nz, .loop
	pop af
	ldh [rSVBK], a
	ret

LoadMonBaseTypePal:
	; destination address of Palette and Slot is passed in 'de'
	; Type Index (already fixed/adjusted if a Special Type) is passed in 'c'
	ld hl, TypeIconPals ; pointer to the Type Colors designated in gfx\types_cats_status_pals.asm
	ld a, c ; c is the Type Index
	add a
	ld c, a
	ld b, 0
	add hl, bc
	ld bc, 2
	jp FarCopyColorWRAM

LoadSingleBlackPal:
	; Destination address of the Palette and Slot is passed in 'de'
	ldh a, [rSVBK]
	push af
	ld a, BANK(wBGPals1)
	ldh [rSVBK], a
	xor a ; the color black is $0000
	ld [de], a
	inc de
	ld [de], a
	inc de

	pop af
	ldh [rSVBK], a
	ret
In each of the functions, rSVBK is being accessed, the current value is saved with push af at the beginning of the function, and then the value is being retrieved with pop af and then put back into rSVBK at the end of the function. When dealing with GFX, they have several different Modes and Banks. Because the function does not know where the function is being called from or from which Bank, this ensures that the function is editing the right data, in these cases, the VRAM Palettes.
- Edit
engine\gfx\color.asmand Load the new palette data we defined ingfx/types_cats_status_pals.asm:
	...
INCLUDE "data/maps/environment_colors.asm"

+ INCLUDE "gfx/types_cats_status_pals.asm"

PartyMenuBGMobilePalette:
INCLUDE "gfx/stats/party_menu_bg_mobile.pal"
	...
- Add the
GetMonTypeIndexfunction at the end ofengine\pokemon\mon_stats.asm:
Types are represented by numbers, 0 being Normal, 1 being Fighting, etc. But the numbers of the Types do not follow this scheme after the "Physical" Types. Then, there are several unused Types inbetween the "Physical" Types and the "Special" Types. In the PNG files for the Types, and palette files for the Types, there are not any gaps for the unused Types. That would be wasteful. So, to refer to the right index of these files, this function is used to make sure the Index is correct for the "Special" Types.
GetMonTypeIndex:
	; type in c, because farcall clobbers a
	ld a, c
	and TYPE_MASK ; Phys/Spec Split only
	; Skip Bird
	cp BIRD
	jr c, .done
	cp UNUSED_TYPES
	dec a
	jr c, .done
	sub UNUSED_TYPES
.done
	ld c, a
	ret
5. Pokedex
5.1 Pokedex: Setup
- Edit
Pokedex_InitDexEntryScreeninengine\pokedex\pokedex.asm:
This changes when the CGB Layout is applied during the set-up process for Pokedex Entry screen for an individual Pokemon. It's being changed so that the CGB Layout is called and applied before call WaitBGMap, this function halts the game execution until the GFX is finished loading. This should be done after the CGB Layout is called, otherwise the Type Tiles will visibly change a split second after landing on the screen, which is very noticable. By moving it, the color change is instant when the screen loads.
	xor a
	ldh [hBGMapMode], a
	call ClearSprites
+	call Pokedex_GetSelectedMon
+	ld [wCurPartySpecies], a
+	ld a, SCGB_POKEDEX
+	call Pokedex_GetSGBLayout

	call Pokedex_LoadCurrentFootprint
	call Pokedex_DrawDexEntryScreenBG
	call Pokedex_InitArrowCursor
...
	call WaitBGMap
	ld a, $a7
	ldh [hWX], a
-	call Pokedex_GetSelectedMon
-	ld [wCurPartySpecies], a
-	ld a, SCGB_POKEDEX
-	call Pokedex_GetSGBLayout

	ld a, [wCurPartySpecies]
	call PlayMonCry
	call Pokedex_IncrementDexPointer
5.2 Pokedex: Main Code
- Edit
enginge\pokedex\pokedex_2.asmby adding the new functionDex_PrintMonTypeTilesat the end:
Dex_PrintMonTypeTiles:
	ld a, [wTempSpecies]
	ld [wCurSpecies], a
	call GetBaseData
	ld a, [wBaseType1]
	ld c, a ; farcall will clobber a for the bank
	farcall GetMonTypeIndex ; returns adjusted Type Index in 'c'
	ld a, c
; load the tiles
	ld hl, TypeLightIconGFX ; gfx\stats\types_light.png
	ld bc, 4 * LEN_2BPP_TILE ; Type GFX are 4 Tiles wide
	call AddNTimes ; increments the TypeLightIconGFX pointer to the right address of the needed Type Tiles
	ld d, h
	ld e, l
	ld hl, vTiles2 tile $70 ; destination address of the Tile, in this case Tiles $70-$73
	lb bc, BANK(TypeLightIconGFX), 4 ; Bank in 'b', Number of Tiles being loaded in 'c'
	call Request2bpp
; 2nd Type
	ld a, [wBaseType2]
	ld c, a ; farcall will clobber a for the bank
	farcall GetMonTypeIndex ; returns adjusted Type Index in 'c'
	ld a, c
; load type 2 tiles
	ld hl, TypeDarkIconGFX ; gfx\stats\types_dark.png
	ld bc, 4 * LEN_2BPP_TILE ; Type GFX are 4 Tiles wide
	call AddNTimes ; increments the TypeDarkIconGFX pointer to the right address of the needed Type Tiles
	ld d, h
	ld e, l
	ld hl, vTiles2 tile $74 ; destination address of the Tile, in this case Tiles $74-$77
	lb bc, BANK(TypeDarkIconGFX), 4 ; Bank in 'b', Number of Tiles being loaded in 'c'
	call Request2bpp

	hlcoord 9, 1
	ld [hl], $70
	inc hl
	ld [hl], $71
	inc hl
	ld [hl], $72
	inc hl
	ld [hl], $73
	inc hl
	ld a, [wBaseType1]
	ld b, a
	ld a, [wBaseType2]
	cp b
	ret z ; pokemon doesnt have a 2nd type
	ld [hl], $74
	inc hl
	ld [hl], $75
	inc hl
	ld [hl], $76
	inc hl
	ld [hl], $77
	ret
If a Pokemon only has one Type, the Type value in [wBaseType1] and [wBaseType2] will both be the same. These two WRAM variables will change value depending on what is currently in [wCurSpecies] which is why the Pokemon's Species value is loaded into it at the start of the function.
Type1 is being shown with Tiles from TypeLightIconGFX and Type 2 is being displayed with Tiles from TypeLightIconGFX, which refer to gfx\stats\types_light.png and gfx\stats\types_dark.png respectivley. Light Gray pixels will take on the Color in Slot 2 of whatever Palette is applied in the CGB Layout, and Dark Gray pixels used Slot 3 of the Palette. So by usng the different Gray shades for the Type Tiles, only 1 Palette needs to be used, and applied to both Type Tiles together.
- Edit function
DisplayDexEntryinengine\pokedex\pokedex_2.asmto callDex_PrintMonTypeTiles:
DisplayDexEntry:
+	call Dex_PrintMonTypeTiles
	call GetPokemonName
	hlcoord 9, 3
	call PlaceString ; mon species
	...
5.3 Pokedex: CGB Layout
Now, to make sure the right colors are used on the newly loaded and placed Type Tiles. By the time DisplayDexEntry is called, the needed palettes have already been loaded via applying the Pokedex CGB Layout. Remember when call Pokedex_GetSGBLayout was done in engine\pokedex\pokedex.asm the previous step? The CGB Layout for the Pokedex was called. Calling the CGB Layout is done by specifying the CGB Layout index (Usually via a Constant, not a naked number) in b, then calling GetSGBLayout.
Inside the pokedex, there's an additional abstraction, Pokedex_GetSGBLayout simply puts the index given in a into b, then calls GetSGBLayout normally.
- Change the Pokedex CGB Layout, by editing function
_CGB_Pokedexinengine\gfx\cgb_layouts.asm:
	...
.is_pokemon
	call GetMonPalettePointer
	call LoadPalette_White_Col1_Col2_Black ; mon palette, pal 1, auto inc's de to next pal
+; black background for Pal 7
+	ld de, wBGPals1 palette 7 ; First color slot of Pal 7
+	call LoadSingleBlackPal ; loads black into slot 1 of pal 7, since it is normally white
+							; but pokedex has black background
+; mon type 1
+	ld a, [wTempSpecies]
+	ld [wCurSpecies], a
+	call GetBaseData
+	ld a, [wBaseType1]
+	ld c, a ; farcall will clobber a for the bank
+	farcall GetMonTypeIndex
+; load the 1st type pal
+	; type index is already in c
+	ld de, wBGPals1 palette 7 + 2 ; slot 2 of pal 7
+	farcall LoadMonBaseTypePal	; loads type color into slot 2 of pal 7
+; mon type 2
+	ld a, [wBaseType2]
+	ld c, a ; farcall will clobber a for the bank
+	farcall GetMonTypeIndex
+; load the 2nd type pal
+	; type index is already in c
+	ld de, wBGPals1 palette 7 + 4 ; slot 3 of pal 7
+	farcall LoadMonBaseTypePal ; loads type color into slot 3 of pal 7
+
.got_palette
	; pokemon sprite or question mark if unseen
	call WipeAttrmap
	hlcoord 1, 1, wAttrmap
	lb bc, 7, 7 ; box 7 tiles high, 7 tiles wide
	ld a, $1 ; pal 1, pokemon's palette or green question mark palette
	call FillBoxCGB
+
+	; Both mon types
+	; if no 2nd Type, those 4 Squares will appear normally as blank Black Tiles
+	hlcoord 9, 1, wAttrmap
+	lb bc, 1, 8 ; box 1 tile in HEIGHT, 8 tiles in WIDTH
+	ld a, $7 ; mon base type pals
+	call FillBoxCGB
+
	call InitPartyMenuOBPals
	ld hl, PokedexCursorPalette
	ld de, wOBPals1 palette 7 ; green cursor palette
	ld bc, 1 palettes
	ld a, BANK(wOBPals1)
	call FarCopyWRAM
	call ApplyAttrmap
	call ApplyPals
	ld a, TRUE
	ldh [hCGBPalUpdate], a
	ret
5.4 Pokedex: CGB Layout Explained
- Here is the detailed breakdown of what was just done:
Palette 7 is being used for the Type Tiles in the Pokedex, as it is unused in the Vanilla pokedex.
The first color loaded into a Palette is usually the background color, denoted by White pixels in .PNG files. The pokedex has a black background color scheme, so that's why Black is loaded into the first Palette slot of Palette 7 via:
; black background
	ld de, wBGPals1 palette 7
	call LoadSingleBlackPal
Each Palette color slot is 2 bytes, for a total of 8 bytes per Palette. So, to load Color 2 into Palette 7 (after the Type1 index is calculated) 2 bytes were added onto the Palette 7 pointer:
; load the 1st type pal
	ld c, a
	ld de, wBGPals1 palette 7 + 2
	farcall LoadMonBaseTypePal
After calculating the index for Type2, (and exiting if the indexes are same, meaning the pokemon only has one Type) 4 bytes are added onto the Palette 7 pointer to load Color 3:
; load the 2nd type pal
	ld c, a
	ld de, wBGPals1 palette 7 + 4
	farcall LoadMonBaseTypePal
Finally, the Screen's Attribute Map (wAttrmap) is edited to tell it that the specified area of 1x8 Tiles starting at grid coordinate 9,1 will be using Palette 7. The function hlcoord X, Y translates the human-readable Grid Coordinate to the actual Map Address of the Square. By adding , wAttrmap at the end of the hlcoord it is calcuting the address of the Attribute Map, not the Screen's Map address like usual:
	...
; mon base types
	hlcoord 9, 1, wAttrmap ; DO NOT FORGET TO SPECIFY 'wAttrmap' HERE
	lb bc, 1, 8 ; area = HEIGHT in 'b', WIDTH in 'c'
	ld a, 7 ; Palette 7
	call FillBoxCGB ; fills in a rectangle/box, there are other options to edit wAttrmap used later on
	...
5.5 Pokedex: Final Edit, Newly Caught Species
- To finish the Pokedex, Edit function
NewPokedexEntryinengine\pokedex\new_pokedex_entry.asm:
This removes a flashing effect after leaving the Pokedex splash screen that comes up after a new species is caught for the first time. That flash highlights the Type tiles in a very ugly way, since the flash effect overrides the palettes, it looks very unnatural. This edit changes the flash to simply fade to black. A small but important change.
	...
	pop af
	ld [wPokedexStatus], a
	call MaxVolume
-	call RotateThreePalettesRight
+	farcall Pokedex_BlackOutBG
	ldh a, [hSCX]
	add -POKEDEX_SCX
	ldh [hSCX], a
	...
Done with the Pokedex! Take a break and compile, and test, the game using the code added so far. Go back and fix any mistakes before continuing on.
6. Party Menu
6.1 Party Menu: Set-up functions
- Open
engine\gfx\color.asmand add this function,InitPartyMenuStatusPals.
InitPartyMenuStatusPals:
	ld hl, StatusIconPals
	ld c, $1 ; PSN Index
	ld b, 0
	add hl, bc
	add hl, bc
	ld de, wBGPals1 palette 4 + 2 ; Color 2 of Palette 4 (Light Gray Pixels)
	ld bc, 2 ; 1 Color (2 bytes)
	call FarCopyColorWRAM

	ld hl, StatusIconPals
	ld c, $2 ; PAR Index
	ld b, 0
	add hl, bc
	add hl, bc
	ld de, wBGPals1 palette 5 + 2 ; Color 2 of Palette 5 (Light Gray Pixels)
	ld bc, 2 ; 1 Color (2 bytes)
	call FarCopyColorWRAM

	ld hl, StatusIconPals
	ld c, $3 ; SLP Index
	ld b, 0
	add hl, bc
	add hl, bc
 	ld de, wBGPals1 palette 6 + 2 ; Color 2 of Palette 6 (Light Gray Pixels)
	ld bc, 2 ; 1 Color (2 bytes)
	call FarCopyColorWRAM

	ld hl, StatusIconPals
	ld c, $4 ; BRN Index
	ld b, 0
	add hl, bc
	add hl, bc
	ld de, wBGPals1 palette 4 + 4 ; Color 3 of Palette 4 (Dark Gray Pixels)
	ld bc, 2 ; 1 Color (2 bytes)
	call FarCopyColorWRAM

	ld hl, StatusIconPals
	ld c, $5 ; FRZ Index
	ld b, 0
	add hl, bc
	add hl, bc
	ld de, wBGPals1 palette 5 + 4 ; Color 3 of Palette 5 (Dark Gray Pixels)
	ld bc, 2 ; 1 Color (2 bytes)
	call FarCopyColorWRAM

	; put white (7fff) into the slot 4 of pals 4, 5, 6
	ldh a, [rSVBK]
	push af
	ld a, BANK(wBGPals1)
	ldh [rSVBK], a
	ld a, $FF
	ld [wBGPals1 palette 4 + 6], a ; pal 4, slot 4, byte 1
	ld [wBGPals1 palette 5 + 6], a ; pal 5, slot 4, byte 1
	ld [wBGPals1 palette 6 + 6], a ; pal 6, slot 4, byte 1
	ld [wBGPals1 palette 4 + 7], a ; pal 4, slot 4, byte 2
	ld [wBGPals1 palette 5 + 7], a ; pal 5, slot 4, byte 2
	ld [wBGPals1 palette 6 + 7], a ; pal 6, slot 4, byte 2
	pop af
	ldh [rSVBK], a
	ret
- Edit
data\predef_pointers.asm:
Predef Pointers allow functions to be called from a different Bank, using either predef or farcall in place of call. Keep in mind when using functions this way, register a and hl will be clobbered, as they are always used to hold the destination Bank and address of where ever the Function is.
	...
	add_predef HOF_AnimateFrontpic
+	add_predef GetStatusConditionIndex
	dbw -1, DummyEndPredef ; pointless
- Add this functions in
engine\pokemon\mon_stats.asm:
GetStatusConditionIndex:
; de points to status condition bytes of a pokemon from a party_struct or battle_struct
; return the status condition index in 'a', and also 'd' for those who farcall
	push de
	inc de
	inc de
	ld a, [de]
	ld b, a
	inc de
	ld a, [de]
	or b
	pop de
	jr z, .fnt
	ld a, [de]
	ld b, a
	and SLP_MASK
	ld a, 0
	jr nz, .slp
	bit PSN, b
	jr nz, .psn
	bit PAR, b
	jr nz, .par
	bit BRN, b
	jr nz, .brn
	bit FRZ, b
	jr nz, .frz
	ld d, a
	ret

.fnt
	inc a ; 6
.frz
	inc a ; 5
.brn
	inc a ; 4
.slp
	inc a ; 3
.par
	inc a ; 2
.psn
	inc a ; 1
	ld d, a
	ret
Note: This function does NOT account for Toxic, which is a substatus, therefore, only active in Battle. Toxic will be dealt with a seperate function then. But having Toxic will still flag this function as being Poisoned. So when the Party Menu is checked while the active Pokemon has Toxic, it will appear as Poison in the Party Menu.
- Edit
engine\battle\core.asm, two functions need to be edited:
In battle, if the Party Menu is opened to Switch during your turn, OR when the battle mode is set to "Shift" and you are offered to pick a Pokemon to switch to from the Party Menu, both of these functions need very small edits. This is because the Status Condition GFX Tiles overwrite the Pokemon's backsprite. So the backsprite needs to be restored after exiting either of these functions that go into the Party menu during battle.
- Edit
BattleMenuPKMN_Loop:
	...
	call DelayFrame
	call _LoadHPBar
	call CloseWindow
+	call GetBattleMonBackpic
+	call WaitBGMap
	call LoadTilemapToTempTilemap
	call GetMemSGBLayout
	call SetPalettes
	...
- Edit
TryPlayerSwitch::
	...
	call DelayFrame
	call ClearSprites
	call _LoadHPBar
+	call GetBattleMonBackpic
+	call WaitBGMap
	call CloseWindow
	call GetMemSGBLayout
	call SetPalettes
...
- Edit
OfferSwitch:
	...
	jr c, .canceled_switch
	ld a, [wCurBattleMon]
	ld [wLastPlayerMon], a
	ld a, [wCurPartyMon]
	ld [wCurBattleMon], a
	call ClearPalettes
	call DelayFrame
	call _LoadHPBar
+	call GetBattleMonBackpic
+	call WaitBGMap
	pop af
	ld [wCurPartyMon], a
	xor a
	ld [wCurEnemyMove], a
	ld [wCurPlayerMove], a
	and a
	ret

.canceled_switch
	call ClearPalettes
	call DelayFrame
	call _LoadHPBar
+	call GetBattleMonBackpic
+	call WaitBGMap

.said_no
	...
6.2 Party Menu: Main Code
This entire section will take place within engine\pokemon\party_menu.asm.
- Create the function
LoadStatusIconSetat the end ofengine\pokemon\party_menu.asm:
This function may look long and complicated, but it isn't. It's very similar to what was already done in engine\gfx\color.asm with the new InitPartyMenuStatusPals function. The same action is being repeated six times, once for each Status Condition, minus Toxic, since Toxic only persists in Battle.
-
Each set of two Tiles for each of the six main Status Conditions are being loaded starting at Tile $50, and ending with Tile $5A, for a total of 12 Tiles. This is done because all six possible Status Conditions need to be loaded at once; the Party could consist of Pokemon that all have the same Status Condition, or all six different Status Conditions, unlike the Battle menu where at most two Status Conditions will be loaded at a single time, and only 1 for the Stats Screen.
-
Notice, BRN and FRZ are loading from the Enemy's Status Condition Tiles. That's because the Palettes and colors will be arranged in such a way to allow all six colors for each major Status Conditions to be available at once, using only 3 Palettes. To do that, there needs to be Tiles that use Light Gray (Slot 2 of Palette) and Dark Gray (Slot 3 of Palette). The enemy's Status Tiles use Dark Gray (Slot 3 of Palette), so that's why
EnemyStatusIconGFXis being used as the GFX pointer instead ofStatusIconGFXfor BRN and FRZ.
LoadStatusIconSet:
	push bc
	push hl
	; status index in a
	ld a, $1 ; PSN Index
	ld hl, StatusIconGFX ; Uses the Light Gray pixels, aka Pal Color 2
	ld bc, 2 * LEN_2BPP_TILE ; Status GFX is 2 Tiles Wide
	call AddNTimes
	ld d, h
	ld e, l
	ld hl, vTiles2 tile $50 ; Destination Tile address
	lb bc, BANK(StatusIconGFX), 2 ; bank in 'b', number of Tiles in 'c'
	call Request2bpp

	ld a, $2 ; PAR Index
	ld hl, StatusIconGFX ; Uses the Light Gray pixels, aka Pal Color 2
	ld bc, 2 * LEN_2BPP_TILE ; Status GFX is 2 Tiles Wide
	call AddNTimes
	ld d, h
	ld e, l
	ld hl, vTiles2 tile $52
	lb bc, BANK(StatusIconGFX), 2 ; bank in 'b', number of Tiles in 'c'
	call Request2bpp

	ld a, $3 ; SLP
	ld hl, StatusIconGFX ; Uses the Light Gray pixels, aka Pal Color 2
	ld bc, 2 * LEN_2BPP_TILE ; Status GFX is 2 Tiles Wide
	call AddNTimes
	ld d, h
	ld e, l
	ld hl, vTiles2 tile $54
	lb bc, BANK(StatusIconGFX), 2 ; bank in 'b', number of Tiles in 'c'
	call Request2bpp

	ld a, $4 ; BRN
	ld hl, EnemyStatusIconGFX ; Uses the Dark Gray pixels, aka Pal Color 3
	ld bc, 2 * LEN_2BPP_TILE ; Status GFX is 2 Tiles Wide
	call AddNTimes
	ld d, h
	ld e, l
	ld hl, vTiles2 tile $56
	lb bc, BANK(EnemyStatusIconGFX), 2 ; bank in 'b', number of Tiles in 'c'
	call Request2bpp

	ld a, $5 ; FRZ
	ld hl, EnemyStatusIconGFX ; Uses the Dark Gray pixels, aka Pal Color 3
	ld bc, 2 * LEN_2BPP_TILE ; Status GFX is 2 Tiles Wide
	call AddNTimes
	ld d, h
	ld e, l
	ld hl, vTiles2 tile $58
	lb bc, BANK(EnemyStatusIconGFX), 2 ; bank in 'b', number of Tiles in 'c'
	call Request2bpp

	ld a, $6 ; FNT Index
	ld hl, StatusIconGFX ; FNT is only in the Player's set of Icons aka gfx\battle\status.png
	ld bc, 2 * LEN_2BPP_TILE ; Status GFX is 2 Tiles Wide
	call AddNTimes
	ld d, h
	ld e, l
	ld hl, vTiles2 tile $5a
	lb bc, BANK(StatusIconGFX), 2 ; bank in 'b', number of Tiles in 'c'
	call Request2bpp
	pop hl
	pop bc
	ret
- To invoke the function just written, edit
LoadPartyMenuGFXfunction inengine\pokemon\party_menu.asm:
LoadPartyMenuGFX:
+	call LoadStatusIconSet
	call LoadFontsBattleExtra
	callfar InitPartyMenuPalettes
	...
- Finally, edit
PlacePartyMonStatusinengine\pokemon\party_menu.asmto utilize the newly loaded Status GFX Tiles:
Based on the Status Condition Index, basic addition is used to select the right Tiles, and the Grid Coordinate is determined based on which spot in the Party Menu the current Pokemon is. The vanilla function already did this for the Status Condition Text, so going over calculating the Grid Coordinates are unecessary. The only change to do with it is to tell it to print the Tiles two Squares to left from where they were. Then, remove call PlaceStatusString and replace it with the new code.
	ret z
	ld c, a
	ld b, 0
-	hlcoord 5, 2 ; where the Status Condition Text was being printed
+	hlcoord 3, 2 ; aligning the Status Tiles with the left-hand side of the Party Menu
.loop
	push bc
	...
-	call PlaceStatusString
+	call GetStatusConditionIndex
+	jr z, .next
+	; get the right tile nums
+	dec a
+	add a
+	ld b, $50 ; PSN tiles are in Tile $50 and $51
+	add b     ;  add the index to $50 to get the right Tiles for the actual Status Condition
+	ld [hli], a
+	inc a
+	ld [hl], a

.next
	...
Vanilla Crystal places the Status Condition Text over the LVL on the party screen whenever the Pokemon has a Status Condition. Now, the Status Condition Tiles will be loaded two Squares to the left on the Screen from where the Status Condition Text used to be loaded, so that the Pokemon's Lvl is not obscurbed in order to display the Status Condition.
6.3 Party Menu: CGB Layout
- Open
engine\gfx\cgb_layouts.asmand edit_CGB_PartyMenu:
This function was designed based on Vanilla functions that traverse the Party Pokemon structures too, and have been adapted for this purpose.
_CGB_PartyMenu:
	ld hl, PalPacket_PartyMenu + 1
	call CopyFourPalettes
	call InitPartyMenuBGPal0
	call InitPartyMenuBGPal7
	call InitPartyMenuOBPals
+	call InitPartyMenuStatusPals ; this is the new function added in engine\gfx\color.asm
+
+	ld a, [wPartyCount]
+	and a
+	ret z
+	ld c, a ; max number of Party Mons
+	ld b, 0 ; how many checked so far
+	hlcoord 3, 2, wAttrmap ; matches the new location specified in PlacePartyMonStatus, in party_menu.asm
+.loop
+	push bc ; party pokemon count (up to six) left, in 'c', number already done in 'b'
+	push hl ; hlcoord 3, 2, wAttrmap, will become adjusted based on which Party member we're working on
+	; checking for egg, skipping to next party mon if so
+	ld a, LOW(wPartySpecies)
+	add b
+	ld e, a
+	ld a, HIGH(wPartySpecies)
+	adc 0
+	ld d, a
+	; 'de' now contains fully adjusted pointer to current Pokemon species in the Party
+	ld a, [de] ; the species
+	cp EGG
+	jr z, .next
+
+	; not an egg
+	push hl ; which row we are printing on, based on hlcoord 3, 2, wAttrmap
+	ld a, b ; number of Pokemon in Party checked so far
+	ld bc, PARTYMON_STRUCT_LENGTH
+	ld hl, wPartyMon1Status ; more pointer math to calc the pointer to Status Condition of the Party Mon
+	call AddNTimes ; adds 'hl' to 'bc' number of times specified in 'a'
+	ld e, l
+	ld d, h
+	farcall GetStatusConditionIndex ; expects the pointer in 'de'
+	; returns Status Condition Index in 'd'
+	ld a, d ; status condition index
+	pop hl ; which row we are printing on, based on hlcoord 3, 2, wAttrmap
+	and a
+	jr z, .next ; Status is "OK", nothing else to be done for this Mon
+	; get the right Pal for the status condition index, which is in 'a'
+	ld b, $1 ; PSN status index
+	ld c, $4 ; PSN pal, includes Toxic, they use same pal
+	cp b
+	jr z, .done
+	ld b, $2 ; PAR status index
+	ld c, $5 ; PAR pal
+	cp b
+	jr z, .done
+	ld b, $3 ; SLP status index
+	ld c, $6 ; SLP pal
+	cp b
+	jr z, .done
+	ld b, $4 ; BRN Status Index
+	ld c, $4 ; BRN pal
+	cp b
+	jr z, .done
+	ld b, $5 ; FRZ Status Index
+	ld c, $5 ; FRZ pal
+	cp b
+	jr z, .done
+	; if we are here, only status left is FNT
+	ld c, $6 ; FNT pal
+.done
+	; hlcoord is already done and ready: hlcoord 3, 2, wAttrmap + (Party Mon Row x2)
+	ld a, c ; the Status palette
+	lb bc, 1, 2 ; box 1 Tile in HEIGHT, 2 Tiles in WIDTH.
+	call FillBoxCGB
+.next
+	pop hl ;
+	ld de, SCREEN_WIDTH * 2 ; adjusts hl to two rows down
+	add hl, de
+	pop bc ; party pokemon count (up to six) left, in 'c', number already done in 'b'
+	inc b ; number of Party Mons checked so far, used in various calculations
+	dec c ; number of party mons left to check, stop when 0
+	jr nz, .loop
+	; done with all party pokemon
	call ApplyAttrmap
	ret
Done with the Party Menu! Take a rest and compile and test your code. Regardless of which Status Conditions your Pokemon may have at the moment, the BGB VRAM Viewer's Tiles Screen from $50 t0 $5A should match the example below. And the Palettes should match the example below too. Try aquiring different Status Conditions to test for yourself.
7. Move Mangement Menu (Phys/Spec Split)
This is the menu that comes up when "MOVE" is selected in the Party Menu. It provides the ability to swap the order of the Pokemon's moves, and also examine the in-game summary of the move, as well as basic information of the move.
This section will replace the Type Text with the new Custom Type GFX, along with new Move Category GFX (Physical, Special, or Status), as well as add new useful information to be shown and tie together the Move Selection Screen as a the useful tool that it was intended to be.
7.1 Move Mangement Menu: Set-Up (Phys/Spec Split)
NOTE: The code will differ slightly depending on if Phys/Spec split has been implemented.
- Open
engine\gfx\color.asmand add a new function,LoadCategoryAndTypePals:
LoadCategoryAndTypePals:
	; given: de holds the address of destination Palette and Slot
	; adding a single white pal the way vanilla game does it
	ldh a, [rSVBK]
	push af
	ld a, BANK(wBGPals1)
	ldh [rSVBK], a
	ld a, LOW(PALRGB_WHITE)
	ld [de], a
	inc de ; slot 1 + 1 byte, now pointing at 2nd byte of slot 1
	ld a, HIGH(PALRGB_WHITE)
	ld [de], a
	inc de ; now pointing at slot 2
	pop af
	ldh [rSVBK], a
	; done adding the single white pal

	ld hl, CategoryIconPals ; from gfx\types_cats_status_pals.asm
	ld a, b
	add a ; doubles the Category Index
	add a ; Quadruples the Category Index
	; each Category has two colors, so each entry is 4 bytes long, 2 bytes per Color
	push bc
	ld c, a
	ld b, 0
	add hl, bc
	ld bc, 4 ; 4 bytes worth of colors means 2 slots are being filled at the same time, the two category colors
	push de
	call FarCopyColorWRAM
	pop de ; still pointing to Slot 2 of the Palette

	ld hl, TypeIconPals ; from gfx\types_cats_status_pals.asm
	pop bc
	ld a, c
	add a ; doubles the Index, since each color is 2 bytes
	ld c, a
	ld b, 0
	add hl, bc
	inc de
	inc de
	inc de
	inc de ; incs 4 bytes, skips 2 slots of a Palette, now at Slot 4
	ld bc, 2 ; 2 bytes, 1 color, the type color in slot 4
	jp FarCopyColorWRAM
- Open
engine\pokemon\mon_menu.asmand add new functionAdjust_percent:
Accuracy and several other chance-related numbers are hard-coded as hexidecimal numbers, including Move's accuracy. To make it human-readable, some simple cross-multiplication needs to be done.
Adjust_percent:
	; hMultiplicand
	; hMultiplier. Result in hProduct.
	ldh [hMultiplicand], a
	ld a, 100
	ldh [hMultiplier], a
	call Multiply
	; Divide hDividend length b (max 4 bytes) by hDivisor. Result in hQuotient.
	; All values are big endian.
	ld b, 2
	; ldh a, [hProduct]
	; ldh [hDividend], a
	ld a, 255
	ldh [hDivisor], a
	call Divide
	ldh a, [hQuotient + 3]
	cp 100
	ret z
	inc a
	ret
- Edit
PlaceMoveDataalso inengine\pokemon\mon_menu.asm:
This shifts where the Move's Base Power number is printed in the text box, to the left 10 Squares.
	...
	call AddNTimes
	ld a, BANK(Moves)
	call GetFarByte
-	hlcoord 16, 12
+	hlcoord 6, 12
	cp 2
	jr c, .no_power
	ld [wTextDecimalByte], a
	ld de, wTextDecimalByte
	lb bc, 1, 3
	call PrintNum
; jump to printint Move Description
	jr .description
	...
- Edit and add the strings that will be used in the move info box, starting with
String_MoveAtk:inengine\pokemon\mon_menu.asm:
	...
String_MoveAtk:
-	db "ATK/@"
+	db "BP /@"
+String_MoveAcc:
+	db "ACC/@"
+String_MoveChance:
+	db "EFCT/@"
String_MoveNoPower:
	db "---@"
	...
- Finally, also in
engine\pokemon\mon_menu.asm, edit the functionPlaceMoveScreenLeftArrow:
The left arrow Tile is no longer being loaded since the space in VRAM is now being used by the new GFX Tiles. Here, it is simply being changed to the right-facing arrow. Later, the you will edit the CGB Layout to flip this Tile so it will look correct, and save space!
	...
.legal
	hlcoord 16, 0
-	ld [hl], "◀"
+	ld [hl], "▶"
	ret

PlaceMoveScreenRightArrow:
	...
7.2 Move Mangement Menu: Main Code (Phys/Spec Split)
- Still in
engine\pokemon\mon_menu.asm, editPlaceMoveData:
NOTE: The code will differ slightly depending on if Phys/Spec split has been implemented.
PlaceMoveData:
	xor a
	ldh [hBGMapMode], a ; screen editing mode
	hlcoord 0, 10
	ld de, String_MoveType_Top
	call PlaceString
	hlcoord 0, 11
	ld de, String_MoveType_Bottom
	call PlaceString
-	hlcoord 12, 12
-	ld de, String_MoveAtk
+; Place Move "Atk"/BP String
+	hlcoord 2, 12
+	ld de, String_MoveAtk ; string for "BP"
	call PlaceString

+; Place Move Cateogry
	ld a, [wCurSpecies]
+	dec a
+	ld hl, Moves + MOVE_TYPE
+	ld bc, MOVE_LENGTH
+	call AddNTimes
+	ld a, BANK(Moves)
+	call GetFarByte
+	push af ; raw Move Type+category Byte, unmasked
+	and ~TYPE_MASK ; Specific to Phys/Spec split
+	swap a ; Specific to Phys/Spec split
+	srl a  ; Specific to Phys/Spec split
+	srl a  ; Specific to Phys/Spec split
+	dec a  ; Specific to Phys/Spec split
-	ld b, a
-	farcall GetMoveCategoryName
-	hlcoord 1, 11
-	ld de, wStringBuffer1
+	ld hl, CategoryIconGFX ; ptr to Category GFX loaded from PNG(2bpp)
+	ld bc, 2 tiles
+	call AddNTimes
+	ld d, h
+	ld e, l
+	ld hl, vTiles2 tile $59 ; category icon tile slot in VRAM, destination
+	lb bc, BANK(CategoryIconGFX), 2
+	call Request2bpp ; Load 2bpp at b:de to occupy c tiles of hl.
+	hlcoord 7, 13
+	ld a, $59 ; category icon tile 1
+	ld [hli], a
+	ld [hl], $5a ; category icon tile 2
+; Place Move Type
+	pop af ; raw Move Type+category Byte, unmasked
+	and TYPE_MASK ; Phys/Spec Split specific
+	ld c, a
+	farcall GetMonTypeIndex
+	ld a, c
+; Type Index adjust done
+; Load Type GFX Tiles, color will be in Slot 4 of Palette
+	ld hl, TypeIconGFX ; ptr for PNG w/ black Tiles, since this screen is using Slot 4 in the Palette for Type color
+	ld bc, 4 * LEN_1BPP_TILE ; purely Black and White tiles are 1bpp. Type Tiles are 4 Tiles wide
+	call AddNTimes ; increments pointer based on Type Index
+	ld d, h
+	ld e, l ; de is the source Pointer
+	ld hl, vTiles2 tile $5b ; $5b is destination Tile for first Type Tile
+	lb bc, BANK(TypeIconGFX), 4 ; Bank in 'b', num of Tiles to load in 'c'
+	call Request1bpp
+	hlcoord 2, 13
+	ld a, $5b ; first Type Tile
+	ld [hli], a
+	inc a ; Tile $5c
+	ld [hli], a
+	inc a ; Tile $5d
+	ld [hli], a
+	ld [hl], $5e ; final Type Tile
+
+; Place Move Accuracy
+	hlcoord 10, 12
+	ld de, String_MoveAcc ; string for "ACC"
	call PlaceString
+	hlcoord 18, 12
+	ld [hl], "<%>"
+
+	; getting the actual Move's accuracy
	ld a, [wCurSpecies]
-	ld b, a
-	hlcoord 1, 12
-	ld [hl], "/"
-	inc hl
-	predef PrintMoveType
+	dec a
+	ld hl, Moves + MOVE_ACC
+	ld bc, MOVE_LENGTH
+	call AddNTimes
+	ld a, BANK(Moves)
+	call GetFarByte
+	call Adjust_percent ; outputs accuracy in decimal instead of hex to print appropiatley
+	hlcoord 15, 12
+	ld [wTextDecimalByte], a
+	ld de, wTextDecimalByte
+	lb bc, 1, 3 ; number of bytes of num being printed in 'b', max digits in 'c'
+	call PrintNum
+; Place Move Effect Chance
+; repeat steps but for Move's effect chance
+	ld a, [wCurSpecies]
+	dec a
+	ld hl, Moves + MOVE_CHANCE
+	ld bc, MOVE_LENGTH
+	call AddNTimes
+	ld a, BANK(Moves)
+	call GetFarByte
+	hlcoord 15, 13
+	cp 2
+	jr c, .no_efct_chance
+
+	call Adjust_percent ; outputs chance in decimal instead of hex to print appropiatley
+	ld [wTextDecimalByte], a
+	ld de, wTextDecimalByte
+	lb bc, 1, 3 ; number of bytes of num being printed in 'b', max digits in 'c'
+	call PrintNum
+
+	hlcoord 10, 13
+	ld de, String_MoveChance ; string for "EFCT"
+	call PlaceString
+	hlcoord 18, 13
+	ld [hl], "<%>"
+.no_efct_chance
+
+; Print BP Num
	ld a, [wCurSpecies]
	dec a
	ld hl, Moves + MOVE_POWER
	ld bc, MOVE_LENGTH
	call AddNTimes
	ld a, BANK(Moves)
	call GetFarByte
	hlcoord 6, 12
	cp 2
-	jr c, .no_power
+	jr c, .no_power ; means it's a status move
	ld [wTextDecimalByte], a
	ld de, wTextDecimalByte
-	lb bc, 1, 3
+	lb bc, 1, 3 ; number of bytes of num being printed in 'b', max digits in 'c'
	call PrintNum
+; Print Move Description
-	jr .description
+	jr .description ; printed BP, don't overwrite with "---", jump to print description
.no_power
-	ld de, String_MoveNoPower
+	ld de, String_MoveNoPower ; string for "---"
	call PlaceString
.description
	hlcoord 1, 14
	predef PrintMoveDescription
+
+	ld b, SCGB_MOVE_LIST
+	call GetSGBLayout ; reload proper palettes for new Move Type and Category, and apply
-	ld a, $1
+	ld a, $1 ; done editing the screen
	ldh [hBGMapMode], a
	ret
-
It's kind of unusual to re-apply the CGB Layout multiple times in the menu like this, apart from things like Battle. But it's necessary to call it like this inside the loop, since the loop is when the player is traversing the Move List with the Up and Down arrows. So calling CGB Layout when you first open the menu or switch to a different pokemon with the Right/Left Arrows isn't enough to update the Move's Type and Category Palettes as you look at different Moves.
-
The CGB Layout will have its own code that determines the Move's Type and Category, so nothing needs to be explicitly passed to it which is nice and convenient.
7.3 Move Mangement Menu: CGB Layout (Phys/Spec Split)
- Open
engine\gfx\cgb_layouts.asmand edit_CGB_MoveList:
Remember the Left Arrow? This is where it's getting Flipped from the Right Arrow into the Left Arrow!
_CGB_MoveList:
	ld de, wBGPals1
	ld a, PREDEFPAL_GOLDENROD
	call GetPredefPal
	call LoadHLPaletteIntoDE
	ld a, [wPlayerHPPal]
	ld l, a
	ld h, 0
	add hl, hl
	add hl, hl
	ld bc, HPBarPals
	add hl, bc
	call LoadPalette_White_Col1_Col2_Black
	call WipeAttrmap

+	ld hl, Moves + MOVE_TYPE
+	ld a, [wCurSpecies]
+	dec a
+	ld bc, MOVE_LENGTH
+	call AddNTimes
+	ld a, BANK(Moves)
+	call GetFarByte
+	and ~TYPE_MASK ; Specific to Phys/Spec split
+	swap a ; Specific to Phys/Spec split
+	srl a  ; Specific to Phys/Spec split
+	srl a  ; Specific to Phys/Spec split
+	dec a  ; Specific to Phys/Spec split
+	add a ; double the index
+	add a ; quadrouple the index
+	; since entries of CategoryIconPals are 4 bytes (2 colors, 2 bytes each) instead of normal 2 bytes (1 color)
+	ld hl, CategoryIconPals
+	ld c, a
+	ld b, 0
+	add hl, bc
+	ld de, wBGPals1 palette 2 + 2 ; slot 2 of pal 2
+	ld c, 4 ; 2 colors (4 bytes)
+	call LoadCPaletteBytesFromHLIntoDE
+
+	ld hl, Moves + MOVE_TYPE
+	ld a, [wCurSpecies]
+	dec a
+	ld bc, MOVE_LENGTH
+	call AddNTimes
+	ld a, BANK(Moves)
+	call GetFarByte
+	and TYPE_MASK
+	ld c, a ; farcall will clobber a for the bank
+	farcall GetMonTypeIndex
+	ld a, c
+	ld hl, TypeIconPals
+	add a ; double the index, entries of TypeIconPals are 2 bytes (1 color). Same as a list of pointers
+	ld c, a
+	ld b, 0
+	add hl, bc
+	ld de, wBGPals1 palette 2 + 6 ; slot 4 of palette 2
+	ld c, 2 ; 1 color (2 bytes)
+	call LoadCPaletteBytesFromHLIntoDE
+
+; Type and Category tiles
+	hlcoord 2, 13, wAttrmap
+	ld bc, 8 ; area 1 Tile in HEIGHT, 8 Tiles in WIDTH
+	ld a, $2 ; Palette 2
+	call ByteFill
+
+; fix left menu arrow, since we dont have left facing arrow
+	hlcoord 16, 0, wAttrmap
+	ld bc, 1 ; 1x1 Square
+	xor a ; pal 0, default palette
+	set 5, a ; flip on x axis
+	call ByteFill
+
-	hlcoord 11, 1, wAttrmap ; this doesnt seem to do anything, so it's being removed
-	lb bc, 2, 9
-	ld a, $1
-	call FillBoxCGB
	call ApplyAttrmap
	call ApplyPals
	ld a, TRUE
	ldh [hCGBPalUpdate], a
	ret
-
Not sure what the
hlcoord 11, 1in vanill was accomplishing, but it doesn't seem to negativly affect anything after removing it. -
This is actually the most simple of the CGB Layouts, no specialized functions needed from
colors.asmbesides the workhorseLoadCPaletteBytesFromHLIntoDE. The Category and Type Indexes are determined the same way as they are in the main code. -
The only new technique in this CGB Layout is the advanced use of the Attribute Map (wAttrmap), where the Right Arrow Tile was flipped in the X direction to make it a Left Arrow without needing to load a Left Arrow GFX. Whichever Palette the Square needs, load it into
afirst, then set the corresponding bit ofa. In this case, it was bit 5 to flip in the X direction, hence theset 5, a. Bit 6 for flipping in the Y direction. Both can done on a single tile, and instead ofsetyou could useorwith a bit-mask, ideally a constant declared locally likeCONST FLIP_BOTH_WAYS_BITMASK EQU %00110000for proper ettiquite, then doingor FLIP_BOTH_WAYS_BITMASKsinceawill be used by default. Again, make sure the Palette number has been loaded intoaBEFOREHAND. -
Also keep in mind, the Attribute Map affects the SQUARE, not the Tile, even though the changes are reflected by the Tile when looking at the Screen, obviously. If a different Tile other than the Right Arrow is loaded into Square 16,0 it would also appear flipped in the X direction unless you remove the code here in the CGB Layout.
Congratulations, the Move List edits are done! Compile the code and ensure everything looks and plays correctly before moving on.
8. Stats Screen
8.1 Stats Screen: Preparation
In the beginning of the tutorial, a new png for gfx\stats\stats_tiles.png was downloaded. It contains a new setup for the Stats Screen Page Indicator Boxes that will allow the Palettes dedicated to the last 1 or 2 colored pages (depending on if 4th Stats Page was implemented or not, doesn't bear on this tutorial either way) so that those Palettes will be free to be used for the Type and Status Icon Palettes.
- Open
engine\gfx\load_font.asmand editStatsScreen_LoadFontandLoadStatsScreenPageTilesGFX:
StatsScreen_LoadFont:
	...
	lb bc, BANK(ExpBarGFX), 8
	call Get2bppViaHDMA
+	ld de, FontBattleExtra + 17 tiles ; Starting at the 18th Tile of the FontBattleExtra PNG
+	ld hl, vTiles2 tile $71 ; loading that 18th Tile into Tile $71
+	lb bc, BANK(FontBattleExtra), 4 ; 4 Tiles, left arrow, ID + No. Tiles
+	call Get2bppViaHDMA
LoadStatsScreenPageTilesGFX:
	ld de, StatsScreenPageTilesGFX
	ld hl, vTiles2 tile $31
-	lb bc, BANK(StatsScreenPageTilesGFX), 17 ; loads 17 Tiles
+	lb bc, BANK(StatsScreenPageTilesGFX), 27 ; Loading More Tiles than in Vanilla
	call Get2bppViaHDMA
	ret
	...
- Still in
engine\gfx\load_font.asm, edit functionLoadHPBar:
This edit loads one less Tile than in Vanilla, starting with the 2nd Tile in the PNG.
	...
	lb bc, BANK(EnemyHPBarBorderGFX), 4
	call Get1bppViaHDMA
-	ld de, HPExpBarBorderGFX
-	ld hl, vTiles2 tile $73
-	lb bc, BANK(HPExpBarBorderGFX), 6
+	ld de, HPExpBarBorderGFX + 1 * LEN_1BPP_TILE
+	ld hl, vTiles2 tile $74
+	lb bc, BANK(HPExpBarBorderGFX), 5
	call Get1bppViaHDMA
	ld de, ExpBarGFX
	...
- Still in
engine\gfx\load_font.asm, editLoadBattleFontsHPBar:to not load tiles from FontBattleExtra PNG:
	...
	call Get2bppViaHDMA
-	ld hl, vTiles2 tile $70
-	ld de, FontBattleExtra + 16 tiles ; "<DO>"
-	lb bc, BANK(FontBattleExtra), 3 ; "<DO>" to "『"
-	call Get2bppViaHDMA
	call LoadFrame
	...
- Still in
engine\gfx\load_font.asm, load less tiles from_LoadFontsBattleExtra:
_LoadFontsBattleExtra::
	ld de, FontBattleExtra
	ld hl, vTiles2 tile $60
-	lb bc, BANK(FontBattleExtra), 25
+	lb bc, BANK(FontBattleExtra), 16
	call Get2bppViaHDMA
	...
In order to save space in VRAM, the code responsible for displaying the EXP bar in Battle and in the Stats screen is going to be changed to use the same Tiles as the HP Bar. This will require several changes.
- Edit
engine\battle\trainer_huds.asm: - in
DrawPlayerHUDBorder:
	...
.tiles
-	db $73 ; right side
+	db $6d ; right side
	db $77 ; bottom right
	db $6f ; bottom left
-	db $76 ; bottom side
+	db $62 ; bottom side
.tiles_end
	...
- in
DrawPlayerPartyIconHUDBorder:
	...
.tiles
-	db $73 ; right side
+	db $6d ; right side
	db $5c ; bottom right
	db $6f ; bottom left
-	db $76 ; bottom side
+	db $62 ; bottom side
.tiles_end
	...
- in
DrawEnemyHUDBorder:
	...
	db $78 ; bottom right
-	db $76 ; bottom side
+	db $62 ; bottom side
.tiles_end
	...
- Edit the function
PlaceExpBarinengine\battle\core.asm:
	...
.next
	add $8
	jr z, .loop2
-	add $54 ; tile to the left of small exp bar tile
+	push hl
+	push af
+	hlcoord 9, 0 ; coord of HP bar label, usually 0,9
+	ld a, [hl]
+	ld b, $62
+	cp $e8 ; if we are in stats screen
+	jr nz, .inbattle
+	ld b, $54
+.inbattle
+	pop af
+	pop hl
+	add b
	jr .skip
	...
- Edit
gfx\stats\pages.pal:
This will condense the Page colors into only 2 palettes instead of 3 or 4 Palettes.
-; pink
+; pink & green
	RGB 31, 31, 31
-	RGB 31, 19, 31
	RGB 31, 15, 31
-	RGB 00, 00, 00
-; green
-	RGB 31, 31, 31
-	RGB 21, 31, 14
	RGB 17, 31, 00
	RGB 00, 00, 00
-; blue
+; blue & orange
	RGB 31, 31, 31
	RGB 17, 31, 31
-	RGB 17, 31, 31
-	RGB 00, 00, 00
-; orange
-	RGB 31, 31, 31
-	RGB 30, 24, 16
	RGB 30, 22, 12
	RGB 00, 00, 00
- NOTE: Ensure that the resulting file looks like this, REGARDLESS of if you've implemented a 4th Stats page (aka Orange Page) or not:
; pink & green
	RGB 31, 31, 31 ; White, color 1
	RGB 31, 15, 31 ; pink, color 2
	RGB 17, 31, 00 ; green, color 3
	RGB 00, 00, 00 ; black, color 4
; blue & orange
	RGB 31, 31, 31 ; White, color 1
	RGB 17, 31, 31 ; blue, color 2
	RGB 30, 22, 12 ; orange, color 3
	RGB 00, 00, 00 ; black, color 4
This file contains all 4 color slots for each of the two palettes(3&4) that will be loaded by the CGB Layout later on.
8.2 Stats Screen: Palette Set Up
Editing engine\gfx\color.asm for the Stats Screen; this is getting its own section because there will be a lot to go over.
- Add set of two new functions together,
LoadPlayerStatusIconPaletteandLoadStatsScreenStatusIconPaletteright above it:
LoadStatsScreenStatusIconPalette will jump to halfway into LoadPlayerStatusIconPalette so it's important to keep them within jr distance of each other.
LoadStatsScreenStatusIconPalette:
	ld de, wTempMonStatus
	predef GetStatusConditionIndex
	; index is in 'd'
	jr LoadPlayerStatusIconPalette.phase2 ; do not load the white pal in slot 4 of pal 6
LoadPlayerStatusIconPalette:
	; given: Status condition index in 'd'

	; load single white color in slot 4 of palette 6
	ldh a, [rSVBK]
	push af
	ld a, BANK(wBGPals1)
	ldh [rSVBK], a
	ld hl, wBGPals1 palette 6 + 6 ; slot 4 of pal 6
	ld a, $FF
	ld [hli], a
	ld [hl], a
	pop af
	ldh [rSVBK], a
	; done loading white color directly into slot 4 of pal 6
.phase2
	ld hl, StatusIconPals
	ld c, d
	ld b, 0
	add hl, bc ; pointers are 2 bytes long, so double the index to point at the right color
	add hl, bc
	ld de, wBGPals1 palette 6 + 2 ; slot 2 of pal 6
	ld bc, 2 ; number of bytes of the color, 2 bytes per slot
	jp FarCopyColorWRAM
- Edit the
LoadStatsScreenPalsfunction:
LoadStatsScreenPals:
	...
	add hl, bc
	add hl, bc
	ldh a, [rSVBK]
	push af
	ld a, BANK(wBGPals1)
	ldh [rSVBK], a
+	ld a, [hli] ; byte 1 of the stats screen page color
+	ld [wBGPals1 palette 0], a ; into slot 1 byte 1 of pal 0
+	ld [wBGPals1 palette 2], a ; into slot 1 byte 1 of pal 2
+	ld [wBGPals1 palette 6], a ; into slot 1 byte 1 of pal 6
+	ld [wBGPals1 palette 7], a ; into slot 1 byte 1 of pal 7
+	ld a, [hl]
+	ld [wBGPals1 palette 0 + 1], a ; into slot 1 byte 2 of pal 0
+	ld [wBGPals1 palette 2 + 1], a ; into slot 1 byte 2 of pal 2
+	ld [wBGPals1 palette 6 + 1], a ; into slot 1 byte 2 of pal 6
+	ld [wBGPals1 palette 7 + 1], a ; into slot 1 byte 2 of pal 7
+
+	dec hl
	ld a, [hli]
-	ld [wBGPals1 palette 0], a
-	ld [wBGPals1 palette 2], a
+	cp $7f ; half of pink page color, which is $7E7F but bytes are reversed when stored in data (endianness),
+	; so check $7F first since it will be the first one read
+	jr nz, .notpinkpage
	ld a, [hl]
-	ld [wBGPals1 palette 0 + 1], a
-	ld [wBGPals1 palette 2 + 1], a
+	cp $7e ; first half of pink page color
+	jr nz, .notpinkpage
+
+	; if we're here, we're on the pink page
+	; set slot 4 (the "text" slot) of Pal 7 to WHITE (FFFF or 7FFF)
+	; pal 6 too, status condition, if slot 2 of pal 6 isnt white
+	; if it is white, means we are "OK", and dont change slot 4 of pal 6
+	ld a, $FF ; loading white into slot 4 of pal 6 and 7, checking pal 6 after
+	ld [wBGPals1 palette 7 + 6], a ; slot 4 of Palette 7, byte 1
+	ld [wBGPals1 palette 7 + 7], a ; slot 4 of palette 7, byte 2
+	ld [wBGPals1 palette 6 + 6], a ; slot 4 of palette 6, byte 1
+	ld [wBGPals1 palette 6 + 7], a ; slot 4 of palette 6, byte 2
+
+	; check if $7F $FF is loaded into pal 6 + 2, means we are "OK" and need black in slot 4 of pal 6
+	ld a, [wBGPals1 palette 6 + 2] ; pal 6 slot 2 byte 1
+	cp $FF ; white color by default will be $7FFF but $ff will be read first
+	jr nz, .done
+	ld a, [wBGPals1 palette 6 + 3] ; pal 6 slot 2 byte 1
+	cp $7F
+	jr nz, .done
+	xor a ; loading black into slot 4 of pal 6
+	ld [wBGPals1 palette 6 + 6], a
+	ld [wBGPals1 palette 6 + 7], a
+	jr .done
+.notpinkpage
+	xor a ; loading black into slot 4 of pal 6 and 7
+	ld [wBGPals1 palette 6 + 6], a
+	ld [wBGPals1 palette 6 + 7], a
+	ld [wBGPals1 palette 7 + 6], a
+	ld [wBGPals1 palette 7 + 7], a
+.done
	pop af
	ldh [rSVBK], a
	call ApplyPals
	ld a, $1
	ret
This function is called anytime the stats screen switches between the different colored pages. The new page color needs to inserted into the first color slot of the Palettes that require the colored backgrounds, which is anything that's printed below the "Upper half", including the Pokemon's Type(s) and Status. Type(s) and Status colors will be loaded into Palettes 6 and 7. So in addition to Palettes 0 and 2, Palettes 6 and 7 need to be loaded with the Page Color in Slot 1. This is done with the following code (hl is pointing to StatsScreenPals incremented with the Page Index :
	ld a, [hli] ; byte 1 of the stats screen page color from StatsScreenPals, incs hl to 2nd byte of page color
	ld [wBGPals1 palette 0], a ; into slot 1 byte 1 of pal 0
	ld [wBGPals1 palette 2], a ; into slot 1 byte 1 of pal 2
	ld [wBGPals1 palette 6], a ; into slot 1 byte 1 of pal 6
	ld [wBGPals1 palette 7], a ; into slot 1 byte 1 of pal 7
	ld a, [hl]
	ld [wBGPals1 palette 0 + 1], a ; into slot 1 byte 2 of pal 0
	ld [wBGPals1 palette 2 + 1], a ; into slot 1 byte 2 of pal 2
	ld [wBGPals1 palette 6 + 1], a ; into slot 1 byte 2 of pal 6
	ld [wBGPals1 palette 7 + 1], a ; into slot 1 byte 2 of pal 7
Another challenge is that because of the Pink background, some of the Tiles are hard to see without White Text inside the Tiles. In all other instances, this isn't a problem because the text inside the Tiles matches the background color. Keep in mind, this is not real "text" it's part of the GFX tiles' design.
To get around this, the Type and (player) Status PNGs all have the text parts in black, so that Slot 4 can hold White in those Palettes, and therefore make the text part of the design White.
To implement this, this function checks if it's currently on the Pink page with this code:
	dec hl ; go back to pointing at the 1st byte of the color from StatsScreenPals incremented to current page color
	ld a, [hli] ; hl now pointing to 2nd byte of color
	; 1st byte of color is now in 'a'
	cp $7f ; half of pink page color, which is $7E7F but bytes are reversed when stored in data (endianness)
	; so check $7F first since it will be the first one read
	jr nz, .notpinkpage
	ld a, [hl]
	cp $7e ; first half of pink page color
	jr nz, .notpinkpage

	; if we're here, we're on the pink page
Then, this is what loads white into slot 4 of the two palettes:
	; if we're here, we're on the pink page
	; set slot 4 (the "text" slot) of Pal 7 to WHITE (FFFF or 7FFF)
	; pal 6 too, status condition, if slot 2 of pal 6 isnt white
	; if it is white, means we are "OK", and dont change slot 4 of pal 6
	ld a, $FF ; loading white into slot 4 of pal 6 and 7, checking pal 6 after
	ld [wBGPals1 palette 7 + 6], a ; slot 4 of Palette 7, byte 1
	ld [wBGPals1 palette 7 + 7], a ; slot 4 of palette 7, byte 2
	ld [wBGPals1 palette 6 + 6], a ; slot 4 of palette 6, byte 1
	ld [wBGPals1 palette 6 + 7], a ; slot 4 of palette 6, byte 2
Similarly, on every other page besides the Pink page, black needs to be in slot 4 of both Palettes, because the CGB Layout is not going to change. Code could be written to make it work via the CGB Layout instead, but this method is what's being used in this tutorial. You can see the black being loaded into slot 4 of both palettes with this code:
.notpinkpage
	xor a ; loading black into slot 4 of pal 6 and 7
	ld [wBGPals1 palette 6 + 6], a
	ld [wBGPals1 palette 6 + 7], a
	ld [wBGPals1 palette 7 + 6], a
	ld [wBGPals1 palette 7 + 7], a
.done
But there is an additional challenge. When the Pokemon has no Status Condition, real text "OK" is printed in the same two Squares as the Status Condition Tiles. So, when the condition is OK, black needs to be in Slot 4 of Palette 6 (the palette for the Status Conditions). GetStatusConditionIndex can be used to deterine the Pokemon's Status (from the values passed in wTempMonStatus, via de). But, since the Palettes' WRAM is in a different WRAM bank, the original WRAM bank needs to be restored before we call predef GetStatusConditionIndex then switch it back to the Palettes' WRAM bank before the Palettes can be directly edited by dereferencing [wBGPals1 palette X]. This is the pertinent code:
	; check if the Pokemon is "OK" and therefore needs black text in Palette 6
	pop af
	ldh [rSVBK], a ; restore the Bank that was there before
	; this code is straight from the Vanilla code in engine\pokemon\stats_screen.asm
	ld de, wTempMonStatus
	predef GetStatusConditionIndex

	ldh a, [rSVBK] ; our current real WRAM bank
	push af
	ld a, BANK(wBGPals1) ; go back to editing the palettes directly in their WRAM bank
	ldh [rSVBK], a

	ld a, d ; Status Condition Index
	and a
	; jr z, .StatusOK
	jr nz, .done ; we are NOT "OK", keep the white color in slot 4 of pal 6
; .StatusOK
	xor a ; loading black into slot 4 of pal 6
	ld [wBGPals1 palette 6 + 6], a
	ld [wBGPals1 palette 6 + 7], a
	jr .done
Set-up is done for the Stats Screen!
8.3 Stats Screen: Main Code
These edits will be taking place within engine\pokemon\stats_screen.asm
- Edit funtion
LoadPinkPage, most of the edits will be taking place here, as the Types and Status Condtion of the Pokemon are displayed on the Pink Page.
	...
	ld [hl], $41 ; right HP/exp bar end cap
-	ld de, .Status_Type
+	ld de, .Status_Text ; string for "STATUS/"
	hlcoord 0, 12
	call PlaceString
+	ld de, .Type_Text ; string for "TYPE/"
+	hlcoord 0, 14
+	call PlaceString
+
+	call PrintMonTypeTiles ; custom GFX function
+
	ld a, [wTempMonPokerusStatus]
	...
	...
	jr z, .NotImmuneToPkrs
-	hlcoord 8, 8
+	hlcoord 19, 1
	ld [hl], "." ; Pokérus immunity dot
.NotImmuneToPkrs:
	ld a, [wMonType]
	cp BOXMON
-	jr z, .StatusOK
-	hlcoord 6, 13
-	push hl
+	jr z, .done_status
+
	ld de, wTempMonStatus
-	predef PlaceStatusString
-	pop hl
-	jr nz, .done_status
-	jr .StatusOK
+	predef GetStatusConditionIndex
+	ld a, d
+	and a
+	jr z, .StatusOK
+
+	; status index in a
+	ld hl, StatusIconGFX
+	ld bc, 2 * LEN_2BPP_TILE
+	call AddNTimes
+	ld d, h
+	ld e, l
+	ld hl, vTiles2 tile $50
+	lb bc, BANK(StatusIconGFX), 2
+	call Request2bpp
+
+	hlcoord 7, 12
+	ld a, $50 ; status tile first half
+	ld [hli], a
+	inc a ; status tile 2nd half
+	ld [hl], a
+
+	jr .done_status
.HasPokerus:
	ld de, .PkrsStr
	hlcoord 1, 13
	call PlaceString
-	jr .done_status
+	jr .NotImmuneToPkrs
.StatusOK:
+	hlcoord 7, 12
	ld de, .OK_str
	call PlaceString
.done_status
-	hlcoord 1, 15
-	predef PrintMonTypes
	hlcoord 9, 8
	ld de, SCREEN_WIDTH
	...
	...
-.Status_Type:
-	db   "STATUS/"
-	next "TYPE/@"
-
+.Status_Text:
+	db   "STATUS/@"
+.Type_Text:
+	db   "TYPE/@"
.OK_str:
	db "OK @"
	...
- Create the new function being called in the Pink Page edit,
PrintMonTypeTiles:
This should be very familiar by now. The same process was done in the Pokedex already.
PrintMonTypeTiles:
	call GetBaseData
	ld a, [wBaseType1]
	ld c, a ; farcall will clobber a for the bank
	farcall GetMonTypeIndex
	ld a, c
	ld hl, TypeLightIconGFX ; from gfx\stats\types_light.png
	ld bc, 4 * LEN_2BPP_TILE ; Type GFX is 4 tiles wide
	call AddNTimes
	ld d, h
	ld e, l
	ld hl, vTiles2 tile $4c
	lb bc, BANK(TypeLightIconGFX), 4 ; Bank in 'c', Number of Tiles in 'c'
	call Request2bpp

; placing the Type1 Tiles (from gfx\stats\types_light.png)
	hlcoord 5, 14
	ld [hl], $4c
	inc hl
	ld [hl], $4d
	inc hl
	ld [hl], $4e
	inc hl
	ld [hl], $4f
	inc hl
	ld a, [wBaseType1]
	ld b, a
	ld a, [wBaseType2]
	cp b
	ret z; Pokemon only has one Type

	; Load Type2 GFX
	; 2nd Type
	ld c, a ; Pokemon's second type
	farcall GetMonTypeIndex
	ld a, c
	ld hl, TypeDarkIconGFX ; from gfx\stats\types_dark.png
	ld bc, 4 * LEN_2BPP_TILE ; Type GFX is 4 Tiles Wide
	call AddNTimes ; type index needs to be in 'a'
	ld d, h
	ld e, l
	ld hl, vTiles2 tile $5c
	lb bc, BANK(TypeDarkIconGFX), 4 ; Bank in 'c', Number of Tiles in 'c'
	call Request2bpp

; place Type 2 GFX
	hlcoord 5, 15
	ld [hl], $5c
	inc hl
	ld [hl], $5d
	inc hl
	ld [hl], $5e
	inc hl
	ld [hl], $5f
	ret
8.4 Stats Screen: Fixing Page indicator boxes
Edit StatsScreen_LoadPageIndicators to change the way the box GFX are used:
- Edit the
StatsScreen_LoadPageIndicatorsfunction, add the following code at the very end of the function:
It's the .load_highlighted_square_alt referred to in the next step below.
	...
	ld [hl], a
	pop bc
	ret
+.load_highlighted_square_alt
+	ld a, $46 ; first of 4 large square tiles, alternate Gray pixels for use of 3rd color slot
+	jr .load_square
The Pink and Blue pages will be using Light Gray version of the boxes (via .load_highlighted_square_alt)
Green (and Orange Page if you implemented it) will be using .load_highlighted_square.
8.4.1 Stats Screen: Fixing Page indicator boxes (Vanilla, no 4th Stats Page)
StatsScreen_LoadPageIndicators:
	hlcoord 13, 5
-	ld a, $36 ; first of 4 small square tiles
+	ld a, $42 ; first of 4 small square tiles
	call .load_square
	hlcoord 15, 5
	ld a, $36 ; " " " "
	call .load_square
	hlcoord 17, 5
-	ld a, $36 ; " " " "
+	ld a, $42 ; " " " "
	call .load_square
	ld a, c
+	cp PINK_PAGE
+	hlcoord 13, 5
+	jr z, .load_highlighted_square_alt
	cp GREEN_PAGE
+	hlcoord 15, 5
+	jr z, .load_highlighted_square
+	; can assume cp BLUE_PAGE will be true, no other choices
+	hlcoord 17, 5
+	jr .load_highlighted_square_alt
+.load_highlighted_square
	ld a, $3a ; first of 4 large square tiles
-	hlcoord 13, 5 ; PINK_PAGE (< GREEN_PAGE)
-	jr c, .load_square
-	hlcoord 15, 5 ; GREEN_PAGE (= GREEN_PAGE)
-	jr z, .load_square
-	hlcoord 17, 5 ; BLUE_PAGE (> GREEN_PAGE)
.load_square
	...
8.4.2 Stats Screen: Fixing Page indicator boxes (Implemented 4th Stats Page)
StatsScreen_LoadPageIndicators:
+	hlcoord 11, 5
+	ld a, $42 ; " " " "
+	call .load_square
	hlcoord 13, 5
	ld a, $36 ; first of 4 small square tiles
	call .load_square
	hlcoord 15, 5
-	ld a, $36 ; " " " "
+	ld a, $42 ; " " " "
	call .load_square
	hlcoord 17, 5
	ld a, $36 ; " " " "
	call .load_square
	ld a, c
+	cp PINK_PAGE
+	hlcoord 11, 5
+	jr z, .load_highlighted_square_alt
	cp GREEN_PAGE
+	hlcoord 13, 5
+	jr z, .load_highlighted_square
+	cp BLUE_PAGE
+	hlcoord 15, 5
+	jr z, .load_highlighted_square_alt
+	; must be ORANGE_PAGE
+	hlcoord 17, 5
+.load_highlighted_square
	ld a, $3a ; first of 4 large square tiles
-	hlcoord 13, 5 ; PINK_PAGE (< GREEN_PAGE)
-	jr c, .load_square
-	hlcoord 15, 5 ; GREEN_PAGE (= GREEN_PAGE)
-	jr z, .load_square
-	hlcoord 17, 5 ; BLUE_PAGE (> GREEN_PAGE)
.load_square
	...
The only difference between the 4th Stats Page implementation and the vanilla is where the first Page indicator Box is printed (the pink page box indicator). If adding a 4th stats page was implemented, the indicator box for the Pink page will be at coordinate 11, 5, instead of 13, 5 like it is in Vanilla. So it's a very simple difference after also switching which Gray version will be loaded at which coordinate. The pink page will always be using the "alt" boxes, so instead of vanilla starting with Tile $42 at Coordinate 13, 5, it will be starting with Tile $42 at Coordinate 11, 5, and Green page (Tile $36) will be using coordinate 13, 5, vanilla would be 15, 5 for Green (Tile $36). Same for Blue page.
8.5 Stats Screen: CGB Layout
For this section, the (possibly) two Types' colors need to be loaded into Palette 7, and the Status Condition color needs to be loaded into Palette 6.
- Edit
_CGB_StatsScreenHPPalsinengine\gfx\cgb_layouts.asm:
This is the part to load the appropiate colors into the appropiate Palettes. We are skipping Palette 5 and leaving it free for future endeavors, otherwise, the palettes are loaded in order nicely. Nothing in this part should be too alien.
Note that the section of code with StatsScreenPagePals, it's loading two whole Palettes at once, that's why ld bc, 2 palettes is being used. 2 palettes is a Macro that calculates into 8 bytes per Palette, so it's telling FarCopyWRAM to copy 16 bytes this way.
NOTE: This code will work the same regardless of if you've implemented a 4th stats page (orange page) or not. If something is wrong, ensure that you properly edited gfx\stats\pages.pal
	...
-	call LoadPalette_White_Col1_Col2_Black
+	call LoadPalette_White_Col1_Col2_Black ; hp palette, palette 0
	ld a, [wCurPartySpecies]
	ld bc, wTempMonDVs
	call GetPlayerOrMonPalettePointer
-	call LoadPalette_White_Col1_Col2_Black
+	call LoadPalette_White_Col1_Col2_Black ; mon palette, palette 1
	ld hl, ExpBarPalette
-	call LoadPalette_White_Col1_Col2_Black
+	call LoadPalette_White_Col1_Col2_Black ; exp palette, palette 2
+
	ld hl, StatsScreenPagePals
-	ld de, wBGPals1 palette 3
+	ld de, wBGPals1 palette 3 ; palettes 3 & 4
-	ld bc, 3 palettes ; pink, green, and blue page palettes
+	ld bc, 2 palettes ; pink, green, blue, ( and orange page) palettes
+	; NOTE: Won't hurt anything if you don't have a 4th stats page, just leave it
	ld a, BANK(wBGPals1)
	call FarCopyWRAM
+
+	call LoadStatsScreenStatusIconPalette
+
+; Load Pokemon's Type Palette(s)
+	call GetBaseData
+	ld a, [wBaseType1]
+	ld c, a ; farcall will clobber a for the bank
+	farcall GetMonTypeIndex
+; load the 1st type pal
+	; type index is already in c
+	ld de, wBGPals1 palette 7 + 2 ; slot 2 of pal 7, byte 1
+	call LoadMonBaseTypePal
+
+	ld a, [wBaseType1]
+	ld b, a
+	ld a, [wBaseType2]
+	cp b
+	jr z, .palettes_done
+	ld c, a ; farcall will clobber a for the bank
+	farcall GetMonTypeIndex
+; load the 2nd type pal
+	; type index is already in c
+	ld de, wBGPals1 palette 7 + 4 ; slot 3 of pal 7, byte 1
+	call LoadMonBaseTypePal
+.palettes_done
	call WipeAttrmap
	...
As shown from ld bc, 3 palettes going to ld bc, 2 palettes we are condensing the page colors into only two palettes instead of using a whole palette for each page. This is why the two different box Tiles in both Light gray and Dark Gray are being used.
This is what the VRAM viewer Palettes tab will look like once everything is finished:
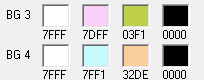
- Still in
_CGB_StatsScreenHPPals, edit the Attribute Map instructions:
	...
	ld a, $2 ; exp palette
	call ByteFill

+; page indicator boxes
-	hlcoord 13, 5, wAttrmap
+	hlcoord 13, 5, wAttrmap ; If 4th Stats Page implemented use this instead -> hlcoord 11, 5, wAttrmap
-	lb bc, 2, 2
+	lb bc, 2, 4 ; 2 Tiles in HEIGHT, 4 Tiles in WIDTH
-	ld a, $3 ; pink page palette
+	ld a, $3 ; pink & green page palette
	call FillBoxCGB
-
-	hlcoord 15, 5, wAttrmap
-	lb bc, 2, 2
-	ld a, $3 ; green page palette
-	call FillBoxCGB

-	hlcoord 17, 5, wAttrmap
+	hlcoord 17, 5, wAttrmap ; If 4th Stats Page implemented use this instead -> hlcoord 15, 5, wAttrmap
-	lb bc, 2, 2
+	lb bc, 2, 2 ; 2 Tiles in HEIGHT, 2 Tiles in WIDTH
+	; If 4th Stats Page implemented use this instead -> lb bc, 2, 4 ; 2 Tiles in HEIGHT, 4 Tiles in WIDTH
-	ld a, $5 ; blue page palette
+	ld a, $4 ; blue & orange box palette
	call FillBoxCGB

+; mon status
+	hlcoord 7, 12, wAttrmap
+	lb bc, 1, 2 ; 1 Tile in HEIGHT, 2 Tiles in WIDTH
+	ld a, $6 ; mon base type light/dark pals
+	call FillBoxCGB
+
+; mon type(s)
+	hlcoord 5, 14, wAttrmap
+	lb bc, 2, 4 ; 2 Tiles in HEIGHT, 4 Tiles in WIDTH
+	ld a, $7 ; mon base type light/dark pals
+	call FillBoxCGB
+
	call ApplyAttrmap
	...
- Still in
engine\gfx\cgb_layouts.asm, edit_CGB_FinishBattleScreenLayout:
This is another hybridized situation where, because of the edits made to the EXP bar to reuse tiles in the Stats screen, edits must also be made to the Battle Screen to avoid the Tiles being wonky. This would need to be done anyways in the next section, so might as well do it now to finish off the Stats Screen section.
_CGB_FinishBattleScreenLayout:
	...
	hlcoord 0, 12, wAttrmap
	ld bc, 6 * SCREEN_WIDTH
	ld a, PAL_BATTLE_BG_TEXT
	call ByteFill
+
+; flip reused tiles
+; HUD vertical bar thingy
+	hlcoord 18, 10, wAttrmap
+	ld bc, 1
+	ld a, PAL_BATTLE_BG_PLAYER_HP
+	set 5, a ; flips tiles on x axis
+	call ByteFill
+
+; player exp
+	hlcoord 10, 11, wAttrmap
+	lb bc, 1, 8
+	ld a, PAL_BATTLE_BG_EXP
+	set 5, a ; flips tiles on x axis
+	call FillBoxCGB
+
	ld hl, BattleObjectPals
	ld de, wOBPals1 palette PAL_BATTLE_OB_GRAY
	ld bc, 6 palettes
	ld a, BANK(wOBPals1)
	...
Done with the complex Stats Screen Page! Congratulations! Compile and Test!
9. Battle Move Info Box (Phys/Spec Split)
The edits in this section won't be as crazy as the Stats Screen, and by this point, you're a pro at this. Nothing being done in this section will be out of left field.
This is our goal:
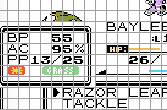
The second goal is for the Status Condition Tiles to be loaded and used for both the Player Pokemon and the enemy. This includes GFX Tiles for Toxic, to distinguish it from normal Poison!
9.1 Battle: Preparation (Phys/Spec Split) in engine\battle\
- Add predef entries in
data\predef_pointers.asmfor new functions that will be added in this section:
	...
	add_predef GetMonTypeIndex
+	add_predef Player_LoadNonFaintStatus
+	add_predef Enemy_LoadNonFaintStatus
	dbw -1, DummyEndPredef ; pointless
- Edit
engine\battle\effects_commands.asm:
Payclose attention to the functions being edited in this particular file, many functions have similar names and repetitive code. It can be easy to get lost and edit the wrong code.
- In
BattleCommand_SleepTarget::
	...
	inc a
	ld [de], a
	call UpdateOpponentInParty
-	call RefreshBattleHuds
+	ld b, SCGB_BATTLE_COLORS
+	call GetSGBLayout
+	call SetPalettes
+	call DelayFrame
+	call UpdateBattleHuds
+	ld c, 3
+	call DelayFrames
+	call WaitBGMap

	ld hl, FellAsleepText
	...
- Edit
BattleCommand_PoisonTarget:
	...
	call PoisonOpponent
	ld de, ANIM_PSN
	call PlayOpponentBattleAnim
-	call RefreshBattleHuds
+	ld b, SCGB_BATTLE_COLORS
+	call GetSGBLayout
+	call SetPalettes
+	call DelayFrame
+	call UpdateBattleHuds
+	ld c, 3
+	call DelayFrames
+	call WaitBGMap

	ld hl, WasPoisonedText
	...
- Edit
BattleCommand_Poison:
	...
.apply_poison
	call AnimateCurrentMove
	call PoisonOpponent
-	jp RefreshBattleHuds
+	ld b, SCGB_BATTLE_COLORS
+	call GetSGBLayout
+	call SetPalettes
+	call DelayFrame
+	call UpdateBattleHuds
+	ld c, 3
+	call DelayFrames
+	call WaitBGMap
+	ret

.check_toxic
	ld a, BATTLE_VARS_SUBSTATUS5_OPP
	...
- Edit
BattleCommand_BurnTarget:
	...
	ld de, ANIM_BRN
	call PlayOpponentBattleAnim
-	call RefreshBattleHuds
+	ld b, SCGB_BATTLE_COLORS
+	call GetSGBLayout
+	call SetPalettes
+	call DelayFrame
+	call UpdateBattleHuds
+	ld c, 3
+	call DelayFrames
+	call WaitBGMap

	ld hl, WasBurnedText
	call StdBattleTextbox
	...
- Edit
BattleCommand_FreezeTarget:
	...
	ld de, ANIM_FRZ
	call PlayOpponentBattleAnim
-	call RefreshBattleHuds
+	ld b, SCGB_BATTLE_COLORS
+	call GetSGBLayout
+	call SetPalettes
+	call DelayFrame
+	call UpdateBattleHuds
+	ld c, 3
+	call DelayFrames
+	call WaitBGMap

	ld hl, WasFrozenText
	call StdBattleTextbox
	...
- Edit
BattleCommand_ParalyzeTarget:
	...
	call CallBattleCore
	ld de, ANIM_PAR
	call PlayOpponentBattleAnim
-	call RefreshBattleHuds
+	ld b, SCGB_BATTLE_COLORS
+	call GetSGBLayout
+	call SetPalettes
+	call DelayFrame
+	call UpdateBattleHuds
+	ld c, 3
+	call DelayFrames
+	call WaitBGMap
+
	call PrintParalyze
	ld hl, UseHeldStatusHealingItem
	jp CallBattleCore
	...
- Edit
BattleCommand_Paralyze:
	...
	ld a, BATTLE_VARS_STATUS_OPP
	call GetBattleVar
	bit PAR, a
-	jr nz, .paralyzed
+	jp nz, .paralyzed
	ld a, [wTypeModifier]
	and $7f
-	jr z, .didnt_affect
+	jp z, .didnt_affect
	call GetOpponentItem
	ld a, b
	cp HELD_PREVENT_PARALYZE
	...
	call UpdateOpponentInParty
	ld hl, ApplyPrzEffectOnSpeed
	call CallBattleCore
+
+	ld b, SCGB_BATTLE_COLORS
+	call GetSGBLayout
+	call SetPalettes
+	call DelayFrame
	call UpdateBattleHuds
	call PrintParalyze
	ld hl, UseHeldStatusHealingItem
	jp CallBattleCore
- Edit
BattleCommand_Heal:
	...
	call CallBattleCore
	call BattleCommand_SwitchTurn
	call UpdateUserInParty
-	call RefreshBattleHuds
+	ld b, SCGB_BATTLE_COLORS
+	call GetSGBLayout
+	call SetPalettes
+	call DelayFrame
+	call UpdateBattleHuds
+	ld c, 3
+	call DelayFrames
+	call WaitBGMap
+
	ld hl, RegainedHealthText
	jp StdBattleTextbox
	...
- Edit
BattleCommand_Defrost:
	...
.done
-	call RefreshBattleHuds
+	ld b, SCGB_BATTLE_COLORS
+	call GetSGBLayout
+	call SetPalettes
+	call DelayFrame
+	call UpdateBattleHuds
+	ld c, 3
+	call DelayFrames
+	call WaitBGMap
+
	ld hl, WasDefrostedText
	jp StdBattleTextbox
	...
These edits ensure that the Status Tiles and colors are updated in sync with the battle effects of moves.
9.2 Battle: Preparation (Phys/Spec Split) in engine\gfx\colors.asm
First, a new function that will load the Move's Type and Category colors just like the code from Move List menu.
This function is necessary because it pulls the data from wPlayerMoveStruct which is only used in battle.
- Find the function
LoadCategoryAndTypePalsinengine\gfx\colors.asm. Add this new function,LoadBattleCategoryAndTypePals, right above it:
NOTE: It's very important that this function is positioned right above LoadCategoryAndTypePals because it will fallthrough into LoadCategoryAndTypePals and continue there normally.
+LoadBattleCategoryAndTypePals:
+	ld a, [wPlayerMoveStruct + MOVE_TYPE]
+	and ~TYPE_MASK ; Phys/Spec split only
+	swap a ; Phys/Spec split only
+	srl a ; Phys/Spec split only
+	srl a ; Phys/Spec split only
+	dec a ; Phys/Spec split only
+	ld b, a ; Move Category Index
+	ld a, [wPlayerMoveStruct + MOVE_TYPE]
+	ld c, a ; farcall will clobber a for the bank
+	farcall GetMonTypeIndex
+	; type index is already in c
+	ld de, wBGPals1 palette 5
+	; fallthrough
LoadCategoryAndTypePals:
	...
- In
engine\gfx\colors.asm, add a new functions,LoadEnemyBattleCGBLayoutStatusIconPaletteandLoadEnemyStatusIconPalette:
It matches up with the function added in the last section, LoadPlayerStatusIconPalette so try and keep near each other in the file to help avoid confusion.
NOTE: These new functions need to be arrange just like this code snippet, LoadEnemyBattleCGBLayoutStatusIconPalette is used by the CGB Layout to check for Toxic and get the Mon's status condition, then it falls through to LoadEnemyStatusIconPalette.
LoadEnemyBattleCGBLayoutStatusIconPalette:
	ld bc, 0
	farcall Enemy_CheckToxicStatus
	jr nc, .check_status_nottoxic
	ld c, 7
.check_status_nottoxic
	ld a, 7
	cp c ; checking if we are Toxic'd
	jr z, .enemy_gotstatus ; yes, we are toxic
	ld de, wEnemyMonStatus
	predef GetStatusConditionIndex
	ld a, d
	and a
	ret z ; .no_status
	cp $6 ; faint
	ret z
.enemy_gotstatus
	ld d, a
LoadEnemyStatusIconPalette:
	ld a, [wEnemySubStatus2]
	ld de, wEnemyMonStatus
	farcall GetStatusConditionIndex ; status cond. index returned in 'd'
	ld hl, StatusIconPals ; from gfx\types_cats_status_pals.asm
	ld c, d
	ld b, 0
	add hl, bc ; add the index twice because file is list of colors 2 bytes each
	add hl, bc
	ld de, wBGPals1 palette 6 + 4 ; slot 3 of Palette 6
	ld bc, 2 ; two bytes, 1 color
	jp FarCopyColorWRAM
- Find the function
LoadStatsScreenStatusIconPaletteinengine\gfx\colors.asm. Add this new functionLoadPlayerBattleCGBLayoutStatusIconPaletteright above it:
NOTE: It's important logically that this function is positioned right above LoadStatsScreenStatusIconPalette because it will jump into LoadPlayerStatusIconPalette and continue there normally.
+LoadPlayerBattleCGBLayoutStatusIconPalette:
+	ld bc, 0
+	farcall Player_CheckToxicStatus
+	jr nc, .check_status_nottoxic
+	ld c, 7
+.check_status_nottoxic
+	ld a, 7
+	cp c ; checking if we are Toxic'd
+	jr z, .player_gotstatus ; yes, we are toxic
+	ld de, wBattleMonStatus
+	farcall GetStatusConditionIndex
+	ld a, d
+	and a
+	ret z ; .no_status
+	cp $6 ; faint
+	ret z
+.player_gotstatus
+	ld d, a
+	jp LoadPlayerStatusIconPalette
LoadStatsScreenStatusIconPalette:
	...
This shouldn't look too differently from the previous work with Status Conditions in the Party Menu and the Stats Screen. The only new thing is the check for Toxic. This function will be called from the CBG Layout to determine what color needs to be loaded for the Player Pokemon's Status Condition.
9.3 Battle: Main Code in engine\pokemon\mon_stats.asm
Add 4 new functions in engine\pokemon\mon_stats.asm:
This is basically split into 2 versions of the same two functions, one set for the Player, one set for the Enemy.
Player_CheckToxicStatus:
	ld a, [wPlayerSubStatus5]
	bit SUBSTATUS_TOXIC, a
	ret z
	scf ; if we are Toxic'd set carry flag
	ret

Enemy_CheckToxicStatus:
	ld a, [wEnemySubStatus5]
	bit SUBSTATUS_TOXIC, a
	ret z
	scf ; if we are Toxic'd set carry flag
	ret

Player_LoadNonFaintStatus:
	ld bc, 0
	call Player_CheckToxicStatus
	jr nc, .player_check_status_nottoxic
	ld a, 7 ; status condition index for Toxic
	jr .player_loadgfx ; yes, we are toxic
.player_check_status_nottoxic
	ld de, wBattleMonStatus
	call GetStatusConditionIndex
	and a
	ret z ; .no_status
	cp $6 ; status condition index for FNT
	ret z
.player_loadgfx
	push af ; status index
; Load Player Status Tiles GFX into VRAM
	ld hl, StatusIconGFX
	ld bc, 2 * LEN_2BPP_TILE
	call AddNTimes
	ld d, h
	ld e, l
	ld hl, vTiles2 tile $70
	lb bc, BANK(StatusIconGFX), 2
	call Request2bpp
	pop de ; status index, needs to be in 'd'
	push de ; status condition index
	farcall LoadPlayerStatusIconPalette
	pop af
	cp 6
	jr z, .player_fnt
	ld c, a
	ret
.player_fnt
	xor a
	ld c, a
	ret

Enemy_LoadNonFaintStatus:
	ld bc, 0
	call Enemy_CheckToxicStatus
	jr nc, .enemy_check_nontoxic
	ld a, 7 ; status condition index for Toxic
	jr .enemy_loadgfx ; yes, we are toxic
.enemy_check_nontoxic
	ld de, wEnemyMonStatus
	call GetStatusConditionIndex
	and a ; could also use c but this was a local call, so a is not clobbered
	ret z ; .no_status
	cp $6 ; faint
	ret z
.enemy_loadgfx
; Load Enemy Status Tiles GFX into VRAM
	push af ; status condition index
	ld hl, EnemyStatusIconGFX
	ld bc, 2 * LEN_2BPP_TILE
	call AddNTimes
	ld d, h
	ld e, l
	ld hl, vTiles2 tile $72
	lb bc, BANK(EnemyStatusIconGFX), 2
	call Request2bpp

	pop de ; status condition index, needs to be in 'd'
	push de ; status condition index
	farcall LoadEnemyStatusIconPalette
	pop af ; status condition index
	cp 6 ; index 6 means the mon is fainted
	jr z, .enemy_fnt
	ld c, a ; status condition index
	ret
.enemy_fnt
	xor a ; status condition index
	ld c, a
	ret
These functions will be called inside engine\battle\core.asm during the battle HUD calculations to load the appropiate Status Condition Tiles as the conditions change throughout battle or when Pokemon get switched in and out.
9.4 Battle: Main Code for Status Condition Tiles in engine\battle\core.asm
There will be two main objective, place the Status Condition Tiles, and edit the MoveInfoBox to show Move Type and Category. To start, the Status Conditon code will be first.
- Edit
PrintPlayerHUDinengine\battle\core.asm:
	...
.got_gender_char
	hlcoord 17, 8 ; gender char
	ld [hl], a
+; Player Mon Status Condition GFX
+	predef Player_LoadNonFaintStatus ; loads needed Status Conditon GFX into VRAM
+ 	ld a, c
+	and a
+	jr z, .status_done ; if Mon is fainted, or it doesnt have a Status Cond, dont print Tiles
+; place status tiles:
+	hlcoord 10, 8 ; status icon tile 1
+	ld [hl], $70
+	inc hl
+	ld [hl], $71
+.status_done
-	hlcoord 14, 8
-	push af ; back up gender
-	push hl
-	ld de, wBattleMonStatus
-	predef PlaceNonFaintStatus
-	pop hl
-	pop bc
-	ret nz
-	ld a, b
-	cp " "
-	jr nz, .copy_level ; male or female
-	dec hl ; genderless
-
-.copy_level
+	hlcoord 14, 8 ; where the player mon's lvl is printed
	ld a, [wBattleMonLevel]
	ld [wTempMonLevel], a
	jp PrintLevel
	...
The result is actually a much simpler function. The Pokemon level is now printed regardless of if there is a Status Condition. The same needs to be done for the Enemy's version.
- Edit
DrawEnemyHUDinengine\battle\core.asm:
	...
.got_gender
	hlcoord 9, 1
	ld [hl], a
+; Enemy Status Condition GFX
+	predef Enemy_LoadNonFaintStatus ; load Status Condition GFX Tiles
+	ld a, c
+	and a
+	jr z, .status_done ; if Mon is fainted, or it doesnt have a Status Cond, dont print Tiles
+	hlcoord 2, 1
+	ld [hl], $72 ; enemy status left half
+	inc hl
+	ld [hl], $73 ; enemy status left half
+.status_done
-	hlcoord 6, 1
-	push af
-	push hl
-	ld de, wEnemyMonStatus
-	predef PlaceNonFaintStatus
-	pop hl
-	pop bc
-	jr nz, .skip_level
-	ld a, b
-	cp " "
-	jr nz, .print_level
-	dec hl
-.print_level
+	hlcoord 6, 1 ; enemy's level
	ld a, [wEnemyMonLevel]
	ld [wTempMonLevel], a
	call PrintLevel
.skip_level
	...
9.5 Battle: Main Code for MoveInfoBox (Phys/Spec Split) in engine\battle\core.asm
As the title of this section states, the edits will all take place in engine\battle\core.asm. Several small edits will be contributing to handling fixing the GFX of the pokemon backsprite after closing the MoveInfoBox. The Pokemon's color palettes will need to be reapplied too. Re-application of the CGB Layout is going to be done at multiple different points.
- Edit
BattleTurn:
	...
	jr nz, .quit
.skip_iteration
	call ParsePlayerAction
+	push af
+	call ClearSprites
+	pop af
	jr nz, .loop1
	...
- Edit
ParsePlayerAction:
	...
.not_encored
	ld a, [wBattlePlayerAction]
	cp BATTLEPLAYERACTION_SWITCH
-	jr z, .reset_rage
+	jp z, .reset_rage
	and a
-	jr nz, .reset_bide
+	jp nz, .reset_bide
	ld a, [wPlayerSubStatus3]
	and 1 << SUBSTATUS_BIDE
	jr nz, .locked_in
	...
	call MoveSelectionScreen
	push af
	call SafeLoadTempTilemapToTilemap
-	call UpdateBattleHuds
+	ld b, SCGB_BATTLE_COLORS
+	call GetSGBLayout
	ld a, [wCurPlayerMove]
	cp STRUGGLE
	jr z, .struggle
	...
- Edit the function
MoveSelectionScreen:
	...
	ld hl, BattleText_TheresNoPPLeftForThisMove

.place_textbox_start_over
+	push hl
+	call ClearSprites
+	ld b, SCGB_BATTLE_COLORS
+	call GetSGBLayout
+	pop hl
	call StdBattleTextbox
	call SafeLoadTempTilemapToTilemap
	jp MoveSelectionScreen
	...
- Edit
MoveInfoBox:
This makes a smaller box than before, but 1 tile taller. The middle edit adjusts where the "Disabled!" Text is placed when a move is disabled in battle. The 3rd part of this edit change where the "PP" text is placed in the MoveInfoBox.
MoveInfoBox:
	xor a
	ldh [hBGMapMode], a

-	hlcoord 0, 8
-	ld b, 3
-	ld c, 9
+	hlcoord 0, 7 ; upper right corner of the textbox
+	ld b, 4 ; Box height
+	ld c, 7 ; Box length
	call Textbox
	call MobileTextBorder

	...

	cp b
	jr nz, .not_disabled

-	hlcoord 1, 10
+	hlcoord 1, 11
	ld de, .Disabled
	call PlaceString
-	jr .done
+	jp .done

.not_disabled
	ld hl, wMenuCursorY

	...

.PrintPP:
-	hlcoord 5, 11
-	ld a, [wLinkMode] ; What's the point of this check?
-	cp LINK_MOBILE
-	jr c, .ok
-	hlcoord 5, 11
-.ok
+	hlcoord 3, 10
	push hl
	ld de, wStringBuffer1
	lb bc, 1, 2
	...
	ld de, wNamedObjectIndex
	lb bc, 1, 2
	call PrintNum
+	hlcoord 1, 10
+	ld a, "P"
+	ld [hli], a
+	ld [hl], a
	ret
+.power_string:
+	db "BP@"
+.nopower_string:
+	db "---@"
+.accuracy_string:
+	db "AC@"
Next, are more changes inside MoveInfoBox, where the Tiles will be placed. Also, a new piece of information will be printed: Move Accuracy.
- Edit
MoveInfoBox:
	...
	call .PrintPP

	farcall UpdateMoveData
-	ld a, [wPlayerMoveStruct + MOVE_ANIM]
-	ld b, a
-	farcall GetMoveCategoryName
+	farcall LoadBattleCategoryAndTypePals
+	call SetPalettes

-	hlcoord 1, 9
-	ld de, wStringBuffer1
-	call PlaceString
+	ld a, [wPlayerMoveStruct + MOVE_TYPE]
+	and TYPE_MASK
+	ld c, a ; farcall will clobber a for the bank
+	farcall GetMonTypeIndex
+	ld a, c ; Type Index
+	ld hl, TypeIconGFX ; from gfx\battle\types.png, uses Color 4
+	ld bc, 4 * LEN_1BPP_TILE ; Type GFX is 4 Tiles Wide
+	call AddNTimes
+	ld d, h
+	ld e, l
+	ld hl, vTiles2 tile $55
+	lb bc, BANK(TypeIconGFX), 4 ; bank in 'b', Num of Tiles in 'c'
+	call Request1bpp
+	hlcoord 4, 11 ; placing the Type Tiles in  the MoveInfoBox
+	ld [hl], $55
+	inc hl
+	ld [hl], $56
+	inc hl
+	ld [hl], $57
+	inc hl
+	ld [hl], $58

-	ld h, b
-	ld l, c
-	ld [hl], "/"
+	ld a, [wPlayerMoveStruct + MOVE_TYPE]
+	and ~TYPE_MASK
+	swap a
+	srl a
+	srl a
+	dec a
+	ld hl, CategoryIconGFX
+	ld bc, 2 tiles ; Move Category is 2 Tiles wide
+	call AddNTimes
+	ld d, h
+	ld e, l
+	ld hl, vTiles2 tile $59
+	lb bc, BANK(CategoryIconGFX), 2 ; bank in 'b', Num of Tiles in 'c'
+	call Request2bpp ; Load 2bpp at b:de to occupy c tiles of hl.
+	hlcoord 1, 11 ; placing the Category Tiles in the MoveInfoBox
+	ld [hl], $59
+	inc hl
+	ld [hl], $5a

-	ld a, [wPlayerMoveStruct + MOVE_ANIM]
-	ld b, a
-	hlcoord 2, 10
-	predef PrintMoveType
+; print move BP (Base Power)
+	ld de, .power_string ; "BP"
+	hlcoord 1, 8
+	call PlaceString
+
+	hlcoord 4, 8
+	ld a, [wPlayerMoveStruct + MOVE_POWER]
+	and a
+	jr nz, .haspower
+	ld de, .nopower_string ; "---"
+	call PlaceString
+	jr .print_acc
+.haspower
+	ld [wTextDecimalByte], a
+	ld de, wTextDecimalByte
+	lb bc, 1, 3 ; number of bytes this number is in, in 'b', number of possible digits in 'c'
+	call PrintNum
+
+; print move ACC
+.print_acc
+	hlcoord 1, 9
+	ld de, .accuracy_string ; "ACC"
+	call PlaceString
+	hlcoord 7, 9
+	ld [hl], "<%>"
+	hlcoord 4, 9
+	ld a, [wPlayerMoveStruct + MOVE_ACC]
+; convert from hex to decimal
+; this is the same code used in function "Adjust_Percent" in engine\pokemon\mon_stats.asm
+	ldh [hMultiplicand], a
+	ld a, 100
+	ldh [hMultiplier], a
+	call Multiply
+	; Divide hDividend length b (max 4 bytes) by hDivisor. Result in hQuotient.
+	ld b, 2
+	ld a, 255
+	ldh [hDivisor], a
+	call Divide
+	ldh a, [hQuotient + 3]
+	cp 100
+	jr z, .print_num
+	inc a
+.print_num
+	ld [wTextDecimalByte], a
+	ld de, wTextDecimalByte
+	lb bc, 1, 3 ; number of bytes this number is in, in 'b', number of possible digits in 'c'
+	call PrintNum
+	ld b, SCGB_BATTLE_COLORS
+	call GetSGBLayout
.done
	ret
9.6 Battle: CGB Layout (Phys/Spec Split)
The edits in this section aren't too bad.
- Edit
_CGB_BattleColorsinengine\gfx\cgb_layouts.asm:
	pop hl
	call LoadPalette_White_Col1_Col2_Black ; PAL_BATTLE_OB_PLAYER
+
+	call LoadPlayerBattleCGBLayoutStatusIconPalette
+	call LoadEnemyBattleCGBLayoutStatusIconPalette
+
	ld a, SCGB_BATTLE_COLORS
	ld [wDefaultSGBLayout], a
	call ApplyPals
- Edit
_CGB_FinishBattleScreenLayoutinengine\gfx\cgb_layouts.asm:
	...
	ld bc, 6 * SCREEN_WIDTH
	ld a, PAL_BATTLE_BG_TEXT
	call ByteFill

; flip reused tiles
; HUD vertical bar thingy
	hlcoord 18, 10, wAttrmap
	ld bc, 1
	ld a, PAL_BATTLE_BG_PLAYER_HP
	set 5, a ; flips tiles on x axis
	call ByteFill

; player exp
	hlcoord 10, 11, wAttrmap
	lb bc, 1, 8
	ld a, PAL_BATTLE_BG_EXP
	set 5, a ; flips tiles on x axis
	call FillBoxCGB
+
+; status icons
+	; enemy
+	hlcoord 2, 1, wAttrmap
+	lb bc, 1, 2
+	ld a, $6
+	call FillBoxCGB
+	; player's
+	hlcoord 10, 8, wAttrmap
+	lb bc, 1, 2
+	ld a, $6
+	call FillBoxCGB
+
+; check if we're in the MoveInfoBox
+	hlcoord 0, 12
+	ld a, [hl]
+	cp $7d
+	jr nz, .done
+
+	; Move Type and Category pal
+	hlcoord 1, 11, wAttrmap
+	ld bc, 7
+	ld a, $5
+	call ByteFill
+
+.done
	ld hl, BattleObjectPals
	ld de, wOBPals1 palette PAL_BATTLE_OB_GRAY
	ld bc, 6 palettes
	...
10. Conclusion: Clean-up
- Delete their predef entries in
data\predef_pointers.asm:
	...
	add_predef ListMoves
-	add_predef PlaceNonFaintStatus
	add_predef Unused_PlaceEnemyHPLevel
	...
	add_predef Unused_AnimateMon_Slow_Normal
-	add_predef PlaceStatusString
	add_predef LoadMonAnimation
	...
- Finally delete
PlaceNonFaintStatus,CopyStatusString, andPlaceStatusStringfromengine\pokemon\mon_stats.asm. As well as the accompanying strings:
-PlaceStatusString:
-; Return nz if the status is not OK
-	push de
-	inc de
-	inc de
-	ld a, [de]
-	ld b, a
-	inc de
-	ld a, [de]
-	or b
-	pop de
-	jr nz, PlaceNonFaintStatus
-	push de
-	ld de, FntString
-	call CopyStatusString
-	pop de
-	ld a, TRUE
-	and a
-	ret
-
-FntString:
-	db "FNT@"
-
-CopyStatusString:
-	ld a, [de]
-	inc de
-	ld [hli], a
-	ld a, [de]
-	inc de
-	ld [hli], a
-	ld a, [de]
-	ld [hl], a
-	ret
-
-PlaceNonFaintStatus:
-	push de
-	ld a, [de]
-	ld de, PsnString
-	bit PSN, a
-	jr nz, .place
-	ld de, BrnString
-	bit BRN, a
-	jr nz, .place
-	ld de, FrzString
-	bit FRZ, a
-	jr nz, .place
-	ld de, ParString
-	bit PAR, a
-	jr nz, .place
-	ld de, SlpString
-	and SLP_MASK
-	jr z, .no_status
-
-.place
-	call CopyStatusString
-	ld a, TRUE
-	and a
-
-.no_status
-	pop de
-	ret
-
-SlpString: db "SLP@"
-PsnString: db "PSN@"
-BrnString: db "BRN@"
-FrzString: db "FRZ@"
-ParString: db "PAR@"
11. Results
Congratulations! Here is the results:
12. Follow On Suggestions
- Changes needed for Physical/Special Split
- Changes needed for 4th Stats Page
- Link to Colored Gender and Shiny Icons in Battle and StatsScreen