Getting started with Intellij Gradle project - Nastel/gocypher-cybench-java GitHub Wiki
Quick start with Intellij Gradle Project
Prerequisites
Must download and install:
- JDK (version 1.8 or above).
- Intellij (Community or Ultimate edition) lowest supported version: 2018.1.x, highest supported version: 2020.3.x.
- CyBench Intellij plugin (must restart Intellij after plugin installation).
Create Gradle project and benchmark your code
- Open Intellij and select menu "File"->"New"->"Project".
- Select "Gradle", check that "Project SDK" points to JAVA 1.8 or above and click button "Next".
- Enter project name -
demo-benchmark - location -
c:\development\intellij-gradle-demo\ - Expand "Artifact coordinates" and enter "GroupId" -
com.benchmark.core, "ArtifactId" shall remain the same as field "Name". - Click button "Finish".
- Select "New window" when Intellij will ask where to open project.
- The Intellij will generate all required Gradle JAVA project artifacts (folders, packages, files).
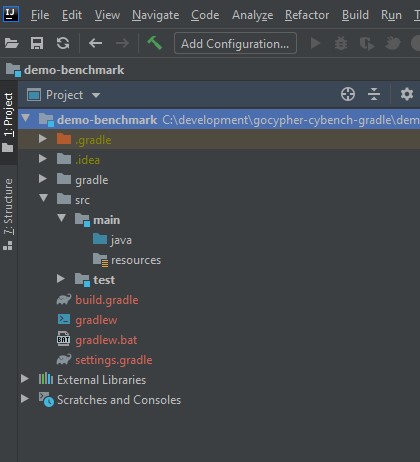
- Using project explorer navigate to newly created project and open file structure it should look similar to this:
Create Java class which contains any implementation
- Right click mouse on java source folder ("src/main/java") inside the project "demo-benchmark" and select "New" -> "Package".
- Enter package name:
com.benchmarks.demo. - Right click mouse on newly created package and select "New" -> "Java Class".
- Enter class name:
StringUtils. - Create a public method inside class
StringUtilswhich concatenates two strings.
	public static String concatStrings (String s1, String s2){
		return s1.concat(s2);
	}
Generate benchmark stub class for your implementation
-
Open class
StringUtils. -
Right mouse click on the class name in the code and select "Generate"->"CyBench benchmark" in the context menu.
-
Dialog window opens which contains "CyBench" benchmarks stub generation options, leave defaults and click button "OK".
-
If error message box appears "Libraries not found. Add?", choose "OK".
-
Benchmark stub class (StringUtilsBenchmark) for implementation class StringUtils will be generated in the same package as code class:
- all CyBench generated benchmark stub classes has prefix "Benchmark";
- all CyBench generated benchmark stub methods has prefix "Benchmark";
- benchmark stub class and methods also contains possible annotations for benchmark settings and metadata.
Note - if generated class StringUtilsBenchmark does not contain any implementation then delete it and repeat benchmark stub generation process once gain.
- Add the dependencies for JMH into your
build.gradlefile dependencies section:
    implementation group: 'org.openjdk.jmh', name: 'jmh-core', version: '1.26'
    annotationProcessor  group: 'org.openjdk.jmh', name:'jmh-generator-annprocess', version:'1.26'
- The
build.gradlefile after changes should look like this:
plugins {
    id 'java'
}

group 'com.benchmark.core'
version '1.0-SNAPSHOT'

repositories {
    mavenCentral()
}

dependencies {
    implementation group: 'org.openjdk.jmh', name: 'jmh-core', version: '1.26'
    annotationProcessor  group: 'org.openjdk.jmh', name:'jmh-generator-annprocess', version:'1.26'
    testCompile group: 'junit', name: 'junit', version: '4.12'
}
Write benchmark for your implementation
- Open class
StringUtilsBenchmarklocated in "src/main/java/com/benchmarks/demo" folder. - Update method
concatStringsBenchmarkimplementation by adding rows which calls source code.
    String s = StringUtils.concatStrings("Demo", "Benchmark") ;
    bh.consume(s);
- Delete the "@BenchmarkTag" annotation and import if it was created on top of your benchmark method. It Requires additional dependencies about which we will talk in another tutorial.
- The class after changes should look like this:
package com.benchmarks.demo;

import com.gocypher.cybench.core.annotation.BenchmarkTag;
import org.openjdk.jmh.annotations.*;
import org.openjdk.jmh.infra.Blackhole;

import java.util.concurrent.TimeUnit;

@State(Scope.Benchmark)
public class StringUtilsBenchmark {
    @Setup
    public void setup() {
    }
    @TearDown
    public void teardown() {
    }

    @OutputTimeUnit(TimeUnit.SECONDS)
    @BenchmarkMode(Mode.Throughput)
    @Benchmark
    public void concatStringsBenchmark(Blackhole bh) {
        String s = StringUtils.concatStrings("Demo", "Benchmark") ;
        bh.consume(s);
    }
}
Launch the benchmark and measure String concatenation performance
-
Right click mouse ion the class name (or click on the gutter button which is displayed on the left side of the class decalration and marked with CyBench icon).
-
Select Run 'StringUtilsBenchmark' (for the quick launch).
-
The benchmark will start, see run window named "StringUtilsBenchmark" for messages at the bottom of the screen.
-
Once benchmark execution will finish then report will be generated and displayed in "CyBench Report" viewer window at the bottom of the screen (marked with "CyBench icon").
-
Score usually represents number of operations per second so in our case number for strings concatenations per second.
-
All workspace reports can be explored using "CyBench Explorer" view which can be opened via right side navigation bar by clicking on "CyBench Explorer" item (this opens "CyBench Explorer" widget).
-
CyBench report is stored in JSON format under the ".cybench" file in folder "reports" which is located under root folder of the project.
NOTE - If after the benchmarks run is finished the "CyBench Report" viewer window does not open automatically follow the steps below:
- Open "CyBench Explorer" view which can be opened via right side navigation bar by clicking on "CyBench Explorer" item.
- Click the folder icon at the top of the opened "CyBench Explorer" window
- Select the "reports" folder from the project folders displayed and click "OK"
- Click on the report that can now be visible inside the "CyBench Explorer" window