Running ROS on Windows - NIURoverTeam/RoverCoreOS GitHub Wiki
Running ROS on Windows
Update Windows 10
A recent version of Windows 10 needs to be installed for ROS to work. If you are in doubt, which version is installed go to Settings -> System -> About and check that you have at least Version 1703
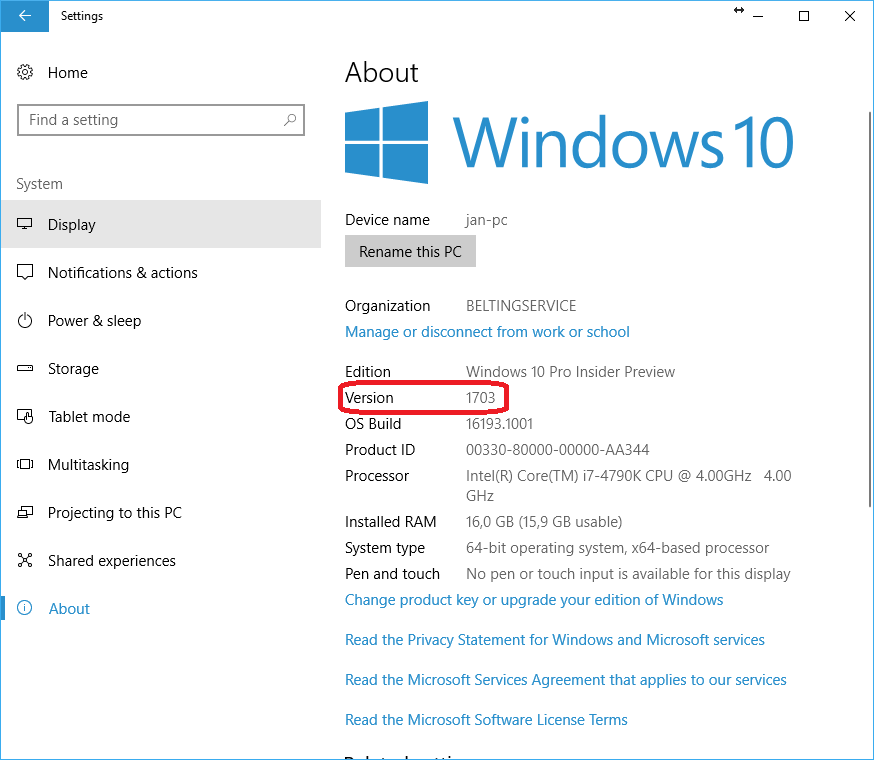
but Version 1809 is preferred.
Install the WSL and Bash on Windows
To install the Windows Subsystem for Linux and Bash on Windows, follow this guide.
In case you have used the WSL before applying the creators update, you may still have the trusty version (14.04) or the xenial version (16.04). However, to install ros melodic, you need ubuntu bionic 18.04. To check which version is actually installed, start an instance of bash and run lsb_release -a. The output should look like
$ lsb_release -a
No LSB modules are available.
Distributor ID: Ubuntu
Description: Ubuntu 18.04.1 LTS
Release: 18.04
Codename: bionic
If it shows an older version, you have to uninstall and then reinstall bash on windows from the windows command line as follows Warning: This will delete all of your existing data in WSL. Make a backup first
lxrun /uninstall /full /y
lxrun /install
Installing ROS
Since WSL is based on ubuntu, we can use the Ubuntu install instructions for ROS Melodic, which are copied for convenience below:
sudo apt-get update -y && sudo apt-get upgrade -y
sudo sh -c 'echo "deb http://packages.ros.org/ros/ubuntu $(lsb_release -sc) main" > /etc/apt/sources.list.d/ros-latest.list'
sudo apt-key adv --keyserver 'hkp://keyserver.ubuntu.com:80' --recv-key C1CF6E31E6BADE8868B172B4F42ED6FBAB17C654
curl -sL "http://keyserver.ubuntu.com/pks/lookup?op=get&search=0x421C365BD9FF1F717815A3895523BAEEB01FA116" | sudo apt-key add
sudo apt update
sudo apt install -y ros-melodic-desktop-full
sudo rosdep init
rosdep update
echo "source /opt/ros/melodic/setup.bash" >> ~/.bashrc
source ~/.bashrc
sudo apt install python-rosinstall python-rosinstall-generator python-wstool build-essential
Once installed, consider checking out our ROS Crash Course.
Install VcXsrv
To run applications with graphical output, you need to install an X Server on Windows. We prefer, VcXsrv.
After you have installed VcXsrv, you also need to configure WSL to use it. To do so modify you .bashrc as follows
echo "export DISPLAY=:0" >> ~/.bashrc
source ~/.bashrc
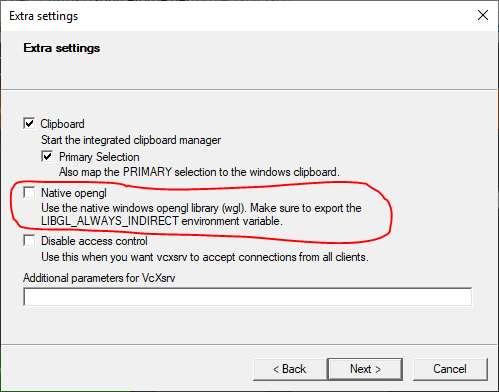
Finally, launch VcXsrv from the start menu (the application will be called XLaunch). You can keep all default settings except Native opengl which needs to be unchecked. Otherwise applications such as rviz will not run as expected.
If you'd like to test that your Xserver is working as intended, run the command xeyes (sudo apt install x11-apps if command not found). You should get a pair of eyes that follow your cursor if everything is functioning.
Note: If your xeyes says something like
Authorization required, but no authorization protocol specified Error: Can't open display: 172.31.80.1:0.0, try checkingDisable access controlin addition to uncheckingNative opengl.
Test using Turtle_sim
Make sure you have an X Server installed, configured and running as described above. Start a new bash prompt and run
roslaunch turtle_tf turtle_tf_demo.launch
You can control the turtle using the arrow keys. Take note that the bash terminal must be selected to control the turtle.