Inventory Spawner - MyShiLingStar/ACNHPokerCore GitHub Wiki
The "Inventory Spawner" is the first interface that you will see after you have connected with your Nintendo Switch.
It allows you to spawn items inside your character's inventory/home storage.
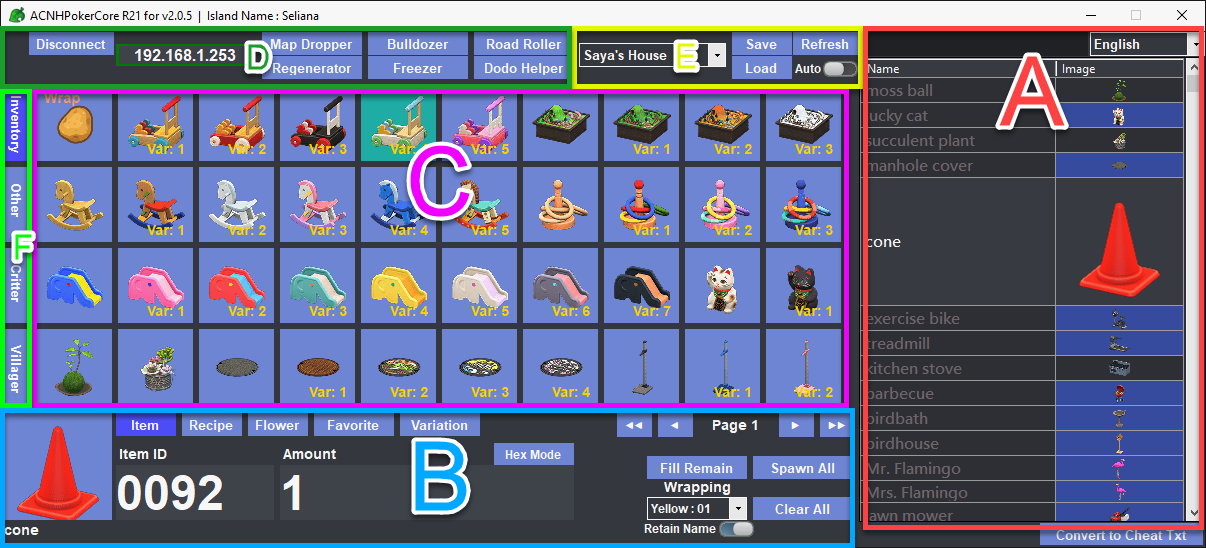
A) The Search and Selection
Allow you to search and select the item by its name.
You can search with other languages by changing it with the dropdown menu.
Selecting the item with [Left mouse button] will send it to B) The Spawning & Mode menu
B) The Spawning & Mode Menu
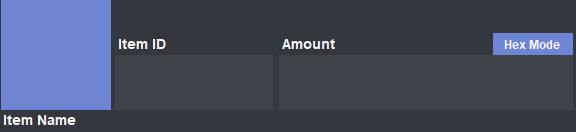
The large button at the bottom left corner is your currently selected item.
Clicking it will proceed to spawn the item into your selected inventory/home storage.
You can enter the "item ID" and "Amount"/"Hex Value" in the input boxes manually if you want.
But selecting the item at A) The Search and Selection will fill these boxes automatically.

The 5 buttons at the top left corner will change the current spawning mode and open the variation menu.
- Item
The ordinary mode for spawning the item. - Recipe
For spawning DIY recipes that your character could learn. - Flower
For spawning "Perfect" flowers with the correct gene information. - Favorite
For spawning items that you have saved as favorites. Useful if you have some items that you spawn frequently. - Variation
Open the variation menu
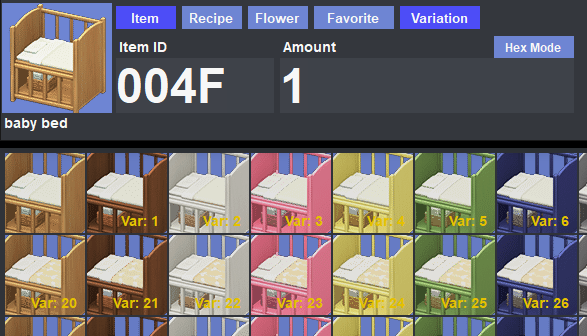
The variation menu will appear below the main window when activated. Clicking the various options will update the selected item accordingly.

The pagination at the top right corner will appear when you select a storage space with multiple pages.
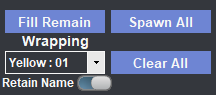
And finally for the buttons at the bottom right corner:
- Fill Remain
This will fill all of the remaining empty space in the selected inventory with the selected item. - Spawn All
This will fill the entire selected inventory with the selected item. Removing all existing items. - Clear All
Empty the selected inventory. - Wrapping & Retain Name
Wrapping papers or envelopes setting for wrapping items.
You can choose whether or not to retain the wrapped item name by changing the toggle.
Mouse right-click in C) Inventory View to wrap the selected item.
C) Inventory View
Please be reminded that the inventory view is NOT synchronous in real-time.
This means any changes you make in-game will NOT be synced to this view.
If you would like them to be in sync, you will need to activate the "Refresh" toggle in **E) Inventory Control**.
This shows the item of the currently selected inventory.
Mouse left-click will select the slot for item spawning. And mouse right-click will show the following menu :

- Copy Item
Copy the item to the currently selected item. You can then spawn an exact copy by clicking the large spawn button. - Delete Item
Delete the item. As you expected. - Wrap Item [ ! ]
This will proceed to warp the item using the wrapping setting B) The Spawning & Mode Menu.
Please be reminded that Nintendo has added an exclusive list of wrappable items in one of the updates.
Wrapping any non-wrappable items will turn them into **tree branch**. - Wrap All Items [ ! ]
This will proceed to warp every item in the selected inventory. - Add to Favorite
This adds the selected item to your favorite list. Allowing you to easily spawn them again if needed. - Unwrap All Items
Unwarp anything that is in the selected inventory. Including those in the present box and envelope.
D) Connection & Extra Functionality
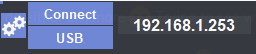
This is the first place you start your connection.
The "Gear" button will bring up the Configuration menu.
The "Connet" button will use sys-botbase to connect. While the "USB" button will use USB-botbase to connect.

The other buttons will bring up their respected functionality.
For more details, please refer to their respected wiki pages.
E) Inventory Control
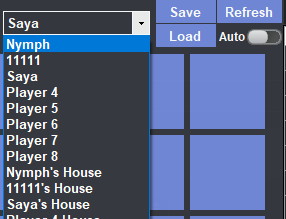
The drop-down box allows you to switch between all 8 players' inventory, their House storage, and the recycling bin inside Resident Services.
The "Save" button will save the content of the currently selected inventory into a .nhi file.
.nhi file is supported by many other ACNH modding tools.
The "Load" button will allow you to select a .nhi file and load it to the currently selected inventory.
.nhi file created by other ACNH modding tools should be compatible.
But do remember that only the first 40 items will be loaded if the .nhi file contains more than that.
F) More Functionality
Four major functionality buttons are located at the side of the main form.

- Inventory
The "Inventory Spawner". The first default interface you would see. - Other
The miscellaneous page. Like Turnips price, emotes and other smaller functionality are located here. - Critter
The "Critter Spawner". The page allows you to manipulate the in-game critter spawning rate.
Gives you an easier time catching rare critters in-game. - Villager
The "Villager Booter". The page allows you to manipulate all villagers living on the island.
Allows you to pick and replace your favorite villager.