MRI_Opera_export_tools - MontpellierRessourcesImagerie/imagej_macros_and_scripts GitHub Wiki
The tool stitches images from the Opera Phenix HCS System. It reads the Index.idx.xml file to pre-arrange the images and then stitches and fuses them using the Grid/Collection stitching-plugin [1]. Images are stitched by plane and channel. Z-stacks and multi-channel images can optionally be created. Projections can also be created.
The source code in git-hub can be found here.
To install the tool save the files opera_export_tools.ijm and opera_export_tools.py into the folder macros/toolsets of your FIJI installation. To use the Pseudo flat-field correction you need to have the biovoxxel-toolbox installed.
Select the "opera_export_tools" toolset from the >> button of the ImageJ launcher.
- the first button opens this help page
- second button allows to select the index-file
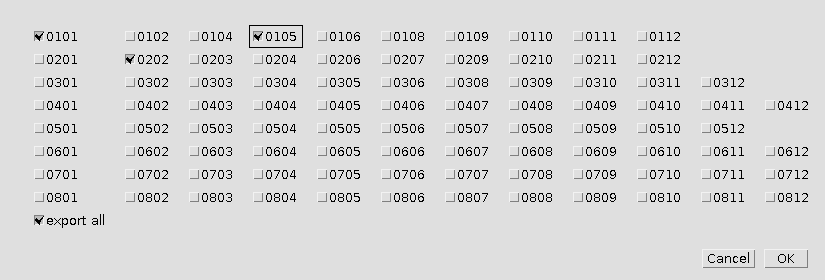
- the third button allows to select the wells, that will be exported
- the fourth button allows to rename the wells (Optional)
- the fifth button allows to modify the export options
- the sixth button allows to modify the correction options (Optional)
- the seventh button starts the batch-export
Press the Set index-file-button and select the folder containing the images and the index file Index.idx.xml or Index.xml.
The path must not contain space or special characters such as accents. If necessary rename folders before selecting the index-file!
Press the Select wells-button and select the wells you want to export. If export all is selected, all wells will be exported.
Press the Rename wells-button and change the names of the wells. Well names will be saved and can be loaded from a wellNames.txt file
You can set the names of the wells automatically from a spreadsheet using Opera_Wellnames_from_CSV
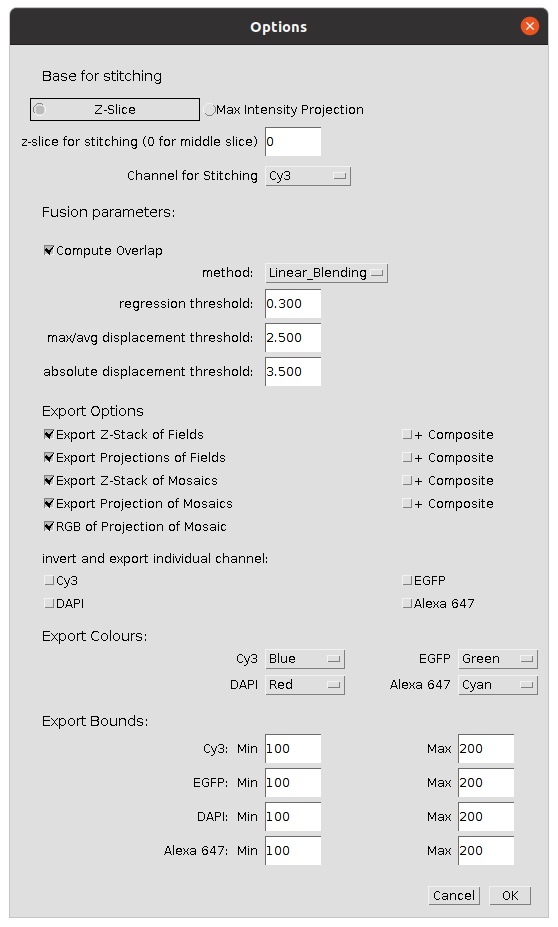
Press Set options-button.
- Base for stitching
- Z-Slice / Max Intensity Projection
- Select if the stitching is calculated from a z-slice or from a projection of each slices
- z-slice for stitching
- The z-slice used to calculate the stitching. Enter 0 to use the middle slice. (Not used if Max intensity Projection is selected)
- channel for stitching
- The channel, that is used to calculate the stitching
- Fusion parameters
- The parameters for the stitching plugin [1]
- Export Options
- Export Z-Stack of Fields
- If selected will create a folder containing the Z-Stack.
- Export Projection of Fields
- If selected will create a folder containing the max intensity projection of each slices.
- Export Z-Stack of Mosaics
- If selected will create a folder containing the mosaics as a Z-Stack.
- Export Projection of Mosaics
- If selected will create a folder containing the mosaics as a max intensity projection of each slices.
- + Composite
- When doing an export, also create a multi-channel composite image.
- RGB of Projection of Mosaics
- If selected will create a folder containing RGB images of the mosaics' projection.
- Invert and export individual channel
- If selected will create a folder containing inverted images of individual channels of the mosaics' projection.
- Export Colours
- Set the colours for each channels.
- Export Bounds
- Set the bounds for each channels for RGB and individual channel export.
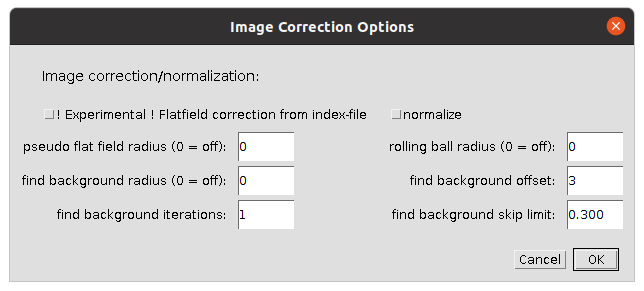
Press Set correction options-button.
- Image correction/normalization
- normalize
- If selected the the intensities of the tiles of a mosaic are normalized.
- pseudo flat field radius
- The radius for the pseudo flat field correction. Set the radius to 0 if you do not want to apply a pseudo flat field correction. You must have the biovoxxel toolbox [2] installed
- rolling ball radius
- The radius for the rolling-ball background correction. Set the radius to 0 if you do not want to apply a rolling-ball background correction.
- find background radius
- The radius for the find and subtract background operation. Set the radius to 0 if you do not want to apply the find and subtract background operation.
Press the Launch export-button to start the batch export of the images.
The resulting images will be written into the parent folder of the folder containing the index-file.
Z-Stack of fields will be in the stack folder
Max intensity projection of fields will be in the projection folder
Z-Stack of mosaics will be in the stackMosaic folder
Max intensity projection of mosaics will be in the projectionMosaic folder
RGB of max intensity projections of mosaics will be in the projectionMosaicRGB folder
Single channel of max intensity projections of mosaics will be in the projectionMosaicChannel folder
An options file will also be written (YYYY-MM-DD_HH_MM_SS_options.txt) it contains the informations about your execution.
- 03.09.2024 - The tool now handles both formats, the format of harmony 5 and the format of harmony 6.
-
S. Preibisch, S. Saalfeld, P. Tomancak (2009) “Globally optimal stitching of tiled 3D microscopic image acquisitions”, Bioinformatics, 25(11):1463-1465. Webpage PDF
-
The BioVoxxel Image Processing and Analysis Toolbox. Brocher, 2015, EuBIAS-Conference, 2015, Jan 5


 Volker Bäcker