Cochlea Hair Cell Counting - MontpellierRessourcesImagerie/imagej_macros_and_scripts GitHub Wiki
The aim of this tool is to count the hair cells in sections of 200µm from the apex of the cochlear to its base. The tool needs two types of input images: the 3d stack of the hair cells and a binary mask created from this stack by using the spot detection algorithm of Imaris (Bitplane). After the detection of the spots the background has been set to 0 and the volumes of the spots to 255 and the image has been exported as a tif-series. The tool allows to make the MIP-projections of the two kinds of input images in batch mode. The operator then traces the cochlear on the projection of the cells image. Both images are straightened and an overlay is displayed. The operator can manually correct the image using the overlay. The cells are then automatically counted in sections of a given length.
You can find an example of the projections of the hair cell stack here and an example of the projection of the spot detection result stack here
Getting Started
To install the tool, drag the link Cochlea_Hair_Cell_Counting.ijm to the ImageJ launcher window, save it under macros/toolsets in the ImageJ installation and restart ImageJ.
Select the "Cochlea_Hair_Cell_Counting" toolset from the >> button of the ImageJ launcher.

- the button with the ? opens this help page
- the second button with the image runs the hair cell counting macro
- the third button allows to draw a grid for manual counting
- the fourth button with the label m will report the manually selected cells (use the point selection tool) per segment - this is to establish the ground truth by manual counting for the evaluation of the tool
- the button with the label z creates the z-rojections of the cell images. It works on all images in a folder.
- the button with the label zs creates the z-projections of the spot images. It works on all image-sequence subfolders in a folder.
- the "combine projections"-button, the button with two groups of small red dots, allows to stitch all open images. Place the image windows in an order from left to right so that images containing overlapping regions are neighbors, then press the button.
- the "straigthen and correct"-button (with the sc label) will ask the user to manually trace the hair cells of the cochlea using for example the segmented-line selection tool and then to select the spots image before pressing ok on the "Action Required" dialog. An overlay of the straightened cells and spots images will open.
- the "stitch straigthened parts"-button (with the st label), will stitch the different straigthened parts together
- the "find cells and measure"-button runs the hair cell counting macro on an already straigthened image
Options
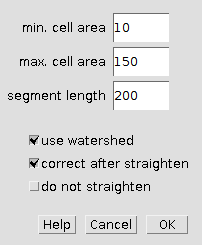
Right click on the "count hair cells" tool button (the one with the image) to open the options-dialog:

- min cell area: objects with a smaller area are not considered to be hair cells
- max cell area: objects witg a larger area are not considered to be hair cells
- segment length: the length of the segments in which the cells are counted
- use watershed: if selected a binary watershed is run on the cells (in the spots-image) to separate touching cells
- correct after straighten: if selected the tool stops after straightening the cochlea and allows to manually remove cells before the cells are counted
- do not straighten: if selected, the tool will not straighten the cochlea
Usage
- Use the z-projection tool (z) to create maximum intensity projections of the cell image stacks. You must select the folder containing the images. The projections will be written to the same folder but with a "MAX_" prefix in the name.
- Use the z-projection-spots tool (zs) to create maximum intensity projections of the mask images. The masks are expected to be image-sequences of tif-files. You must select the folder containing the sequence subfolders (it must not contain any other subfolders).
- Open a projection of a cell image and the corresponding projection of the spots image.
- Make sure the cells image is selected and press the "count hair cells" button. You need to do this before making the selection (see next step).
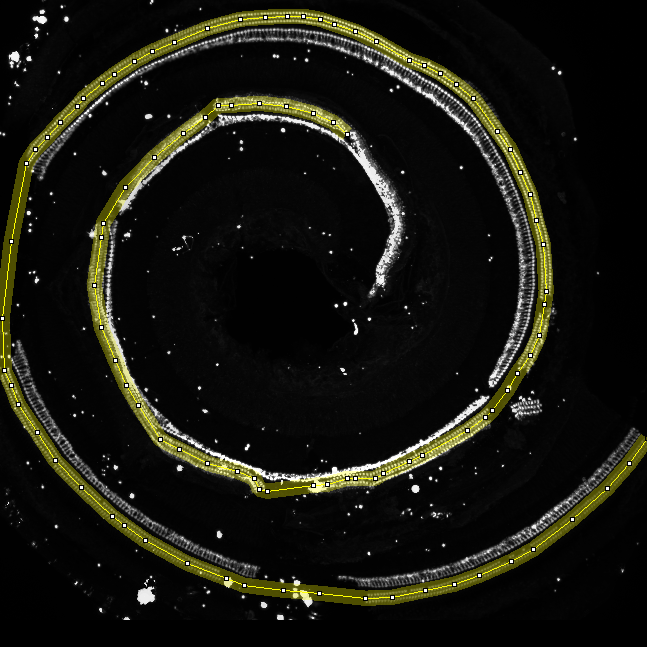
- Manually trace the hair cells of the cochlea using for example the segmented-line selection tool. Set the line width of the selection tool to a size that covers the 3 rows of hair cells on all points of the cochlea. Zoom into the image while you are making the selection and use space + left mouse button to drag the image when the structure is not visible anymore.

- Now make sure the spots image is selected and press the ok button on the "Action Required" dialog.
- You now get an overlay of the straightened cells and spots images. To remove unwanted cells from the count (red) select the drawing tools toolset and the paint brush tool from it. Make sure your foreground color is black and that the brush width is reasonable (double click on the tool button). By painting over cells in the red channel you can remove them.

- When finished press the ok-button on the "Action Required" dialog.
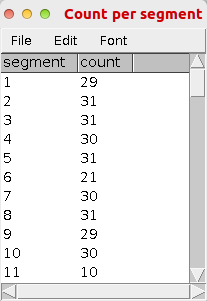
- A results table with the title "Counts per segment" will be displayed. The counted cells will be added to the roi-manager. The segments will be drawn on an overlay of the image.
Working with big images
If the image is too big you might have problems to work with it. In this case you can cut the image into multiple parts using either Imaris or FIJI. You can follow the procedure for each part independently until you have created the projections of the hair cell stacks and the projections of the segmented spots. Before continuing by pressing the "count hair cells-button, you can stitch the parts of each projection together again. Close all images, load the part images of the first projection, place the windows in a way that images with overlapping content are neighbours and press the "combine projections"-button. Save the resulting image and repeat the procedure for the parts of the second projection. When done, load the first stitched projection, so that both stitched images are open now and follow the usual procedure by selecting the projection of the cells-imageand pressing the "count hair cells"-button.
The tool uses the pairwise stitching plugin. Please cite the corresponding paper (see the website of the plugin).
Results
| |
|  |
|
Publications citing the tool
- Cortada, M., Sauteur, L., Lanz, M., Levano, S., and Bodmer, D. (2021). A deep learning approach to quantify auditory hair cells. Hearing Research 409, 108317.
Publications using the tool
-
Parham, K., Sohal, M., Petremann, M., Romanet, C., Broussy, A., Tran Van Ba, C., and Dyhrfjeld-Johnsen, J. (2019). Noise-induced trauma produces a temporal pattern of change in blood levels of the outer hair cell biomarker prestin. Hearing Research 371, 98–104.
-
Saleur, A., Baecker, V., Dyhrfjeld-Johnsen, J., poster: AUTOMATED CELL COUNTING IN COCHLEAR HISTOLOGICAL SAMPLES, "53. Workshop Inner Ear Biology, Montpellier, 2016