02 配置与调试 - MiEcosystem/ios-rn-sdk GitHub Wiki
config.plist 文件位于插件包目录下,是个 XML 格式的 plist 文件,用于配置一些插件的整体行为。
<?xml version="1.0" encoding="UTF-8"?>
<!DOCTYPE plist PUBLIC "-//Apple//DTD PLIST 1.0//EN" "http://www.apple.com/DTDs/PropertyList-1.0.dtd">
<plist version="1.0">
<dict>
        <key>pluginStructureVersion</key>
        <integer>2</integer>
        <key>deviceStatusRefreshInterval</key>
        <integer>6</integer>
        <key>customSceneTriggerIds</key>
        <array>
                <string>250</string>
        </array>
        <key>customSceneActionIds</key>
        <array>
                <string>250</string>
        </array>
  	 	<key>supportIPhoneX</key>
		<true/>
</dict>
</plist>插件结构版本(当前2.x的SDK固定为2)
插件页设备状态轮询间隔。
Int
单位为秒。不设置默认为6秒,有效设置范围为1-60。
插件支持的自定义场景触发条件sc_id数组
Array <String>
参见“开发自定义智能场景”章节
插件支持的自定义场景动作sa_id数组
Array <String>
参见“开发自定义智能场景”章节
蓝牙插件快联是否需要被代理扫描蓝牙设备
Boolean
获取属性变化的监听方式 integer
0 轮询方式,设备需在1秒内给出返回,否则超时错误
1 订阅方式,通过mipush实现,前提是设备需把属性值上报后台
2 不获取,则调用相关注册函数被忽略,不获取属性值
作用:是否显示“功能设置”
类型:BOOL
不设置,或者设置为NO,根据设备是否是分享过来的,来决定是否隐藏。
设置为YES,强制隐藏"功能设置"项目。
如果“功能设置“最终还是需要显示,请在插件中提供你自己设置的页面。
“ 反馈 ”
类型: bool
设置为YES, 不显示"反馈"
“ 解除连接 ”
类型: bool
设置为YES, 不显示"解除连接"
“ 检查固件升级”
类型: bool
设置为YES, 则不显示"检查固件升级"
要显示“检查固件升级”,需保证:设备不是共享的且不是虚拟设备
“ 设备名称”
类型: bool
设置为YES, 则不显示"设备名称"
要显示“设备名称”,需保证:设备不是被分享过来的
“ 设备共享”
类型: bool
设置为YES, 则不显示"设备共享"
要显示“设备共享”,需保证:设备不是被共享的过来的。
是否适配 iPhoneX
类型:bool
假如你的插件适配了 iPhone X,请设置为 YES
否则不用添加该字段,或设置为 NO ####isShowPrivacyItemsInSettingView
类型:bool
对于还在使用已被废弃的
MHPluginSDK.openNewSettingPage();
来打开设置页的插件,如果想在插件设置页中查看授权的隐私协议。需要将isShowPrivacyItemsInSettingView设置为true,默认为false。
建议直接使用Demo 工程中的MHSetting.js
-
与普通的 RN 应用相同,插件的 js 入口也是 index.ios.js (其中的 PluginApp),整个插件的页面导航使用 Navigator 组件,导航栏 Component 为 CommonModules 目录下的 MHNavigationBar。
根据启动插件时携带的 MHPluginSDK.extraInfo 中是否包含自定义场景的 trigger/action 信息,PluginApp 会选择启动自定义场景页组件 SceneMain 还是插件主页面组件 MainPage。
PluginApp 对象提供了一些方法来完成一些全局性的功能,各个页面 component 可以通过 this.props.app 来获取到 PluginApp 的引用并调用其上的方法:
获取插件包内资源的路径
获取插件包内图片的 source,通常是给 Image 组件使用
<Image style={styles.iconDemo} source={this.props.app.sourceOfImage("control_home.png")} />
> **注意** React Native的require方式获取图片只支持常量字符串,不能采用字符串拼接的方式,如果要用require方式获取图片,不能用以上方法,而要用类似如下的代码:
>
> ```js
var icon = MHPluginSDK.devMode ? require('../Resources/xxx.png') : require('./xxx.png');
<ImageButton source={icon} ...>
setIsNavigationBarHidden(isHidden)
设置导航栏是否隐藏
每个页面组件都有 route 对象来管理自己页面的导航栏属性,这个方法只当导航栏需要动态改变时调用
设置导航栏背景样式
每个页面组件都有 route 对象来管理自己页面的导航栏属性,这个方法只当导航栏需要动态改变时调用
插件中每一个页面 component 都是一个单独的js文件,与 RN 的 Component 基本一致,只是在 export 的时候,除了 export 组件以外,还要 export 一个 route 对象,用来设置一些页面的属性,包括标题、导航栏样式等。
module.exports = {
  component: MainPage,
  route: route,
}
const KEY_OF_MAINPAGE = 'MainPage';
var route = {
  key: KEY_OF_MAINPAGE,
  title: MHPluginSDK.deviceName,
  component: MainPage,
  navLeftButtonStyle: {
    tintColor:'#ffffff',
  },
  navTitleStyle: {
    color:'#ffffff',
  },
  navBarStyle: {
    backgroundColor:'transparent',
  },
  isNavigationBarHidden: false,
  renderNavRightComponent: function(route, navigator, index, navState) {
    if (MHPluginSDK.userId == MHPluginSDK.ownerId) // 非分享设备
    {
      return (
        <View style={{left:0, width:29+15*2, height:APPBAR_HEIGHT, justifyContent:'center', alignItems:'center'}}>
          <ImageButton
            source={{uri:MHPluginSDK.uriNaviMoreButtonImage, scale:PixelRatio.get()}}
            onPress={() => {
              openMorePage(navigator);
            }}
            style={[{width:29, height:29, tintColor: '#ffffff'}]}
          />
        </View>
      );
    }
    else {
      return null;
    }
  },
}
与普通的 RN 应用相同,插件的 js 入口也是 index.ios.js (其中的 PluginApp),整个插件的页面导航使用 Navigator 组件,导航栏 Component 为 CommonModules 目录下的 MHNavigationBar。
根据启动插件时携带的 MHPluginSDK.extraInfo 中是否包含自定义场景的 trigger/action 信息,PluginApp 会选择启动自定义场景页组件 SceneMain 还是插件主页面组件 MainPage。
PluginApp 对象提供了一些方法来完成一些全局性的功能,各个页面 component 可以通过 this.props.app 来获取到 PluginApp 的引用并调用其上的方法:
获取插件包内资源的路径
获取插件包内图片的 source,通常是给 Image 组件使用
<Image style={styles.iconDemo} source={this.props.app.sourceOfImage("control_home.png")} />
> **注意** React Native的require方式获取图片只支持常量字符串,不能采用字符串拼接的方式,如果要用require方式获取图片,不能用以上方法,而要用类似如下的代码:
>
> ```js
var icon = MHPluginSDK.devMode ? require('../Resources/xxx.png') : require('./xxx.png');
<ImageButton source={icon} ...>
setIsNavigationBarHidden(isHidden)
设置导航栏是否隐藏
每个页面组件都有 route 对象来管理自己页面的导航栏属性,这个方法只当导航栏需要动态改变时调用
设置导航栏背景样式
每个页面组件都有 route 对象来管理自己页面的导航栏属性,这个方法只当导航栏需要动态改变时调用
插件中每一个页面 component 都是一个单独的js文件,与 RN 的 Component 基本一致,只是在 export 的时候,除了 export 组件以外,还要 export 一个 route 对象,用来设置一些页面的属性,包括标题、导航栏样式等。
module.exports = {
  component: MainPage,
  route: route,
}
const KEY_OF_MAINPAGE = 'MainPage';
var route = {
key: KEY_OF_MAINPAGE,
title: MHPluginSDK.deviceName,
component: MainPage,
navLeftButtonStyle: {
tintColor:'#ffffff',
},
navTitleStyle: {
color:'#ffffff',
},
navBarStyle: {
backgroundColor:'transparent',
},
isNavigationBarHidden: false,
renderNavRightComponent: function(route, navigator, index, navState) {
if (MHPluginSDK.userId == MHPluginSDK.ownerId) // 非分享设备
{
return (
<View style={{left:0, width:29+15*2, height:APPBAR_HEIGHT, justifyContent:'center', alignItems:'center'}}>
<ImageButton
source={{uri:MHPluginSDK.uriNaviMoreButtonImage, scale:PixelRatio.get()}}
onPress={() => {
openMorePage(navigator);
}}
style={[{width:29, height:29, tintColor: '#ffffff'}]}
/>
</View>
);
}
else {
return null;
}
},
}由于整个 React Native 插件(应用)由各类型的 Components(组件) 组成,当我们讨论 React Native 插件的生命周期时,讨论得即是 Component 的生命周期及其管理。
本文没有提及之处,则皆以 React 的 官方文档 为准。
大致可以分为三个部分:
- 挂载(Mounting)
- 更新(Updating)
- 卸载(Unmounting)
挂载期,即 Component 初始化并被插入虚拟DOM中时,以下方法会被触发:
constructor(){}
Component 的构造函数,此处可用来初始化 state 模型。
componentwillMount(){}
表示 Component 将要加载到虚拟DOM,在 render() 方法之前执行,可以用来做一些加载前的准备工作。不建议在此处做网络请求或者蓝牙连接,原因是不能保证请求仅在 Component 加载完毕后才会要求响应,如果网络请求在 Component 加载之前就完成,并且调用了 setState 函数将数据添加到 Component 状态中,则会出错。推荐将网络请求放在 componentDidMount() 中执行。更多讨论参考此处。
componentDidMount(){}
Component 已加载到虚拟DOM中。
更新期,或者称为运行期,以下方法会被触发:
componentWillReceiveProps(){}
在 Component 收到其父组件传递的 props 时执行,在整个生命周期可以执行多次。
shouldComponentUpdate(){}
在componentWillReceiveProps()执行之后立刻执行;或者在 state 更改之后立刻执行。该方法包含两个参数,分别是 props 和 state 。在组件的整个生命周期可以多次执行。如果该方法返回false,则componentWillUpdate() 及其之后方法都不会执行,组件不会进行重新渲染。
render(){}
组件渲染,在挂载期和更新期均会执行。
卸载期,只有一个方法:
componentWillUnmount(){}
Component 将要卸载时调用,可以在此处做一些清理工作。**此处有一处特殊情况需要注意,**即调用MHPluginSDK.closeCurrentPage()退出插件时,插件组件会被强制卸载,该方法中的操作可能来不及执行。该种情形通常出现在插件的首页(第一页),用户点击返回按钮时,调用 closeCurrentPage(),首页中该方法中的操作未全部执行。故,监听插件的退出,清理工作需要在 closeCurrentPage()之前进行,不要写在该方法中。
如需监听插件的启动,可监听首个 Component 的挂载,即 AppRegistry.registerComponent() 注册的 Component 的挂载。在其触发的方法中做你需要的操作,比如:在 componentDidMount(){} 中进行设备数据的拉取。
如果需要判断该插件是否是第一次被启动,可利用SDK提供的存储能力写一个 flag 来判断:进入插件后,尝试获取某个 key 的值,返回为空则为第一次启动,并写入值,后续再进入插件尝试获取该 key 的值,返回不为空则不为第一次启动。
举个例子:
var MHPluginFS = require('NativeModules').MHPluginFS;
MHPluginFS.readFile("isNew", (success,res)=>{
  if(res){
    console.log("not the first");
    return;
  }
  //this is the first time!
  MHPluginFS.writeFile("isNew", "some content", (success,res)=>{});
}));
具体来说:
MHPluginFS 模块是根据设备 Model 来存储,相同model 的不同设备以及同一设备的不同插件版本共享同一片存储空间,可用来判断某一类设备(相同 model )是否是第一次启动。同时可在存储时加入用户的uid、插件版本号等等,来判断不同用户、版本的首次启动。
MHPluginSDK.saveInfo 方法是根据设备 did 来存储,可用来判断某一个设备是否是第一次被打开。
注意上面两个方法都是本地存储,用户删除米家 app 后会导致数据被删除,重装 app 后,则用户会被认为是第一次启动,同时用户使用不同的手机也会遭遇同问题。如果有跨设备的强需求,可利用云端的存储能力,相同的逻辑,将 flag 写在云端。
MHPluginSDK.setUserConfigs 与 MHPluginSDK.getUserConfigs 可向云端存取数据,云端根据厂商分配的 appid + uid 存取,可跨设备判断某一用户是否是第一次启动该插件。
参考上文 componentWillUnmount(){} 方法中的描述,注意 closeCurrentPage() 是直接退出插件。
插件可以使用兼容 React Native 0.25.0 版本的第三方纯 js 开源组件,不能使用包含 Native 代码的组件。
如果有特殊需求,请与米家工作人员联系
react-native-camera 相机界面,支持二维码扫描。插件可引用 CommonModules 下的 Camera.ios.js 并修改界面。
var Camera = require("../CommonModules/Camera.ios");注意 比原库多提供一个事件标志打开相机失败
  var {DeviceEventEmitter} = require('react-native');
  var subscription = DeviceEventEmitter.addListener("RCTCameraSessionErrorEvent", (notification) => {
    // 相机打开失败,界面提示用户打开相机授权
  });
  // 记得取消监听通知
react-native-chart 绘制图表。
注意 这个库集成了两个版本,0.1.4(有native部分)
var RNChart = require('react-native-chart');以及1.0.7beta(纯js,例子参见开发板demo)AL-[105,)
import 'Chart' from '../CommonModules/Chart/Chart.js'绘图、绘制自定义控件
var ReactART = require('ReactNativeART');
var {
	Surface,
	Path,
	Group,
	Transform,
	Shape,
} = ReactART;
React-ART 的功能强大,可以完成各种自定义绘图的过程,SDK 的开发板 demo 插件中有简单使用的示例。更详细的使用教程请查阅相关资料。
一个环形的滑块 slider 控件。
var MHCircularSlider = require('../CommonModules/MHCircularSlider');

// ...
// 使用
render: function() {
  return (<MHCircularSlider style={styles.container} minimumValue={0} maximumValue={100} value={50} onUpdate={this._onUpdate.bind(this)} ref="sliderA" />);
},

_onUpdate: function(e) {
	var body = e.body;
	console.log("on Update: "+e.nativeEvent.value+" touchend:"+e.nativeEvent.touchEnded);
	//this.refs.abcd.setPower(true, 30); //设置按钮开关
	//this.refs.abcd.setValue(60); // 设置slider的值
	//this.refs.abcd.getValueWithCallback((value)=>{ // 获取slider当前值
	//  console.log("value:"+value);
	// });
},由于 RN 提供的 ListView 控件在 cell 较多的时候会出现一些性能问题,这里提供一个 TableView 组件,能够对 Cell 做一些简单的定制,适合 UI 简单的情况。 cell 只包含一个左侧的图片区域、一个标题、一个副标题三个部分,支持 section
var MHTableView = require('../CommonModules/MHTableView');<MHTableView refs={component=>this._tableView=component} hasIndex={true} onGetMore={this._onGetMore.bind(this)} onSelectRow={this._onSelectRow.bind(this)} />// MHTableView的DataSource示例
var dataSource = {
"index" : {
"foregroundColor":"#000000",
},
"sections":[
// SectionA
{
"header": {
"text": "Section标题",
"height": 40,
"backgroundColor": "#ff00ff",
"foregroundColor": "#00ff00",
"x": 20,
"fontSize": 18,
"fontIsBold": true,
"extra": {
"ignoreIndex": true,
"separatorColor": "#228888",
"separatorPadding": 40,
},
},
// Cell Array
"cells": [
{
"height":150,
"backgroundColor":"#008888",
"extra": {
"separatorColor":"#444444",
"separatorPadding": 20,
},
"title": {
"text": "主标题",
"foregroundColor": "#660000",
"fontSize": 25,
},
"subTitle": {
"text": "副标题",
},
"image": {
"imageUri": "http://www.图片地址",
},
}
]
};// 刷新列表
this._tableView.reloadData(dataSource);UIImagePickerManager 通过原生相机和相册空间选择图片
var UIImagePickerManager = require("NativeModules").UIImagePickerManager; // 旧版
var UIImagePickerManager = require("NativeModules").ImagePickerManager; // 新版
gl-react-native OPENGL组件,由于RN引擎版本的原因,集成的是2.27.0的版本
react-native-orientation 转屏组件,1.17.0,参见转屏demo
react-native-video 视频播放器,0.8.0,参见开发板demo中的VideoDemo
react-native-svg SVG组件,2.0.0,参见SVG组件应用Demo
react-native-particle-system 粒子系统。
import 'ParticleCell' from '../CommonModules/ParitcleSystem/ParticleCell.js'
import 'ParticleView' from '../CommonModules/ParitcleSystem/ParticleView.js'
react-native-webview-bridge React Native Webview with Javascript Bridge
-
rn的调试菜单在release模式下禁用了,所以用App Store版本无法调试,需要使用debug版本的米家app,可以通过联系米家工作人员获得
-
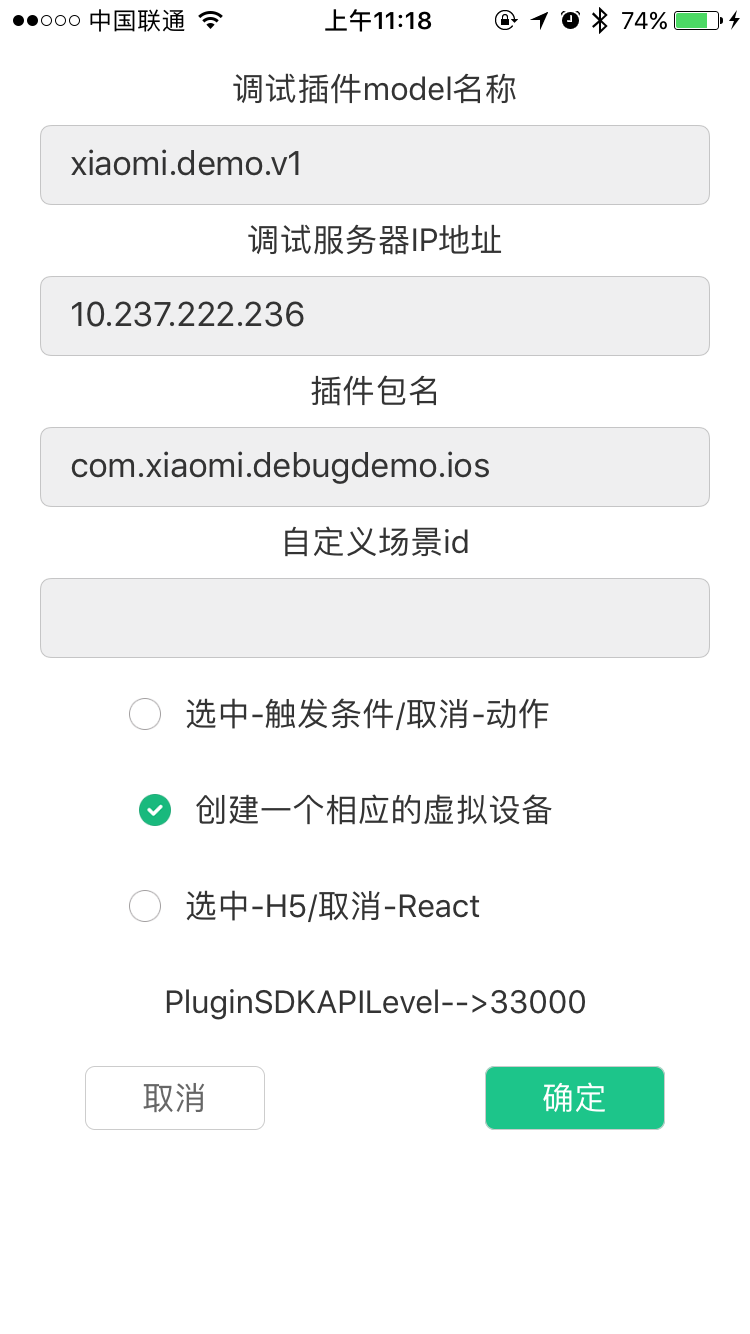
在开发者模式设置好配置,如下图
-
在个人页设置中打开rn调试功能,“开发者通用设置”=>"插件调试"
-
打开rn调试后,进入插件页,会自动打开Mac上的chrome一个网页
-
打开chrome开发者模式(Mac上是Command
⌘+ Option⌥+ I)即可进行调试,具体可以参照rn文档 -
准备工作就绪,进入插件页,可以在chrome中看到log
或者加断点进行调试