How Azure Batch Works? - MeirellesLab/AzureCustomTasks GitHub Wiki
Azure Batch runs large-scale applications efficiently in the cloud. Schedule compute-intensive tasks and dynamically adjust resources for your solution without managing infrastructure.
Azure Batch creates and manages a pool of compute nodes (virtual machines), installs the applications you want to run, and schedules jobs to run on the nodes. There's no cluster or job scheduler software to install, manage, or scale. Instead, you use Batch APIs and tools, command-line scripts, or the Azure portal to configure, manage, and monitor your jobs.
There is no additional charge for using Batch. You only pay for the underlying resources consumed, such as virtual machines, storage, and networking.
Batch works well with intrinsically parallel (also known as "embarrassingly parallel") workloads. These workloads have applications that can run independently, with each instance completing part of the work. When the applications are executing, they might access some common data, but they don't communicate with other instances of the application. Intrinsically parallel workloads can therefore run at a large scale, determined by the amount of compute resources available to run applications simultaneously.
The following high-level workflow is typical of nearly all applications and services that use the Batch service for processing parallel workloads:
- Upload the data files that you want to process to an Azure Storage account. Batch includes built-in support for accessing Azure Blob storage, and your tasks can download these files to compute nodes when the tasks are run.
- Upload the application files that your tasks will run. These files can be binaries or scripts and their dependencies and are executed by the tasks in your jobs. Your tasks can download these files from your Storage account, or you can use the application packages feature of Batch for application management and deployment.
- Create a pool of compute nodes. When you create a pool, you specify the number of compute nodes for the pool, their size, and the operating system. When each task in your job runs, it's assigned to execute on one of the nodes in your pool.
- Create a job. A job manages a collection of tasks. You associate each job to a specific pool where that job's tasks will run.
- Add tasks to the job. Each task runs the application or script that you uploaded to process the data files it downloads from your Storage account. As each task completes, it can upload its output to Azure Storage.
- Monitor job progress and retrieve the task output from Azure Storage.
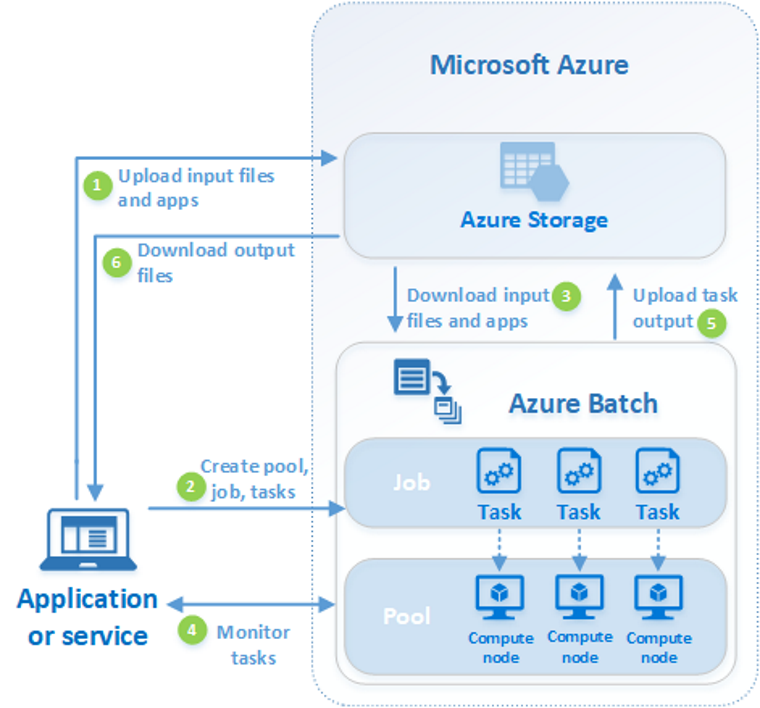
| Step | Description |
|---|---|
| 1. Upload input files and the applications to process those files to your Azure Storage account. | The input files can be any data that your application processes, such as financial modeling data, or video files to be transcoded. The application files can include scripts or applications that process the data, such as a media transcoder. |
| 2. Create a Batch pool of compute nodes in your Batch account, a job to run the workload on the pool, and tasks in the job. |
Compute nodes are the VMs that execute your tasks. Specify properties for your pool, such as the number and size of the nodes, a Windows or Linux VM image, and an application to install when the nodes join the pool. Manage the cost and size of the pool by using Azure Spot VMs or by automatically scaling the number of nodes as the workload changes. When you add tasks to a job, the Batch service automatically schedules the tasks for execution on the compute nodes in the pool. Each task uses the application that you uploaded to process the input files. |
| 3. Download input files and the applications to Batch | Before each task executes, it can download the input data that it will process to the assigned node. If the application isn't already installed on the pool nodes, it can be downloaded here instead. When the downloads from Azure Storage are complete, the task executes on the assigned node. |
| 4. Monitor task execution | As the tasks run, query Batch to monitor the progress of the job and its tasks. Your client application or service communicates with the Batch service over HTTPS. Because you may be monitoring thousands of tasks running on thousands of compute nodes, be sure to query the Batch service efficiently. |
| 5. Upload task output | As the tasks are complete, they can upload their result data to Azure Storage. You can also retrieve files directly from the file system on a compute node. |
| 6. Download output files | When your monitoring detects that the tasks in your job have been completed, your client application or service can download the output data for further processing. |
Keep in mind that the workflow described above is just one way to use Batch, and there are many other features and options. See Batch service workflow and resources for an overview of features such as pools, nodes, jobs, and tasks. Also, check out and try to follow the Azure Batch best practices.
To see the latest news on Azure Batch go to the Batch service updates.
Source: All information on this page comes from the Microsoft Azure Batch documentation. For more details, you can check it out directly.