How to make your extra slot character - MarklyThomas/Secret-Repo GitHub Wiki
/* [Introduction] starts here */
Introduction:
Extra slot characters are character modifications featuring custom movesets, sprites, HUD elements, etc., without replacing Sonic, Tails, or Knuckles. Creating these characters is simplified with the assistance of the framework, which offers built-in functions, features, and a comprehensive guide to ensure you have all the necessary tools for developing your characters.
Important:
-
Ensure that you download the framework from this link. In your mod list, the framework must be positioned below the Extra Slot character.
- Framework Link (Included in the submission): ESU Framework
-
If you intend to share your extra slot character with the community, consider reserving your character slot. This prevents your slot from being previously chosen or conflicting with another reserved slot.
-
To include your character's IDs in the registered list, follow these steps:
- Sign up on github.com if you haven't already.
- Visit this link to generate an ID.
- Go to this GitHub repository and fork it.
Resources:
Empty .lemon file: Download Link
Empty .json file: Download Link
Recommended Tools:
- Sonic 3 Animation Editor (Instant download link)
- Any sprite software (recommended: GraphicsGale, Aseprite, or GIMP)
- For coding, use Visual Studio Code or Notepad++
For Visual Studio Code, ensure you click on the provided icon to access the marketplace.

Search for "s3air" to find the required plugin for lemon scripting.
/* [Introduction] ends here */
/* [File setup] starts here */
Setting Up Your Files:
Let's begin by establishing the foundational steps to set up your extra slot character.
- Create a folder – feel free to name it as you prefer. In this guide, we'll use the name "ES example."

- Within this folder, create three subfolders named "palettes," "scripts," and "sprites."

-
Obtain the "char(number)" file from the "s3air-extra-character-slots-unlimited-main\scripts\charscripts" directory. Copy and paste this file into your newly created "charscripts" folder.
If your character is based on Tails, Knuckles, or Sonic's partner, replace "CHARS_SONIC_ALONE" in your
ExtraChar.startup_charnumber()function with one of the following:- CHARS_TAILS_ALONE
- CHARS_SONIC_AND_TAILS
- CHARS_KNUCKLES_ALONE
For this tutorial, we'll stick with "CHARS_SONIC_ALONE."
-
Create a "mod.json" file and place it in your folder. You can choose between two options:
-
Inside the "scripts" folder, add the required main file: Main File Link
-
Create a new subfolder within the "scripts" folder named "charscripts."

-
Download and open this lemon file to configure your character in the data select: Lemon File
Locate the provided function:
function string ExtraChar.getCharacterName(u8 xtrachar)
{
    if (xtrachar == 105)
        return "ES template"
    return base.ExtraChar.getCharacterName(xtrachar)
}
Replace "105" with the chosen character number and "ES template" with your character's name. Ensure the name isn't excessively long, and retain the quotation marks.
For example, if your character is Mecha Sonic MK.II with slot 163:
function string ExtraChar.getCharacterName(u8 xtrachar)
{
    if (xtrachar == 163)
        return "Mecha Sonic"
    return base.ExtraChar.getCharacterName(xtrachar)
}
Place this file in the "charscripts" folder.
-
Create a ".json" file named "dataSel_105.json" with the following structure:

Set up the content of the JSON file as shown in the example.
To ensure smooth functioning of your character's sprites, follow these next steps carefully.
Sprite Naming Conventions:
- For the data/act select sprite, the sprite key should be named
dataSel_Slot(num). Additionally, the key for setting the life icons should bedataSel_lifeContinue_Slot(num).
Important Note: Ensure that your data select sprites are in PNG format. Otherwise, you might encounter issues like the example shown below.

Sprite Positioning and Animation:
In the animation editor, pay attention to the "Rect" and "Center" attributes. These attributes define the position of your sprites. The animation editor will be your ally in setting up offkeys for various sprites. Keep in mind that your offkeys might not necessarily match those in the tutorials. The exact offkeys depend on your spritesheet. You can, however, use template offkeys as a guide to correctly position your sprites.

Within the animation editor's frame properties section, you can adjust sprite positioning. This feature is useful to ensure that your sprite aligns correctly and isn't offset.
JSON File Setup:
Next, structure your JSON file as shown in the example.
Now, let's move on to setting up sprites for your character. If you already have a character in mind and have all the necessary sprites prepared, you can skip this section.
-
Navigate to
sonic3air_game\doc\modding\spriteswithin your Sonic 3 Air zip file. Retrieve the following files required for this tutorial:hud_life_sprites.jsonhud_life_sprites.pnghud_text_sprites.jsonmonitors.bmpmonitors.jsonresult_nameplate.json
-
If your ES character is based on Sonic, obtain the following files instead:
signpost_sonic.bmpbluesphere_sonic.bmpbluesphere_sonic.jsoncharacter_sonic.bmpcharacter_sonic.jsoncharacter_sonic_dropdash.jsoncharacter_sonic_peelout.bmpcharacter_sonic_peelout.jsoncharacter_sonic_snowboarding.bmpcharacter_sonic_snowboarding.jsoncharacter_supersonic.bmpcharacter_supersonic.jsoncontinue_icon_sonic_wait.bmpcontinue_icon_sonic_wait.jsonendpose_sonic.bmpendpose_sonic.jsonendpose_supersonic.bmpendpose_supersonic.jsoncharacter_sonic_continue.bmpcharacter_sonic_continue.jsoncharacter_sonic_ending.bmpendpose_supersonic.jsonendpose_supersonic.bmp
-
For an ES character based on Tails, retrieve these files:
character_tails.bmpcharacter_tails.jsoncharacter_tails_continue.bmpcharacter_tails_continue.jsoncharacter_tails_ending.bmpcharacter_tails_ending.jsoncharacter_tails_tails.bmpcharacter_tails_tails.jsoncontinue_icon_tails_tails_wait.bmpcontinue_icon_tails_tails_wait.jsoncontinue_icon_tails_wait.bmpcontinue_icon_tails_wait.jsonsignpost_tails.bmp
-
For an ES character based on Knuckles, retrieve these files:
continue_icon_knuckles_wait.jsoncontinue_icon_knuckles_wait.bmpcharacter_knuckles_continue.jsoncharacter_knuckles_continue.bmpcharacter_knuckles.jsoncharacter_knuckles.bmpbluesphere_knuckles.jsonbluesphere_knuckles.bmptornado_knuckles.jsontornado_knuckles.bmpsignpost_knuckles.bmpendpose_knuckles.jsonendpose_knuckles.bmp
-
Gathered the necessary sprite files, place them all in the "sprites" folder.
-
In the
sonic3air_game\doc\modding\palettesdirectory, get the appropriate palette files based on your character choice. These files are namedcharacter_palette_(character)andbluesphere_palette_(character). Place them in the "palettes" folder.Remember to replace
(character)with your reserved slot name, as shown below: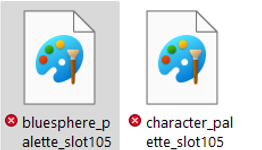
/* [File setup] ends here */
/* [File naming] starts here */
Naming the files for the ES character to work.**
/* [character_slot(number) and character_superslot(number)] starts here */
character_slot(number) and character_superslot(number)
Next up, we need to set up the sprites to make our ES character sprites function properly.
Let’s start with character_(sonic, tails or knuckles).json. We will use the sonic.json file for this tutorial.

“That’s a lot of things, how do I change them all?”
For visual code we use the search icon and we can find all cases of Sonic and replace it with slot(number).
Like here

Make sure to click on the highlighted icon to replace them all. After that, save the edit and change the name of character_(sonic,tails or knuckles).bmp with character_slot(number).bmp and the json file you did the edits with character_slot(number).json
This one is for Sonic only: We will do it for Super Sonic next, do the same, replace any case of Sonic and replace it with slot(number).

It should be something like this, remember it must be your slot number and not 105 unless your ES character takes slot 105. After that, replace the character_supersonic.json filename with character_superslot(number).json and character_supersonic .bmp with character_superslot(number).bmp.
/* [character_slot(number) and character_superslot(number)] ends here */
###/* [Signpost] starts here */
Signpost
Here is how you set our signpost. Replace the character name in "signpost_(character)" of the character you choose and replace the character with slot(number)_0x0Y. Replace the Y with 0, 1 or 2 if your character is based on Sonic, Tails or Knuckles respectively. Then clear the rest of your file and make it look like this:
{
//the "file" doesn't need to be signpost_sonic.bmp, but the file is used as an example.
	"signpost_slot(number)_0x0Y": { "File": "signpost_sonic.bmp", "Rect": "0,0,48,32", "Center": "24,16" }

}
###/* [Signpost] ends here */
###/* [character_slot(number)_snowboarding] starts here */
character_slot(number)_snowboarding
This is also for Sonic only:
Now we got to character_sonic_snowboarding and replace any case of Sonic with slot(number) and change the name of character_sonic_snowboarding.json with character_slot(number)_snowboarding.json and character_sonic_snowboarding.bmp with character_slot(number)_snowboarding.bmp
###/* [character_slot(number)_snowboarding] ends here */
/* [ Hud elements] starts here */
Hud sprites
Now we go to our hud_life_sprites.json file and the inside of the file should be like this.

For this one, all you need to do is replace the name of the character you're using with their slotnumber.
Just like this.

Now clear your json file and make sure it looks like this
{
	// Character icon for lives
	"hud_lives_icon_slot105":    { "File": "hud_life_sprites.png", "Rect": "0,16,48,16" }
}
Now we go to hud_text_sprites.json and scroll down until you find this

Simply replace, blue, orange, or red with slot(number).
In the same file, go here and simply replace either the text that says continue_icon_(sonic, or tails, or knuckles) with slot(number), in this image, I changed the text that said sonic with slot105.

Clear the rest of your hud_text_sprites.json and make sure it's organized like this
{
	// HUD texts
	"hud_bonus_icon_slot105":   { "File": "hud_text_sprites.png", "Rect":  "0,61,12,19" },

	// Continue icons
	"continue_icon_slot105":    { "File": "hud_text_sprites.png", "Rect": "0,82,20,24",  "Center": "12,24" }
}
/* [ Hud elements] ends here */
/* [Peelout and dropdash sprites] starts here */
Peelout and drop dash sprites:
The following ones need you to go to your char.(number) file.
Now we must go to our char(number) file and search peelout, make sure you find this line of code

Once you do simply add the number of your slot on it or simply call it slot(number) instead of character_slot(number) Something like this:

Do the same thing for the drop dash too, just add character_slot(number) in character_slot%d_dropdash_%d or do it like in the image above.
Now time to go to the json files. First, we go to character_sonic_peelout.json and then we will replace the “sonic_peelout” with the name you chose to call your peelout string. In my case, I do it like this.

We do the same thing with the drop dash, replace “sonic_dropdash ” with how you named your keystring.

/* [Peelout and dropdash sprites] ends here */
/* [Monitors] starts here */
Monitors:
There is an easy way we can add and set this up for your ES character.

This is what the current function looks like.
Replace it with this instead
Have this in the text
//@ Original function taken from sonic3air_dev/scripts/objects/basics/monitor.lemon
	``function u64 ExtraChar.getIconSpriteKey_char(number)(u8 type)``
	``{``
	    ``if (type == 0x01)``
	        ``return "monitor_icon_slot(number)"``
	    ``else if (type == 0x02 && Renderer.hasCustomSprite("eggman-lrz-blue-12") && System.getGlobalVariableValueByName("EggmanBlue.disableMonitorReplacement") != 1)``
	        ``return "monitor_icon_eggman"``
	    ``else if (type == 0x04 && Template_Shoes)``
	        ```return "monitor_icon_Templateshoes"``
	    ``else``
	        ``return base.ExtraChar.getIconSpriteKey_char(number)(type)```

	    ``return 0x00``
	``}``
We now must go to our monitors.json file and replace “monitor_icon_sonic” or “monitor_icon_tails” or “monitor_icon_knuckles” with monitor_icon_slot(number)
    else if (type == 0x02 && Renderer.hasCustomSprite("eggman-lrz-blue-12") && System.getGlobalVariableValueByName("EggmanBlue.disableMonitorReplacement") != 1)
    return "monitor_icon_eggman"
This allows compatibility with Blue Glasses Eggman, but make sure the Robotnik monitor in your monitors.json is still called “monitor_icon_robotnik” and make sure to put Blue Glasses Eggman in a higher priority than any ES mod you have in your mod list.
Now for the custom speed shoes option.
The mod.json provided to you in this tutorial comes pre-installed with the things needed to set up your custom speed shoes monitor. But if you want to add it manually consider the following
/1.png)
This is what a normal mod.json file looks like, and this is how we will add our settings. We add a , after the second bracket that contains the “metadata” and we type “Settings:". After that place the brackets, {}, just like in this image:
/2.png)
In the brackets, we do the same but with the square brackets, []:
/3.png)
Next up, we add the following inside our second settings blocks.
/4.png)
Very important to ´put the comma in every line after the orange “” for InternalName, DisplayName, Variable, Defaultvalue, Category and the numbers in the options except the last number, such as the 1 in this image:
/5.jpg)
Internal name, you can name it how you want but we will call it here "Unique Template speed shoes":
/6.jpg)
DisplayName is how the option will be named when you go see it in the options. So if I call my DisplayName “Speed Shoes Icon” It will show up there:
/7.png)
Variable is the most important one. I recommend calling the variable Slot(number)_Speed_Shoes or in my case Template_Speed_Shoes.
Now go to the beginning of your char(number).lemon file and put global bool Slot(number)_Speed_Shoes or Template_Speed_Shoes if you are me.
/8.png)
Put it above ExtraChar.startup_char(number)()
Defaultvalue is the number that automatically sets the option chosen in the mod settings. This is determined by “options”.
Category is utilized to organize a categorize your options in the mod settings. You can make multiple and call them however you like.
Options are how we can set up our speed shoes, they can also be used to let other people playing your mod choose if they want to have the speed shoes or not.
Here is how we are going to set our options
/9.jpg)
We will set up how blocks and put the numbers 0 and 1.
With 0, write “0”: and make another “” which can be named what you want. I will call it “Unique”. After that, put a comma (,) after the orange ““ so that “1” can work.
Next up we go with the “1”. Just like with 0, write “1”: then make another “” which you can call anything but I will call “Default”. Don’t put a comma after the second “”.
We can add more numbers other than 0 and 1, with the same method of how to add it, only the last number in the options should not have a comma (,) just like how 1 doesn’t have it in the image.
Finally, remember the global bool from our variable from earlier, time to use it now.
In our char(number).lemon we go to ExtraChar.getIconSpriteKey_char(number)(u8 type) after the Eggman monitor we'll write the following:
function u64 ExtraChar.getIconSpriteKey_char(number)(u8 type)
{

    else if (type == 0x04 && Yourvariable == 0)
        return "monitor_icon_slot(num)shoes”
}
Then we go back to our monitors.json file and replace "monitor_icon_speedshoes" with “monitor_icon_Templateshoes”
And lastly, add the following:
    else
        return base.ExtraChar.getIconSpriteKey_char105(type)

    return 0x00
/10.png)
Just like in this image, of course, the “template” chosen throughout this section is my choice, you should call them based on how you call them in the tutorial.
And now you have your custom monitors ready!
/11.png)
/* [Monitors] ends here */
/* [Data select clear sprites] starts here */
Data select clear sprites:
Well you beat the game with your characters, you fought the dreaded Mecha Sonic, the intimidating Fire breath and the horrifying Pointdexter. Lets set our Data select clear sprites to celebrate our victory! Lets go back to our dataselect.json file and add the following:
dataSel_savePortrait_slot(number) for save with no emeralds dataSel_savePortrait_superslot(number) for when you acquire the chaos emeralds dataSel_savePortrait_clear_slot(number) for when you have all super emeralds.
Set it up like this.

/* [Data select clear sprites] ends here */
/* [Knuckles cutscene sprites] starts here */
Knuckles cutscene sprites:
Remember when I said we will get to the cutscene sprites for Knuckles? Now is the time. First we need to set up a renderhook for Knuckles.
function void Standalone.renderCutsceneKnuckles(u8 variant, s16 px, s16 py, u16 renderQueue)
{
    u64 key = 0
    bool prioFlag = (objA0.sprite_attributes & sprite_attribute.PRIORITY) != 0
    if (objA0.update_address == 0x063466) && (global.xtrachar == 107)
    {
        key = stringformat("cutscene_slot107_%d_0x%02x", variant, objA0.animation.sprite)
        if (Renderer.hasCustomSprite(key))
        {
            Renderer.drawCustomSprite(key, px, py, 0x80, objA0.render_flags | (prioFlag ? SPRITE_FLAG_PRIO : 0), renderQueue)
            return
        }
    }

    base.Standalone.renderCutsceneKnuckles(variant, px, py, renderQueue)
}
Place the code somewhere in your char(number) file Now open cutscene_knuckles_5.json. In the file just replace any instance of cutscene_knuckles with cutscene_slot(number).

And rename your bmp file to cutscene_slot(number).bmp and call your json file cutscene_slot(number).json
After that you should be golden!
/* [Knuckles cutscene sprites] ends here */
/* [Blue sphere bumpers] starts here */
Blue sphere bumpers:
This one should be easy. The key for the blue sphere bumper is bump_slot(number) And the frames need to be from bump_slot(number)_0x00 to bump_slot(number)_0x07. Make a new json file and call it bump_slot(number).json

/* [Blue sphere bumpers] ends here */
/* [File naming] ends here */
/* [Mod compatibility] starts here */
Mod compatibility:
This section is to set up compatibility with mods ES Mighty, Ray and Amy are compatible with:
/* [CD Spring twirl Remastered] starts here */
CD Spring twirl Remastered

Real talk, we are going to learn how to add compability with SCD spring twirl remastered. This part is not mandatory and you can put the codes for mod compatibility anywhere, but to be more organized lets make a new .lemon file called “Mod compatibility.lemon” the name should speak for itself. Now we first need to set up the code for the spring twirl. Replace CHARACTER_SONIC with CHARACTER_TAILS or CHARACTER_KNUCKLES if your character is not Sonic.
//@ Function taken from sonic3air_dev/scripts/standalone/rendering/render_character.lemon
// Replace CHARACTER_SONIC with CHARACTER_TAILS or CHARACTER_KNUCKLES if your character is not Sonic.
function string getCharacterSpriteKey(u8 character)
{
    if (global.xtrachar == (number) && character == CHARACTER_SONIC && char.state == 0x31)
    {
        return "character_slot(number)"
    }
    return base.getCharacterSpriteKey(character)
}
And paste this in your new Mod compatibility.lemon file
Now we set up our own sprites.
I recommend to make/use a new json file to add mod compatibility.
In that json file you call the keys for the twirl as character_(number)_springtwirl.
We can add as many frames to our spring twirl as we want. But it depends on the number of sprites you use. In this case we only have 5

For those who will only use 5 frames like me, order the sprites in the animation editor like this.

The front facing sprite must be character_slot(number)_springtwirl_0

The back facing must be character_slot(number)_springtwirl_1

The back facing sprite but flipped must be character_slot(number)_springtwirl_2

The front facing sprite but flipped should be called character_slot(number)_springtwirl_3

And finally the middle facing sprite must be called character_slot(number)_springtwirl_4
Use the animation editor to center the sprites or do any other fixes.
/* [CD Spring twirl Remastered] ends here */
/* [Falling Sprites for All] starts here */
Falling Sprites for All:
Put this in Mod compatibility.lemon file and make the appropriate changes. Replace CHARACTER_SONIC with CHARACTER_TAILS or CHARACTER_KNUCKLES if your character is not Sonic.
// Replace CHARACTER_SONIC with CHARACTER_TAILS or CHARACTER_KNUCKLES if your character is not Sonic.
function string getESCharacterFallSpriteKey(u8 character, u8 extrachar)
{
    if (extrachar == (number) && character == CHARACTER_SONIC)
    {
        return "Slot(number)_falling_anim"
    }
    return base.getESCharacterFallSpriteKey(character, extrachar)
}
If you want to add more sprite to your falling animation, do this instead:
// Replace CHARACTER_SONIC with CHARACTER_TAILS or CHARACTER_KNUCKLES if your character is not Sonic.
function string getESCharacterFallSpriteKey(u8 character, u8 extrachar)
{
    if (extrachar == (number) && character == CHARACTER_SONIC)
    {
        return "Slot(number)_falling_anim_%d"
    }
    return base.getESCharacterFallSpriteKey(character, extrachar)
}
You can set up the animation speed of your falling sprites to how much you like.
// Replace CHARACTER_SONIC with CHARACTER_TAILS or CHARACTER_KNUCKLES if your character is not Sonic.
function u8 FallAnimSpeed(u8 character, u8 extrachar)
{

    if (global.xtrachar ==(number) && character == CHARACTER_SONIC)
    {
        return 1
    }
    return base.FallAnimSpeed(character, extrachar)

}
Time to add our spritekey in the “Modcompatibility”.json
If your only going to use one frame( you are not using _%d) for your falling sprite, just use the key from the falling code.

If you want to add more frames (you are using _%d) the frames start with 0 and you add more than one but this how you set up at least 2 frames.
/* [Falling Sprites for All] ends here */
/* [Animated signposts] starts here */
Animated signposts:
Now we are going to add animated signposts. First of all we need to put this code in our own Mod compatibility.lemon file
function u64 GetXtraName(u8 xtrachar, u8 char)
{
     if (xtrachar == 105 && char == CHARACTER_SONIC)
        return "Signslot105"

     return base.GetXtraName(xtrachar, char)
 }
We should make/use a new json file to avoid clutter so lets make a new one for our animated signposts, lets call it Goal_animes_slot(number).json Like the spring twirl sprites before it, the frames should start with 0. Make sure there all called Goal_animes_Signslot(number).

/* [Animated signposts] ends here */
/* [Mania inspired signposts] starts here */
Mania inspired signposts:
This is the easiest one to add.
All you need is the sprite and the key, which is maniainsp_signpost_slot(number).
Lets go back to our Mod compatibility.json and add it

/* [Mania inspired signposts] ends here */
/* [Sonic 3 Complete level select] starts here */
Sonic 3 Complete level select:
Now finally lets make our character compatible with the s3c level select. Add this code in your Mod Compatibility.json
function string RenderExtraCharIcon(u8 xtrachar)
{
    if (xtrachar == (number))
        return "Slot(number)S3c"

    return base.RenderExtraCharIcon(xtrachar)
}
After that, we add our key in the Mod compatibility.json file

/* [Sonic 3 Complete level select] ends here */
/* [Extra Save Slots] starts here */
Extra Save Slots: And lastly we are adding compatibility with Extra save slots for our ES characters
We don’t actually need any code to add compatibility to the mod, only the json keys.
Normal ending portrait in the data select is: ESS_Zone_Es[num]_0
Super ending portrait in the data select is: ESS_Zone_Es[num]_1
Hyper/100% ending portrait in the data select is : ESS_Zone_Es[num]_2
The continue icon in the data select menu is : ESS_Cont_Es[num]
The life icon in the data select menu is : ESS_Life_Es[num]
And finally, the portrait of the character is: ESS_Char_Es[num]
Lets go back to our dataSel_105.json and add our keys like this.

I highly suggest using the animation editor to set up your sprites for ESS properly.
/* [Extra Save Slots] ends here */
Now your ES character is compatible with all the mods (that I know of) that are compatible with ES Mighty, Ray and Amy.
/* [Mod compatibility] ends here */
/* [Extras ] starts here */
Extras (For those who want to go beyond just having your characters in the main game)
/* [Title cards] starts here */
Title cards:
Lets add title cards for our characters now.
We will need the renderhook to set up our title card :
function bool Standalone.onWriteToSpriteTable(s16 px, s16 py, u16 renderQueue)
{
    if (global.xtrachar == (number) && objA0.update_address == 0x02d8e2) && (Custom_Template_Titlecards == 0) //&& global.zone != 0x0c
    {
        u64 key = stringformat("titlecard_%d", global.xtrachar)
        if (Renderer.hasCustomSprite(key))
        {
            Renderer.drawCustomSprite(key, px - 0x20, py - 0x40, 0x00, SPRITE_FLAG_PRIO | SPRITE_FLAG_NO_GLOBAL_TINT, renderQueue)
            return true
        }
    }

    // Return the base function
    return base.Standalone.onWriteToSpriteTable(px, py, renderQueue)
}
You can put this code anywhere, preferably in your char(number).lemon file
Now put this key titlecard_(number) I recommend putting the key in a new json file, simply have it be called titlecards.json

/* [Title cards] ends here */
/* [Competition mode] starts here */
Competition mode:
Now we will learn how to make our characters work in competition mode!
Here is how we are going to do it:
Make them load in the competition mode:
We need to make our character load in the competition mode before doing any of the following steps
// Sets the availability status of the character for selection in the Competition menu.
function bool ExtraChar.CompetitionMode.isCharacterAvailable(u8 xtrachar)
{
    // Check
    if (xtrachar == (number))
        return true

    // Call the base function
    return base.ExtraChar.CompetitionMode.isCharacterAvailable(xtrachar)
}
If you want to add the Tails Tails normally has, use this code
function bool AddCompTails(u8 ExtraChar)
{
    // Usage example:
    if (ExtraChar == number)
    {
     return true
     }
     return base.AddCompTails(ExtraChar)
    return false
}
Place this code preferably in your char(number).lemon file
Setting up sprites (GIMP ONLY; PC ONLY)
Now is time to make the sprites.
There is an easy way to make the competition mode sprites, a method I like to call “The GIMP Method”
First we open GIMP and set up our sprite.

Next we use this red image and place it over our sprite

You will need to extend it if needed.

Now right click on wand icon and you will find color selection tool.

This one right here

Use the color tool to CTRL + T the red image. After that, hide the red image and use edit and clear on the layer of your sprite.


And finally use zealous crop to unite them all

The sprites may not be perfect and may require a bit of editing, but at least you have an easy way to make them.
Setting up the sprites in the json file.
The zip file for Sonic 3 air does not offer resources for competition mode sprites or json keys, so use have json keys for Sonic, Tails and Knuckles here.
For these you will have to replace the number from slot_ as there based on templates.
Once again the animation editor is helpful to know the keys to certain sprites.
/* [Competition mode] ends here */
/* [Genesis accurate palette coloring] starts here */
Genesis accurate palette coloring:
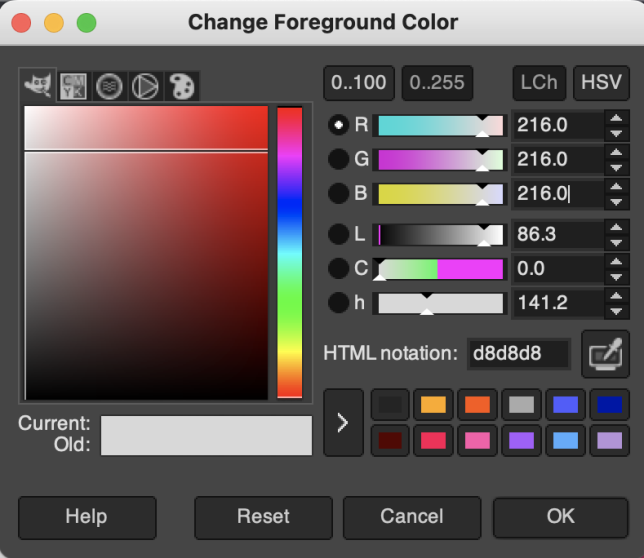
Here is a way on how to make you palette hardware accurate to the original Sonic 3 and Knuckles! You can do this method without GIMP but I am not aware on which software you can do it.

The are the RGB values for genesis palettes. Make sure when making Genesis accurate palettes, round the RGB values of your color to the closest numbers in this image.
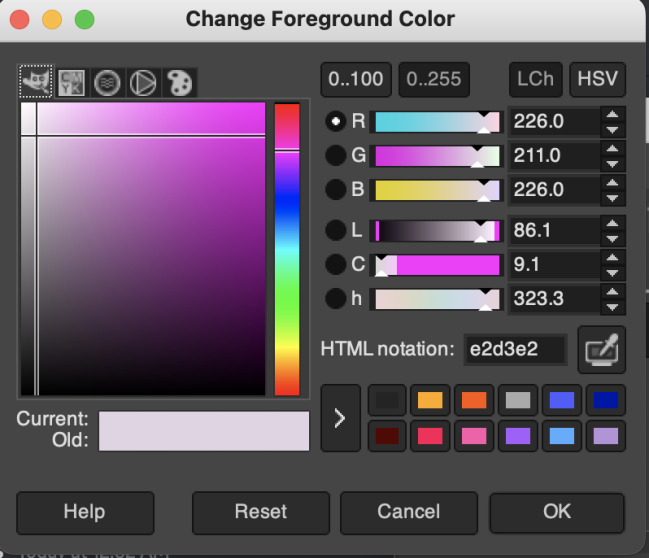
Let's say you use the color picker tool from Gimp on a color and you see this:
Make sure 0..255 is set and not 0..100.
What you wanna do is round the numbers in the R, G, and B tabs to the nearest number in this image.
All of those are the closest to 216, so they'd all be 216.
If you get a number that you're not sure about, you can just do something like, 226 - 252 = -26 * -1 = 26 or 226 - 216 = 10.
If you get a number that's in the middle of both, then you can decide on your own which way it should round.
For example, if the value in the R tab is 18. It's 18 away from 0 and 36, you can decide which one the number rounds.
I would round up (36 in this case) if I'm trying to get a darker color. Or down (0 in this example), if I'm trying to get a lighter color.