setting up a WAMP stack (unfinished 3rd draft) - ManvilleFog/buttonmen GitHub Wiki
The night was dense with Shade and Fog (Fog being, by far, more dense) as the dark and shadowy master guided the foggie one through setting up a WAMP stack (wamp wamp wamp thubba thubba - dubstep rules!).
Setting up a WAMP stack
NOTE: All installations were done using the default settings, unless otherwise noted.
QUICK
The following Windows feature probably needs to be turned on for all installations to go through:
Microsoft .NET framework - Windows Communication Foundation HTTP Activation
If you haven't already, download and install SQLyog
http://code.google.com/p/sqlyog/downloads/detail?name=SQLyog-11.3.0-0.x64Community.exe&can=2&q=
Download and install Visual C++ in order to install WAMPSERVER (64 bits & PHP 5.4) 2.4
http://www.microsoft.com/en-us/download/details.aspx?id=13523
Go to the following link :
http://pear.php.net/go-pear.phar
and save the file to
c:\wamp\bin\php\php5.4.12
(if this directory does not exist, you need to find the PHP version directory under wamp\bin\php - you'll need to enter the following commands from there)
Open your Windows command prompt and enter the following commands:
cd c:\wamp\bin\php\php5.4.12
phar.phar.bat
php go-pear.phar
PEAR_ENV.reg
pear channel-discover pear.phpunit.de
pear channel-discover components.ez.no
pear channel-discover pear.symfony-project.com
pear install --alldeps phpunit/PHPUnit
pear install -f  phpunit/PHPUnit
pear install phpunit/PHPUnit_SkeletonGenerator
. . . continued in Setting up WampServer below
VERBOSE
NOTE: Some of these steps are prerequisites I needed to install the appropriate tools. For example, you won't need to do anything with Visual C++ except install it, but if you already use Visual C++ you can probably skip this step. Note that I've also included some links simply as reference, or in case you run into problems. Along with James' instructions, these are what I used to help me set up the WAMP stack.
SQLyog
SQLyog - yes, there's a free version
http://code.google.com/p/sqlyog/downloads/detail?name=SQLyog-11.3.0-0.x64Community.exe&can=2&q=
NOTE: SQLyog is also used for tunneling to PagodaBox.
WAMPSERVER
Install .net (assumed necessary, please let someone know if this is not the case)
Just before James told me about SQLyog, I was going to install MySQL. It required .net to install. I assume that since the M in WAMP stands for MySQL then .net is required for it as well. It may or may not be needed for Visual C++.
You probably don't need instructions to do this, but JIK:
Control Panel > Programs > Turn Windows Features On or Off > Microsoft .NET Framework (3.5.1 on my machine)
check the box labeled Windows Communication Foundation HTTP Activation (non-HTTP not needed)
click OK
Visual C++
You need Visual C++ to install the wamp server. The pop-up window that opens when you click to download WampServer has links for C++, but here's the 64 bit version for easy reference:
http://www.microsoft.com/en-us/download/details.aspx?id=13523
(if I recall correctly, this downloads from a sourceforge page)
WampServer
I went with the WAMPSERVER (64 bits & PHP 5.4) 2.4
PHPUnit
I'm giving some pages as reference, though you won't be able to follow them directly with the newer versions of PHP.
http://nishutayaltech.blogspot.in/2011/04/installing-phpunit-on-windows.html
is mostly what is followed, except for installing pear
http://blog.pear.php.net/2009/07/01/php-53-windows-and-pear/
has other directions for installing pear, which I didn't use (but it's how I discovered go-pear.bat doesn't work)
PHP Phar
In older versions of PHP you could use the instruction go-pear.bat. That file isn't included in this version of PHP, and even if you find and place the file there, it doesn't do the job. Instead you need to use Phar, which is used to unzip PHP archive files.
Phar should already be included in this version of PHP, though you may need to unzip it (which, I guess you can unzip the file used to unzip itself if you're using PHP: Hypertext Preprocessor ;p )
Open your Windows command prompt and navigate to your PHP version directory:
cd c:\wamp\bin\php\php5.4.12
This command should work if you didn't change the default folder during installation, and if your installation used this version of PHP. If not, just find and go to your wamp directory, cd bin\php and then dir to see the php version folder and cd there.
run the phar batch file:
phar.phar.bat
PHP Pear
http://pear.php.net/manual/en/installation.getting.php
has instructions using go-pear.bat, which you can ignore and instead just click the link to:
http://pear.php.net/go-pear.phar
and save it to your php version directory (c:\wamp\bin\php\php5.4.12)
run it with the command:
php go-pear.phar
*This was the last of the instructions for installing PHPUnit that don't work with the newer versions of PHP. You can use
http://nishutayaltech.blogspot.in/2011/04/installing-phpunit-on-windows.html
to continue (until you get to NetBeans), or:
you have to register Pear by either typing
PEAR_ENV.reg
if you're still in the command prompt in the proper folder, or by simply finding the PEAR_ENV.reg in windows explorer and double-clicking on it.
PHPUnit
NOTE: The following commands are entered from the Windows command prompt while in the PHP version directory
First, register the PHPUnit channel with PEAR:
pear channel-discover pear.phpunit.de
pear channel-discover components.ez.no
pear channel-discover pear.symfony-project.com
Then install the packages
pear install --alldeps phpunit/PHPUnit
Now bring PHPUnit up-to-date:
pear install -f phpunit/PHPUnit
Following these instructions should result in a successful installation of PHPUnit. I, unfortunately, assumed that I only needed to choose one of the channels to register instead of all three. The following page helped me resolve my problems. Hopefully you won't need it:
http://stackoverflow.com/questions/13763154/unable-to-install-phpunit-invoker-for-windows7
PHPUnit Skeleton Generator
One more thing needed to run tests using NetBeans. FYI, the instructions are found here :
http://phpunit.de/manual/current/en/skeleton-generator.html
While still in Windows command mode in the PHP version directory, enter the following command:
pear install phpunit/PHPUnit_SkeletonGenerator
Setting up WampServer
Start WampServer. An icon will appear in your system tray. It will start as yellow, then after a moment it will turn yellow, then hopefully green. If it turns green, then you're set (for now). If not, there's a good chance it's a port conflict. That's not a difficult fix.
Fixing Yellow Status Icon
Reference page:
http://www.ttkalec.com/blog/resolving-yellow-wamp-server-status-freeing-up-port-80-for-apache/
has a number of fixes. The one I'm focusing on is the one I encountered. I don't use Skype, and checking port 80 didn't give a clue as to what was using it, so I had to change the port WAMP used for localhost.
To by sure it's the problem the following steps should fix, try the following page:
http://localhost:80/phpmyadmin/
and if you get a "This page can't be displayed" error then do the following:
Click on the Web Server icon in the system tray.
Click on Apache > httpd.conf
This will open httpd.conf in notepad. You want to find the line that begins with the word "Listen" that isn't commented (#). Change this line to:
Listen 8178
(This is assuming you're not already using port 8178)
Next, find the line that begins with the word "ServerName" (again, doesn't begin with a comment hashtag). Change this to read:
ServerName localhost:8178
Save this (don't close it just yet) and Restart All Services (from the system tray icon). You should get a green icon this time.
Setting the Wamp Server to run Buttonmen locally
If you just resolved a yellow status problem, then you already have httpd.conf open. If not, the steps to open it are nine lines up.
This step won't be utilized till later (and you can wait till you've done everything else first and come back to this, or just go ahead and take care of it now. It's up to you.
I don't have a reference page for this - just James' instructions.
In httpd.conf, find the two lines that begin "DocumentRoot" and "<Directory". Copy these two lines, and paste the copy right below the originals. Now comment out the originals (add a # to the beginning of each line).
These two lines probably had "c:/wamp/www" in them. Whatever they had in quotes, you want to change to the direct path to your buttonmen\src directory. For example, I have the following:
#DocumentRoot "c:/wamp/www"
#<Directory "c:/wamp/www">
DocumentRoot "C:\Users\Fog\Desktop\buttonmen online alpha\git\buttonmen\src"
<Directory "C:\Users\Fog\Desktop\buttonmen online alpha\git\buttonmen\src">
Once you make those changes, save and close httpd.conf. You should be done with that file.
Fixing Yellow Status Icon: Part II
If you had to change your port number for localhost, then you won't be able to directly access phpMyAdmin, nor localhost or any other WAMP system tray app that is accessed through localhost.
Reference page:
http://forum.wampserver.com/read.php?2,13744
You want to edit the file called wampmanager.tpl in C:\wamp (or wherever you have your wamp directory).
Basically, you want to find where it has "http://localhost" and change that to "http://localhost:8178". This is what I ended up with after my edit:
;WAMPMENULEFTSTART
Type: separator; Caption: "Powered by Alter Way"
Type: item; Caption: "${w_localhost}"; Action: run; FileName: "${c_navigator}"; Parameters: "http://localhost:8178/"; Glyph: 5
Type: item; Caption: "${w_phpmyadmin}"; Action: run; FileName: "${c_navigator}"; Parameters: "http://localhost:8178/phpmyadmin/"; Glyph: 5
     ~~~
     ~~~
Type: item; Caption: "${c_webgrind}"; Action: run; FileName: "${c_navigator}"; Parameters: "http://localhost:8178/webgrind/"; Glyph: 5
(I'm not sure what webgrind is, but if I ever want to use it I'm sure I can now do so from the system tray)
After you make these changes you will need to exit and restart WAMP server for them to take place.
phpMyAdmin
By now you should have a green WAMP icon in your system tray all set up to allow you to access phpMyAdmin. So just click on the icon and click on phpMyAdmin to open it.
When you first log in, the username is root and the password is empty. The first thing you want to do is change the root password to "root". You should see a link to change the password as soon as you open phpMyAdmin in the section marked General Settings near the center of the page. Just click on that, click on the Password: radio button, type "root" (without the quotes, of course) in both text boxes, and click [Go].
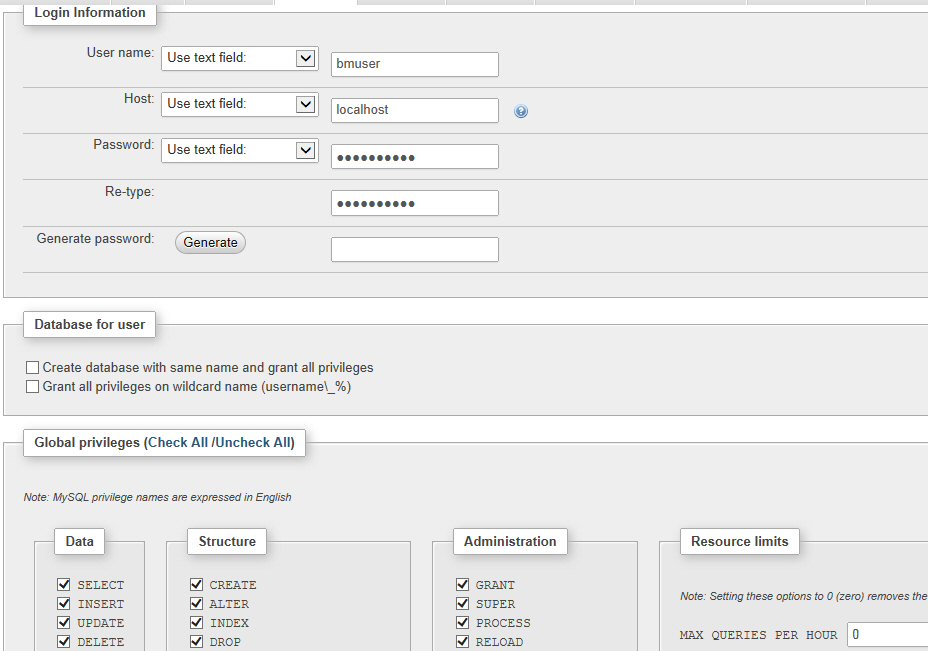
Next you want to add bmuser and bmtest - passwords are bmuserpass and bmtestpass respectively. Click on the Users tab near the top, center. If the yellow [Loading] pop-up doesn't want to go away, just click stop and refresh the page and try again. Once you get to the User page, you want to click on Add User near the bottom. This will take you to the Add User page. Do not change any of the left-side drop-down box options in the Login Information section - use the defaults.
Fill in the text boxes: Host: is localhost (even if you had to change the port number - it's just localhost). Hopefully the rest is obvious: User Name: is bmuser, and use bmuserpass for both Password: and Re-type: fields. You don't want to click [Generate] or check either of the boxes under Database for user.
You DO want to click Check All next to Global Privileges. After you do that, click [Go] at the bottom right of the page, and bmuser is created.
Do the same thing for bmtest (Password: bmtestpass).
And, you're done with phpMyAdmin, as far as set-up goes.
NetBeans
Download and install NetBeans:
https://netbeans.org/downloads/
I went with the ALL package. More space, but still free.
Start a New Project
Open NetBeans
File > New Project
PHP > PHP Application with Existing Sources
(Netbeans gave me an "activating PHP", probably because it was my first use)
For your Source Folder browse to the buttonmen folder in your git repository. This should automatically name the project "buttonmen".
Check the box labeled [Put NetBeans metadata into a separate directory]. You can ignore the warning. The default is a NetBeansProjects\buttonmen folder in your Documents folder. If you're ok with the default, click NEXT.
You can click FINISH. The other information will be added next.
Configure the Project
After closing the New Project window you will see your new project, buttonmen, listed in the Projects tab in the upper left corner. Right-click on the project to open the Properties window (bottom selection). If you're not already there, click on Sources in the Categories list(top of list). The Project and Source Folders should already be filled out (and probably greyed out). You're here to fill out Test Folder and Web Root. For Test Folder either type the full path to buttonmen\test in your repository, or browse there. Because Web Root is a relative path to buttonmen\src it's better to browse there and let NetBeans fill in the text box. For some reason James and I ended up with two different entries with some of the relative paths.

Select Run Configuration in the Categories list (second from top): Run As: Local Web Site (running on local web server). Project URL: http://localhost (or http://localhost:8178 if you had to change ports). Browse to buttonmen\src\ui\index.html (another relative path).
Expand Testing in the Categories list to access PHPUnit. Check both boxes that start: Use Bootstrap. In the Bootstrap textbox either enter the full path or browse to buttonmen\src\lib\bootstrap.php.
This should complete the NetBeans setup, but you'll be using it to do PHP unit testing and to run ButtonMen, so you can keep it open.
SQLyog
Before you start SQLyog, make sure that WAMP is running and all services are started (icon should be green).
You're going to check to make sure bmuser and bmtest are set up properly first.
Start SQLyog. It will open a Connect to MySQL Host window. If it doesn't choose New Connection from the file menue or by clicking the icon directly below it. Click [New] and name the connection bmuser (or whatever you want). Fill out the MySQL tab. MySQL Host Address is localhost, Username is bmuser, Password is bmuserpass, and you can probably use the defaults for the rest. My defaults are Port 3306, and a check in the box for Use Compressed Protocol.
Click [Test Connection] at the bottom right of the window. If access is denied, check for typos. If that's not the problem, log back into phpMyAdmin as root, delete bmuser and recreate the user. There is a check box labeled "Drop the databases that have the same names as the users" on the Users tab under Remove selected users. To delete a user check this box, check the box for the user, and click [Go] at the bottom right.
If none of this works, skip bmuser and bmtest for now and make sure you can connect to root. Once you get root working, use the same connection settings for the other two.
When the connection test for bmuser is successful, click New and do the same thing to test bmtest. The only things you need to fill out differently are the username and password.
The same thing goes for root, except that you shouldn't try to recreate the account if you can't connect. The only thing you want to check or change through phpMyAdmin is the password. If that is set to root, then the connection problem is with the connection setting in SQLyog. Sorry, but I can't give any advice with that except to check for typoes.
Create the databases
The only reason I had you check root last was because once that's working you are going to Connect rather than just test the connection. So, click [Connect].
To create the database you need to execute the nine of the SQL scripts in the deploy/database directory. There are four scripts each for button, game, and player. The schema scripts need to be run first. You then need to run the views and data scripts, but do not run initialize.
From the menu bar, choose Tools > Execute SQL Script (or hit Ctrl-Shift-Q). In the window that opens up browse to buttonmen/deploy/database/schema.button.sql and click [Execute]. Do the same for the other two schema scripts, then the six data and views scripts. You can now close the execute window.