How to configure Export to ICP (for DPG users) - MaksimAbelchuk/RnS_Docs GitHub Wiki
To pass data from Report Builder to ICP you need to use Workspace to share access rights to files with other users and Task Broker to run scripts.
Goal: Add custom action for report to export POS IDs to ICP service.
To be able to perform export to ICP, you have to meet following conditions first:
- Have access to the following applications:
- Workspace - https://t0004-stg-platform-1.periscope-solutions.com/workspace/;
- Task broker (aka Jobs) - https://t0004-stg-platform-1.periscope-solutions.com/task-broker/
- Report builder https://t0004-stg-platform-1.periscope-solutions.com/report-builder/report/test-dpg-table
- You must have read\write permissions for all content stored in the Workspace.
Step 1
Helpful links
Workspace:
- Create new files and folders
- Upload data (S3 clients or other)
Workspace
- Create folder with name Export_to_icp_task and upload following package of files.
- In the root folder of the Workspace, copy Export-to-icp.json file from the above archive;
Step 2
Helpful links
Jobs:
- Create new job
- Create API Token
Jobs (Task broker)
- If Export to ICP job is not available yet, create a new job in the Jobs application and fill in the gaps:
- Job Name
- Job Description
- In the Tasks tab:
- Click on BROWSE and select file task.py from the folder Export_to_icp_task on the Workspace.
- OPTIONAL - Turn toggle switch on for Advanced settings
- OPTIONAL - Check if there is actual version of python executor in the Executor image field and change.
- In the Parameters tab:
- set parameter names as the following:
- CLUSTER_CODE
- CLUSTER_SET_CODE
- START_DATE
- END_DATE
- ICP_OAUTH_URL
- NOTIFICATIONS_SERVICE_ADDR
- NOTIFICATION_LINK
- PROMO_API_URL
- VIEW_API_URL
- VIEW_ID
- TARGET_GROUP_NAME
- turn toggle switch on to Show Secrets and add following secure parameters:
- API_TOKEN_SECRET
- API_TOKEN_ID
- ICP_AUTH_ID
- ICP_AUTH_SECRET
-
Save the job by clicking the
 icon at the top.
 -
Copy and save job ID, you can find it in the job URL once saved:

Step 3
Helpful links
Workspace:
- Share files and folders
Workspace
-
Open file Export-to-icp.json in the root folder.
-
Click Quick edit and navigate to the FormData part to change values of variables:
NOTE: THESE ARE LINKS FOR DEV ENV, please add relevant PREVIEW/PROD URLs:
- task id (use copied job id on step 2 point 5 above)
- cluster_set_code - DEFAULT
- icp_oauth_url - https://ppv-stg-tenant4.sso-npn.periscope-solutions.com/oauth/token
- promo_api_url - https://dev.periscope.mckinsey-solutions.com/tstapp4/promoAPI/v1/tst/storeclusters
- notification_service_addr - t0004-qa-platform-2-shared.stage-us-e1.envs.internal:9003
- view_api_url - https://t0004-dev-platform-1.periscope-solutions.com/report-builder/view
- notification_link - https://dev.periscope.mckinsey-solutions.com/tstapp4/promo/#/
- In order to make sure taskbroker response timeout is enough, set timeout parameter to 60000 ms (1 min)

-
Click Save.
-
OPTIONAL
Select your files/folders and Share with other Workspace users:
- Export-to-icp.json file
- Export_to_icp_task folder
Step 4
Workspace
In the params sub-folder on workspace, find icp.py file and make sure the audience parameter points to the correct audience value:

Step 5
Helpful links
Report Builder Configuration:
- Create the dataset.yml file
- Upload the dataset.yml file
- Create the report.yml file
- Upload the report.yml file
Report builder (DPG)
To make export to ICP working, you need to make changes in the configuration data files:
- In the dataset.yml file add elements:
additional_settings:
  pos_id_dimension_name: POS_ID
  pos_id_db_field: POS_ID_NUMERIC
- In the report.yml file add elements:
custom_actions:
  title: Header.contextMenu.exportToICP
  url_template: '{FORM_APP_URL}/fill/ws/
export-to-icp?view_id={view_id}'
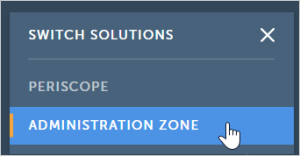
- Navigate to the Administration zone of the Report Builder:
-
Open Manage Datasets and upload dataset.yml file with new elements.
-
Open Manage Reports and upload reports.yml file with new elements.
Step 6
Helpful links
Report Builder:
- Create Data Table chart
Report builder (DPG)
- Go to DPG of Report Builder by the link
https://t0004-stg-platform-1.periscope-solutions.com/report-builder/report/test-dpg-table
-
Create a View and Save it.
-
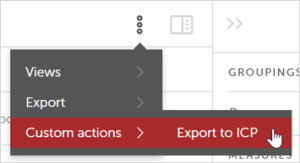
In the contextual menu, choose Custom actions and click Export to ICP:
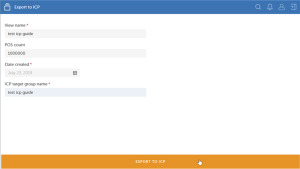
- Form app page opens in a new tab.
To complete export, click Export to ICP button at the bottom of the page.
- Notification message appears to confirm, that Export to ICP is completed successfully.
Step 7
Check on the ICP side that target group was created successfully.