Adafruit ProTrinket 3V - LieBtrau/electronics-design-data GitHub Wiki
Properties
ProTrinket has several advantages with respect to Arduino Pro Mini, Arduino Micro and Arduino Nano:
- 3V & 5V version
- USB connection for easy programming (No debug functionality :-( )
- Small
- One side PBA, so can be soldered onto a baseboard
- Same ATMEGA328P as on Arduino Uno
- < $10
It also has some drawbacks: - 3V version works on 12MHz, not 16MHz. 12MHz is a frequency that isn't supported on many libraries.
- Serial communication on 115200baud doesn't work reliable (with the RN4020)
- It can take several reset pushes to get into the USB-bootloader mode. Adafruit suggests a bootloader upgrade. It works better to reset the board by touching the reset pin with a wire connected that is connected to GND on the other end.
An even better solution is to leave the USB altogether and use the FTDI connection for firmware upgrades.
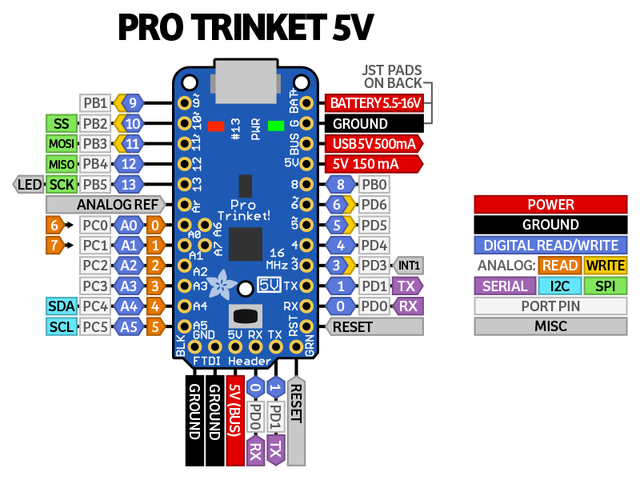
Pinout
Command line
Building code with Arduino-builder
Build your project first with the Arduino IDE to get the "build.options.json" file in the "/tmp" folder. Later on you can invoke arduino-builder yourself using this json file.
arduino-builder -build-path=%{buildDir} -warnings=none -verbose -build-options-file="../QtCreator/build.options.json" ./pulse-dtmf-converter.ino --verbose
Building code with Arduino
arduino --verify --board adafruit:avr:protrinket3 --pref target_package=adafruit --pref build.path=$HOME/build --pref target_platform=avr --pref board=protrinket3 $HOME/git/Aiakos-bike/Aiakos-bike.ino --verbose
Reflashing bootloader
Use the instructions on Adafruit Re-programming Bootloader
Uploading code using FTDI-connection and Arduino toolchain
This is the preferred way of working. Uploading is reliable and the serial connection can be used with "Serial" for debugging. Make sure there are no more open serial terminals on the FTDI-port before programming.
Capture the avrdude command line and use it as the "run" configuration in QtCreator. This avoids the annoying "recompile" when executing the "arduino --upload" command.
Example:
avrdude -C/home/ctack/Downloads/arduino-1.6.9/hardware/tools/avr/etc/avrdude.conf -v -patmega328p -carduino -P/dev/ttyUSB1 -b115200 -D -Uflash:w:/home/ctack/build/Nucleo.ino.hex:i
Uploading code using USB-connection and Arduino toolchain
USB Connection can only be used for programming, not for serial debug output.
Don't forget to push the reset button before programming.
Example:
arduino --upload --board adafruit:avr:protrinket3 --pref target_package=adafruit --pref build.path=/home/ctack/build --pref target_platform=avr --pref board=protrinket3 /home/ctack/git/arduino-as3933/examples/test1/test1.ino --pref programmer=arduino:usbtinyisp --verbose
Capture the avrdude command line and use it as the "run" configuration in QtCreator. This avoids the annoying "recompile" when executing the "arduino --upload" command.
Example:
avrdude -C/home/ctack/Downloads/arduino-1.6.9/hardware/tools/avr/etc/avrdude.conf -v -patmega328p -cusbtiny -Uflash:w:/home/ctack/build/test1.ino.hex:i
Library compatibility
SoftwareSerial
Works at 115200baud. Remember that data can not be sent and received at the same time. So making a loopback connection from RX to TX in order to test communication will not work.