Manual - Kulitorum/Decenza GitHub Wiki
New here? Start with the Quick Start — it takes you from install to your first drink in a few minutes. This manual is the full reference for when you want the details.
- Getting Started
- Connecting Your Machine and Scale
- The Idle Screen
- Recipes
- Beans, Equipment and Grind
- Profiles
- Espresso
- Steam
- Hot Water and Flush
- Shot History
- Layout Editor
- Screensavers
- AI Assistant
- MCP Server (AI Agent Control)
- Web Server (Remote Access)
- Automation
- Home Screen Widget
- Data Management
- Settings Reference
- Themes and Language
- Accessibility
- Troubleshooting
- Appendix A: Keyboard Shortcuts
- Appendix B: Glossary
- Appendix C: Supported Scales
- Appendix D: File Locations (Advanced)
Download from GitHub Releases (Android, macOS, Windows, Linux — free) or the App Store (iOS, $10, to offset Apple Developer fees).
Installation has the per-platform steps — Android permissions and battery optimization, macOS Gatekeeper, Windows SmartScreen, and the Linux setcap step Bluetooth needs.
On first launch, Decenza opens to the idle screen and starts scanning for your DE1 via Bluetooth. If the de1app was previously running, close it completely first — only one app can hold the Bluetooth connection at a time.
Decenza checks GitHub Releases for new versions and shows a prompt when an update is available. You can also update via the web interface (see Web Server). iOS updates go through the App Store and typically arrive 2–3 days after other platforms.
To opt into beta releases, go to Settings → About and enable "Include beta versions". Beta builds contain the latest features and fixes but may have rough edges — they are intended for users who want to stay on the cutting edge and are comfortable with the occasional issue. For a stable daily driver, leave this off and stick to full releases.
Decenza is free and open source (Android, macOS, Windows, Linux). The source code is at github.com/Kulitorum/Decenza.
- Power on the DE1
- Fully close the de1app if it was running (Android: press the recent-apps button and swipe it away)
- Open Decenza — it automatically scans for the DE1 on startup
- Connection status is shown in the top status bar (shows firmware version when connected)
If auto-connect fails, go to Settings → Connections and tap Scan Devices.
Reconnecting: The app attempts automatic reconnection when a previously connected DE1 comes back into range after a restart.
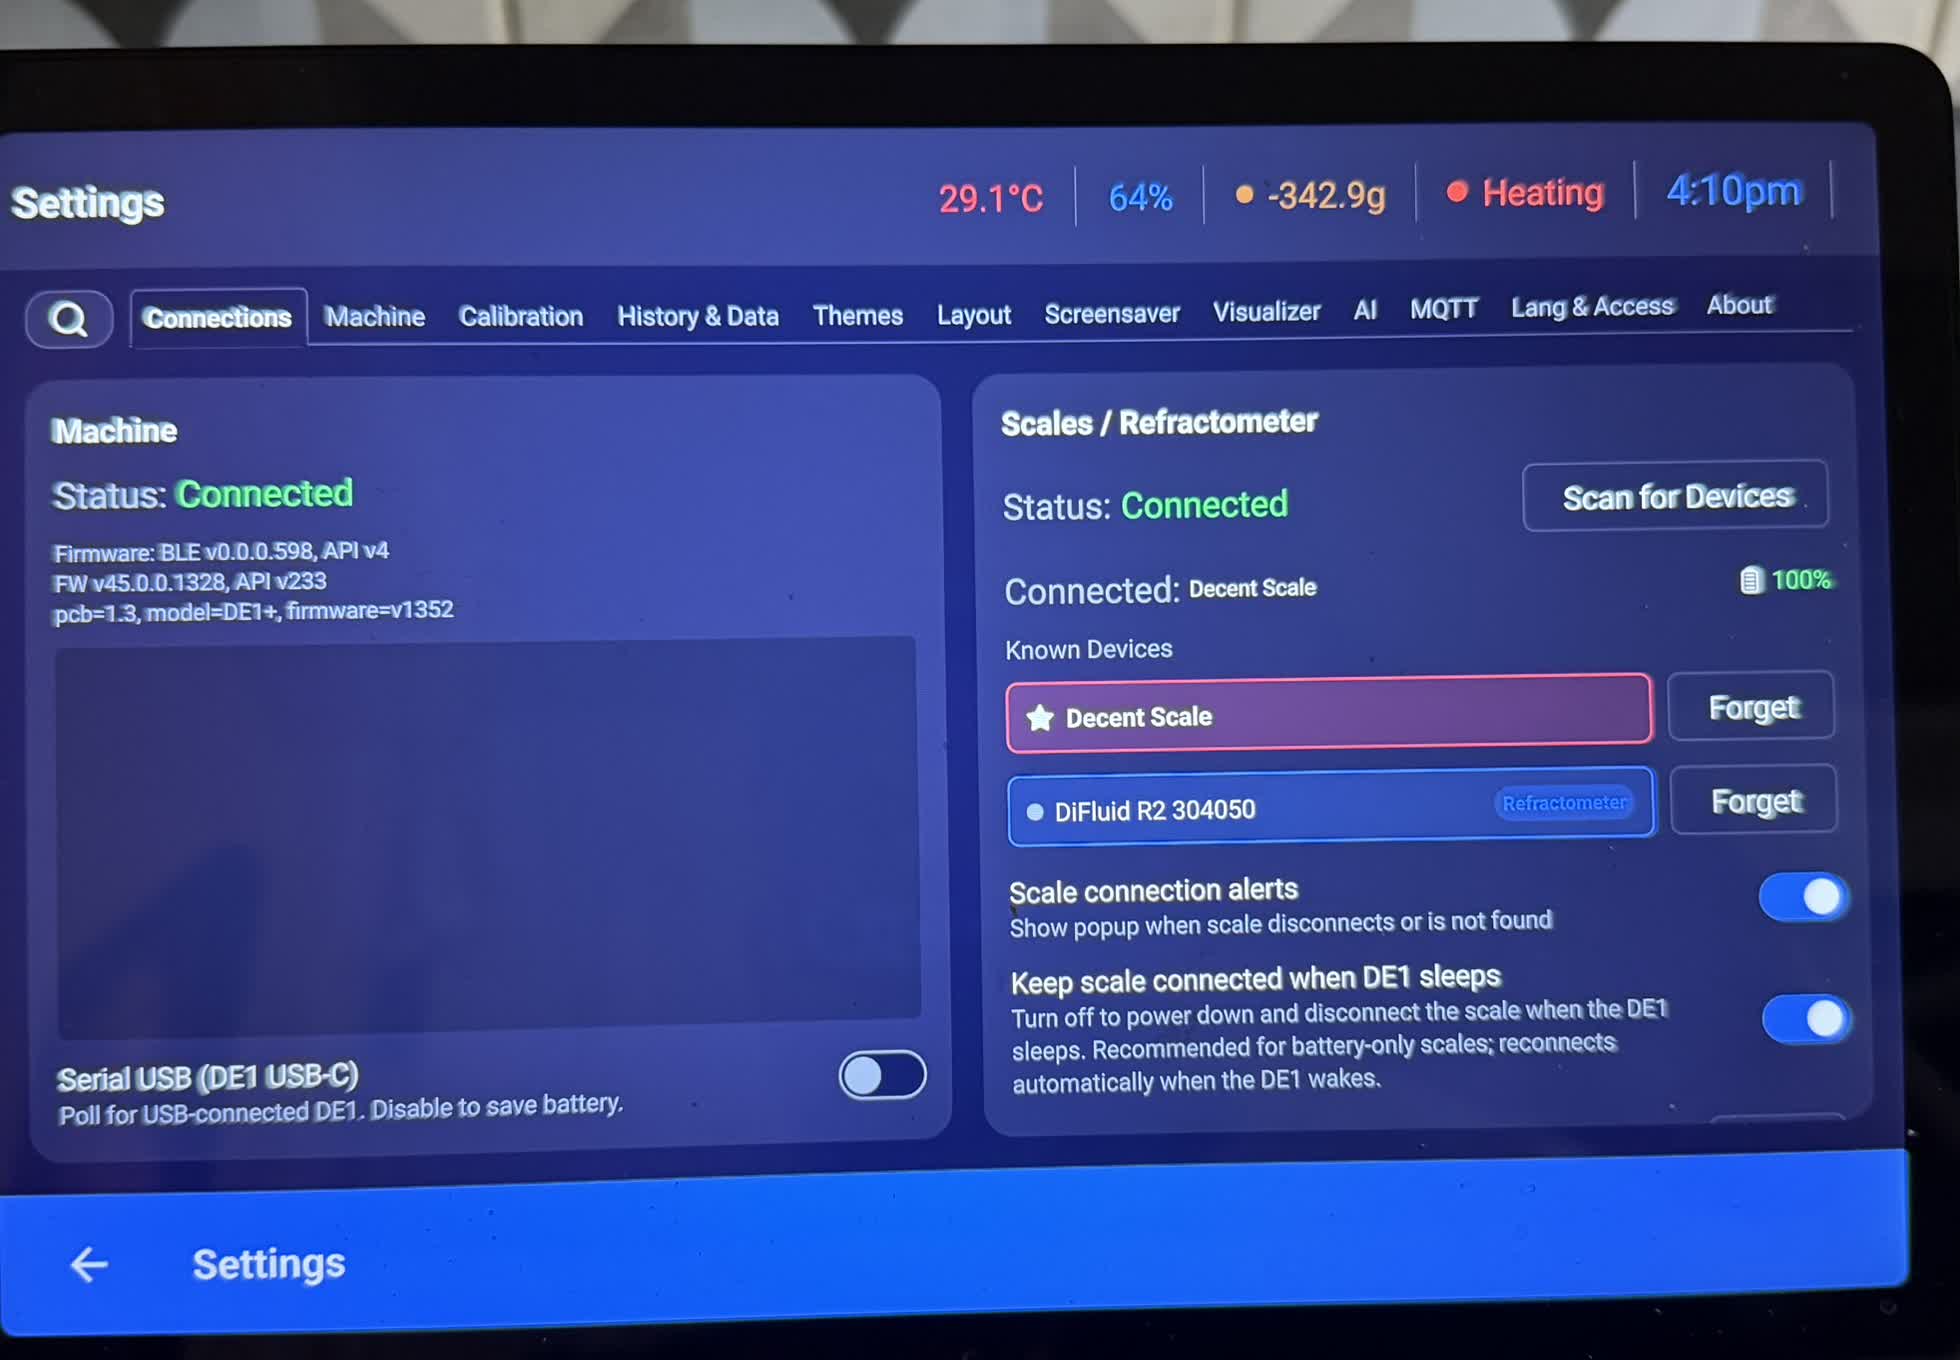
Decenza supports a wide range of Bluetooth scales (see Appendix C).
- Power on the scale and put it in pairing/Bluetooth mode (consult your scale's manual)
- Decenza auto-scans on startup
- If the scale is not found, tap the red "Scale not found" indicator in the top bar
- Or go to Settings → Connections → Scan Devices
- Select your scale from the discovered list to save it for future connections
Saved scales reconnect automatically, including on the start screen. Retries start fast (5 s, 30 s, then once a minute) and slow to every 5 minutes after about ten minutes away, to save battery. Waking the DE1, dismissing the screensaver, switching back to the app, or tapping Scan Devices restarts the fast retries.
Forget removes the saved pairing and stops retries. The scale can still appear in scan results; select it to pair again.
Note: If no scale is connected, Decenza uses a virtual "flow scale" derived from the DE1's flow sensor — useful for stop-at-volume but less accurate for stop-at-weight.
When a connected Half Decent Scale has a compatible firmware update, Update appears beside Forget in Settings → Connections. Review the release notes, then tap Start update. The scale installs it on its own over Bluetooth, USB or WiFi — there is nothing to confirm on the scale itself. Keep it powered and in WiFi range until it restarts; it downloads and verifies the update itself, and reports any problem on its own display.
Older scale firmware still asks you to choose the version and hold to confirm on its display.
If you have a Belka PORTAL sensor, select it in Settings → Connections → Scan for Devices; nothing PORTAL-related shows until you do. In advanced mode its raw EC and outlet temperature are drawn on the shot graph and saved with the shot. EC is a raw value with unverified units — not TDS. It reconnects when the machine is idle; Forget removes it.
Both panels on Settings → Connections carry a live log of what that device is doing — the first place to look when something won't connect. Each shows the current session only, and only the lines worth reading: lifecycle events, discovery outcomes, connects and disconnects, transport fallbacks, and problems. Frame-by-frame protocol detail is still recorded in the shareable log file.
Clear empties the on-screen view only. Share Log sends the full system log, not just the panel you're looking at — when a scale fails to connect, what the machine and network were doing at that moment is usually part of the answer.
| Indicator | Meaning |
|---|---|
| Weight readout (brown/orange text) | Scale connected; tap to tare |
| "Scale not found" (red) | Tap to re-scan |
| "Simulated scale" | No physical scale; using flow data |
Won't connect? Almost always the de1app still running in the background — close it completely. The full checklist is in the FAQ#connecting-to-the-de1-and-scales.
The idle screen is your home base in Decenza. It leads with Recipes — the center row is Recipes · Beans · Steam · Hot water, with the Shot Plan summary beneath it and Profiles and Flush on the bottom bar.

Tap Recipes, tap a recipe, brew. That is the whole normal loop, because a recipe carries the profile, the beans, the grinder, and your dose, yield and temperature together — see §4 Recipes. Everything else on this screen exists for the times you want to step outside that: switch beans mid-bag, pull a one-off on a different profile, or steam and dispense on their own.
New here? Start with the Quick Start. Prefer the classic Profiles-led arrangement, or want the buttons somewhere else? Rearrange any of it in the Layout Editor.
Decenza uses a consistent tap vocabulary throughout the app. Learning these gestures once means you can navigate any screen:
| Gesture | Typical effect |
|---|---|
| Single tap | Quick action — show pills, select a preset, tare the scale |
| Double-tap | Open the full settings or configuration screen for that element |
| Long-press | Same as double-tap in most places; also used to reveal a preview (e.g., long-press a profile pill to see its graph before loading it) |
Key examples on the idle screen:
| Element | Single tap | Double-tap / Long-press |
|---|---|---|
| Recipes button | Show recent recipe pills | Open the full Recipes page |
| A recipe pill | Activate that whole drink | — |
| Steam / Beans / Hot Water | Show preset pills | Open full settings for that function |
| Profiles button (bottom bar) | Show favorited profile pills | Open full profile list |
| A profile or preset pill | Load it onto the machine | Preview its graph |
| Shot Plan line | Open Brew Settings | — |
| Temperature readout | — | Set a per-shot temperature override |
| Weight readout | Tare the scale | Open brew-by-ratio dialog |
Note: the bottom bar carries Sleep, Flush, History, Equipment, Profiles and Settings — none of them are main tiles.
Tapping Recipes slides out pill buttons for your most-recently-used recipes, each with a drink-type icon. Tap one to activate that whole drink. A page is however many pills fit the space available — two rows for the center buttons — and when you have more than that, prev/next arrows appear beside them to page through the rest in most-recently-used order. A recipe whose bag is finished shows dimmed but still works.

Double-tap or long-press Recipes — or tap it when you have no recipes yet — to open the full Recipes page.
The same single-tap-for-pills pattern works for everything else on the screen.
Beans shows your bean bags for quick switching between coffees, paged the same way, with prev/next arrows once there are more than fit. The bottom info line shows the active profile, last shot settings, and dose/yield for the selected bean. Switching beans while a recipe is active deactivates the recipe, since the drink is no longer the one you saved.

Profiles (bottom bar) shows your favorited profiles. Tap a pill to upload that profile to the DE1; long-press for a graph preview. A row anchored to the bottom bar fills the empty space above it, so it fits more pills at once than the center rows do. This is the one-off path — pulling a shot on a profile without saving the whole drink.

Hot Water and Steam show their vessel and pitcher presets the same way, for dispensing or steaming on their own rather than as part of a drink.

- Temperature — group head temperature; double-tap to set a per-shot override
- Weight readout — current scale weight; single-tap to tare, double-tap to open brew-by-ratio dialog
- Connection indicator — machine online/offline
- Water level — tank level (where supported)
Double-tap the weight readout (or tap the Ratio quick-select widget) to open the ratio chooser. Picking a ratio (e.g., 1:2) arms a ratio for the next brew: the stop-at-weight target is calculated from the dose you actually weighed and keeps following it — weigh 17.5 g instead of 18 g and a 1:2 target moves from 36 g to 35 g automatically. Picking a ratio never changes a recipe or a bean by itself — see Yield: a fixed weight or a ratio. Ratios run up to 1:100, so a filter 1:16 or a tea ratio fits; set one with Edit in the chooser, which steps by 1 from 1:10.
Recipes are how Decenza is meant to be used. A recipe is the whole drink saved as a single one-tap object: tap it and the machine is set up completely — right profile, right beans, right grind, right dose and yield — with nothing left to remember. Where a profile only describes how the shot is pulled and a bag only describes what coffee you have, a recipe ties them together with everything else the machine needs into one named beverage:
- the profile (how the shot is pulled),
- a specific bag from your inventory (not just "a bean" — the exact bag, so two bags of the same coffee at different ages stay distinct),
- the equipment package (grinder + basket),
- dose, yield, and brew temperature,
- grind — the recipe's own dial (and RPM, for RPM-capable grinders),
- an optional milk / steam block,
- an optional hot-water block (what turns a shot into an Americano or long black, or brews a hot-water tea),
- a drink type (espresso, filter, americano, long black, latte/cappuccino, latte + water, or tea).
The app stays flexible underneath: nothing ever requires a recipe, you can still brew from a bare profile, and a recipe can be as thin as you like (bean-less and equipment-less is valid). But the recipe path is the one that pays off — it is where dial-in, drink type, milk and hot water all come back automatically instead of being re-entered each morning. Every recipe needs a profile, with one exception: a hot-water tea recipe has none at all, since the "brew" is you starting Hot Water.
Where recipes live: the Recipes button leads the idle screen — tap for a pill row of recent recipes, double-tap for the full Recipes page (see §3). Recipes are also reachable from the web interface and to AI agents.
Upgrading from an earlier version? You get a one-time "Try the recipes-first layout?" dialog. Upgrade layout is non-destructive: it puts Recipes front and center, moves Profiles to the bottom bar (unchanged in behaviour) and drops the Auto-Favorites button (still available in the Layout Editor), keeping every other customization. Keep my layout dismisses it for good. With shot history but no recipes yet, the same dialog offers to build a starter recipe from your last shot.
Tapping a recipe — from an idle pill, the Recipes page, the web interface, or an AI agent — loads the entire drink in one step. Activation sets, in order: the profile → the linked bag (its beans and roast date apply; a recipe with no beans clears the bag selection) → equipment package → the recipe's own grind → dose → yield and temperature → the milk block → the hot-water block. If Let the recipe decide is on, the recipe's pitcher becomes the active one and the heater follows it. The active recipe is marked with an Active badge on its card and a highlighted pill.
- With "Let the recipe decide" on, a recipe with no pitcher turns the steam heater off while it's active, and a milk recipe warms it when you start the shot. Deactivating returns to your own pitcher.
- Only dose and grind write through: changing them while a recipe is active updates it in place. Yield and temperature apply to the next brew only — save them into the recipe with the Update Recipe button (see Brew Settings).
- The same line applies to beans: a bag remembers your grind, RPM, and dose automatically — things you physically dialed — but its yield changes only when you press Update Bag.
- Changing the profile, bag, equipment, steam pitcher, or water vessel deactivates the recipe — those are the drink's ingredients, so changing one means you are making something else. The recipe itself is untouched, so one tap on its pill brings everything back. Re-selecting the same one does not deactivate, and editing a pitcher or vessel preset does not either.
Recipes are built and edited in one page, the Recipe Wizard. Open it from Add: Recipe on the Recipes page, from Clone on a card, or from the Recipe button on a shot (see below).
The wizard walks drink-type-first through a series of one-thing-per-screen windows — Drink type → Beans → Profile → Equipment → Dose, yield, temp & grind → Steam and/or Hot water (only for drinks that have them) → Summary — and auto-advances as you tap (there is no Next button; picking a tile moves you straight on). Breadcrumb chips at the top let you jump back to the Drink/Beans/Profile steps. The Summary is also the edit page, and tapping a card on it reopens exactly that window — so creating a recipe and editing one use the same screens.
-
Drink type — Espresso, Filter, Americano, Long black, Latte/Cappuccino, Latte + Water, or Tea. This sets sensible defaults (which blocks are on, which profiles are offered) but never locks you in — the Summary always has Add/Remove milk and Add/Remove hot water buttons. Latte + Water is a milk drink with an added shot of hot water (its tile shows both the steam and water icons); the water goes in before the espresso and is pre-set for you — there's no before/after choice to make.

-
Beans — a tile grid, one tile per open bag (photo, roaster, coffee, roast date + age). Two open bags of the same coffee appear as separate tiles, so picking one links exactly that bag. Ghost tiles at the end offer Add a new coffee… (or Add a new tea…) and No bean.

-
Profile — the profile picker (see Finding a Profile) narrowed to the drink type, with a Recommended for ‹your bean› row (profiles used with that bean first, then suggestions, each with a reason) above All profiles.

-
Equipment — your grinder/basket packages as tiles (plus None), the active one preselected. With only one package the wizard fills it in and skips this window. Equipment comes before the numbers because the grind window's RPM field only appears for an RPM-capable grinder. (The grind and RPM values themselves belong to the recipe and are set next, not here.)
-
Dose, yield, temp & grind — the recipe's own numbers, ready to edit: dose; the yield as a fixed weight or a ratio of the dose (whichever you edited last is kept, the other shown dimmed); a temperature offset; and the grind. A hint line says where the numbers came from — your last shot with this bean+profile, the profile's recommendations, or a tea's brewing instructions — and the grind hint shows the bag's latest dial plus a direction only ("start finer/coarser") when the chosen profile differs. Reset to profile reverts. (Tea has no grind; hot-water tea shows volume and temperature instead.)
-
Steam / Hot water — shown only for drinks carrying that block. Your pitcher presets and water vessels appear as tiles; tap one to pick it and move on. Two tiles above the vessels set whether the water pours after the espresso (Americano) or before it (long black) — prefilled from the drink type, and switching it is the only thing that separates those two drinks. A drink with both milk and water always pours the water first, so it offers no order choice.
-
Summary — the edit page. A live Recipe card (see the widget section below) sits above component cards for Equipment, Dose, yield, temp & grind, Bean, Profile (with an (i) info button and the AI knowledge-base button), and Steam / Hot water when present — each opening its own window when tapped. Add/Remove milk, Add/Remove hot water, and Save are here too.
The name field is filled in as you build, from the bean, drink type, and profile — "Yirgacheffe Latte · Cremina". Including the profile keeps recipes for one bean made several ways easy to tell apart and to find. On a collision Decenza appends the distinguishing number (ratio, yield, or dose) rather than a bare "2". Type your own name at any point and the app stops suggesting.
Each active recipe needs its own name. A name another non-archived recipe already uses disables Save until you change it — duplicates are impossible to tell apart in the cards, pills, and Shot Plan. Capitalisation and surrounding spaces are ignored.

With no recipes yet, the Recipes page instead shows two starter tiles — Start from a good shot (opens Shot History) and Build from scratch (opens the wizard).
Once you've built up more recipe cards than fit on one screen, a search and sort bar appears above the grid:
- Search — filters on a recipe's name, coffee (roaster or coffee name), and profile. Several words can each match a different field: "Yirg Df" keeps recipes whose coffee is a Yirgacheffe and whose profile is D-Flow, the same idea as Shot History search. Punctuation is ignored, so "df" finds D-Flow. Tap ✕ to clear; searching always starts empty when you open the page.
- Sort — tap the sort button to order the cards by Date used (the default — most recently used first), Date created, Coffee, Profile, or Name. The arrow button next to it flips between ascending and descending. Your choice is remembered for next time.
Both the search filter and the sort order apply to the archived recipes too (tap Show archived to reveal them). If a search matches nothing, the page says so rather than showing an empty grid.
Pin one recipe as the one Decenza always comes home to. Useful when you have a daily default but occasionally stray to something experimental — auto-load brings the default back without you walking through the picker.
To set it, tap the pin icon on a recipe's card (just left of Edit). The pin tints, a compact Auto-load row appears on that card with a revert-minutes stepper, and a toast confirms. Tap the pin again to disable.
It fires on three triggers:
- App start — so the first thing you see is always what you pinned, never whatever was active when you last closed the app.
- When the DE1 wakes from sleep — if the machine slept on a one-off, your default is restored.
- After N idle minutes on the Idle screen — for when you walked away mid-experiment. Touch, navigation, and machine activity all reset the timer, which only runs on the Idle screen between operations. Range 0–60; 0 ("Never") disables this trigger only, leaving the other two.
You can pin a profile instead of a recipe — on the profile list, tap ⋮ on its row → Set Auto-Load. It behaves identically but restores only the profile, not the beans, equipment, grind and dial-in that come with a recipe. The two are mutually exclusive: whichever you pinned most recently wins, and the switch is silent apart from a toast. The revert-minutes timeout is shared, so changing it on either surface changes both.
Notes:
- Only non-archived recipes, and only favorite profiles, are eligible. If the pinned item is archived, hidden or deleted, auto-load clears itself and a toast confirms.
- Auto-load only fires when the target differs from what's already active.
- A pinned profile and the shared timeout round-trip through settings backup. A pinned recipe does not — like the active recipe and bag, it's a device-specific reference.
Tea recipes use tea bags (bags created with Bag of Tea). They never store a grind, their equipment package can be grinder-less (basket only), and the Profile step includes a "Just hot water — no profile" row that produces a profile-less hot-water tea — the brew is simply starting Hot Water. Details prefill from the tea bag's brewing data (steeping temperature and leaf dose).
Any recipe can carry a milk block, a hot-water block, both, or neither — use the Add/Remove buttons on the Summary.
- Milk stores a milk weight and a snapshot of the chosen steam-pitcher preset; cards show it as a weight (e.g. "200 g milk"). See Steam.
- Hot water makes an Americano (water after the shot, the default) or a long black (water before). The amount, temperature, and flow come from the selected water vessel — there's no separate per-recipe water amount. See Hot Water and Flush.
- Both together make a Latte + Water — a milk drink with an added shot of hot water. Pick it straight from the Drink type step (or add milk and water to any recipe on the Summary). For this drink type the water is fixed to pour before the espresso, so there's no before/after choice.
Every recipe has its own grind (and RPM, when the grinder supports it). When you create a recipe, the grind field starts from the linked bag's current dial — or from your last shot with that bean and profile, when one exists — as an editable default; from then on the value belongs to the recipe. Adjusting the grind while a recipe is selected keeps the recipe up to date automatically, and the bag always remembers the last grind dialed with it, so a new recipe for the same bag starts from where you left off. There is no follow/pin choice to make. (Clearing the grind while creating a recipe re-arms that default — the bag's dial fills back in the next time you pick a bag.)
Because a recipe links a specific bag, Decenza keeps the link healthy for you — silently, with no dialogs:
- When you finish a bag, its recipes roll onto the newest open bag of the same coffee.
- When you restock, matching recipes wake up and re-home to the new bag.
- A guard protects deliberate two-bag comparisons (it won't collapse two recipes onto one bag).
- Every automatic move shows a brief toast ("recipe(s) moved to <bag>").
A recipe whose bag is no longer in inventory is stale: it still lists and activates fully (with its own grind), but its card reads "Bag finished — tap to choose beans" and its idle pill dims. Tap the stale affordance to open a bag picker scoped to just that recipe (a tea recipe only sees tea bags) and re-point the link.

The Recipes page shows your recipes as cards.

- Edit (pencil) — reopens the wizard on the Summary.
- Clone — opens the wizard as "Copy of <name>" with the name ready to rename — handy for building a family of variants.
- Delete vs. Archive — a recipe with no shots shows a trash icon and deletes outright; a recipe with any shots shows Archive instead, so its history provenance is never broken. A Show archived (N) toggle reveals archived cards, each with a Restore button. (Archiving an active recipe deactivates it first.)
When a shot comes out great, turn it into a reusable recipe. A Recipe button appears next to Load on Shot History rows, as Save as recipe at the top of the shot page, and on Auto-Favorites rows. It opens the wizard on the Summary, prefilled from that shot — profile, the shot's own bag, dose/yield/temperature, grind, and any milk/hot-water snapshots — so a good shot round-trips into a one-tap drink.
The button is hidden on shots that were already made with a recipe — those don't need creating, they need editing. Tap the recipe's name on the row to find its other shots.

The Recipe card (on the Recipes page and the wizard's Summary) and the Shot Plan widget (the "Brew 36.0 → 40.0 g…" line on the idle screen) share one renderer. Shot Plan summarizes the drink you're about to brew, swaps to a steam plan in steam context, and opens Brew Settings when tapped.
Configure it per instance in the Layout Editor:
- Ordered items (chip editor) — which facts appear and in what order: dose/yield, profile, temperature, roaster, coffee, grind, roast date, recipe (the last two off by default). The Recipe chip shows the active recipe's name, and nothing when no recipe is active.
- Sentence — render a readable line: "Brew 36.0 g of Espresso, using <profile> at 92 °C," with the rest trailing. Swap the Profile chip for Recipe and the recipe name takes that slot instead. With no profile and no recipe, the line reads from the beans: "Brew 40.0 g of Espresso at 92 °C from 18.0 g of <Roaster> <Bean>."
- Stacked details — push the trailing details onto their own line.
- Final yield only — show the effective target instead of the "profile-default → target" arrow.
A deliberate override tints only that item amber — the temperature, or the yield's "36.0 → 40.0 g" arrow — matching Brew Settings, and clearing the same way. A cleaning/descale profile replaces the plan with a "no coffee in the portafilter!" warning.
Recipes are available from the web interface (browse, search and sort, create, edit, clone, activate, and archive or delete — the same cards and actions as the app) and to AI agents through the MCP server (recipe_list, recipe_get, recipe_create, recipe_create_from_shot, recipe_clone, recipe_update, recipe_archive, and recipe_activate — which loads the whole drink exactly like tapping a pill).
A recipe points at a bag of coffee and an equipment package, and carries its own grind. This chapter covers those three — what they hold, how Decenza fills them in for you, and the picker that sets every grind in the app.
Beans are tracked as bags — each bag is one physical bag of coffee (or tea) in your inventory. Double-tapping Beans opens the Bag Inventory page, with one card per bag and two creation buttons, Bag of Coffee and Bag of Tea (a bag's type is set at creation and can't be changed afterward).
There is no separate "save preset" step: the active bag is your bean state. Whatever bag is selected supplies the roaster, coffee, roast date/level, dose, and grind attached to every shot, and any edit you make to those fields writes straight back to the bag. Each bag remembers its own grind dial-in — switching bags restores that bag's last setting. Bags live in the shot-history database, so they carry through device transfer and backup/restore. (The grinder is not part of the bag — it lives in a separate equipment package, see below.)

Each bag card shows a product thumbnail (pulled automatically from the roaster's page when available, or a beans-icon placeholder), the roaster and coffee, roast date, shot count, and freeze state, and offers:
- Edit (pencil) — opens the Change Beans editor to change identity, roast level, grind/RPM (via the grind picker), dose, notes, equipment, and the full Bean details section (origin, region, farm, producer, variety, elevation, process, harvest, quality score, place of purchase, tasting notes, and a product link).
- Find in Bean Base — look the coffee up and pull in its canonical details (see below). Once linked, this becomes an info (ⓘ) button.
- Bag finished / Archive — a bag with no shots deletes outright; a bag with shots is archived instead, so shot history is never orphaned. Either way the bag leaves the active list while its shots are kept.
- Restock — opens a new bag prefilled from this one; enter the new roast date and save.
- Show finished — below your bags, lists the finished ones, each with Restock and Restore (puts that bag back). A recipe whose bag is finished offers Restock too, and moves to the new bag.
Search and sort. Type in the search field above your bags to find any bag by its text: roaster, coffee, origin, tasting notes, or "tea" / "coffee". Finished bags are searched too, and Show finished (N) counts the matches. The sort button orders by Last used, Roast date, Coffee or Roaster, and the web page shares your choice.

Freeze, thaw, and storage. Tap Freeze on a bag's card when it goes in the freezer, and Thaw when you take a portion out. Your first shot from a bag, or from a newly thawed portion, records it as opened. Restock keeps the old bag's freezer and storage habits; change any date from Edit.
Both dates track the current portion, not the bag, so freezing in portions works: the bag stays Frozen, and you tap Thaw again for each new portion. Earlier shots keep the dates that were true when they were pulled.
The Out of freezer dropdown — Counter, Airtight container, Vacuum-sealed, or Fridge — records how the beans are kept when they're not frozen. It's always available, since it's as much a plan as a description.
All of this rides onto every shot, and lets the AI advisor reason about freshness in both directions: a recently thawed or opened bag is often still gassy and under-rested — it may choke the puck and want a slightly coarser grind for a few days — not simply "fresher."
Change Beans from a brew: the Brew Settings dialog has a Change Beans button to switch the active bag or add a new one on the spot.
You shouldn't have to type origin, process and tasting notes by hand. Three paths, each the backup for the one before:
1. Search by name. In the bag editor, search the coffee or tea against the community Bean Base (Loffee Labs / Visualizer) and pick the match — roaster, origin, region, process, variety and tasting notes fill in. Near-duplicate entries are common, so results read as "Roast name (Roaster)"; an Archived page or No page tag marks one whose product link no longer works. No API key needed. For tea, the search also pulls brewing numbers (steeping temperature, leaf-per-100 ml, steep time) that seed the recipe.

2. Paste the product URL. If the coffee isn't in the database — new roaster, small producer, a tea vendor — paste the product page's URL and tap Get info from page. Decenza reads the page text, and for script-rendered shop pages falls back to your configured AI provider to fetch it ("Page is script-rendered — asking the AI to fetch it…"), photo included. Empty fields fill and stale Bean Base values are corrected from the page, each named in the status line. What you typed yourself is never overwritten, and Revert to Bean Base data undoes the rest.
3. No URL at all? Tap Find page & get info — the same button, when the URL box is empty. Your AI provider looks for the product page and then reads it. It offers what it found, with the site name; you decide whether to use it. Opening the bag also tries once on its own. (Paths 2 and 3 use your configured AI provider — see §13.)

Either path writes into the bag, so the details carry into every recipe, every shot, and your Visualizer uploads.
A Bean Base match also links the bag to that canonical entry, which is what enriches your history and gives the AI advisor something to reason about. Two things worth knowing:
- The link is a badge, not a lock. Linked bags stay fully editable — nothing greys out. Type over any field, Unlink, or Revert to Bean Base data to restore the canonical values. Editing never breaks the link.
- Snapshots, not references. Each shot stores the bean details as they were at link time, so your history never changes if the community entry is later edited or removed.
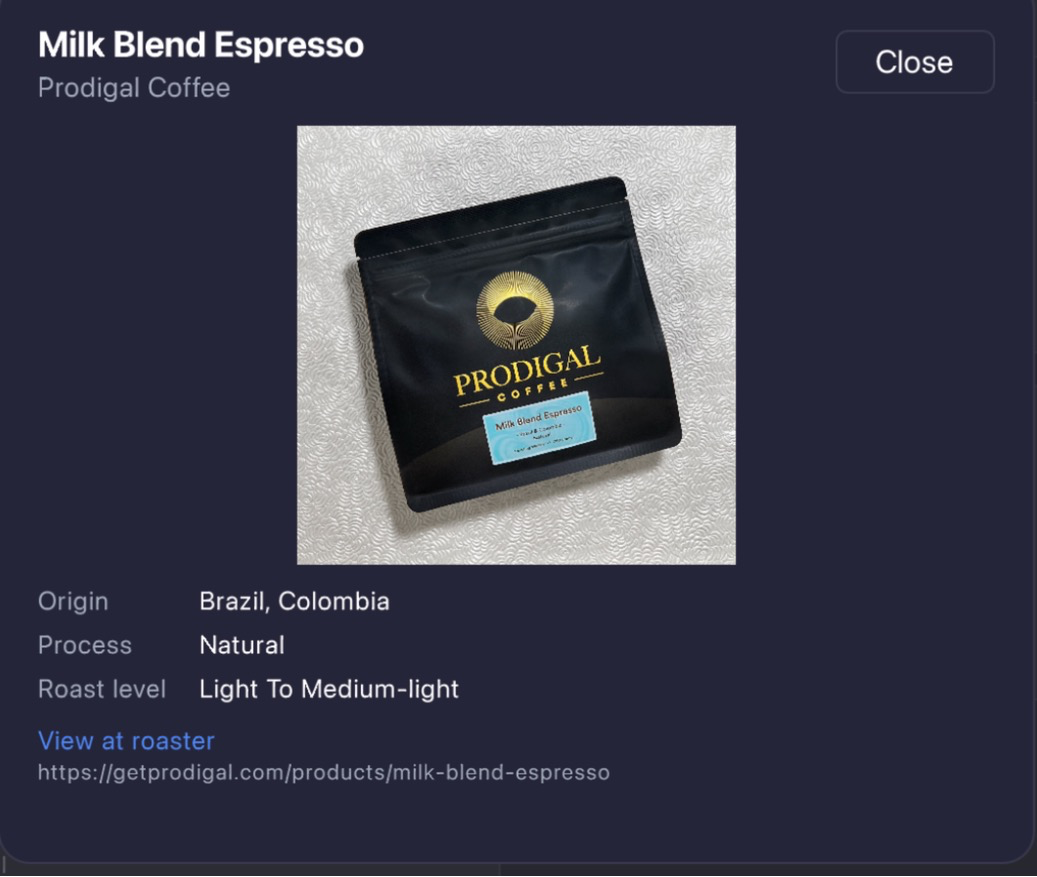
You can also link from a shot's review page, where an unlinked shot shows a Link to Bean Base link pre-filled with that shot's coffee. On an older shot this enriches only that shot — no new bag, active bag untouched. On your most recent shot it runs the full Change Beans flow, which is the intended "wrong bag" fix.
An equipment package is a saved, switchable setup that bundles three things — a grinder (brand, model, burrs), a basket, and puck prep (WDT, shaker, puck screen, bottom paper filter, RDT/spritz). It's independent of your beans, so you can change grinders or baskets without touching bean data. Double-tap the Equipment button on the idle screen to open the equipment page, where you add, edit, and remove packages.

A package's grinder identity is frozen once it has been used in a shot: editing the grinder on a used package creates a new package and retires the old one (kept for history, so past shots still show the grinder they were actually pulled on). The grind setting and RPM stay editable and are remembered per package — switching packages restores that package's last dial.
The active package is attached to each shot. You can switch packages from the equipment page, from the Brew Settings dialog, or while editing a bean bag. Anywhere the equipment line appears you'll find an info button (view the package's contents) next to a Switch / Add button. RPM is shown only when the grinder supports adjustable RPM. A package can be basket-only (grinder-less) — useful for tea.

The info dialog lists the package name, Grinder, Burrs, Last grind (with RPM for adjustable grinders), Basket, Basket details, and Puck prep (summarized, e.g. "WDT · Shaker"); empty rows are hidden.
Each package needs its own name. Naming is optional — leave it blank and Decenza shows the grinder instead — but a name another active package already uses disables Save until you change it, since two identically-named packages are impossible to tell apart when switching. Capitalisation and surrounding spaces are ignored. A separate rule also stops you creating two packages with identical gear (same grinder, basket and puck prep).
Grind and RPM are set the same way everywhere in Decenza. Wherever a grind appears — the Grind quick-select widget, Brew Settings, the bag editor, the recipe wizard, the post-shot review — you tap the value and the same picker opens.
Spin to choose. The wheel opens centred on the current value, and its steps match how you actually dial your grinder: Decenza learns the increment from your shot history, so quarter-step users get 8.5, 8.75, 9, 9.25 rather than whole numbers. Nothing to configure. With no history yet (or no grinder selected) it steps by 1. Spinning is unlimited — espresso to filter in one go.

Or type it. The keyboard button in the header swaps the wheels for text fields and back. Decenza keeps exactly what you type — nothing is rounded to a step and nothing is rejected, including a setting finer than zero on a grinder whose zero you calibrated yourself (a Niche Zero, say). Emptying a field and pressing Done clears that value, which is how you record "no RPM set".
For a grind that has never been set, the wheel centres on your typical setting for that grinder so you can spin over the full range. Never used that grinder at all? The picker opens ready to type, and the wheel fills in around your first value.
RPM. Adjustable-RPM grinders (Turin DF-series, Option-O) show both halves together — the pill reads 8.75 · 900 and the picker has Grind and RPM wheels side by side, both step-learned. When you've never set an RPM the wheel parks dimmed on a neutral value: that's a starting point, not a setting. Press Done without touching it and no RPM is recorded. Fixed-RPM grinders never show the RPM half.
Nothing applies until you press Done; Cancel discards. The dialog ignores outside taps and Escape, so a stray tap can't throw away a half-made change.
The picker always uses the grinder that owns the value you're editing — the one recorded on that shot, or selected for that recipe. Reviewing a shot pulled on another grinder offers that grinder's steps.
On the web interface the same suggested values appear as a dropdown on ordinary text fields — it's used with a keyboard, so it keeps text entry rather than copying the wheels.
A profile controls how the DE1 pulls a shot — pressure, flow, and temperature over time. It's the engine inside a recipe, and most of the time you pick one once, when building the recipe, and never think about it again.
This chapter is for the times you do: choosing between profile types, editing one, importing more, or pulling a one-off on a profile without saving a whole drink.
| Type | Description | Best for |
|---|---|---|
| D-Flow | Flow-driven extraction with pressure limit, 3-phase | Conceptual "coffee-first" workflow |
| A-Flow | Hybrid: pressure saturation then flow ramp, optional 2nd fill | Complex extractions |
| Pressure | Classic pressure-controlled with preinfusion and decline | Traditional espresso |
| Flow | Constant flow with pressure limiter | Consistent, reproducible pulls |
| Advanced | Full frame-by-frame editor: every parameter per step | Expert dialing-in |
Decenza auto-detects the correct editor from the profile title and type field.
Double-tap the Profiles button. Every profile is a card: source letter (D Decent, V Visualizer, U yours), temperature and yield, how many shots you have pulled with it and when. Type in the search box or tap filter chips — Favorites, a source, a beverage (Espresso, Filter, Tea, Maintenance). The page opens on Favorites. Chips combine, so Downloaded + Filter shows only your downloaded filter profiles, and each chip shows how many profiles it would leave. When a bean is set, a Recommended for ‹your bean› row appears above the grid: profiles you have pulled with that bean first, then suggestions with a reason on each.
Tap a card to load it. Long-press for a graph preview. ⋮ holds Edit, Copy, Rename, Auto-Load, and Delete. The + button imports or creates profiles.
The recipe wizard's Profile step is the same picker, already narrowed to the drink type.
Tap the star on a card to make it a favorite. Favorites are the pills on the idle screen. Long-press a pill for a graph preview.
The Favorites… button sets the pill order: A–Z, Recently used (most recent shot first), or Custom, a drag-to-reorder list. Existing favorites keep the order you gave them; a fresh install starts on Recently used. The Sort dropdown next to it only sorts the list you are looking at.
You can pin a profile as the one Decenza always comes home to: tap ⋮ on its card in the profile list → Set Auto-Load. A pin appears on the card and a status strip gives you the revert-minutes input and a clear (×) button.
It works exactly like pinning a recipe, and the two are mutually exclusive — full detail under Auto-Load in the Recipes chapter.
Auto-Favorites tracks your unique bean + profile combinations from shot history and presents them as a dynamic pill row. Enable and configure it from the Auto-Favorites screen. One tap loads all settings — profile, dose, bean info, grinder — from a past shot.

Tap Info to see the combination's history, Show to preview the shot graph, or Load to restore all settings. Configure the list by tapping the gear icon:

- Group by — choose the grouping key (Bean + Profile + Grinder + Burrs is the default)
- Max items — cap the number of combinations shown (default 20)
- Hide unrated favorites — suppress combinations with no rated shots
- Open brew settings after load — show the brew settings dialog automatically when you tap Load
From the DE1 app (on the same tablet):
Double-tap Profiles → + → Tablet — scans the de1app profile folder.
From a file (JSON or TCL):
Double-tap Profiles → + → File — file picker.
From Visualizer.coffee:
Double-tap Profiles → + → Visualizer (requires credentials in Settings).
When importing, choose: Add new (no overwrites) or Overwrite (replaces profiles with matching names). A profile that arrives without a beverage type is tagged from its title and shape; correct it in the editor's Beverage type field if the guess is wrong.
- Long-press or double-tap a pill on the idle screen to open the editor
- Alternatively: double-tap Profiles → ⋮ on the profile's card → Edit
- Adjust parameters; the profile graph updates live as you edit
- Press Back when done — choose: Discard, Save As (new name), or Overwrite
To create a new profile: edit any existing profile and choose "Save As" with a new name.
To change a profile's name without making a copy, open the profile selector (double-tap Profiles), tap the ⋮ (overflow) button on a profile's card, and choose Rename. This changes the display title in place — favorites, auto-load, and history references all stay intact, and if the profile is currently loaded the editor and idle headers update immediately.
Rename works for every editable profile type (D-Flow, A-Flow, Pressure, Flow, and Advanced). Built-in profiles are read-only and don't offer Rename — use Copy / Save As to create an editable copy instead. ("Save As" always copies the profile; Rename keeps the single profile and just relabels it.)
The ✨ button on a profile — in the profile selector and on the shot pages — shows what Decenza knows about it: expected curves, grind guidance, and which quirks are by design. That knowledge also stops the shot-quality badges reporting a profile's intentional behaviour as a fault.
Renaming or retuning a built-in profile keeps it. The match is made on frame structure, so changes to temperature, dose, yield and pressure are fine, but adding or removing a frame breaks it. A profile matched that way is labelled "Based on ‹name›".
When your profile is a modified copy, the window opens with "Your changes from ‹name›" — the temperature, yield, setpoints and exit points where yours differs from the built-in. Read it first: everything below it describes the original. A copy you only renamed says so instead. If two built-ins match yours equally well and disagree about the numbers, no comparison is shown.
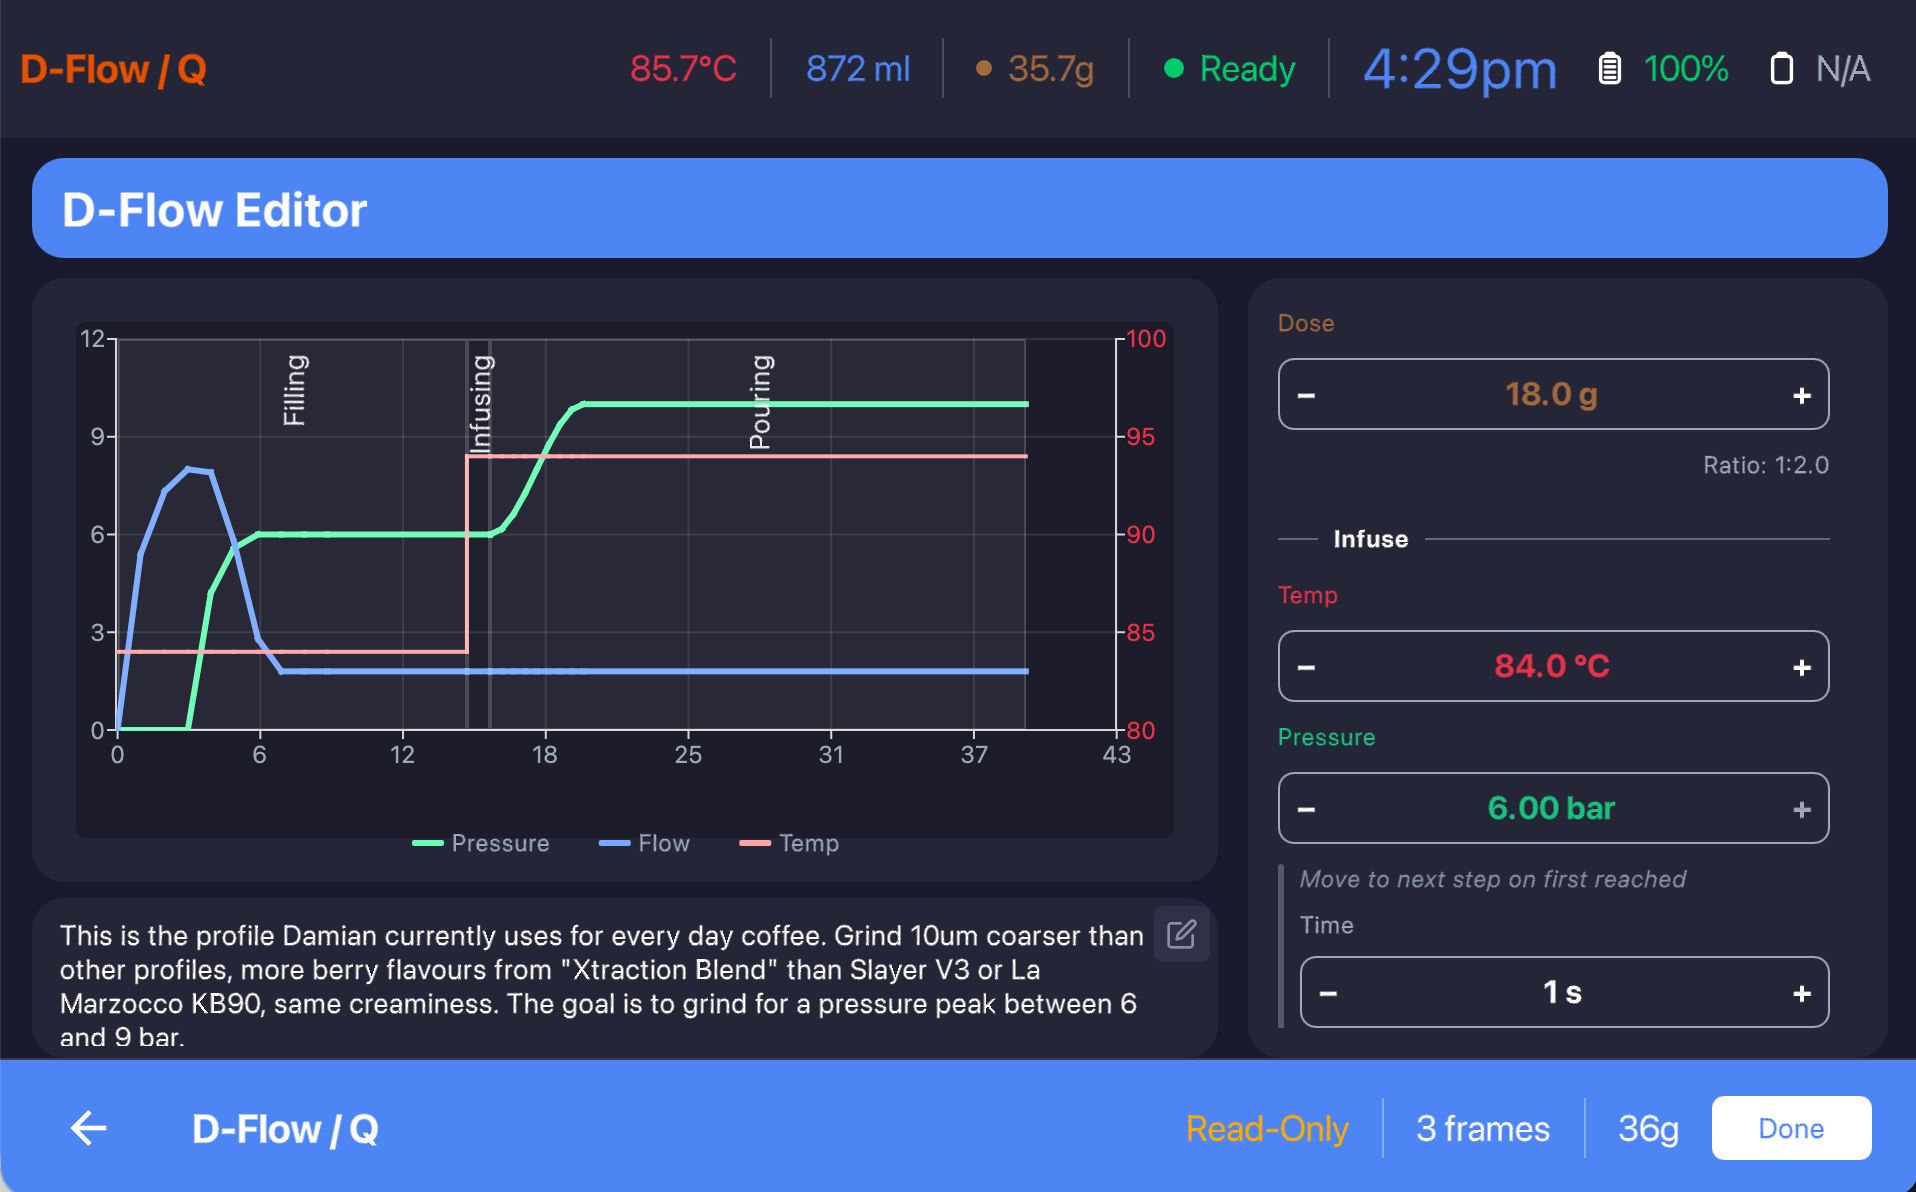
The D-Flow Editor is a simplified 3-phase visual editor (Filling → Infusing → Pouring) with per-phase temperature, pressure, and transition controls:
The Advanced Editor gives full frame-by-frame control:

Each frame (Prefill, Fill, Compressing, Dripping, Pressurize, Extraction start, Extraction…) is a column on the graph. Select a frame to edit its parameters on the right:
- Temperature — target brew temperature; sensor: Coffee (group head) or Water (inlet)
- Goal — what the DE1 controls: Pressure or Flow; set the target value
- Transition — how to ramp from the previous value to the target
- Exit conditions — when to advance to the next frame (pressure/flow/weight/time thresholds)
- Flow limit — the most water a pressure frame may deliver. A pressure frame always has one; when a profile does not set it, Decenza uses 8 mL/s. This matches the de1app, so a profile shared between machines pours the same way on each. On a flow frame the same control is a pressure limit, which can still be off.
Settings button (top-right) sets global temperature and stops. Limits sets SAW/SAV targets. The bottom bar shows Read-Only status, frame count, and stop limits. Built-in profiles are read-only — use Copy to duplicate a frame or Save As to create an editable copy.
Decenza ships with the same built-in profiles as the de1app (Classic, Adaptive, Spring Lever, D-Flow variants, Cleaning/Descale, etc.). These can be updated via the "Update All" button that appears when a new app version includes profile changes. To force-reimport a single built-in profile, long-press it in the profile list.
In the profile editor (top section), enable "Recommended dose" and enter a value. When this profile is selected, the dose is set from it — unless something more specific already has a say.
Three things can carry a dose, in this order of precedence:
- The active recipe — a whole drink you chose deliberately, so its dose wins.
- The active bean — each bag remembers the dose you last dialed for it.
- The profile's recommended dose — used when neither of the above supplies one.
So loading a profile while a recipe or a dosed bean is active leaves your dose alone: the dose belongs to the coffee and the drink, not to the way the shot is pulled. A source holding no dose is skipped rather than counted as zero, so a grind-only recipe, or a bean you've never dialed, still lets the profile's recommendation through.
To change the dose, edit it in Brew Settings — it writes back to whichever of the recipe or bean is active.
Before starting a shot, tap the settings icon (gear) next to the active profile pill, or access it via the Profiles button long-press, to open the Brew Settings dialog — a quick-access overlay for per-shot overrides without entering the full profile editor.

Fields available:
- Profile — switch profiles without leaving the idle screen
- Roaster / Coffee — update bean information
- Temp Delta — per-shot temperature override, shown as an offset from the profile; its Update Profile button bakes the shown temperature into the profile itself
- Dose — grams of coffee in
- Ratio — brew ratio; edit it and the stop-at weight derives from it (dose × ratio) and follows the dose
- Stop at — stop-at-weight target (g); edit it and the ratio becomes the derived display value
- Equipment — the active equipment package (grinder); tap the info button to view its contents or Switch to change it
- Grind setting / RPM — per-shot dial-in (RPM appears only for adjustable-RPM grinders)
The Ratio and Stop at rows are two views of one choice: your yield is either a fixed weight (36 g, no matter the dose) or a ratio of the dose (1:2 — the target follows the beans you actually weighed). Whichever row you edited last is the one that's kept; the other shows the calculated consequence. There is no mode switch — editing a row is the choice.
A single Update button sits next to whichever row is kept, and moves when you edit the other row — that's also how you convert a recipe from a fixed yield to a ratio (or back): edit the row you want, then press Update. The button's label says where it saves, following the same order the brew resolves from:
- Update Recipe — a recipe is active and the value saves into it;
- Update Bag — no recipe (or the recipe defines no yield of its own): the value saves onto the active bean, so it comes back whenever you select that bean — the useful home for a yield when you brew without recipes;
- no button — no recipe and no bean; the dialed value still applies to the next brew.
A profile is never a save target here: profiles are shared and exported, so they hold a plain target weight only. Update Profile for the stop-at weight lives in the Profile Editor instead. (The Temp Delta row's Update Profile button is unaffected.)
Two things follow from keeping a ratio rather than a weight:
- A ratio survives a switch to a profile of the same kind (espresso, filter or tea). Switching kind drops it, and the recipe's or bean's saved ratio applies instead. A fixed weight always drops: 36 g was about that profile.
- A ratio follows the scale. Weigh your beans and the target updates; a fixed weight stays put.
Amber means "Clear resets it." Each editable value shows in the normal text color at its baseline and turns amber when it differs from what the Clear button would restore — the profile temperature, the bag's remembered dose, and the recipe's or bean's own yield (or the profile target when neither defines one). (The Dose cup value is never tinted; Clear doesn't touch it.) The same amber marks the overridden item on the Shot Plan widget, so the two surfaces always agree.
With a recipe active the dialog slims down: the recipe owns the profile, beans, and equipment, so those three rows become a single Recipe row that quick-switches between recipes. The dial-in fields work as before, and both Update Recipe buttons save into the recipe — the shared profile is never touched, so sibling recipes on the same profile are unaffected. A yield or temperature tweak committed with just OK applies to the next brew only.
You don't have to type your dose. Set your dose cup of beans on the scale, and when the weight settles Decenza fills in the dose automatically. No buttons.
To enable it, set your empty dose cup's weight once: on the Dose cup row in Brew Settings, place the empty cup on the scale and tap Weigh. (A saved cup weight of 0 means the feature is off and only the manual "Get from scale" button is shown.) Decenza subtracts the cup weight from the reading, so it captures the beans even if the scale wasn't zeroed first.
A capture updates the dose only. A ratio yield re-derives its target from the new dose (1:2 on 17.5 g → 35 g); a fixed weight stays put — weighing beans is a measurement, and a measurement doesn't change what you asked for. Dial a ratio if you want the target to follow the dose.
A short capture "ding" can confirm the reading — off by default; toggle it with the bell icon on the Dose cup row.
You can also set a temperature override without opening the Brew Settings dialog: double-tap the temperature display on the idle screen. The override is applied as a delta across every step of the profile (not just the first), so the whole shot shifts up or down by the same amount. An override indicator appears next to the readout; tap it and press Clear to remove the override.
- Tap Recipes and tap a recipe pill. That loads the whole drink — profile, beans, equipment, grind, dose, yield and temperature — in one tap. (Pulling a one-off instead? Tap Profiles on the bottom bar and pick a profile pill; dial anything else in Brew Settings.)
- Grind and dose your portafilter, and lock it in.
- On machines with a GHC (Group Head Controller): press the Espresso button on the machine.
- On headless machines: use the on-screen button, or keyboard shortcut E.
- The screen switches to the extraction view, and Decenza stops at your target weight automatically.
A headless DE1 has no physical Group Head Controller — the app is the sole control surface. Decenza is designed to work fully without a GHC.
Starting operations from the idle screen:
- Single-tap the operation button (Profiles, Steam, Hot Water, or Flush) — the pill row for that function slides out showing your configured presets
- Tap a pill:
- If the pill is already selected (highlighted): one tap starts the operation immediately
- If the pill is not yet selected: first tap selects it (turns blue); second tap starts
- Long-press the main operation button to open the full settings for that function
A Stop button appears on the active operation screen (shot, steam, hot water, flush) for headless machines.
Mini GHC layout widget: The Layout Editor (Settings → Layout) includes a "Mini GHC" widget — five compact buttons (Espresso, Steam, Hot Water, Flush, Stop) you can place anywhere on the idle screen for instant one-tap access. The widget is active only on headless machines; it is dimmed and non-functional when a physical GHC is detected.
Keyboard shortcuts are useful with an external keyboard or macro pad — see Appendix A.
Steam — stopping and purging: One press of Stop both stops the steam and purges the wand. To confirm the purge as a separate step, enable "Two-tap to stop steaming" in Settings → Machine.
Remote control: Mirror the tablet onto your computer and drive it with a mouse and keyboard — see Remote Control. Decenza Pocket extends control over the internet.
Tap the chart icon (top-right) to toggle between Shot Chart and Cup Fill views.
Shot Chart — live graph of all sensor curves as extraction progresses:

The bottom bar shows real-time readouts: Time, Pressure (with target), Flow (mL/s), Temperature (°C), Weight flow (g/s), and current weight vs. target. During preinfusion and pouring, the −5 g, −10 g, +5 g and +10 g buttons adjust the stop-at-weight target for this shot only, with a minimum of 1 g. Skip advances to the next profile frame immediately.
The curves shown are:
| Curve | Color | Description |
|---|---|---|
| Pressure | Blue | Pump pressure (bar) vs. profile target |
| Flow | Green | Water flow rate (mL/s) vs. profile target |
| Temperature | Orange | Brew water temperature (°C) |
| Weight | Brown | Cup weight from scale (g) |
| Target weight | Dashed | SAW stop target |
Frame markers (vertical lines) mark transitions between profile frames. Tap any legend item to toggle that curve on/off.
Reading the axes. The left axis is shared: pressure in bar and flow in mL/s are drawn against the same scale, which is the usual convention on DE1 charts.
The right axis carries a third quantity, and you choose which — tap the right-hand labels to cycle through Weight (g), Temperature, and Flow (mL/s). Your choice sticks until you change it.
Flow Scale. Flow spends most of a shot between about 1.5 and 2.5 mL/s, so on a 0–12 axis the part you actually dial on sits squashed against the bottom. The flow scale magnifies it:
| Setting | Effect |
|---|---|
| 1x | True scale. Flow reads directly off the left axis. |
| 2x (default) | Flow drawn at double height. The left axis reads 0–6 mL/s for flow. |
| 3x | Triple height, 0–4 mL/s. Best resolution on the pour; the fill spike and any channeling blowout clip at the top. |
It magnifies Flow, Weight flow and the dashed flow goal together, so those three stay comparable with each other. Pressure is never scaled.
Two things follow from that, both deliberate:
- At 2x or 3x the left axis label changes from
bar / mL/sto justbar, because the axis no longer reads true for flow. If you want to read flow numerically at those settings, tap the right axis round to Flow — it always shows the true scale. - The numbers are always true. Tap the chart to inspect, and flow reports its real mL/s regardless of the magnification. Only the drawing is scaled.
If you are sharing a screenshot of a chart for help, note which flow scale you were on — at 2x or 3x the flow curve sits higher than its real value. The
baraxis label is the giveaway.
Advanced curves. The Advanced Curves option adds extra diagnostic curves to the legend, on this live chart as well as the review, detail and comparison charts. Each curve is off until you switch it on, and all of them stay hidden while Advanced Curves is off:
| Curve | Description |
|---|---|
| Mix temp | The actual temperature of the water reaching the puck. Its gap from basket temperature reflects group head thermal stability. |
| Mix temp goal | What the machine was aiming the incoming water at. Read it against Mix temp to see how well that target was held. Only recorded from v2.0 on — older shots show no line. |
| Resist(P/F), Resist(P/F²) | Puck resistance. Rising = puck tightening, falling = puck opening, erratic = channeling. |
| Conduct(F²/P) | Puck conductance — flow² / pressure. |
| dC/dt | Rate of change of conductance. Post-shot only; spikes reveal channeling that other curves miss. |
Where these settings live. On this live screen, both Advanced Curves and Flow Scale are in the view selector (the same dialog that switches between Shot Chart and Cup Fill). On the shot page and the comparison page they are behind the gear button above the graph, which opens a Graph Options menu. It is one setting either way — change it anywhere and every chart follows.
Cup Fill — 3D animated cup that fills as espresso pours:

The current phase label (e.g. "rise and hold") appears top-left. Tap the chart icon to switch back to the graph.
SAW sends a stop command to the DE1 just before the target weight is reached, compensating for drip that continues after the pump stops.
Adaptive SAW automatically learns your scale's characteristic lag after 4–5 shots and converges to ±0.3g accuracy. View or reset the learned value in Settings → Calibration → Weight Stop Timing. The value is learned per profile, scale and basket, so a basket you have not used before needs its own 3 shots.
To set the target weight:
- Set it in the profile editor (yield/target weight field),
- dial a fixed weight or a ratio in Brew Settings (see Yield: a fixed weight or a ratio), or
- use the brew-by-ratio dialog (double-tap the weight readout) to arm a ratio
SAV uses the DE1's internal flow measurement. Set the target volume in the profile editor. Set to 0 to disable. SAV and SAW are independent — whichever triggers first stops the shot.
The DE1's flow sensor accuracy varies by flow rate and between machines. An uncalibrated sensor gives inaccurate yield readouts and makes Stop-at-Weight less precise, since SAW uses flow data to predict drip after the pump stops. Where other DE1 apps offer a manual calibration tool, Decenza calibrates automatically, per profile, with no manual steps.
After each shot with a Bluetooth scale connected, Decenza finds a steady-state window in the shot data and compares what the scale measured against what the profile targeted, correcting for water density at brew temperature. It accumulates results across 5 shots and applies the median — outlier-resistant, and it avoids changing the machine's behaviour between back-to-back shots you're trying to compare.
Calibration is per profile, because the error varies at different flow rates. A global median across your espresso profiles also seeds any newly-created profile, so it starts close to correct rather than converging from zero.
A brief toast appears on each update ("Flow cal updated for Filter 3: 1.00 → 1.08"), and the active factor shows on the Profile Info page with an "auto" label. An unusually high factor (possible on v1337+ firmware) shows in amber as a prompt to check scale accuracy.
It's on by default and needs no setup beyond a paired scale. To view factors, clear one, or disable the feature, go to Settings → Calibration → Flow Calibration.
After a shot completes, the Shot Review screen opens automatically (configurable in Settings → Machine → Shot Review Timer).
Part 1 — Graph and extraction quality:

A Clean extraction badge (or a warning badge) appears based on automated quality detection. Tap Shot Summary for an AI-readable text summary, or the sparkle icon for AI dial-in advice.
At the top of the shot page, amber marks what was overridden when that shot was pulled: the temperature in the title highlights if the shot ran with a temperature override, and the yield in the dial-in line under the title highlights if the target was dialed off the profile's default. Both read from the shot's own record — the current dial never changes how a saved shot displays.
Part 2 — Phase summary, rating, and measurements:

-
Phase Summary — per-phase duration, avg pressure, avg flow, and weight contribution
-
Rating — drag the slider or tap 25/50/75/100 shortcuts
-
Notes — free-form tasting notes
-
Measurements — Dose, Out (yield), TDS%, EY% (auto-calculates from TDS + dose/yield). If you've paired a DiFluid refractometer (R1 or R2), a Read TDS button measures and fills in TDS directly; it reads "R1 Off" / "R2 Off" when the device is asleep.
A reading usually takes a few seconds, but can take considerably longer if you've just loaded the sample. That's expected: a refractometer has to compensate for the sample's temperature, so the R2 keeps re-measuring and won't report a figure until the prism has settled. Let it finish — the value it lands on is the reliable one.
Below the rating and notes, Shot results lists the shot's numbers — time, yield against its target, ratio, first drop, peak pressure, flow — and how it stopped; Show more adds the rest. When there is an earlier shot on the same profile, the card names it, says what you changed and what moved, and shows each number's change since then; Compare opens the full comparison.
With Auto Test on, the R2 starts measuring by itself as soon as it detects a sample on the prism — nothing to press. The reading arrives in the shot review just like a button-press one.
Turn it on under Settings → Connections, on the row for your paired refractometer. Decenza remembers your choice and applies it the next time the R2 connects, so the device doesn't need to be awake and nearby when you set it.
Auto Test readings take longer — around 15–20 seconds — because they always catch the prism mid-temperature-change. In exchange you can't take a reading too early by mistake. The setting lives on the refractometer itself, so it stays on until you turn it off, even if you use the R2 elsewhere. It's off by default.
Part 3 — Bean, equipment, and dial-in metadata:

All fields carry forward from the active bean bag and profile. The ↑ arrow next to each field pushes the value back to the bag. The grind setting and RPM are editable (RPM only for adjustable-RPM grinders). The Equipment card sits at the bottom of the section and is read-only — it shows the package the shot was pulled on, with a Change Equipment button to re-point the shot to a different package. Tap Upload to Visualizer to send immediately; AI Advice or Discuss to open AI analysis.
If the shot's bean isn't linked yet, a Link to Bean Base link sits under the bean name and opens a search pre-filled with this shot's coffee — see Filling In a Coffee's Details.
You can edit any of these fields on any historical shot later by opening it from Shot History.
- Tap the Steam pill on the idle screen
- The DE1 heats the steam boiler to the configured temperature
- A progress bar shows warm-up (when current temp < target − 5°C)
- Insert the steam wand into the milk pitcher
- On the GHC: press the Steam button to begin
- Steam runs until the configured time expires or you stop it manually
- Remove the pitcher, wipe the wand
- Press Stop on the GHC — the DE1 automatically purges the steam wand

Once steam is running the page switches to a live view:

-
Countdown — elapsed against target, e.g.
8.8s / 65s, with a progress bar beneath. While the boiler is still warming up this shows current against target temperature instead. - −5 s / +5 s — nudge the running steam time up or down. See Weight-Timed Steaming for how a manual nudge interacts with auto-capture.
- Steam Flow — the flow slider stays live, so you can go flatter or foamier mid-pour. Low = flat, high = foamy.
- Preset pills — switch pitcher preset without leaving the screen.
- Stop — shown on headless machines (no GHC), where the tablet is the only control. It stops the steam, purges, and returns you to the idle screen. With "Two-tap to stop steaming" enabled it becomes two-stage: the first tap stops, and the button then reads Purge for the second. On a machine with a GHC there is no on-screen stop button — press Stop on the GHC, which stops the steam and automatically purges the wand.
- Chart toggle (top right) — swaps the countdown for a live steam graph. The Stop button (on headless machines) remains available in both views.
Manage steam configurations in Settings → Steam → Pitcher Presets. Each preset has:
- Name (e.g., "Small pitcher", "Cortado")
- Temperature — target steam heater temp (typically 140–160°C)
- Duration — auto-stop timeout (seconds)
Presets appear as pills on the idle screen. Tap one to load it; tap Heater off to shut the heater down. Heater off is built in — you can't rename or remove it.
A fixed steam duration over-steams a half-full pitcher and under-steams a full one. Weight-timed steaming scales the auto-stop time to the amount of milk on the scale, so different pitcher fills all finish at the right temperature.

Enable it in Settings → Steam, then set each pitcher's empty weight (Weigh) and the Steam rate (steam once to your liking, then tap Use last steam).
Set the pitcher with at least 50 g of milk on the scale; Decenza captures the weight once it settles and sets the steam time. No tare needed. A manual ±5 s nudge sticks until you lift the pitcher.
From the shot review page: tap the pitcher button next to the TDS button, then set the pitcher down. Long-press it to switch pitchers.
Turning it off uses the preset's fixed time; your settings are kept. For a milk-only readout while pouring, set a Weight widget to Net milk.
Concept credited to DSx2 / Damian-AU.
Decenza can coach you through steaming as it happens — short cues timed to the pour. This is a local, real-time helper, unrelated to the post-shot AI advisor. The DE1 can't measure milk temperature, so cues are paced against the target steam time. There are four, each firing at most once per steam:
| Cue | When | Meaning |
|---|---|---|
| Stretch | at the start | Keep the tip near the surface — stretch/fold in air |
| Roll | ~⅓ through | Submerge the tip — roll and texture |
| Almost | near the end | Almost there — get ready |
| Done | at steam stop | Steam done (fired from the machine, not a guess) |
Coaching only runs when the steam time came from your milk weight — i.e. when weight-timed steaming captured the pitcher on the scale. A fixed preset duration says nothing about how much milk is in the pitcher, so pacing off it could steer you wrong. Without a milk-derived time you get one info pill: "No coaching — milk weight not captured."
Both cue channels are off by default and live in a Coaching section on the Steam page:
- Show coaching banner — an on-screen pill, tinted by urgency.
- Speak coaching cues — spoken aloud (works with the banner off, and independently of the accessibility screen-reader switch).

Enable "Auto flush wand" in Settings → Machine. The purge runs automatically after a configurable delay without requiring a GHC button press.
"Two-tap to stop steaming": By default a single press of Stop both stops the steam and purges the wand. Enabling this splits it in two — the first tap stops the steam, the second purges — which is useful if you want a moment to lift the pitcher clear before the purge fires.

The steam heater takes several minutes to heat, so two settings in Settings → Machine → Steam Heater decide when it runs — both on by default: Keep warm when idle, and Let the recipe decide, which hands control to the active recipe's pitcher.
| Keep warm when idle | Let the recipe decide | The heater is |
|---|---|---|
| ✓ | — | always warm |
| ✓ | ✓ | warm, unless the active recipe has no pitcher |
| — | ✓ | warm once you start a milk recipe's shot |
| — | — | warm only when you press Steam |
A recipe with no pitcher counts as no milk, so the heater goes off — add a pitcher to the recipe if you want it warm.
To shut it down at any time, select Heater off in the pitcher row — one tap from the idle screen. It overrides both settings.
Scale builds up in the DE1's steam circuit over weeks or months, and the machine gives no warning until performance noticeably degrades. Decenza tracks steam performance over time and warns you early, before milk texture or steaming speed change in ways you'd notice.
After 5 steam sessions it establishes a personal pressure baseline for your hardware, flow setting, and water quality. Every session after that is compared against it:
- Pressure trending upward — restriction in the steam circuit, usually limescale or milk residue from inadequate purging. You get a warning bar and, once the drift is significant, a cleaning notification.
- Sudden pressure drop — a descale or wand clean; the baseline resets automatically, with a two-session confirmation so one outlier can't trigger a false reset.
- Temperature spike — a sustained excursion above 180°C during steaming warns separately.
Readings are normalized across steam flow settings, so switching between a cortado steam and a full pitcher doesn't cause false alerts. The bars in Settings → Calibration → Steam Health show how far you've drifted from baseline; tap Reset there after descaling or deep-cleaning the wand.
Tap the Hot Water pill on the idle screen to show vessel presets (e.g., Cup, Mug). Tap a preset to start dispensing. Double-tap or long-press to configure:
- Weight (g) / Volume (ml) — toggle between weight-based or volume-based stop
- Temperature — typically 92–95°C
- Flow Rate — dispensing speed

Manage presets by tapping + in the preset row, or hold/double-click an existing preset to edit it.
Tap Flush in the bottom bar to flush the group head. You can configure presets (e.g., Quick, Normal, Thorough) in the Flush settings page:
- Duration — how long to flush (e.g., 3–10 seconds)
- Flow Rate — how fast water flows (high = more aggressive clean)
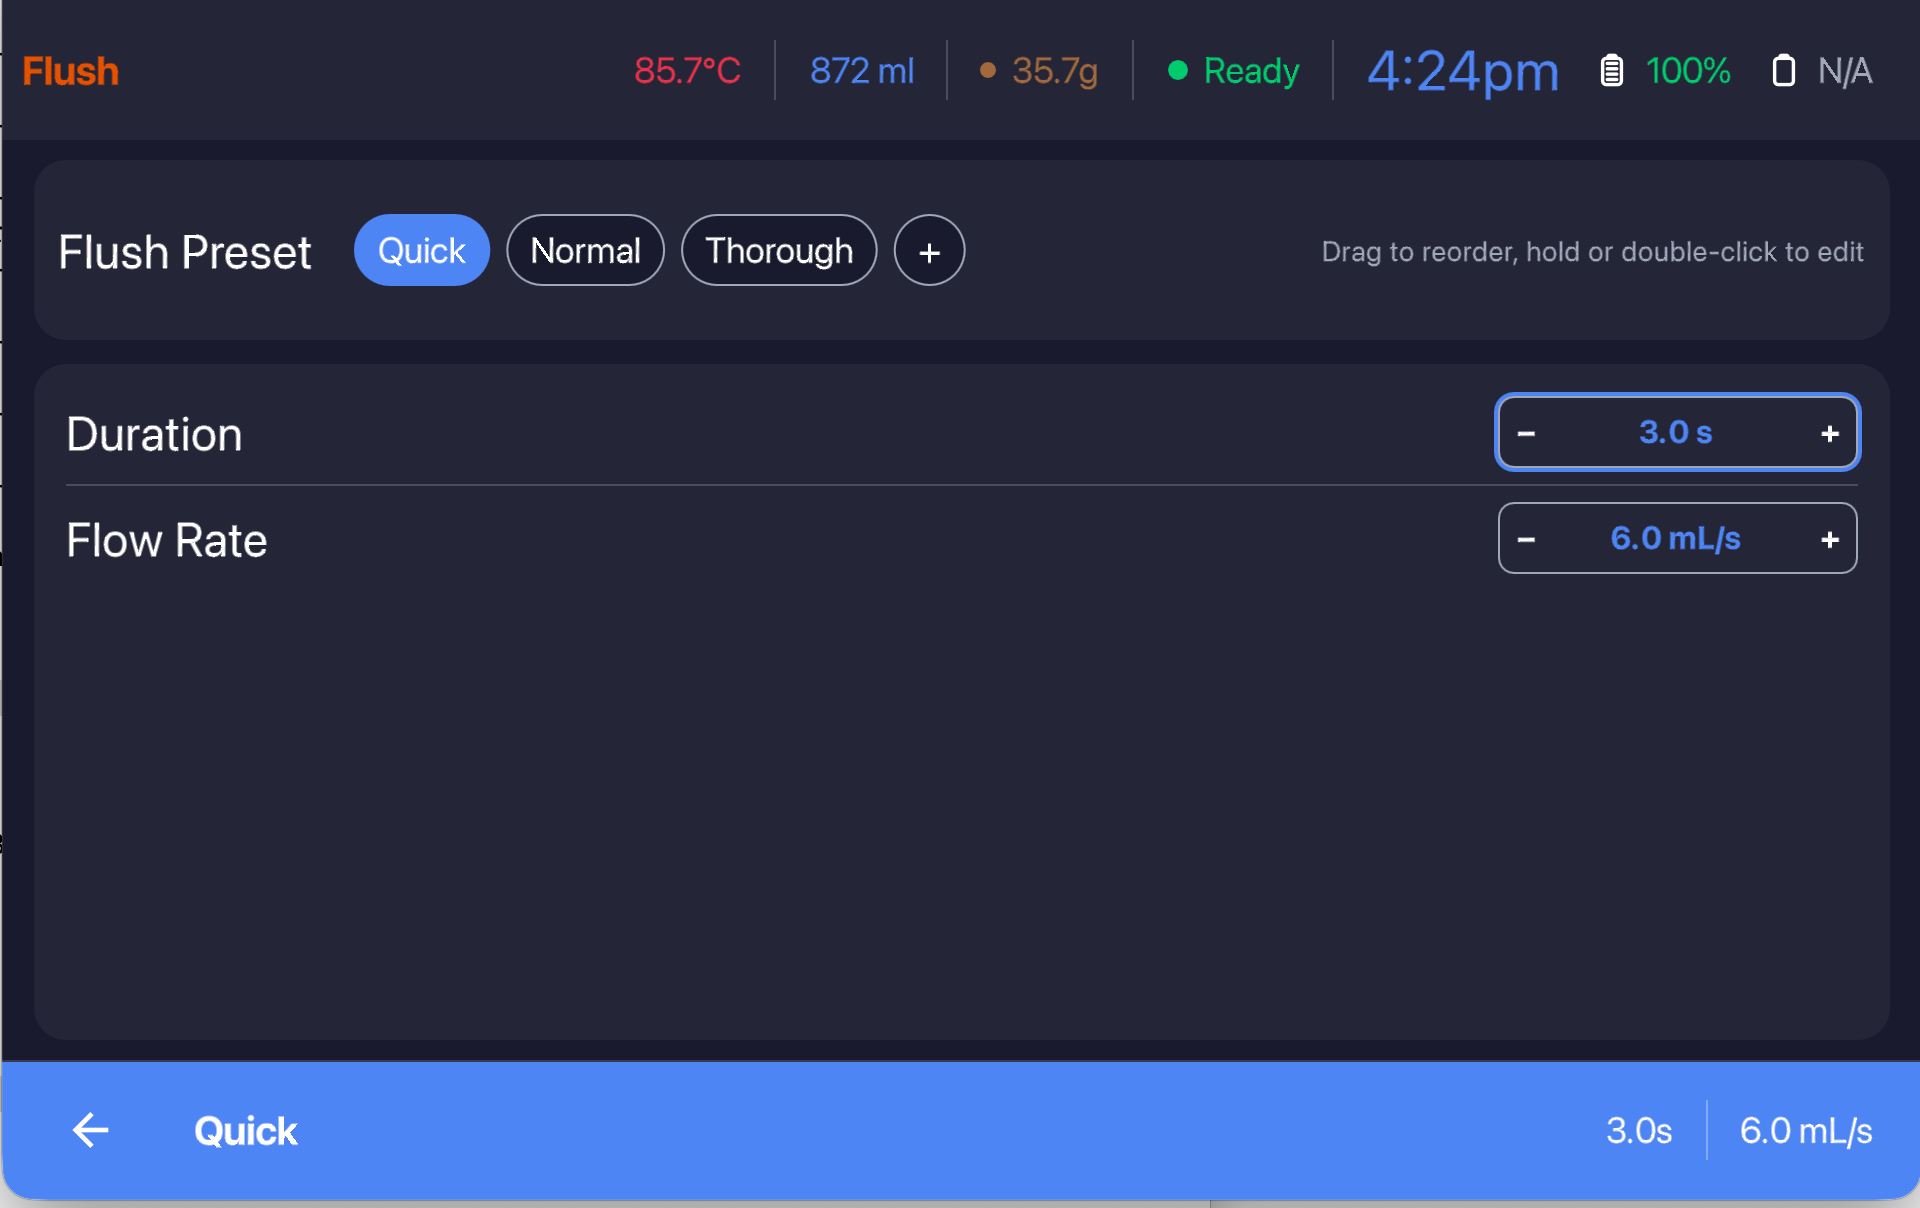
While a flush runs, −5 s / +5 s beside the timer change how long it lasts (1–45 s). The change applies to that flush only; the next one uses the preset's duration again.
Tap the History button on the idle screen, or browse via the web interface at http://<tablet-ip>:8888.

Each row shows date/time, profile name, bean, and then a line of numbers — dose → yield, Time, and Grind (with RPM when recorded) — plus upload status (☁ = uploaded to Visualizer) and your rating. Tap Load to restore all settings from that shot. Tap > to open the shot on its page.
Quality dots. Small coloured dots after the upload icon flag what the automatic detectors found, so you can spot a bad shot without opening it: red for a truncated pour, channeling, or a skipped first frame, and amber for a grind issue. A clean shot shows none. The same detections are searchable as channeling:yes, grind:yes and skipframe:yes (below).
Shots made with a recipe show the recipe. The row leads with the drink-type icon and the recipe's name in place of the profile, which moves down beside the bean — nothing is lost, and the name you gave the drink is what you see first. An archived recipe's name is dimmed; its shots stay in history as normal. The Recipe button (which creates a recipe from a shot) is hidden on these rows.
Tap the recipe name to show every shot made with it. This matches on the recipe itself rather than its name, so renaming never splits a recipe's history and two recipes sharing a name stay separate. A banner shows the filter — tap Clear to return to the full list.
Check multiple shots (tap the checkbox on the left) to enable Compare mode.
Type in the search bar to filter by bean name, profile, roaster, grinder, recipe name, or notes. Tap Keywords for the full search syntax reference:

Numeric keyword syntax:
| Keyword | Field | Example |
|---|---|---|
rating: |
Enjoyment (0–100) | rating:70+ |
dose: |
Dose weight (g) | dose:16-18 |
yield: |
Yield weight (g) | yield:30-40 |
time: |
Duration (seconds) | time:25-35 |
tds: |
TDS | tds:1.3-1.5 |
ey: |
Extraction yield (%) | ey:18-22 |
recipe: |
Recipe name | recipe:"dad tuesday" |
bag: |
Coffee bag | bag:"ethiopia guji" |
Quality flag keywords: channeling:yes, temp:yes, grind:yes, skipframe:yes
Recipe keyword: recipe: narrows to the recipe name only, unlike plain typing, which also searches beans, profile, grinder and notes. Both forms match part of a name — recipe:dad finds both Dad Monday and Dad Tuesday; quote it (recipe:"dad tuesday") when the text has spaces. To pin down one exact recipe, tap its name on a row instead.
Bag keyword: bag: narrows to one coffee bag, matching its coffee name, roaster and roast date together — bag:"guji 2026-07" finds the July bag and not the August one. Narrower than the bean name, which spans every bag of that coffee.
Range syntax: N (exact), N-M (range), N+ (minimum)
Combine with text: ethiopia dose:18 channeling:yes, or rating:70+ recipe:dad
Tap a keyword in the dialog to insert it into the search bar. Tap Save to save the current search as a preset; Saved to recall saved searches.
Tap a shot in history to open it on the same page as Post-Shot Review, where everything stays editable. Swipe the graph, or use Newer Shot / Older Shot, to step through the list. Delete Shot and View Debug Log (advanced mode) are at the bottom.
Tick two or more shots in history and tap Compare, or tap Compare on a shot's detail or review page to compare it with your previous shot of the same profile and setup. The oldest shot is the base; tap another shot's chip to make it the base. Each shot gets a one-line summary, then What you changed and Shot results show its difference from the base (▲ higher, ▼ lower).

Drag across the graph to read values under it. The chips switch curves and phase markers on and off; Align pours lines up each shot's pour start, and the eye on a shot hides it from the graph. The same page is on the web at /compare/.
Tap a shot → press "Load". This restores the profile and all bean/grinder settings from that shot, making it the active configuration for the next shot.
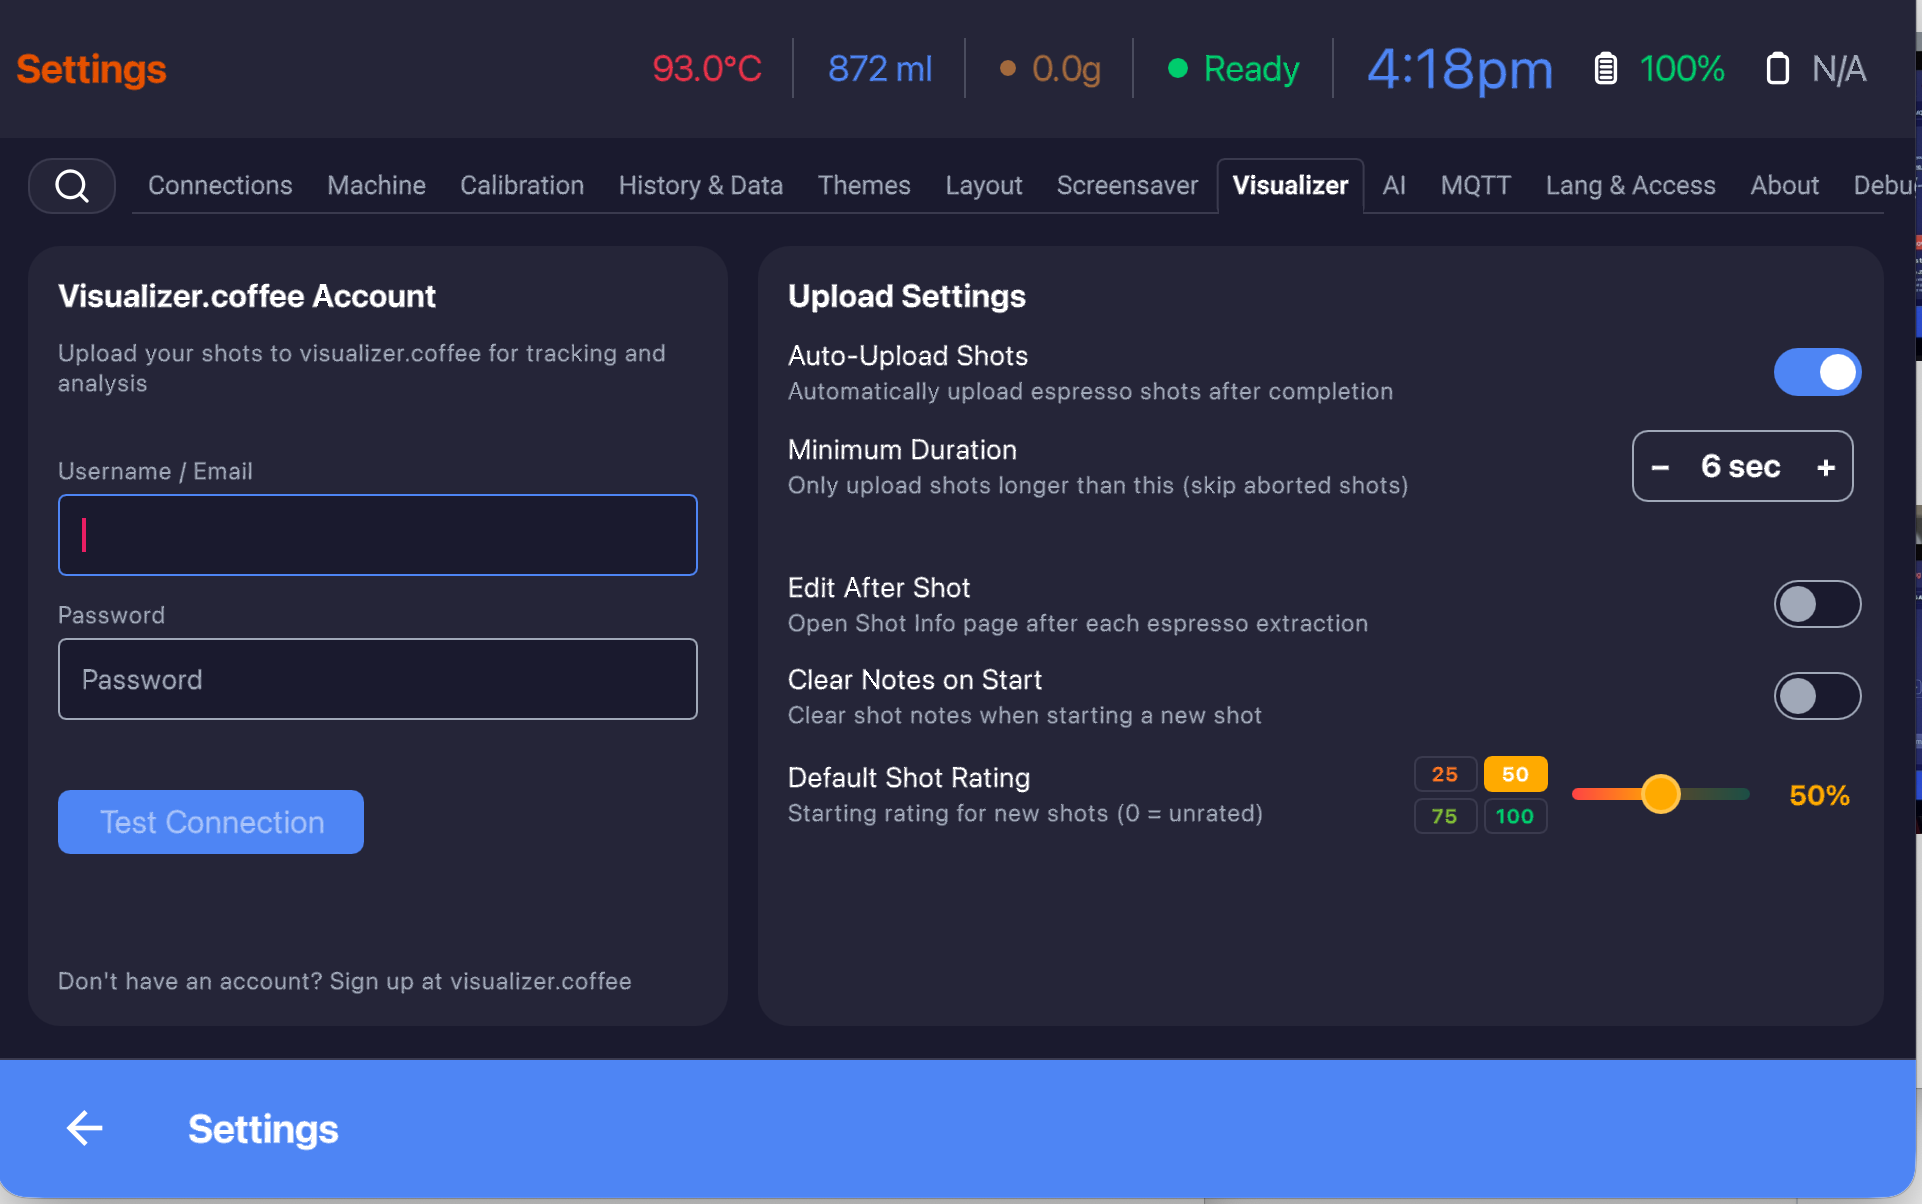
- Enter your Visualizer username/email and password in Settings → Visualizer
- Tap "Test Connection" to verify credentials
- Enable "Auto-Upload Shots" to send each shot automatically after completion
- Minimum Duration — skip aborted shots shorter than this (default 6s)
- Or tap Upload on any shot's page to upload manually
All DYE metadata (bean, grinder, enjoyment, notes) is included in the upload. If you discussed the shot with the AI assistant, the AI's recommendation is also included in the upload metadata.
Two-way sync. With Auto-update shots on (Settings → Shot Upload), edits made on visualizer.coffee come back to Decenza: shot ratings, notes, grind and measurements, and, with Coffee Management, your bags, including archiving. Screens showing a shot or your bags refresh when they open. An edit you made here and haven't synced yet is never overwritten.
Connect your decentespresso.com account in Settings → Shot Upload → Decent Account. Shots then upload to it with the same Shot Upload settings as Visualizer, filed under the serial number of the connected DE1. Some older DE1s don't report a serial number; Decenza then uses the DE1 registered to your account, and asks which one if you have several. If an upload says your DE1 doesn't report its serial number, sign out of the Decent account and sign in again.
From any shot's page, tap the AI button to discuss that shot with the AI assistant. The AI receives the full shot data as context.
The Layout Editor lets you customize every zone of the idle screen.
Access: Settings → Layout, or the web interface burger menu → Layout Editor.
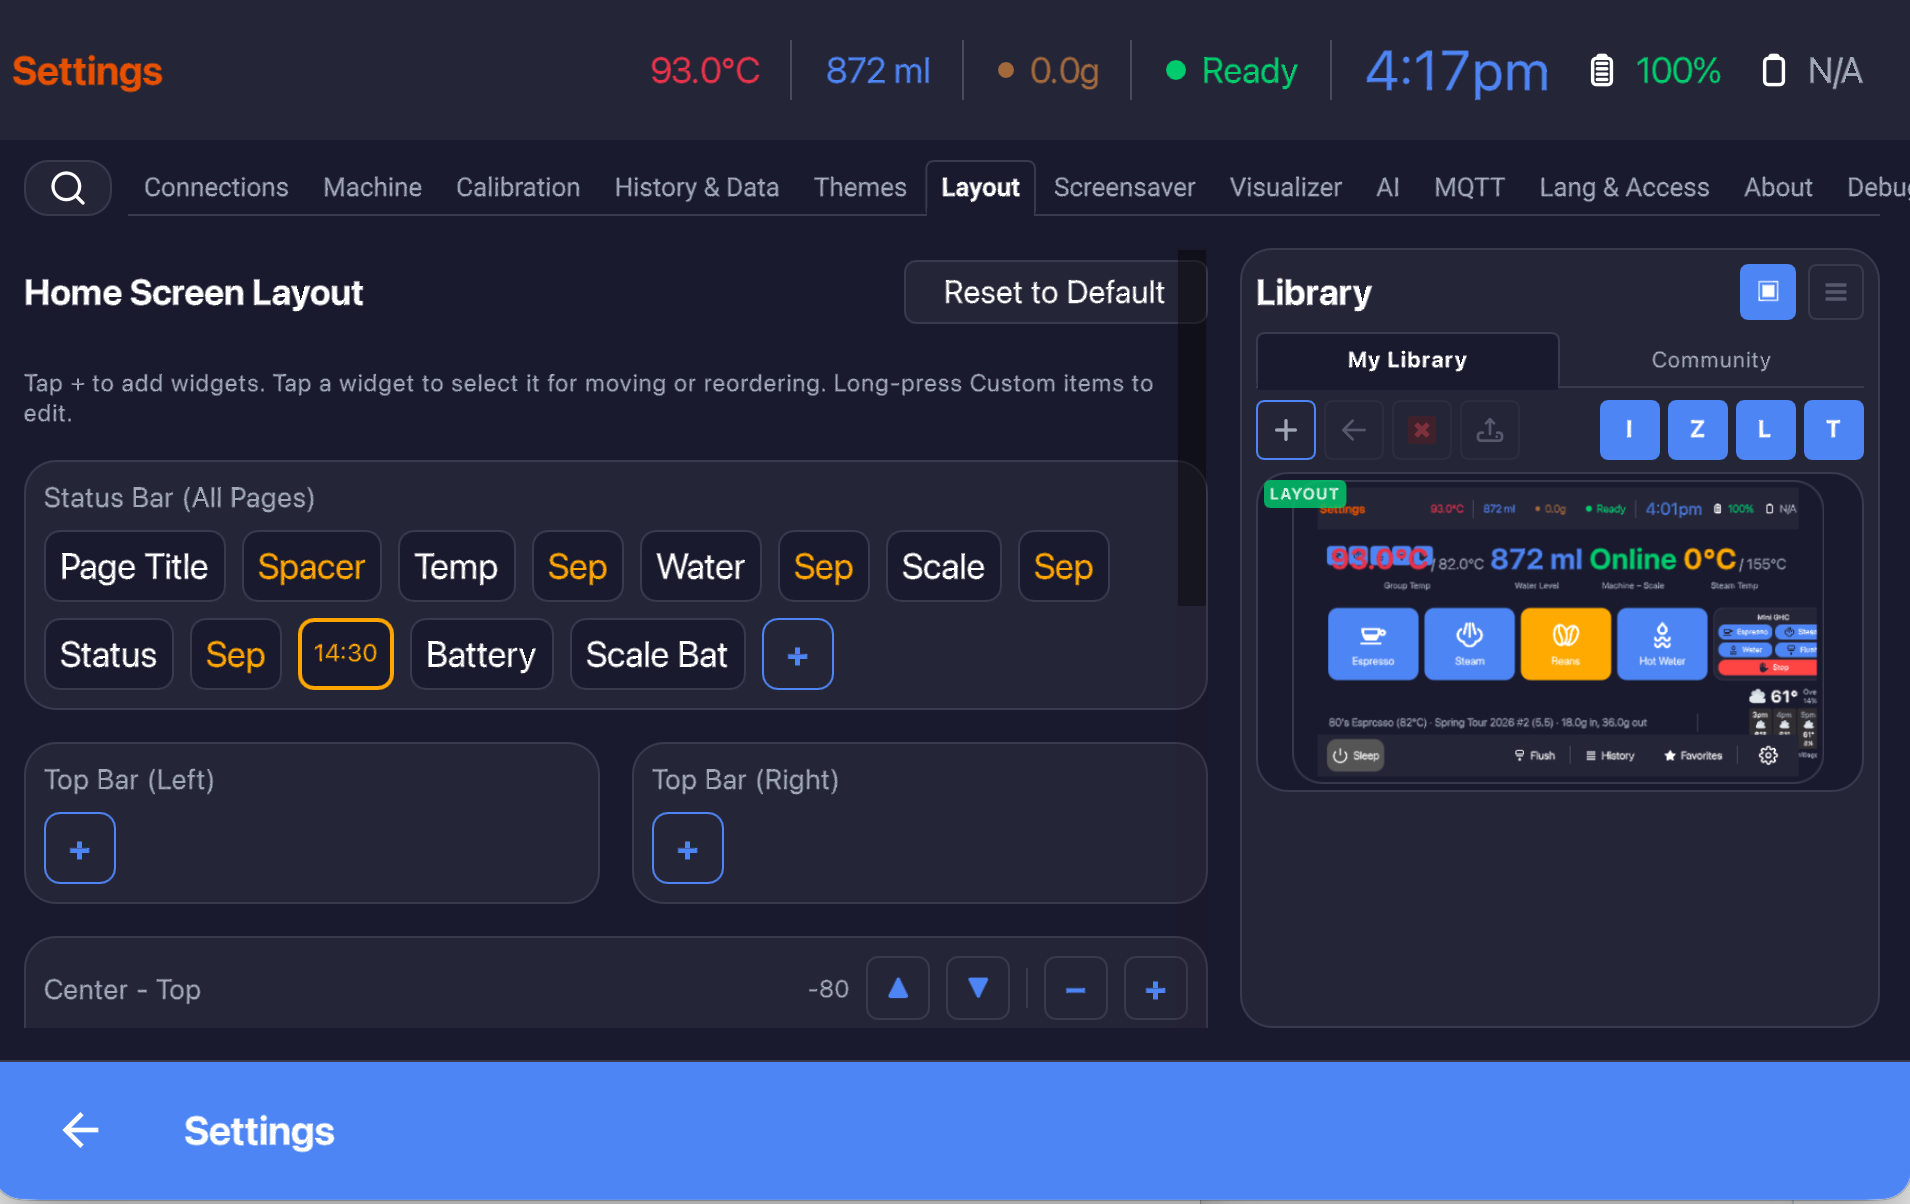
Can't reach Settings? If you've packed the bottom bar so full that the Settings button is pushed off the edge of the screen, long-press the page title (the "Idle" text in the top status bar) to open Settings directly. From there you can remove a widget or Reset to Default to get the bar back in order. The long-press works only on the idle screen, and an ordinary tap does nothing — so it won't fire by accident. With TalkBack or VoiceOver running, simply activating the page title opens Settings, since a long-press isn't available there.
Add a widget to a zone, then arrange it:
- Reorder by drag-and-drop — drag a widget chip to a new spot within its zone.
- Widget picker — adding a widget opens a picker with labeled categories and a type-to-filter field.
- Per-widget options — any configurable widget shows a gear indicator on its chip; tap it (or long-press the chip) to open its options. Only one widget's options panel is open at a time.
- Remove — a configured widget asks for confirmation before it's removed, and Reset to Default is confirmed too.
- Live preview (in-app editor) — a scaled, faithful preview of the home screen sits beside the editor and updates as you edit. (The web editor has no preview — you're already looking at the device.)
- Top bar (status bar) — compact readouts shown on every page
- Left / Center / Right zones — the main idle content area
- Lower-mid bar — a full-width band just above the bottom action bar; empty by default (reserves no height until you add to it). A good place for a "brew bar" of readouts.
- Bottom bar — action buttons, settings, history shortcut
Every zone has its own options (open the zone's options button, or long-press / double-click its label):
- Distribution — packed / equal-width / spaced. Offered for the bar zones only: the center zones size their buttons from a fixed cell, so there is nothing for it to change there.
- Alignment — left / center / right
- Style — theme-driven presets: standard / surface / accent bar. The status bar and the lower-mid bar take a full background; the other zones restyle their text.
- Populate presets — one-tap fills: Fill with Brew bar (accent band with the five brew readouts) and, on the status bar, Compact status bar. Plus Clear zone and Reset to default.
| Widget | Description |
|---|---|
| Action Buttons | Main operation buttons (Profiles/Steam/Water/Flush) with pill rows |
| Machine Status | Machine phase / connection state — shows "Disconnected" when offline (replaces the old separate Online Status widget) |
| Temperature | Group head temperature readout |
| Steam Temperature | Steam boiler temperature readout |
| Weight | Scale weight readout (see data modes below) |
| Dose Weight | Measured dose (g) |
| Milk Weight | Last measured milk weight (g), from weight-timed steaming |
| Profile Name | Active profile name |
| Ratio | Tappable 1:x.x pill that opens the ratio chooser |
| Grind Quick-Select | Tappable pill showing the current dial-in; opens the grind/RPM picker and edits the same live dial-in Brew Settings does |
| Temp Quick-Select | Tappable pill showing the brew temperature; opens a list of nearby values (±2.5 °C in 0.5 °C steps) and sets the same brew-temperature override Brew Settings does. Picking the profile's own temperature clears the override. Outside the 70–100 °C range it is a read-only display |
| Clock | Current time, updating each second; respects the 12/24-hour setting |
| Water Level | Tank level indicator |
| Custom Text | HTML text with template variables (see below) |
| Weather | 4-hour compact or 24-hour scrollable forecast |
| Flip Clock | Retro split-flap clock display (also available as a screensaver) |
| Sleep | Put the machine to sleep. Long-press quits the app; its options can turn that off or make it ask before quitting |
| Spacer | Empty space for layout control |
Display mode (text vs icon). The readout widgets (Machine Status, Temperature, Steam Temperature, Weight, Water Level, Clock, and others) each have a per-instance Display mode — show the value as text, or icon-led with a small glyph. Set it from the widget's options (long-press → display-mode popup). This lets the same readout look compact on the status bar and full-size in a center zone.
Scale data mode. The Weight widget additionally offers a data mode: gross, net beans (minus the dose-cup tare), net milk (minus the pitcher), or context-aware (picks automatically based on what you're doing).
The Custom Text widget supports template variables for live data:
| Variable | Description |
|---|---|
%TEMP% |
Group head temperature (°C) |
%STEAM_TEMP% |
Steam temperature (°C) |
%PRESSURE% |
Current pressure (bar) |
%FLOW% |
Current flow rate (mL/s) |
%WEIGHT% |
Current scale weight (g) |
%PROFILE% |
Active profile name |
%DOSE% |
Dose (g) |
%RATIO% |
Brew ratio |
%TIME% |
Current time (HH:MM) |
%DATE% |
Current date |
Example:
<span style="color:orange; font-size:48px; font-weight:bold">%STEAM_TEMP%°</span>
<br><span style="color:grey; font-size:18px">Steam Temperature</span>
The AI assistant can generate custom text HTML for you — describe what you want and it will write the code.
A Custom widget can also do something. Assign an action to its tap, long-press and double-tap separately — go to a page, start a shot, tare the scale, load a profile, and so on. The same list is available in the web layout editor.
Four of them open Shot History already filtered to whatever is active right now, which answers the question you usually have standing at the machine:
| Action | Shows |
|---|---|
| Go to History (this recipe) | Shots made with the recipe currently active |
| Go to History (this bean) | Shots with this coffee — across every bag of it |
| Go to History (this bag) | Shots from this bag only |
| Go to History (this profile) | Shots pulled with the profile now loaded |
History opens with a Filtered: banner and a Clear control. The widget follows whatever is active, so there is nothing to reconfigure when you switch beans.
The Recipes, Beans, Steam, Hot Water, Flush, Profiles, Equipment, History, Favorites and Settings buttons can carry their own long-press and double-click actions, from the same list as the Custom widget. Layout Editor → the button's options → Gestures (also in the web editor).
Most of these use tap for something else and reach their page only by gesture, so one gesture always stays reserved to open it — assign long-press and double-click keeps opening the page, or the reverse. History, Favorites and Settings open their page on tap, so both gestures are free.
Each row starts with Default (opens …) to restore normal behaviour and None to silence the gesture. Buttons behave as they always have until you change something.
The Widget Library in the web interface lets you browse, download, and share layout widgets with the community through decenza.coffee.
Screensavers activate after a configurable idle timeout.
Available screensavers:
| Type | Description |
|---|---|
| Video/Images | Loops uploaded videos and images |
| Flip Clock | Retro split-flap clock |
| 3D Pipes | Windows 95-style animated pipes |
| Shot Map | Live community map from decenza.coffee |
| Strange Attractors | Animated mathematical attractor patterns |
| Turn off display | Blank screen (most power-efficient) |
Configure in Settings → Screensaver:

- Screen: Sleep after — how long before the screen turns off completely
- Screensaver: Dim after / Dim amount — when and how much to dim before full sleep
- Auto-Wake — scheduled wake days/time, plus the Stay awake duration that keeps the machine on after it wakes (see Auto-Wake / Auto-Sleep)
- Video Category — select which video/image category to rotate
- Display Type — Videos & Images, Flip Clock, 3D Pipes, Shot Map, Strange Attractors, or Turn off
- Override system screen timeout — enable this so Decenza controls the screen; without it, Android's own screen-off timer may blank the display before the screensaver activates
- Enable the web server: Settings → History & Data → Enable Server
- Open
http://<tablet-ip>:8888in a browser - Burger menu → Upload images
- Uploaded content rotates in the screensaver
Non-video screensavers (including the flip clock) are also available as layout widgets, so you can display them directly on the idle screen.

-
Go to Settings → AI
-
Choose a provider. Claude, OpenAI and Gemini all give good dial-in advice — pick whichever you already have an API key for:
- Anthropic (Claude)
- OpenAI (ChatGPT)
- Google Gemini
- OpenRouter — one API key for several providers' models
- Ollama — Local/offline AI at no API cost
A shot analysis costs from under a cent to about six cents, depending on the model. Settings → AI shows an estimate for the model you pick.
-
Enter your API key (obtained from the provider's developer console)
-
Tap "Test Connection" to verify
-
Tap "Continue Chat" to open the AI conversation panel
Where a provider offers more than one model, a Model dropdown appears under it. The first option is the recommended default:
| Provider | Models (default first) |
|---|---|
| Anthropic (Claude) | Sonnet 5.5, Haiku 5.5 (about a twentieth of the cost, shorter replies) |
| OpenAI (ChatGPT) | GPT-6.1 Sol, GPT-6 Luna (about a twentieth of the cost, shorter replies) |
| Google Gemini | 3.8 Flash |
| OpenRouter | GPT-6 Luna, GPT-6.1 Sol, Sonnet 5.5, Haiku 5.5, Gemini 3.8 Flash, GLM-5.3 Flash, Gemma 4 31B |
If you never pick a model you get the default, which moves when the recommendation changes; a model you pick is kept while it is still offered. Ollama takes an endpoint and model name. The choice syncs with the web settings page and the MCP server (aiModel).

The AI assistant is accessible from:
- A shot's page (tap the AI button)
- The post-shot review screen
- A dedicated chat button (if added to the layout)
The AI receives your full shot data as context — curves, profile, bean info, history — and can suggest grind adjustments, temperature changes, or profile switches.
Conversation history persists across app restarts for multi-session dialing-in.
If a request fails (for example, the AI service is briefly overloaded), your typed message is kept and a Retry button appears in the error box — tap it to re-send the same question without retyping.
The one thing the AI can't read from your shot's curves is how it actually tasted — and that's the single biggest clue for what to change next. So when you open the assistant for a shot you haven't discussed or rated yet, a quick tap-only panel appears instead of the keyboard:
- Taste — Sour · Balanced · Bitter (sour usually means under-extracted → go finer/hotter/longer; bitter means the opposite)
- Body — Thin · Medium · Heavy
- Overall — the same 25/50/75/100 rating used elsewhere
Tap what fits — every row is optional — and press Ask. Your taps become the opening question, sent with the shot attached, so the AI goes straight to advice instead of first asking how it tasted. Skip takes you to the normal chat. The panel appears for any shot you haven't rated or described yet, and once you have, the assistant opens straight into the chat.
Your taps are also saved to the shot — rating, taste, and body, exactly as if entered on the review screen — so they enrich your dial-in history and, with Visualizer auto-upload on, upload as the standard tasting-assessment scores (acidity, bitterness, mouthfeel). Turn the panel off under Settings → AI ("Ask how it tasted").
The same Taste and Body choices also appear on the post-shot review screen next to the rating, so you can record them there whether or not you use the assistant.
From v1.6.0, Decenza includes a Model Context Protocol (MCP) server — a standard that lets external AI agents like Claude Desktop connect directly to your DE1. Unlike the in-app AI (which sends requests to a cloud provider through a chat interface), an MCP-connected AI runs locally and has direct, real-time access to the machine.
The MCP server exposes 97 tools across seven categories — machine state, machine control, shot history, profiles, settings, scale, and BLE devices — plus seven live resources for push notifications. An external AI agent can do nearly everything the on-screen UI can do: start shots, edit profiles, switch themes, scan for BLE devices, trigger backups, and more.
There are two ways to connect an AI to it, and you only need one. Pick whichever suits you — setting up both gains you nothing.
| Works from | What it takes | |
|---|---|---|
| Remote Access (recommended) | The Claude and ChatGPT phone and tablet apps, plus desktop — anywhere in the world | Two toggles and a URL you paste into the app. No terminal, no install, nothing left running on a computer |
| Claude Desktop on your WiFi | Claude Desktop only, on a Mac or Windows computer on the same network | Node.js, a terminal, and an install script |
Remote Access is the one to choose. It is the only route that reaches the mobile and tablet apps — which is where most people actually want to ask about a shot — and it is less work to set up, not more.
Two toggles in Decenza, whichever route you take:
-
Enable the web server — Settings → History & Data → Enable Server. The MCP server shares its port (8888) and authentication, so nothing under
/mcp/*responds while it is off. - Enable MCP — Settings → AI → MCP Server, toggle Enable MCP Server. Access level and confirmation defaults live on this page too.
The server itself runs inside Decenza on any platform — Android tablet, iOS, Windows, macOS, Linux.
Remote Access makes the MCP server reachable over the public internet, so the Claude and ChatGPT apps — mobile or desktop — can reach your DE1 from anywhere, not just your home WiFi. There is nothing to install and no terminal involved: you turn it on, authorize once, and paste a URL into your AI app.
It is off by default and fully opt-in. Only the tokenized MCP connector is exposed — nothing else on your device — and the link is protected by a secret token you can rotate or revoke at any time.
Configure it in Settings → AI → MCP Server → Remote Access, or from the web settings page (easier on a computer with a keyboard). There are two methods:
-
Tailscale (built-in) — the simplest option, with no server of your own to run. Decenza runs an embedded Tailscale node and publishes a stable, private public link of the form
https://decenza-<device>.<your-tailnet>.ts.net/mcp/<token>. One-time setup:- Turn on Enable remote access and choose Tailscale.
- Open the sign-in link shown and authorize the device on your (free) Tailscale account.
- In the Tailscale admin console, enable Funnel (Access controls → add the Funnel node attribute) and HTTPS certificates (on the DNS page). Funnel is what makes the link reachable from the public internet.
- When the status shows Active — public link is live, copy the connector URL. Right after Decenza starts it can show Funnel is on — waiting for Tailscale for a few minutes; that is normal and clears by itself.
(The built-in Tailscale method ships on Android, iOS, and macOS. On Windows and Linux, use the Custom method below.)
-
Custom — if you already run your own tunnel or reverse proxy (Cloudflare Tunnel, an nginx reverse proxy, ngrok, etc.), enter its public HTTPS base URL and Decenza appends the tokenized path, giving a connector URL of
https://your-domain/mcp/<token>.
Adding it to your AI app. The AI app's cloud backend dials the connector URL, which is why a public link (not your LAN address) is required — and why it works from anywhere once configured.
-
Claude (mobile or desktop): go to Settings → Connectors → Add (top-right) and paste the connector URL. No authentication is needed — the secret token in the URL is the credential.
-
ChatGPT (configured on the web, then usable on mobile): custom MCP connectors require a paid plan (Plus, Pro, Business, Enterprise, or Education) and can only be added from the web app, not the phone app.
- On chatgpt.com, open Settings → Security and login and turn on Developer mode.
- Go to Settings → Plugins (or chatgpt.com/plugins) and click + to create a new developer-mode app.
- Paste the connector URL as the MCP server URL, and set Authentication to No Authentication (the token in the URL is the credential).
- Save — ChatGPT connects and lists the Decenza tools. The connector is then available from the ChatGPT mobile app too.
On Business/Enterprise workspaces an administrator may first need to allow custom connectors under Workspace Settings → Permissions & Roles.
Rotating the token. The Rotate token button issues a fresh token and immediately kills the old connector URL, dropping any live connection. Use it if a URL ever leaks, then paste the new URL into your AI app.
Stuck on the Tailscale sign-in? A Sign out of Tailscale button clears this device's stored identity — see FAQ: Remote Access.
Use this instead of Remote Access, not as well as it. If you'd rather not expose anything to the internet, Claude Desktop can reach the MCP server directly over your local network — but only from a Mac or Windows computer on that network, never from a phone or tablet. It needs Node.js and a terminal.
-
Install Claude Desktop.
-
Open
http://<tablet-ip>:8888/mcp/setupin a browser. Decenza generates this page itself — it detects your OS, shows the exact install command, and reports the live MCP status and tool count. If it doesn't load, the web server is still off. -
Run the command it gives you:
-
macOS / Linux:
curl -fsSL http://<tablet-ip>:8888/mcp/install.sh | bash -
Windows (PowerShell):
powershell -c "irm http://<tablet-ip>:8888/mcp/install.ps1 | iex"
It installs Node.js if you don't have it, then writes the Decenza entry into Claude Desktop's config.
-
macOS / Linux:
-
Quit and reopen Claude Desktop.
-
Ask Claude "What's the current state of my espresso machine?" — live water level, profile and phase means you're connected.
To remove it later, run the matching uninstall.sh command from the same setup page and restart Claude Desktop.
Note: Remote Access exposes only the MCP connector — the same access-level and confirmation gating below still applies to everything the AI does. It does not open the web interface, or anything else, to the internet.
Three tiers of permission control how much the AI can do:
| Level | What the AI can do |
|---|---|
| Monitor Only | Read machine state and live telemetry, browse shot history, read profiles and settings — no control |
| Control | Everything above, plus: wake/sleep the machine, start/stop espresso/steam/hot water/flush, skip frames, tare the scale, run backups, scan and connect BLE devices, control MQTT |
| Full Automation | Everything above, plus: switch profiles, edit profile parameters, create/delete profiles, change settings, delete shots, apply themes |
Decenza uses a hybrid confirmation system because you may be at the machine (physically tending a shot) or at your desk (chatting with the AI):
| Setting | Behavior |
|---|---|
| None | All allowed commands execute immediately |
| Dangerous Only | Machine-start operations (espresso, steam, hot water, flush) show a dialog on the tablet with a 15-second auto-deny timeout. Profile and settings changes ask the AI to confirm with you in chat before re-calling the tool. |
| All Control | Every control and write command requires confirmation through the appropriate channel |
The two channels exist by design: when you're at the machine, the dialog goes where your eyes are; when you're at your desk, the AI confirms in the conversation you're already having.
- Current phase (idle, heating, ready, pouring…), connection status, water level (ml + mm), firmware version, active profile name
- Live pressure, flow, temperature, scale weight, and goal values
- During an active shot, the full time-series so far (not just the latest sample), so the AI can detect channeling or stalling mid-shot
- Steam-system health metrics (recent steam-out events, water-supply observations) for diagnosing steam-pour quality
- List shots with filters: date range, profile, bean, enjoyment rating, paginated
- Full shot record with curves for any shot
- Per-shot debug log (BLE frames, phase transitions, stop-at-weight events, flow calibration entries) for deep diagnostic work
- Compare shots: what changed and what happened, measured against the oldest
- Update any metadata field — enjoyment, notes, dose, yield, bean info, grinder settings, barista, TDS, EY
- Delete shots (Full Automation only)
- List all available profiles
- Read the active profile and its editable parameters (tailored to its editor type — D-Flow, A-Flow, Pressure, Flow, Advanced)
- Switch the active profile
- Edit profile parameters (temperature, flow targets, dose, yield, etc.) — frames are regenerated and uploaded to the machine automatically
- Save edits to disk
- Create a new blank profile in any editor type
- Delete a profile (built-in profiles revert to the original built-in version)
- Recipes — list, read, create, create-from-a-shot, clone, update, and archive whole-drink recipes; activate a recipe (loads the entire drink — profile, bag, equipment, grind, dose/yield/temp, milk, and hot water — exactly like tapping its pill)
- Bean bags — list, select, create, and update bags; extract bean details from a product URL
- Equipment packages — list, select, and update the grinder/basket/puck-prep package
- Steam pitchers and water vessels — list, add, update, delete, and select presets
- Wake or sleep the DE1
- Start espresso, with optional per-shot brew overrides — dose, yield, temperature, grind — that match the BrewDialog you'd see in the UI; overrides apply to that shot only and do not permanently change the profile
- Start steam, hot water, or flush
- Stop the current operation
- Skip to the next profile frame
Note: machine-start commands only fully work on DE1 v1.0 headless machines. Most machines with a Group Head Controller (GHC) require a physical button press to start a shot.
- Get current weight and flow rate
- Tare (zero) the scale
- Start, stop, or reset the scale's built-in timer
- List discovered DE1 machines and scales
- Start a fresh BLE scan
- Connect to a DE1 by BLE address
- Connect or disconnect a scale
- Read the live connection status of the DE1 and scale
The AI can read every setting Decenza exposes and write any setting that is not sensitive (API keys and passwords are excluded) — every Settings tab is covered, from machine and connection options through espresso/steam/water/flush presets, DYE metadata, screensaver, accessibility, AI, history, themes, MQTT, language, and battery. It can also reset stop-at-weight learning and clear flow calibration multipliers.
-
Backup —
backup_nowtriggers an immediate backup of the database, settings, profiles, and media files - Apply theme — switch to a preset theme by name (Full Automation)
- MQTT — connect to or disconnect from the broker, and publish Home Assistant discovery messages
- Debug log — fetch the persisted app debug log for diagnostics (paginated)
The MCP server exposes resources the AI can subscribe to for real-time updates without polling:
| Resource | What changes trigger a notification |
|---|---|
decenza://machine/state |
Phase changes (idle → heating → ready → pouring …), connection events, water-level updates |
decenza://machine/telemetry |
1 Hz throttled live pressure / flow / temperature / weight during a shot |
decenza://shots/recent |
A new shot is saved — used for the dialing-in flow |
decenza://profiles/active |
The active profile changes |
decenza://profiles/list |
A profile is added, edited, or deleted |
decenza://debug/log |
Full persisted debug log + memory snapshot (on demand) |
decenza://debug/memory |
RSS, peak RSS, QObject count, memory samples (on demand) |
This is what makes "Claude noticed I just pulled a shot" possible — the dialing-in flow uses decenza://shots/recent to detect new shots without polling.
Claude Desktop works well as a shot-by-shot dialing advisor:
- Pull a shot — Claude is notified instantly via
decenza://shots/recent - It calls
dialing_get_contextfor the full picture in one call: shot curves, profile steps, your recent shots on the same profile family, bean metadata, grinder context, and espresso reference tables - It suggests changes, and on your approval calls
settings_setto adjust grind, dose, temperature or yield — orprofiles_set_activefor a different profile - Tell it how the shot tasted; it records that via
shots_updateand tracks progress across sessions
There's no per-shot API cost here — Claude Desktop calls the tools directly — and the conversation can run across many shots without context trimming.
The Discuss button on a shot's page opens your preferred AI app. When MCP is connected, that AI immediately has full shot context via the MCP tools and can start advising without you pasting anything.
You can also add a Discuss layout widget to your idle screen via the Layout Editor — tap once and the configured AI app opens with the most recent shot in scope, no shot-review navigation needed.
Configure which app opens in Settings → AI → Discuss Shot: Claude, Claude Desktop, ChatGPT, Gemini, Grok, a custom URL, or None to hide the button entirely. When MCP is not connected, tapping Discuss copies a formatted shot summary to the clipboard for pasting into any AI chat.
The MCP server is disabled by default — you must explicitly enable it. It runs on the same port as the web server (8888). If you secure the web server with HTTPS + TOTP authentication, the MCP server inherits the same protection.
Server-side limits:
- Rate limit — max 60 control + settings calls per minute per session (read tools are unrestricted)
- Sessions — max 8 concurrent MCP sessions; max 4 concurrent SSE (push-notification) streams
- Idle timeout — a session that goes 30 minutes without activity is cleaned up
- Access enforcement — tools outside the configured access level are filtered from the tool list and rejected if called anyway
- State validation — control tools verify the machine is in a valid state before executing (e.g., you cannot start espresso unless the DE1 is in Ready)
Settings → History & Data → Enable Server → toggle on. The IP address and port (default 8888) are shown.
Access from any browser on the same network: http://<tablet-ip>:8888

The web interface shows shots as cards in a grid — profile, dose → yield, ratio, time, bean, and rating. The same keyword search syntax works here as in the app. Click any card to open the shot: the same page as the app's, with the graph, the results against your last shot, and every field editable in place (except the refractometer and milk weighing, which need you at the machine).
The burger menu (☰, top-right) gives access to everything else:
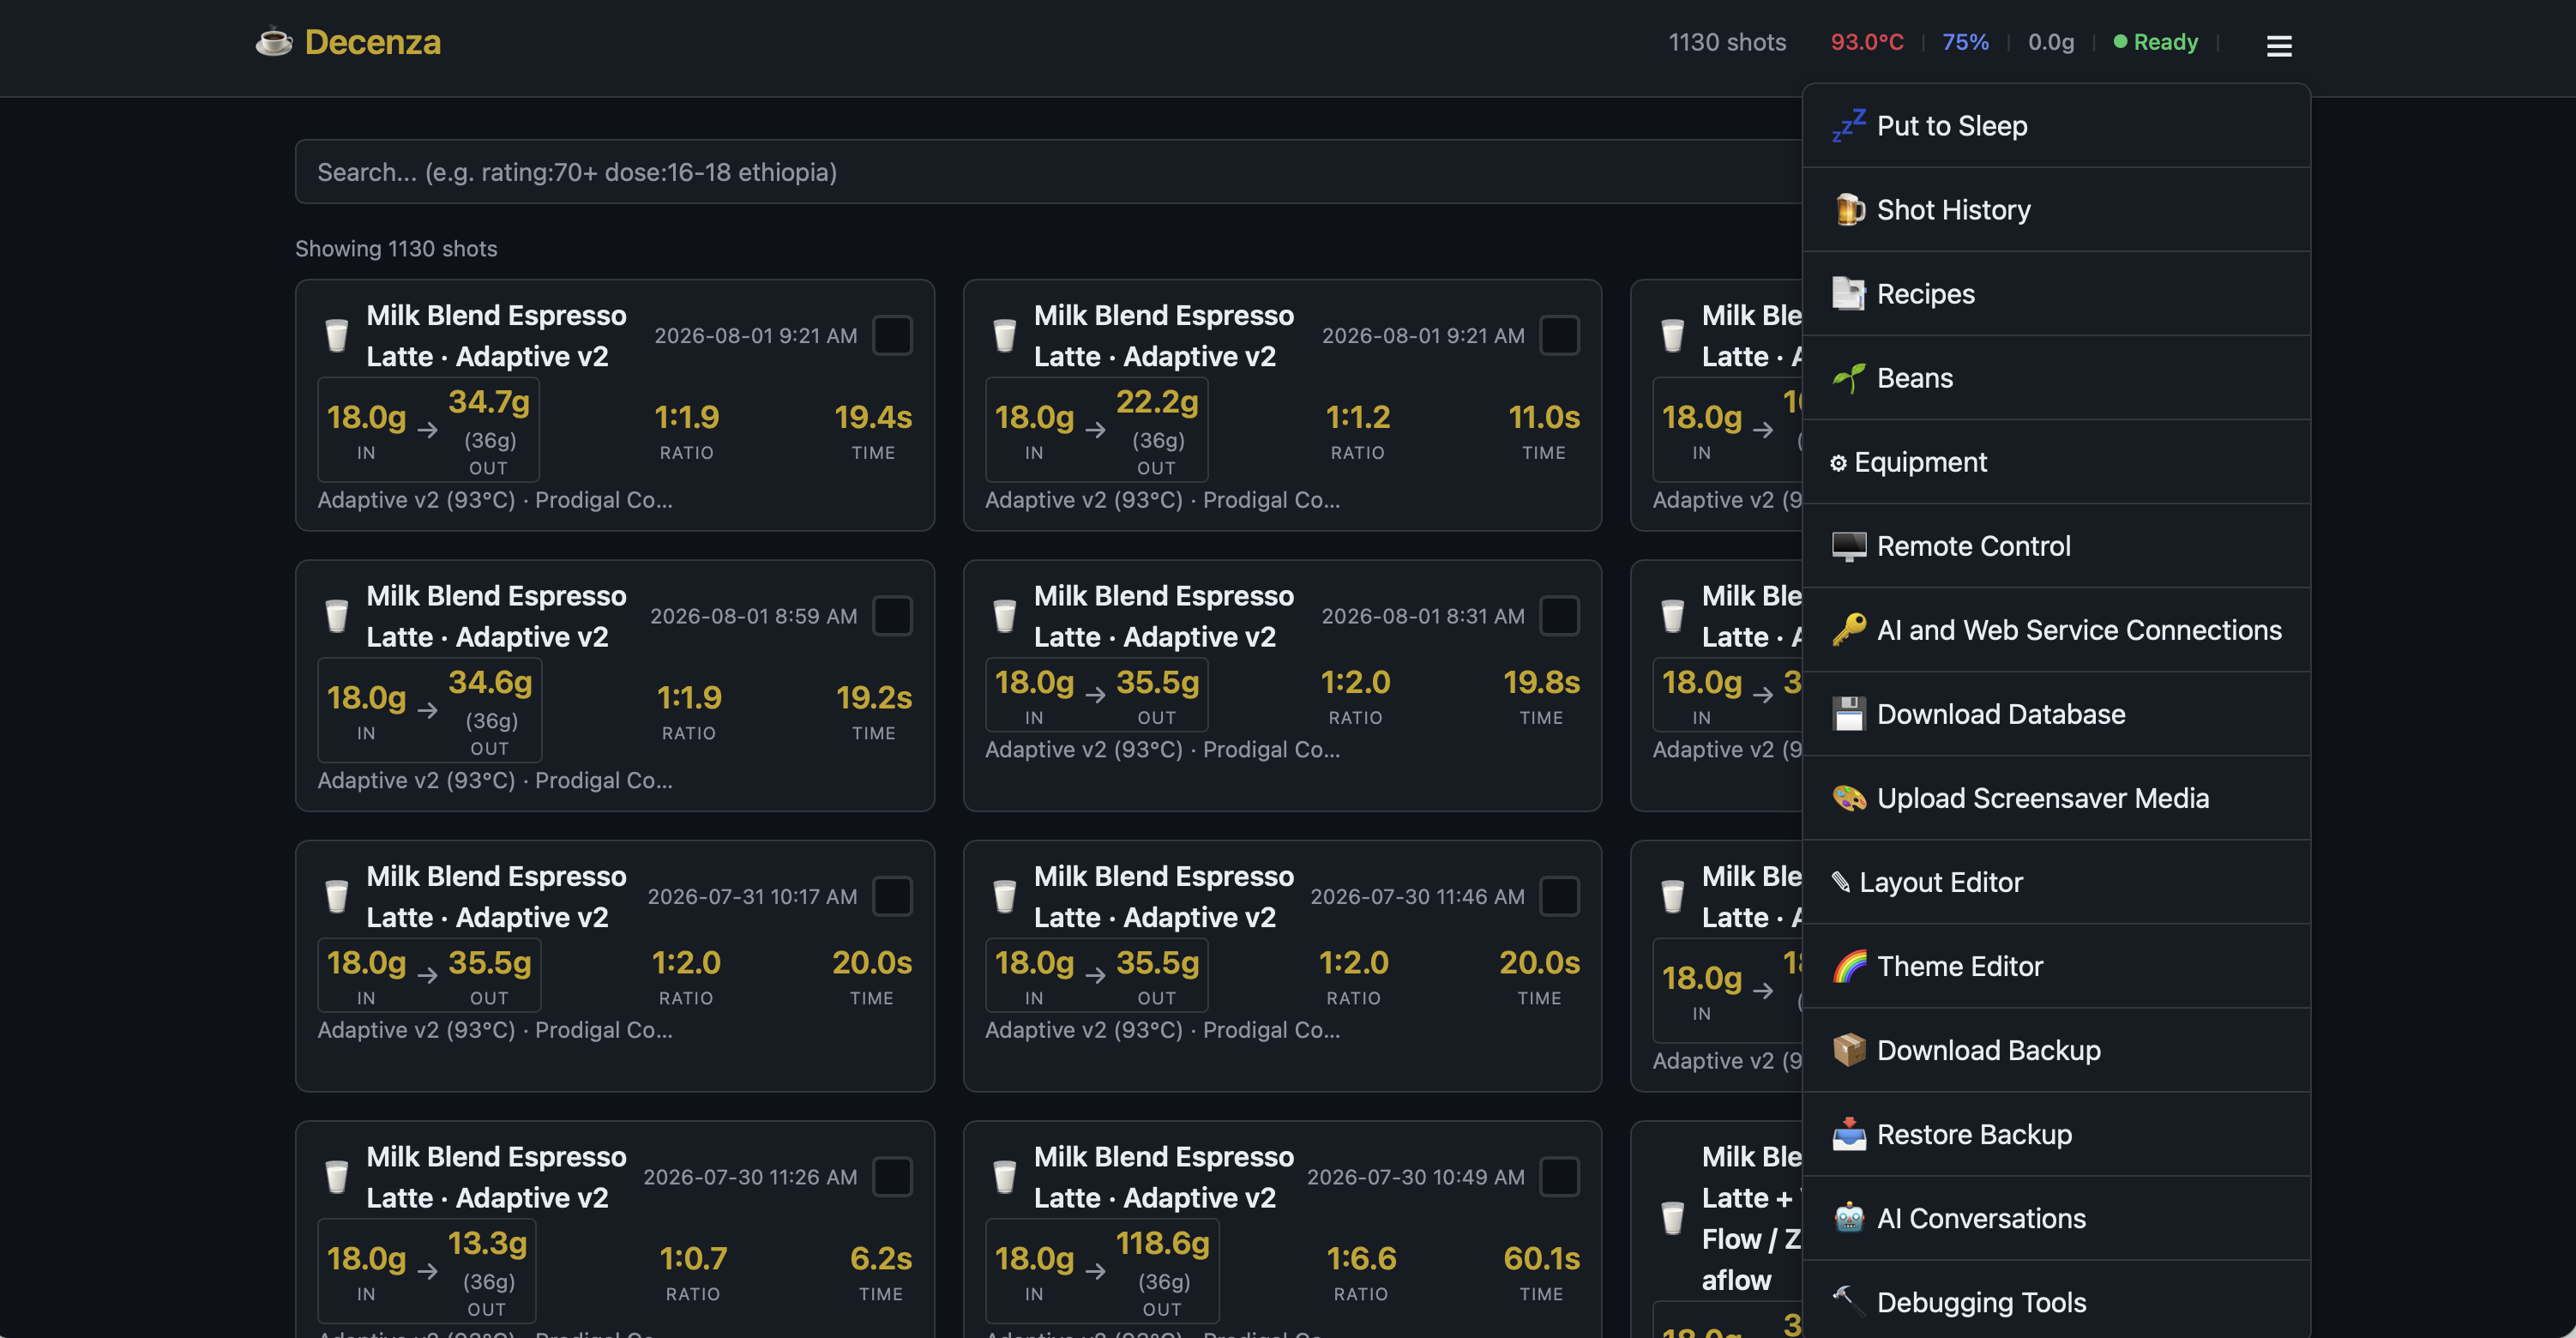
| Menu item | Function |
|---|---|
| Put to Sleep | Sleep the DE1 remotely |
| Shot History | Return to shot list |
| Recipes | Browse and edit drink recipes |
| Beans | Browse and edit bean bags |
| Equipment | Grinders, baskets, and other gear |
| Remote Control | Setup guide for mirroring the tablet screen to your computer — see below |
| AI and Web Service Connections | Configure the AI provider, Visualizer credentials, MQTT, and — from v2.0 — the MCP server and Remote Access (access level, connector URL, token rotation) |
| Download Database | Download raw SQLite shots database |
| Upload Screensaver Media | Add images/videos for the screensaver |
| Layout Editor | Customize the idle screen layout |
| Theme Editor | Adjust colors (full preview, CRT shaders) |
| Download Backup | Full data ZIP backup |
| Restore Backup | Restore from a ZIP |
| AI Conversations | Browse AI chat history |
| Debugging Tools | View/download debug logs |
| Community Widget Library | Browse, download, and share layout widgets |
| Update App | Upload a new APK directly from the browser |
The Remote Control menu item is a setup guide, not a control panel. It walks you through scrcpy — a free, open-source tool that mirrors the tablet's screen into a window on your computer, where you can drive Decenza with your mouse and keyboard. The page fills in your tablet's IP automatically and gives you copy-buttons for each command.
The tablet needs a one-time Android debugging setup first — enable Developer options and USB/Wireless debugging, then authorise your computer. The web page walks you through it; the FAQ has the same steps plus what to redo after a reboot.
Useful scrcpy options: --stay-awake, --turn-screen-off (saves the tablet's battery), --max-size 1024 (smoother over WiFi), --window-title "DE1".
From v1.5.5, secure the web server for internet access:
- Enable HTTPS in server settings
- Set up TOTP (a 2-factor authentication code from an authenticator app like Google Authenticator)
- Access now requires the TOTP code on each login
Decenza can publish machine state to an MQTT broker (e.g., Home Assistant, Node-RED).

Configure in Settings → MQTT:
- Broker address and port
- Username/password (if required)
- Encrypted connection (TLS) — port 8883; paste the CA certificate if your broker's is self-signed
- Publish Interval — how often to send telemetry (default 1 second)
- Retain Messages — broker keeps last value for new subscribers
- Home Assistant Auto-Discovery — automatically creates sensors and switches in HA (Home Assistant 2024.11 or newer); tap "Publish Discovery Now" to trigger immediately
- New device ID — only for a second device restored from the same backup
Home Assistant also gets profile and recipe dropdowns, last-shot sensors, a shot event for automations, and a Stop button.
Published topics:
-
decenza/phase— current machine phase ("idle", "heating", "ready", "espresso", etc.) -
decenza/pressure— pressure (bar) -
decenza/flow— flow rate (mL/s) -
decenza/temperature— brew water temperature (°C) -
decenza/water_level— tank level
Remotely switch profiles: publish a profile name to decenza/profile/set.
Schedule the DE1 to turn on automatically and stay on through your morning.
Settings → Screensaver → Auto-Wake:
- Choose the days and the wake time (e.g., 7:00 AM)
- Set the Stay awake duration — how long to keep the machine on after the wake time (e.g., 8 h; up to 12 h)
How the stay-awake window works: the window runs from the wake time to wake time + Stay-awake duration (wake 7:00 AM, stay awake 8 h → on until 3:00 PM), and may cross midnight. Inside it the machine stays on no matter what — the schedule outranks the normal auto-sleep timeout, and it holds even if the app wasn't running at the wake minute or you turned the machine on yourself, because the window is checked against the clock continuously rather than armed once. Outside the window, the normal idle timeout applies.
If the machine now stays hot longer than you're used to, lower the Stay awake duration.
Decenza Pocket (GitHub releases) is a separate Android/iOS app for remote monitoring and control:
- Wake or sleep the machine from anywhere in the world (after initial WiFi pairing)
- View a live screenshot of the tablet
- Home-screen widget for one-tap power toggle
Setup: Install Pocket on your phone and connect to the same WiFi as the tablet — the devices pair automatically. After pairing, Pocket works over the internet.
New in v1.7.6.
The Home Screen widget shows your DE1's current state and most recent espresso at a glance, without opening the app. Available on iOS and Android. Tap the widget to open Decenza.
-
Machine state —
Sleep,Idle,Heating,Ready,Preheating,Pouring,Steaming,Hot Water,Flushing, and so on. -
Temperature, rendered for the current state:
- Heating →
Heating 84 → 93 °C(current → target) - Ready →
Ready · 93 °C - Steaming →
138 °C steam
- Heating →
-
Last shot (medium/large sizes only) — yield and duration of your most recent saved espresso, e.g.
Last: 36.1g · 28s. -
Connection / freshness:
- When Decenza isn't connected to the DE1, the widget shows
Disconnected — Tap to open. It never displays a temperature as if it were current when the app is disconnected. - When the displayed data is older than about 3 minutes the widget appends
updated N min agoso you can tell at a glance it's not live.
- When Decenza isn't connected to the DE1, the widget shows
Two widget sizes are supported on iOS (Small and Medium); Android widgets are resizable. The Small size shows only the machine state and temperature — long state labels would otherwise be truncated. Medium and larger sizes also show the last-shot summary and the freshness line.
The widget is read-only — it doesn't control the machine. Tap it to open the app for anything else.
- Long-press an empty area of the Home Screen until the icons jiggle.
- Tap the + button at the top-left, then search for Decenza.
- Pick a size (Small or Medium), tap Add Widget, then Done.
Requires iOS 18 or later and Decenza installed from the App Store. After installing or updating Decenza, open the app once so it can publish its first status snapshot — the widget will then start showing real values.
- Long-press an empty spot on the Home Screen and choose Widgets.
- Scroll to Decenza and drag it onto the Home Screen.
- Drag the corner handles to resize. Taller widgets reveal the last-shot and freshness lines.
Requires Android 9 (API 28) or later. The widget reads data the running app writes, so Decenza needs to have run at least once on the current boot for the widget to show live status.
- Android: while Decenza is running and connected to the DE1 (including when the app is in the background, thanks to the BLE foreground service), the widget refreshes promptly on every state change.
- iOS: while Decenza is connected (including backgrounded, thanks to Bluetooth background mode), the widget reads the latest snapshot the app publishes. iOS refreshes widgets on its own schedule; an instant push refresh from the app isn't currently supported on iOS, so during very fast state changes you may briefly see slightly stale data — the freshness line keeps it honest.
The widget shows the most recent saved espresso. Aborted shots and steam sessions don't update the last-shot line.
Widget stuck, blank, or missing from the picker? See FAQ: Home Screen Widget.

This settings tab centralizes all data management: Auto-Favorites, Auto-Upload to Visualizer, device-to-device transfer, backup/restore, and DE1 app import.
Transfer all data (profiles, shots, settings, AI conversations) between two Decenza devices over WiFi — works across platforms (Android → iOS, Android → Windows, etc.).
- Source device: Settings → History & Data → Enable Server
- Target device: Settings → History & Data → Search for Devices
- Select the source device from the list
- Choose what to import: All, or individually (Profiles, Shots, Settings, Media, AI history)
- Tap Import — data transfers over WiFi
Automatic backups: Decenza backs up shots, settings, profiles, and media daily, and the backups survive app reinstalls. On Settings → History & Data you can set the Backup Time, see when the next one runs, and restore by picking a dated entry from Restore from Backup. Backups are written to Documents/Decenza Backups/ and kept for 5 days. Backup Now runs one immediately.
Manual backup: Web interface burger menu → Backup → download a .zip file.
Restore: Web interface burger menu → Restore → upload a .zip → select which data types to restore.
Restoring merges by shot, so shots you already have are not duplicated and AI chat history keeps pointing at the right ones. If a restore says it was refused, nothing was changed — it could not tell which shots you already had, so it stopped rather than duplicate them.
Export Shots to File (Mirror shots to JSON files) writes each shot as Visualizer-format JSON into the history folder alongside your profiles. These files are for your own archive — the app never reads them back.
Profiles: Double-tap Profiles → Import → "Tablet" — scans the de1app profile folder on the same device.
Shot history: Settings → History & Data → Import from DE1 App — converts de1app shot files to Decenza's SQLite database, including all DYE metadata.
If shots are missing from this device's history but exist in your Visualizer.coffee account — after a device swap, a fresh install, or a gap in auto-upload — you can pull them back down by date range.
- Make sure your Visualizer account is connected: Settings → Visualizer (enter your username and password). The recovery section is disabled until credentials are set.
- In the same tab, scroll to Recover Shots from Visualizer.
- Pick a From and To date (the range defaults to the last 30 days). The range is inclusive of both days.
- Tap Retrieve. Decenza lists the shots in that range, downloads each full shot (telemetry + metadata + profile), and imports the ones you don't already have.
A progress line reports how many were imported, skipped (already present), or failed. Shots you still have locally are skipped automatically, so it's safe to re-run the same range — it fills in what's missing and never duplicates, which is also how you pick up anything that failed on a network hiccup. Recovered shots include curves, frame markers, DYE metadata, and taste notes. For very large libraries, choose a more recent range if you're told there are too many shots to search through.
An Obsidian plugin lets you browse and embed shot data in your Obsidian vault. Find it in the GitHub repository under obsidian-plugin/. Connect it to Decenza's REST API over your local network.
Search. Tap the magnifier before the tabs and type a setting's name or what it does — "fahrenheit", "descale". Every switch and field can be found, even with a typo, and tapping a result jumps to it.
- Machine — DE1 connection status, firmware info; BLE scan
- Scales / Refractometer — shows connected device, known devices list, Forget button
- Serial USB — poll for USB-connected DE1 (disable to save battery)
- Scale connection alerts — popup when scale disconnects
- Keep scale connected when DE1 sleeps — recommended off for battery-only scales. With a Half Decent Scale, turn it off and set Power → WakeOnWeight on the scale: it sleeps with the DE1, wakes when you put a cup on it, and Decenza reconnects within seconds. The scale must be calibrated, and over WiFi its WiFi must be on at boot


- Battery Charging — controls the USB port on the front of the DE1, so it only applies to a tablet powered from the machine. USB Charger off keeps the port off; use it if your device isn't charged from the DE1. When it's on, Smart Charging Mode picks Off (always charge), On (55–65%) or Night (90–95%) to extend battery lifespan
- Steam Heater — Keep warm when idle; Let the recipe decide; Auto flush wand after N seconds; Two-tap to stop steaming
- Theme Mode — Follow system theme; choose Dark and Light theme variants; Glass chrome — make cards and bars translucent under any theme; Background — pick one of nineteen built-in colours plus a pattern, or your own image, applied across every page. See Backgrounds below
- Extraction View — Shot Chart or Cup Fill visualization during espresso
- Temperature unit — Show temperatures in Fahrenheit (°F) (default off = Celsius). Display only: temperatures are always stored in Celsius, but this changes how they're shown and entered everywhere — brew and temperature dialogs, the Shot Plan, live shot graphs, and shot history and comparison views all follow it.
- Water Level — Show in ml; Water Refill Threshold (mm)
- Shot Map — Share shots on the global map at decenza.coffee. Coordinates are rounded to ±11 km for privacy. Set a Manual city to place yourself without GPS — it's geocoded once and overrides the device location, so it doubles as a deliberate override if you'd rather not publish where you actually are. Test opens a globe showing the spot you'll appear at
- Shot Review Timer — Return to idle after N minutes of reviewing a shot
- Screen Zoom — Configure zoom per screen
- Pocket Integration — Allow Decenza Pocket app remote viewing/control
- Simulation Mode — Use the app without a connected DE1. Desktop only (Windows, macOS, Linux): the simulator is not included in the Android and iOS releases, so this setting does not appear on a tablet or phone
- Maintenance — Descaling Wizard and Transport Mode. See Maintenance.
The Maintenance card on Settings → Machine is the home for machine-upkeep operations.

Descaling Wizard — walks you through the DE1's built-in descale routine for the boiler, group head, and steam system. Opening it switches the steam heater off, but the boiler still has to cool below 60 °C, which takes up to an hour from hot — so open the wizard right after waking the machine to save the wait. Prepare a 5% citric acid solution (the wizard gives the exact amounts), remove the steam tip, then start. A cycle takes about 12 minutes; when it finishes, rinse thoroughly, since leftover citric acid must be flushed out completely. Repeat until the solution is used up.
Transport Mode drains internal water for storage or shipping. Wake the machine and follow the prompts, pulling the water tank forward when asked so it draws air instead of water. It can start while heating; older GHC firmware is prepared automatically. Leaving or covering the page during cold-start preparation cancels the pending start and restores your selected profile once the machine is idle. It pumps until dry and stops automatically; if stopped early, run it again to finish.

- Flow Calibration — per-profile multiplier written to the DE1 flow sensor. When auto calibration is enabled (default), this updates automatically after every 5 qualifying shots using your Bluetooth scale as ground truth. The current factor and "auto" or "global" source label are shown on the Profile Info page. Tap Clear to reset a profile's calibration; toggle Disable auto calibration to manage the multiplier manually. See Auto Flow Calibration.
- Weight Stop Timing — the learned drip lead time for Stop-at-Weight. Adapts automatically after 4–5 shots; tap Reset to clear and let it re-learn (e.g., after changing your scale or basket).
- Heater Calibration — fine-tune the steam heater's warm-up behaviour for consistent steam temperature from first use. It also holds Nominal heater voltage (120 V / 230 V), which you only touch if the machine reports the wrong one or none at all.
- Sensor Calibration — Pressure and Temperature, each a guided run needing an external gauge or thermometer. Opening it loads the test profile; start the shot as usual, then type what your instrument read and re-run until it agrees with the machine. The correction is stored in the machine, so it survives a reinstall and stays with the machine if you change tablets.
- Enable virtual scale — use DE1 flow data as a simulated scale when no Bluetooth scale is connected. Flow-derived weight is less accurate than a real scale but enables SAW and yield tracking without hardware.
- Prefer Weight over Volume — when a Bluetooth scale is paired, ignore SAV and rely on SAW alone. Useful when scale accuracy is higher than the DE1 flow sensor for your profile type.
- Steam Health — longitudinal tracking of steam pressure and temperature. Shows warning bars when readings drift from your clean-machine baseline, indicating scale buildup in the steam circuit. Tap Reset after descaling to establish a new baseline. See Steam Health.
Each has its own chapter — this is the map:
| Tab | Covers | Chapter |
|---|---|---|
| History & Data | Enable Server, device-to-device transfer, backup/restore, DE1 app import, Auto-Favorites | §17 Data Management |
| AI | Provider, API key, model, MCP server, Remote Access, "Ask how it tasted" | §12 · §13 |
| Themes | Colour roles, palette generator | §19 |
| Layout | Idle-screen zones and widgets | §10 |
| Screensaver | Screensaver type, dimming, Auto-Wake | §11 · §15 |
| Shot Upload | Visualizer and Decent accounts, auto-upload, shot recovery | §9 · §9 · §17 |
| MQTT | Broker, discovery, published topics | §15 |
| Lang & Access | Language, string editing, accessibility | §19 · §20 |
The About tab (Settings → About) shows the current app version, build number, and platform. It also surfaces DE1 firmware status and the software update panel.

- Current Version — app version, build number, and platform (Android/iOS/Windows/etc.)
- DE1 Firmware — shows the current firmware version with an "Up to date" or "Update available" indicator. Tap Manage to open the Firmware tab, where you can check for updates, install them over Bluetooth, or downgrade. Decenza updates the DE1 directly — you do not need the original Decent tablet or any other app. See DE1 Firmware Updates.
- Software Updates — Check Now, Download & Install, or What's New; update notes displayed inline
- Auto-check for updates — polls for new releases hourly
- Include beta versions — opt into pre-release builds
- Support This Project — link to support the developer
Decenza includes a complete DE1 firmware updater. No Decent tablet, no de1app, no other software needed — you can keep your machine's firmware current from any phone, tablet, or computer where Decenza is installed.
Updates transfer over Bluetooth in three phases: erase the inactive flash bank, upload the new firmware in chunks, then verify. The DE1 uses dual-bank flash — the currently-running firmware is never touched until verification succeeds, so a failed or interrupted update cannot brick the machine. A power-cycle after verify switches the active bank to the new firmware.
Two firmware channels are available:
| Channel | Description | Who should use it |
|---|---|---|
| Stable (default) | Bundled firmware v1352 | Everyone |
| Early access (opt-in) | Bundled firmware v1358 | Testers and early adopters |
Update time on Android is typically 15–20 minutes — Android's BLE stack serialises write acknowledgements at ~30 ms each, and a firmware image is ~29,000 chunks. On macOS and desktop platforms the same update takes 2–3 minutes. The upload runs in the background; you can use other parts of the app while it proceeds.
The firmware ships inside Decenza, so "Update now" installs it without downloading. The first upgrade from the old nightly setting resets to Stable once; later upgrades keep your selection. Enable Use early access firmware in the firmware manager to opt in.
Downgrading is supported (matching de1app behaviour) — the Firmware tab labels the action "Downgrade now" and shows both the installed and available version.
To manage firmware: Settings → About → DE1 Firmware → Manage.
- System language or manual override, applied immediately without restarting
- Browse and customize individual translation strings
- Text-to-Speech enable/disable
- Tick sounds during extraction
- Phase announcement settings
Go to Settings → Themes. The left panel lists all color roles; tap one to edit it on the right.

- Color list — Background, Surface, Primary, Primary Contrast, Secondary, Text, and more
- Edit panel — enter a hex code or use RGB/HLS sliders; Copy/Paste for sharing exact values
- Default Dark / Default Light — reset to built-in defaults
- + Save — save the current color as a named preset
- Random Theme — generate a harmonious color palette instantly
For font sizes, CRT shaders, live preview, and additional theme options, use the web interface: enable the web server and visit /theme.
Settings → Machine → Theme Mode → Glass chrome softens the bars, tiles and controls. With a background image or the last-shot chart set, cards and dialogs also turn translucent so the picture shows through — and in that case it is always on, since solid panels sitting on a picture look like slabs. It is an option rather than a theme, so it works with any theme and stays on when you switch themes or between light and dark.
Settings → Machine → Theme Mode → Background opens a chooser with four sections — Pattern, Last shot, Colours and Images — plus a live preview of the idle screen in the corner that updates as you highlight tiles.

Colours — nineteen built-in backgrounds named after coffee and the things around it, running from French Roast at the dark end to Porcelain at the light. For anyone who wants something other than the stock dark blue but finds a full-screen photo too busy to work in front of.
Patterns — Grain, Dot Grid, Pinstripe, Twill, Weave and Linen. Any pattern sits on any colour, and each tile previews itself on the colour you have selected.
Every colour works under any theme, light or dark: text, icons and card colours are derived from the background you pick, so a pale background stays readable under a dark theme and vice versa. One consequence — while a background colour is selected it decides the text colour, so a custom text colour from the theme editor isn't used. Accent, warning, error and success colours keep their hue but are deepened as needed to stay legible on a pale background.
Images are your own uploads plus any stock screensaver images already downloaded to this device (they appear gradually as that download progresses, and never if screensaver image caching is off).
Last shot turns the chart of your most recent espresso into the wallpaper, updating the moment a shot finishes. Last Shot draws the basic curves; Last Shot (Advanced) adds resistance, conductance and mix temperature. Which curves appear follows the Shot Review legend toggles. Patterns don't apply over the chart, and pages that draw their own graph show a plain background instead, so you never see two charts at once.
An image, a colour preset and the last-shot chart are one choice — picking any clears the others, and None returns to your theme's own background colour. Highlighting a tile previews it live; nothing is saved until you tap Apply. Choosing a theme, or editing its background colour, clears the preset.

Languages: Decenza is translated into approximately 66 languages and automatically uses your device's system language. To add, update, or switch a language: Settings → Lang & Access → Languages. Tap "Browse & Customize Strings" to edit individual translation strings.
Switching language takes effect immediately, across the whole app — there is no need to restart. If you edit an individual string, that change appears as soon as you save it.
Incomplete translations: community translations are works in progress, so a language may not cover every phrase in the app — anything not yet translated falls back to English. When you switch to a language with gaps, Decenza tells you how complete it is and offers to translate the remainder using your own configured AI provider. Choose Translate to fill the gaps (progress is shown, and you can stop at any time), or Not Now to carry on with English fallbacks. If you have not set up an AI provider, the message points you to Settings → AI; you are only asked once per language per session.
Translations produced this way are stored on your device. To share them with other users, use Browse & Translate Strings… → Submit.
Accessibility: Enable screen reader support, voice announcements, and frame tick sounds from the right panel. See Section 20 for full details.
Decenza provides full screen reader support. Blind users can operate the machine completely independently.
Interaction model:
- First tap — announces the element's label, value, and state
- Second tap — activates the element
This means navigating the app feels natural with TalkBack/VoiceOver's standard swipe-to-next/previous gestures.
During extraction: Value inputs announce the parameter name and units when changed (e.g., "Brew temperature: 93°C"). Each profile frame transition is signaled with a configurable tick sound.
Configuring accessibility:
- Settings → Accessibility — enable/disable TalkBack integration, audio feedback, tick sounds, and specific announcements
Each page has an individual zoom setting in the Layout Editor, letting you scale text independently per zone.
The size of each kind of text in the app — headings, titles, body text, labels, captions, the large
readout values, and the shot timer — can be set individually. These controls live in the web
interface only: enable the web server (Settings → Web Server), then visit /theme from a
browser on the same network and use the Font Sizes panel.
| Text role | Default | Where you see it |
|---|---|---|
| Heading | 32 px | Page titles |
| Title | 24 px | Section and dialog titles |
| Subtitle | 18 px | Sub-headings |
| Body | 18 px | Ordinary text |
| Label | 14 px | Field labels, table cells |
| Caption | 12 px | Small print, hints |
| Value | 48 px | Large readouts (pressure, flow, weight) |
| Timer | 72 px | The shot timer |
Changes apply immediately on the tablet, so you can watch the effect as you drag a slider. Reset next to the Font Sizes heading restores all eight and leaves your theme colours alone; the Reset to Default button at the bottom of the page clears colours and font sizes together.
If text looks cramped, clipped, or overlapping, oversized fonts are the first thing to check — resetting them is the quickest way to rule it out.
The FAQ is the troubleshooting page — it covers connection failures, missing graphs, shots
stopping early, screensavers, the widget, remote access, and update problems, each with the full
checklist. Install-time problems (Gatekeeper, SmartScreen, Linux setcap, BlueZ) are in
Installation#troubleshooting.
Two things to try before anything else:
- Fully close the de1app — not just minimize. It holds the Bluetooth connection, and this is the single most common cause of every connection symptom.
- On Android, disable battery optimization for Decenza. This is the second.
- Settings → History & Data → Enable Server
- Open
http://<tablet-ip>:8888in a browser - Burger menu → Debug → Download Log (system log)
- For shot-specific issues: open a shot in the web interface → debug log link at the bottom of the shot page
Logs label each subsystem and suppress routine repeats so faults and meaningful changes are easier to find. For missing coffee-bag information, BeanBase records whether the lookup returned usable details, an empty result, or an error. Include the complete time window when reporting a problem; older entries and framework warnings may fall outside a subsystem filter.
If you've found a bug, open an issue at https://github.com/Kulitorum/Decenza/issues. Include:
- Decenza version number
- Device model and Android/iOS version
- Steps to reproduce
- System debug log
- Shot debug log (if shot-related)
- Screenshot or screen recording if helpful
If you're not sure whether something is a bug or just unexpected behaviour, the Decent Diaspora community on Basecamp is the best place to ask — other users and the developer are active there and can help you figure out if it needs a GitHub issue.
For desktop (Windows, macOS, Linux) or users with Bluetooth/USB keyboards attached to a tablet:
| Key | Action |
|---|---|
| E | Start Espresso |
| S | Start Steam |
| W | Start Hot Water |
| F | Start Flush |
| Space | Stop current operation / Go to Idle |
| P | Sleep machine |
| Term | Definition |
|---|---|
| BLE | Bluetooth Low Energy — wireless protocol used by the DE1 and scales |
| D-Flow | Profile type: flow-driven extraction with pressure limit |
| A-Flow | Profile type: hybrid pressure-then-flow extraction |
| SAW | Stop-At-Weight — stops the shot when scale reaches target yield |
| SAV | Stop-At-Volume — stops the shot when DE1 flow sensor reaches target volume |
| GHC | Group Head Controller — the physical buttons on the DE1 machine |
| Headless | A DE1 without a GHC; the app or web server provides all control |
| DYE | Describe Your Espresso — metadata standard (bean, grinder, tasting notes) |
| MQTT | Message Queuing Telemetry Transport — IoT/home-automation protocol |
| MCP | Model Context Protocol — standard for AI agents to interact with tools |
| Visualizer.coffee | Community website for sharing and analyzing espresso shot data |
| Frame | One extraction step; a profile can have multiple frames run sequentially |
| Recipe Profile | A profile created in a visual editor (D-Flow, A-Flow, Pressure, Flow) |
| Auto-Favorites | Dynamic pill row populated from recent bean+profile combinations in history |
Decenza supports 13+ Bluetooth scales, including:
- Decent Scale
- Skale (v1 and v2)
- Acaia Lunar / Pearl / Pyxis
- Felicita Arc and others
- Eureka Precisa
- Bookoo
- Atom Heart Éclair
- Difluid Microbalance and Microbalance Ti
- Hiroia
- Solo Barista
- Timemore
- Varia Aku
- Hario V60
- Weightman
If your scale is not listed, check the GitHub issues page — community members have contributed support for additional models.
For users who need to access Decenza's files directly:
| Data | Path |
|---|---|
| Profiles |
{AppData}/profiles/ (.json files) |
| Shot database |
{AppData}/shots.db (SQLite) |
| Settings | {AppData}/settings.json |
| Debug logs | {AppData}/debug.log |
| Media | {AppData}/media/ |
Platform-specific AppData paths:
-
Android:
/data/data/io.github.kulitorum.decenza_de1/(requires root to access directly; use app's Backup feature instead) - iOS: In the app's sandboxed container (use app's Backup feature)
-
macOS:
~/Library/Application Support/io.github.kulitorum.decenza_de1/ -
Windows:
%APPDATA%\DecentEspresso\Decenza\ -
Linux:
~/.local/share/DecentEspresso/Decenza/
On Android and iOS, direct file access is restricted by OS sandboxing. Use Decenza's built-in Backup/Restore and Import/Export features instead of accessing files directly.
For the latest changes, community discussion, and bug reports, visit the GitHub repository.