Sound & Music - Kermalis/PokemonGameEngine GitHub Wiki
Overview
Sound in this engine is manually mixed together without any libraries. It works in the most basic way by mixing the samples together and performing volume calculations. This all happens in SoundChannel.cs.
Supported files & formats
Only .wav files are supported, and not compressed ones either. But 8-bit, 16-bit, and 32float are supported, mono and stereo. 24-bit is not, and 32-bit PCM is not, and more than 2 channels are not. 8-bit is currently only used for the Pokémon cries (they are mono), and 16-bit is supported with the idea being you can use it for sfx or music.
Recommendations
Bit Depth: It's recommended that for music you choose to use 32float stereo. The reason 32float is recommended over 16-bit PCM is not because you can tell the difference when listening, but because there will be less rounding errors when dealing with volume at the mixing level. It's not going to be a big deal but it's way easier. If you want to save space on a drive, or reduce the amount of data being read from the drive during runtime (since the audio is loaded as it's needed by a stream), then choose 16-bit PCM instead, since the quality difference will be negligible.
Volume: What I do for the music is use a free DAW plugin called "Youlean Loudness Meter 2".
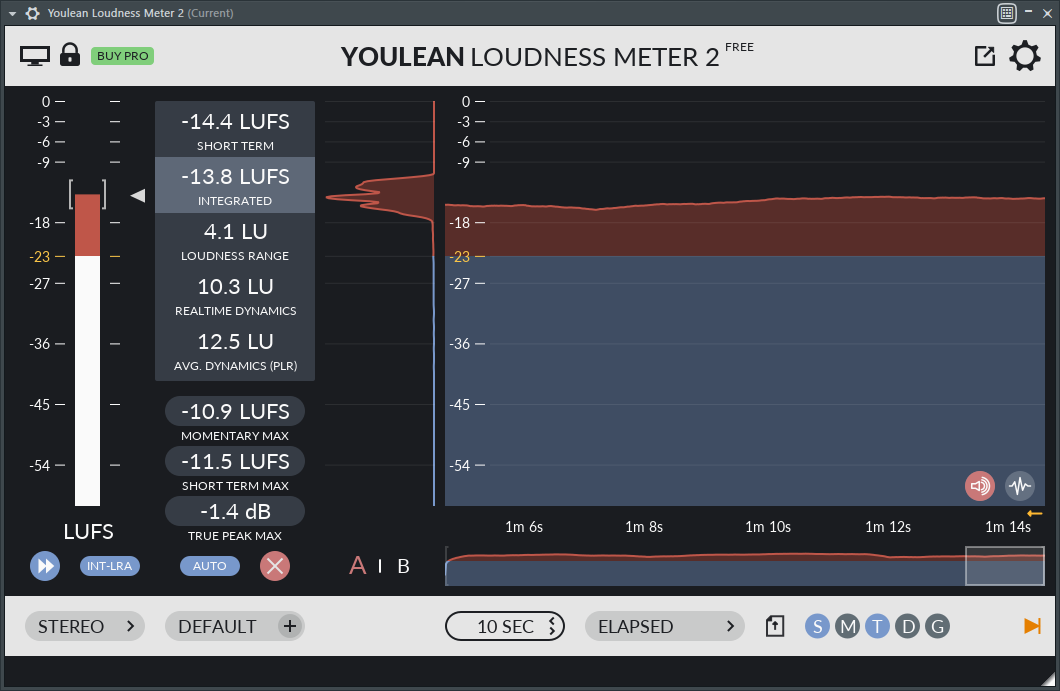
This shows you how loud your music is in terms of LUFS, or Loudness Units relative to Full Scale. So this will create a LUFS metric that compares all parts of your song's loudness together. It's only accurate if you feed it the whole track though. LUFS is the metric that all streaming services, such as YouTube, Spotify, Soundcloud, etc., use to evaluate your music, so everything on their platform can be around the same loudness. They are looking to convert your uploaded music to a value of -14 LUFS, which is the "INTEGRATED" value this plugin gives you. It's fine if the "SHORT TERM" value is higher, especially in the loudest part of the music, and -12 LUFS is an acceptable value for short term, and is the value your loudest part of the track can reach.
I target -14LUFS and -1.5DB peak volume. The reason I don't aim for a 0DB peak volume is there will be other sounds playing with your music in-game. Cries and sfx will be on top of your music, and if your music had a peak of 0DB, you would be above 0DB once you add in those other sounds. So these two target metrics are very good not only for streaming services, but also for the game, and lots of PC/mobile games aim for the same metrics. Not to mention, those streaming services will convert your music, so having a -1.5DB peak gives them enough headroom for their conversions, so it's best that if you are making music, you get used to these targets anyway. However, if you are making quieter music, such as a museum theme similar to Ruby/Sapphire/Emerald's, you may want to go lower than that to give it a more peaceful volume in-game. But for regular music, these are the levels I aim for. In the end, it's a creative process so there are no rules, and it's up to you and the feeling you want to create for your game.
Fun fact: A louder piece of music uploaded to one of these services will sound worse than if it was uploaded quieter due to them looking at LUFS and converting based on that.
How to prepare looping sounds
Music isn't the only thing you can loop, but the way you create a looping .wav is going to depend on the tools available to you.
How the loop is determined
The loop is determined in WaveFileData.cs where the .wav is loaded.
The smpl chunk of the .wav, if present, is where the loop is checked.
Only very basic smpl chunks are loaded by the game, since a lot of its features are not necessary for us.
You can look in the code to see which offsets the loop is loaded from, but you won't need to do this if you follow my example below.
The code checks if there are either 0 or 1 loop point(s) available.
If there are more than 1, it throws an exception instead.
So if there is 1 loop point defined, then that will be the loop to use and it will load the loop start and end from the next data.
A majority of the data (like play count) is not loaded because it's not needed.
It's as simple and as complicated as that.
Example of exporting a loop using FL Studio
I use FL Studio to create the default music and also to export them with loops, so this example will use FL Studio and nothing else.
When I am making the music and I know where the loop will be, I place a playlist marker where the loop goes and another at the end.
It doesn't matter what type of playlist marker you use though.
You add markers by pressing Alt+T and dragging them to the correct spot.
You can change the type of a playlist marker by right clicking it.
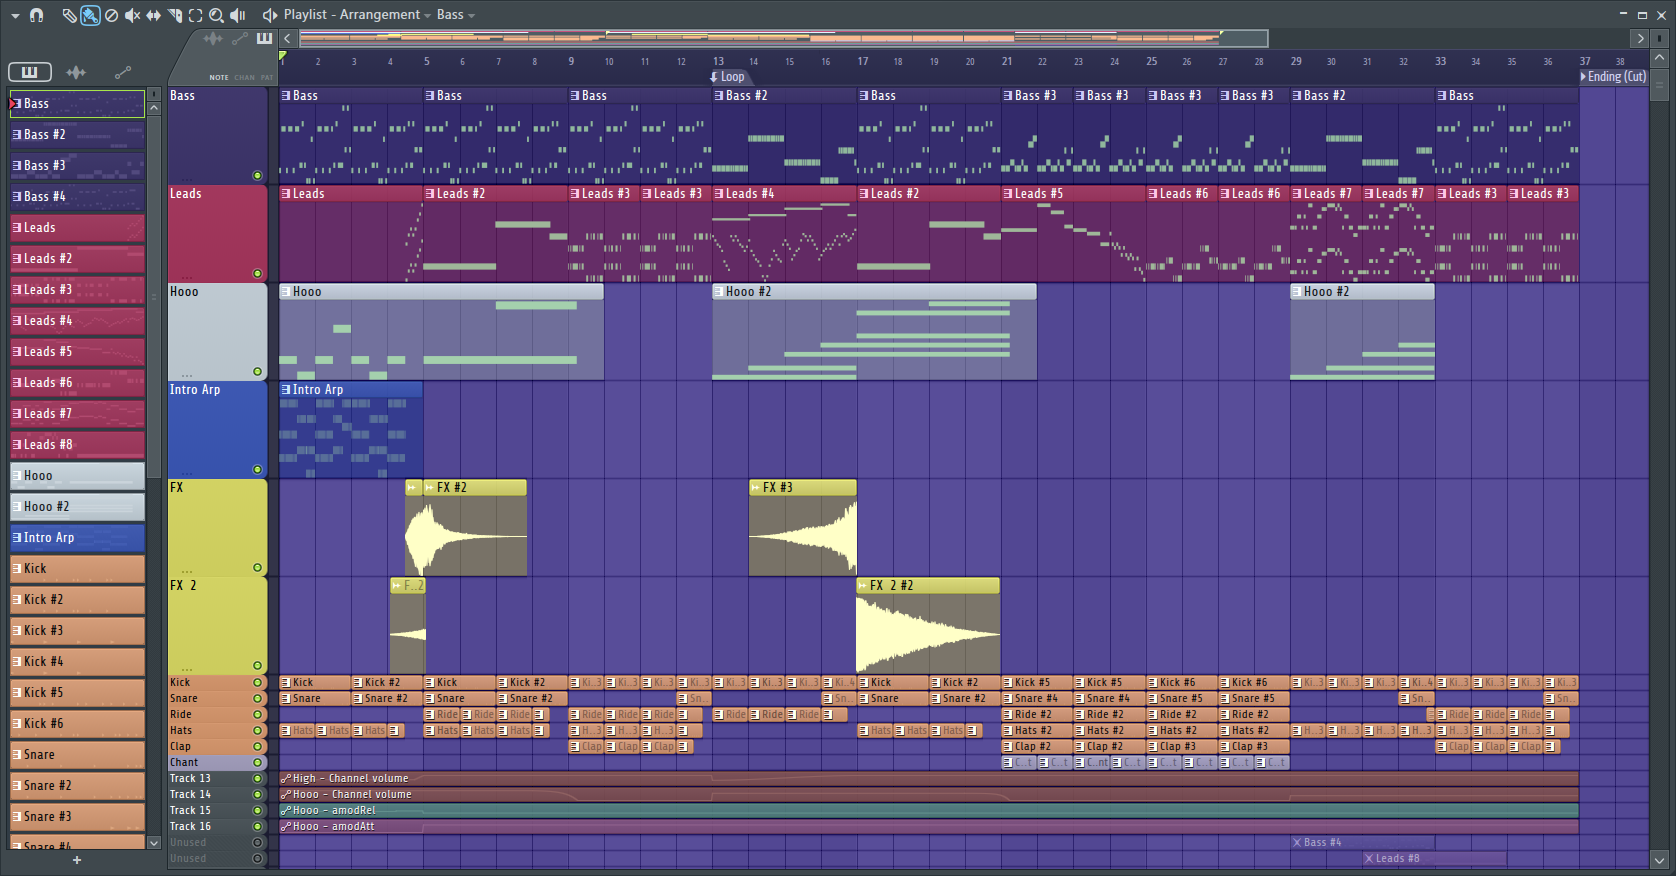
It is at this step where you need to know whether your end point will "cut" right there, meaning everything after it will not be included in the .wav, or if you want the trailing effects to wrap over the loop start. One case where you'd want the trailing effects to wrap over the loop start would be if the loop start was exactly at the beginning of the music. Knowing which kind of end loop you want will be important for when you export the music. I make sure to name the end marker with "cut" or "wrap" in the name so I remember even if I don't work on the music for a long time. Once you're ready to export, export the music as a wave file. Now, depending on which type of end loop you want to make, you need to go to the top right where it says "Tail" and either choose "Cut remainder" (if you want to cut) or "Leave remainder" (if you want to wrap the remaining effects over the loop start).
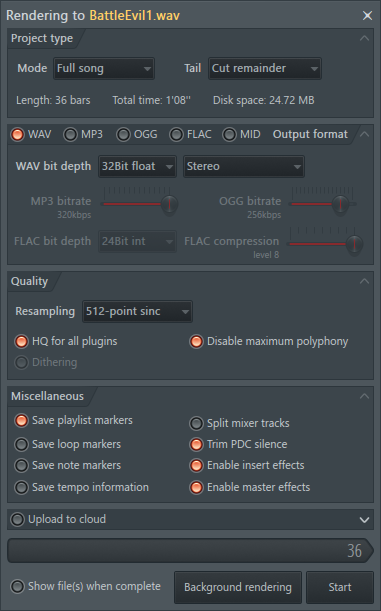
Make sure to check "Save playlist markers".
This will place the loop start and end into the .wav's smpl chunk like we want, but this is not the last step.
This will also place ALL playlist markers, such as time signature changes or the "start" marker if you use those, so we will want to get rid of them.
Even if you don't have other playlist markers, like in my example, you still need to do the next step.
You can use a tool to do this, and I have thought about adding one to the project, but I instead use FL Studio's "Edison" plugin to do this, which is the next step.
Load Edison onto the Master insert as you would with any other effect. Click the floppy disk icon (File) and then "Load sample". Load the .wav you just exported.
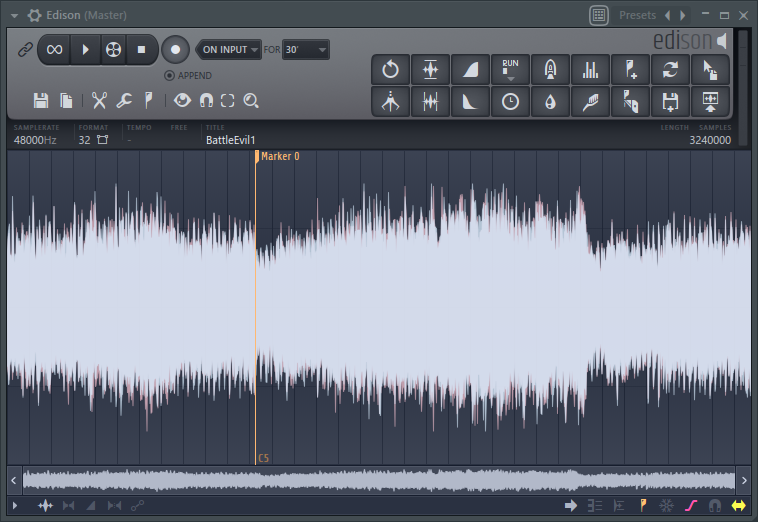
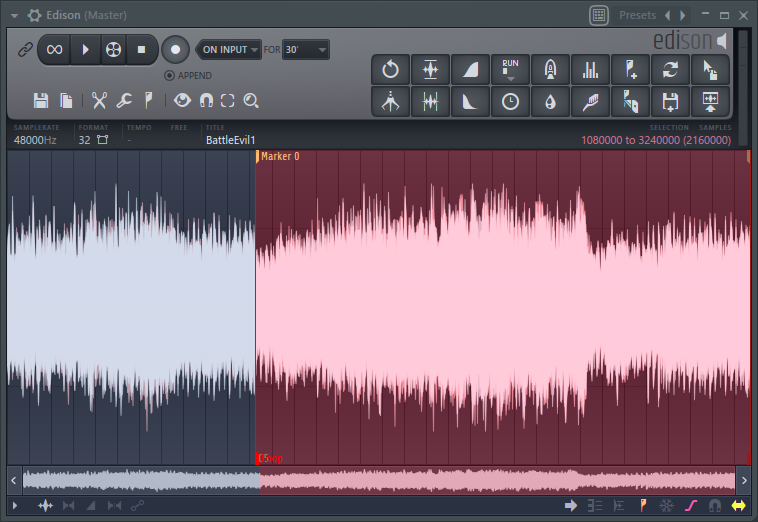
Now you can see the playlist markers. The end marker will be hidden if you chose to "cut" it when exporting, which is fine. It's still present in the file, which is why we want to perform this step even if we only have those two markers. Anyway, what you want to do is delete any other markers you see, such as the time signature ones, etc. You just right click them and choose "Delete".
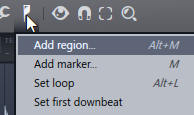
Once you're left with only the loop markers, right click the loop start marker and select "Turn into region".
Now the end marker will be present even if you chose to cut.
Right click the loop start and choose "Select", and now everything is highlighted.
This also goes for wrapped end loop points, where the remainder after it will not be highlighted.
Next, click on the "regions" button next to the wrench, and choose "Set loop", or Alt+L.
This will convert the two markers into a loop which will make Edison recognize how to export the smpl chunk regardless of which type of loop you are making.
The last step is to delete the OLD loop start and end markers that are yellow.
You do this by right clicking them and choosing "Delete".
If you have the "cut" loop type, the end marker will be removed when you delete the start one.
Now you are left with only the red loop markers, which is exactly what we want.
Now it's time to save it, which you do by pressing Ctrl+S or going back to the floppy disk icon and pressing "Save sample".
Save it as the final .wav file, and you're done.
The last thing to do is test it in-game to see if you made any errors, either in this process or otherwise.