2. Animations - KaruzoHikari/Revo-Launcher GitHub Wiki
Revo Launcher's key mechanic is the ability to create channel animations, for both the icon (animation in main menu) and banner (animation when you open a channel).
They can seem very confusing to use at first. However, you can read all about them here in order to create your own animations!
You can access the animation editor through the Revo button. In there, you can choose to edit existing Icon or Banner channel animations, or even create new ones!
Feel free to check the pre-created ones in order to learn more about them.
When editing an animation, you can preview it by clicking "Preview" and then hitting the "Play" button.
Hint! You can also preview any of the animations in the animation list by holding their title.
The icon animations are smaller than the banner animations, so it's okay if you use lower-quality images.
When editing an Icon animation, you'll find that they have a "Loop duration" box. This is because all Icon animations loop, so make sure your animation returns to a proper initial state by the end of the loop!
Their resolution is 930x700px.
Banner animations usually take the whole phone screen, and play a sound when they're launched.
Their resolution is 1080x1650px.
Every channel animation is formed from various images that perform different animations.
If you click "Edit images", you'll find the list of images in the animation.
Tip! If you hold the "Edit" button of any image, you can clone it! (animations and everything)
Scroll down, and you'll find both "Add Image", "Add App Icon" and "Add Video".
They behave the same, but the App Icon will use as image whatever app's icon is linked to your channel (so you can create generic animations that will look different with each linked app, like the default ones!).
As for the videos, you can use .mp4 videos in your animations. However, keep in mind they need a few frames to buffer, so it looks best in icons rather than banners (feel free to try it anyway!)
Here, you will find various fields:
- Image
- The image used for this Animated Image. Format is expected to be
.png,.jpgor.gif(so you can use animated images!)
- The image used for this Animated Image. Format is expected to be
- Initial position, scale and rotation
- It defines those initial values when the image appears in the animation (aka, when the start time is reached)
- Note: The app's camera is ortographic, which means the XY rotations won't change the look very much (it'll look like the image is squished, rather than rotated). The Z rotation will work as expected, though.
- Layer
- The layer defines in which order all the animated images are gonna be drawn. Lower layers will push items to the background, while higher layers are gonna be pushed towards the foreground
- Keep in mind this doesn't change the scale or position of the images, only the order they're drawn in
- Negative layer values are allowed
- Initial color
- The color the image will be tinted with. It works like a filter, so white == image is unchanged.
- Start and End time
- These 2 important values specify when in the timeline the image is gonna appear.
- Start time: 0 means it appears right when the animation starts, higher values makes the image appear later
- End time: -1 means the image never disappears once it has spawned. Otherwise, specify a value (higher than the start time) for it to disappear
- These 2 important values specify when in the timeline the image is gonna appear.
And finally, you have the "Edit Anim." button, that allows you to add various animations to the images.
The image animations can be created from the "Edit Anim." button.
Clicking on the animation name will show a popup explaining what each animation does.
All animations have their own parameters, but the common ones are the following:
- Start time
- It shows when in the timeline this specific animation should start (so, if it's a movement animation, it specifies when the image should start moving)
- End time
- It shows when in the timeline this specific animation should end (if it's a movement animation, it says when the image should end its movement)
- Should loop?
- It's a boolean that lets you choose whether this animation should loop or not.
- This means that, once the animation finishes, it starts with the same parameters again, endlessly.
- Keep in mind that this will NOT reset the image to their previous state (so, if you want to create a back-and-forward movement, you'll need to do 2 different animations for them)
- Loop delay
- If the checkbox above is marked, it says how much this animation should wait before starting again (so, once the animation ends, it waits a bit until the animation starts again)
- This is usually used to chain animations: If an animation should loop a movement forward from 1s-3s, and move backwards from 3s-5s, then you'll want to add a delay of 2s to each
- Ease
- This option does NOT appear in every animation. It basically lets you tweak how fast the values will change throughout the animation.
- You can easily see all the eases in this page: https://easings.net/
Finally, each animation will contain its own parameters (the movement animation will ask you where the animation should move, the rotation animation where it should rotate, the shadow animation asks where the shadow should be projected...).
If you do not know what some of them mean, try playing around with them! You can always preview what you're doing with the "Preview" -> "Play" buttons.
A more unique animation is the Path animation. It allows you to set a number of waypoints that an image should move along, for easier or curved movement.
The Linear and CatmullRom Path Types will be enough for you 90% of the times!
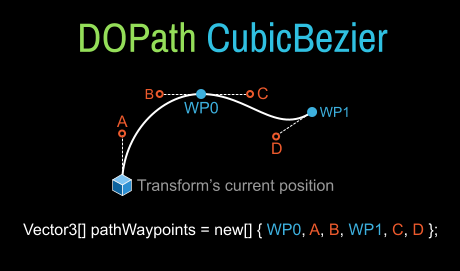
However, there's a special PathType called "Cubic Bézier". This is an advanced way of creating curves, and a standard among internet animations. You can find a lot of info about it online.
If you're gonna use a Cubic Bézier path, keep in mind it's expecting you to add waypoints in "groups of 3", as shown here:
Both channels and animations are saved in...:
- Android:
Internal Storage\Android\data\com.karuzohikari.wiiphone\files\<Channels or Animations> - Windows:
C:\Users\<Your User>\AppData\LocalLow\KaruzoHikari\Revo Launcher\<Channels or Animations>
You can backup your files this way, and even send animations and Main Menu layouts to your friends! (they'll get loaded when the app starts, if you place them in their folders)
Some extra actions can be triggered in the editor!
- Cloning an image: Hold the "Edit" button