App Development The ShopInOne Build - Jonaath/EmergingTechnologiesMendix GitHub Wiki
This section walks through the development of ShopInOne, feature by feature, with screenshots, and without splitting it into abstract layers. Everything is documented below, in one place, as it was built.
Overview & Use Case: Marketplace App with AI connector
We have developed an application that allows users to buy and sell products across various categories. We incorporated a DALL-E 2 connector to generate customized profile pictures.
Application Objective
The application offers users the ability to:
- Buy and Sell: Browse and post listings for various products.
Key Features (User/Buyer Perspective)
Homepage
- Product Overview: Access featured products and main categories.
Product Search & Filtering
- Name Search: Quickly find a specific product.
- Advanced Filters: Filter by category, price, and name.
Product Listings
- Grid or List Presentation: Visualize products with essential details such as price, quantity, and optionally the seller's rating.
- Quick Access to Information: Easily explore available products.
Product Detail Page
- Comprehensive Information: Display images with detailed descriptions
Collaboration
Mendix natively offers its own Version Control System (VCS) to manage collaboration and application versioning. However, it is also possible to use other source code management platforms. For this project, we decided to rely on GitHub to store and track the evolution of our code.
Setting Up GitHub in Mendix
-
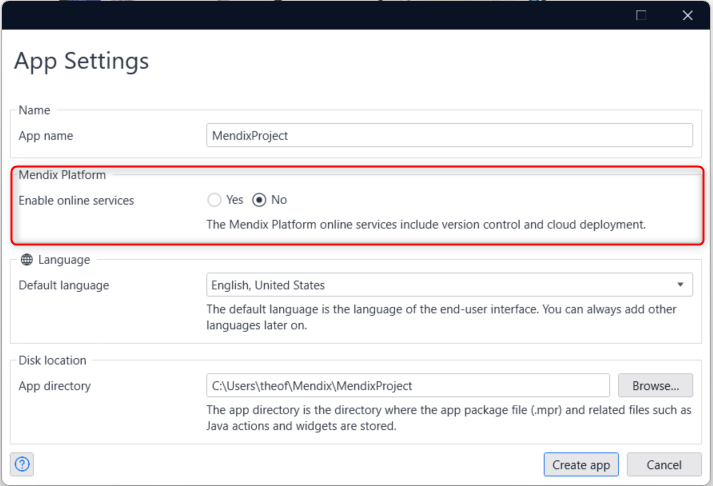
Create a New Project in Mendix
- During your application's setup, select “Enable online services” so that you can use a different Version Control than the one provided by Mendix.
-
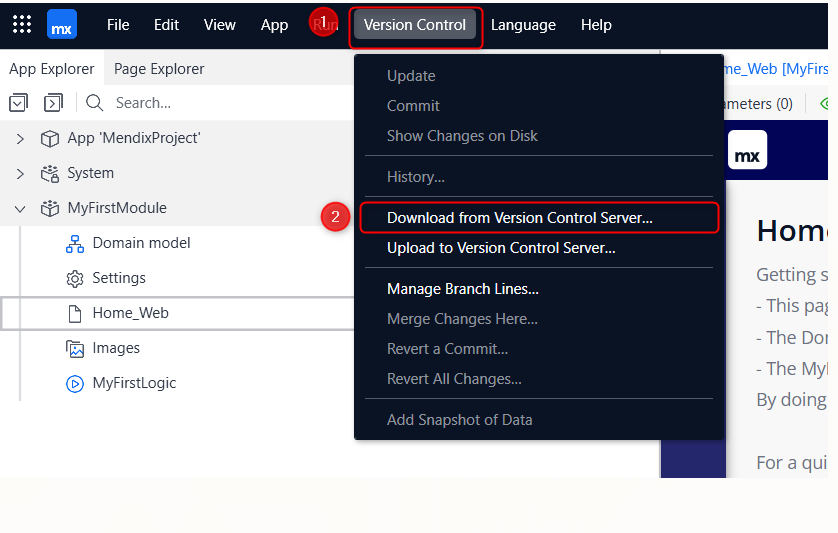
Open the Application's Version Control Section
- Click under “Version Control”.
- Select “Download from Version Control Server.”
-
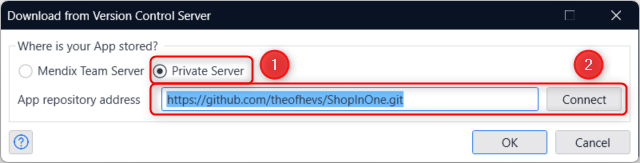
Configure Your Credentials
- Click on Private Server.
- Paste the link to your GitHub repository.
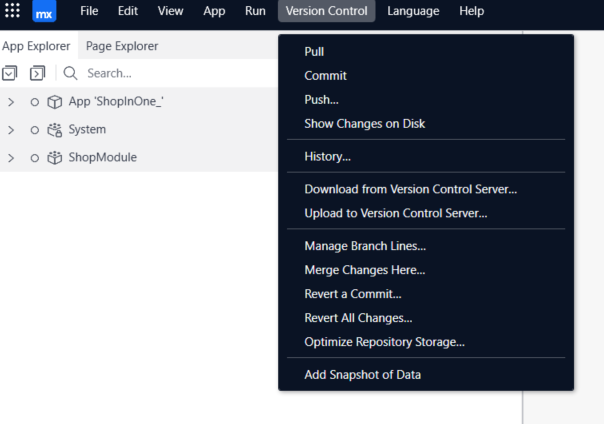
You can now use all the Version Control functionalities such as Pull, Push, etc.
Application Persistence
In this application, data persistence is based on an automatically generated Domain Model. To achieve this, we used Maia (domain model generator). As discussed in the Mendix presentation, providing a clear and precise prompt is essential to obtaining a quality result.
Prompt Used
create me a Domain model that have those entities
1. User
- Username (String, Unique)
- Email (String, Unique)
- FirstName (String)
- LastName (String)
- PhoneNumber (String)
- UserType (String)
2. Product
- Name (String, Indexed)
- Description (String, Long)
- Price (Decimal)
- Quantity (Integer)
- CreatedDate (DateTime)
3. Category
- CategoryType (String)
4. ProductImage
- ImageFile (FileDocument)
5. Order
- OrderNumber (String)
- OrderDate (DateTime)
- TotalAmount (Decimal)
6. OrderItem
- Quantity (Integer)
- Price (Decimal)
- Subtotal (Decimal)
7. ProfileImage
- ImageFile (FileDocument)
Results
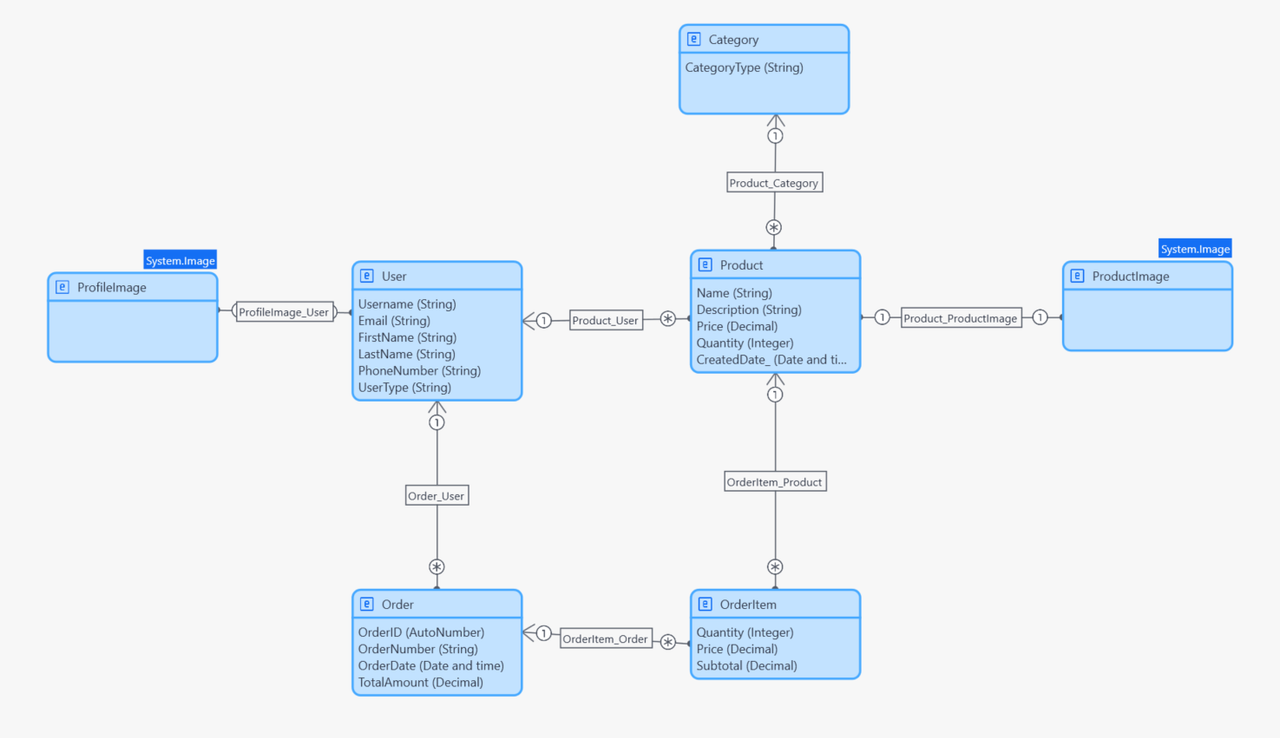
Using this prompt, Maia generated the following data model (as shown in the screenshot above). It includes the following entities, each corresponding to the specified requirements:
- User: Manages user identification and contact information.
- Product: Contains information related to products.
- Category: Allows products to be classified by category type.
- ProductImage: Stores image files associated with products.
- Order: Represents an order placed by a user.
- OrderItem: Details each item included in an order.
- ProfileImage: Stores a user’s profile picture.
This Domain Model reflects the basic structure required to manage users, products, orders, and associated images. The use of Maia greatly simplified the generation of this model.
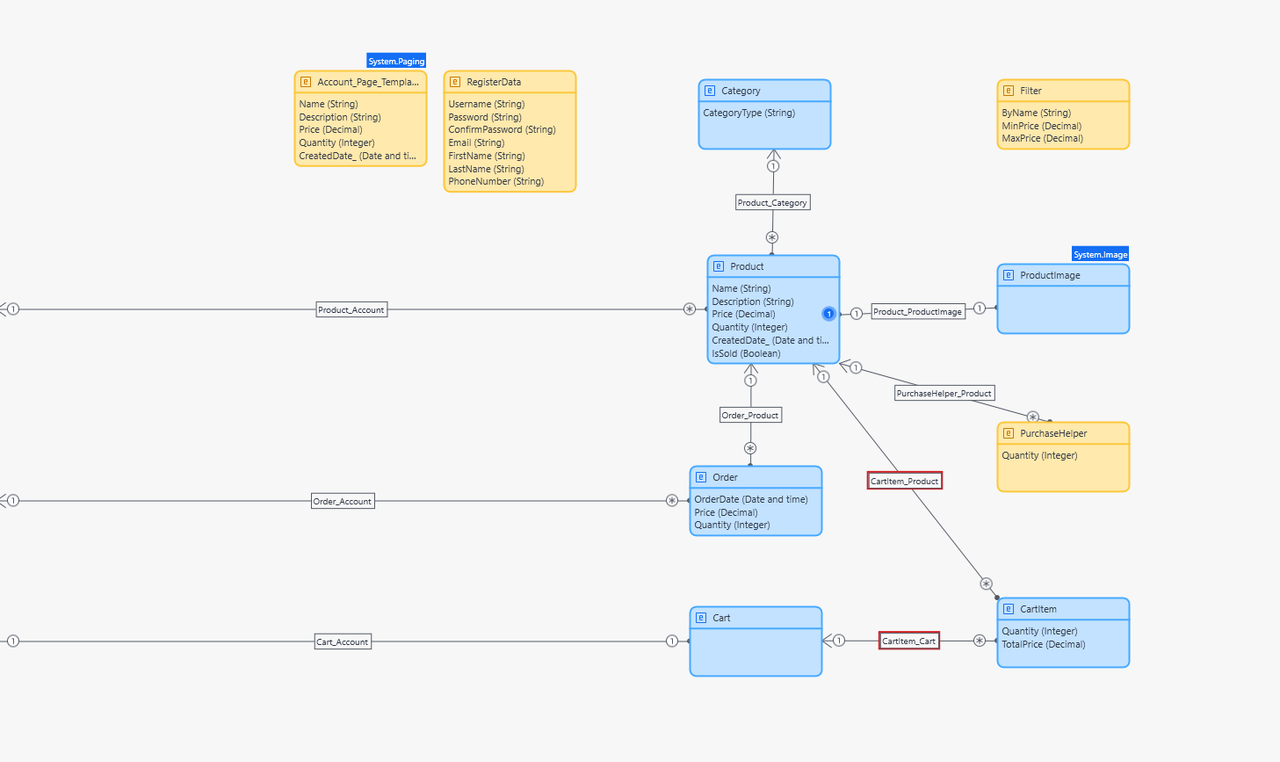
Manual Evolutions of the Domain Model Throughout the Project
Throughout the evolution of the project, we enriched the initial Domain Model automatically generated by Maia by manually adding several additional elements to better meet specific project requirements. These changes were manually implemented because they were too complex to be effectively managed by Mendix's built-in AI. Below is a detailed summary of these evolutions:
Manual Additions
Added Entities:
-
Cart: Represents a shopping cart, allowing users to add products before placing an order.
- Linked to the Account entity to identify the cart specific to each user.
-
CartItem: Describes specific details about products added to the cart.
- Properties:
Quantity(Integer)TotalPrice(Decimal)
- Associated with Cart and Product to precisely manage selected items.
- Properties:
-
PurchaseHelper: Temporarily used to facilitate the purchase or ordering process.
- Property:
Quantity(Integer)
- Linked to Product for easier quantity management during purchases.
- Property:
-
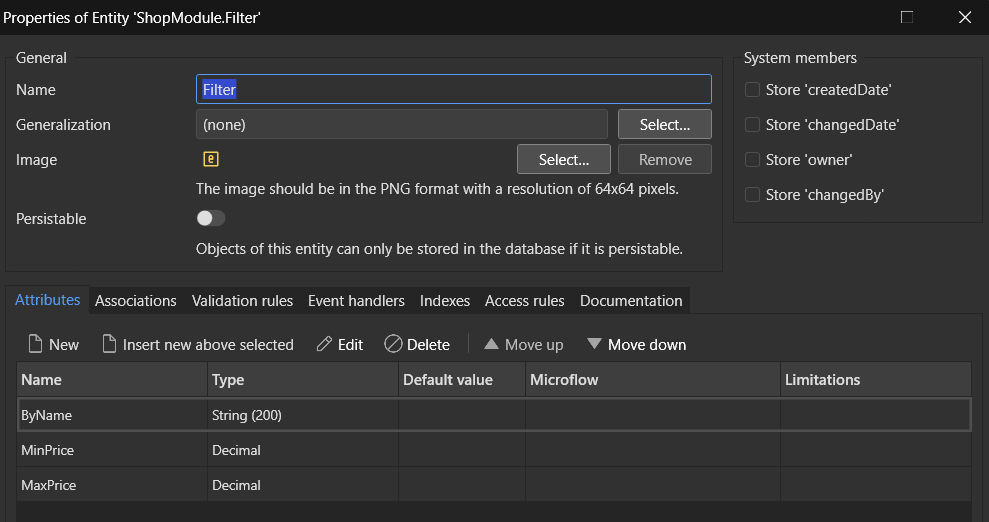
Filter: Implemented to facilitate product filtering functionality for users.
- Properties:
ByName(String)MinPrice(Decimal)MaxPrice(Decimal)
- Properties:
-
RegisterData: temporarily store user input data before creating the persistent Account object
- Properties:
Username(String)Password(String)ConfirmPassword(String)Email(String)FirstName(String)LastName(String)PhoneNumber(String)
- Properties:
-
Account_Page_Template: ensures a robust, secure, and user-friendly account management experience.
- Properties:
Name(String)Description(String)Price(Decimal)Quantity(Integer)CreatedDate_(Date and time)
- Properties:
Modified Entities:
-
Product: Enhanced by adding a new property
IsSold(Boolean) to indicate product availability or sale status. -
Order: Modified initial properties to more precisely meet business needs:
OrderNumberwas replaced by implicit internal identifier management.- Added a
Quantity(Integer) property and adjusted thePrice(Decimal) to facilitate financial and logistical management.
User Account Management:
This second Domain Model is part of the Administration module (available on the Mendix marketplace here) and is used to manage user accounts. We've improved it by adding entities and attributes so that it contains the information we need for our application:
-
Account: Manages specific user account information.
- Added properties:
FullName(String)Email(String)IsLocalUser(Boolean)PhoneNumber(String)
- Added properties:
-
AccountPasswordData: Used to securely manage password changes.
- Properties:
OldPassword(String)NewPassword(String)ConfirmPassword(String)
- Properties:
-
ProfilePicture: Facilitates the management of user profile images generated by DALL-E.
- Property:
ProfilePicURL(String)

- Property:
Product Management Logic
The business logic of the application is primarily managed through microflows. We will describe them here to show how we've managed the interactions between the three layers.
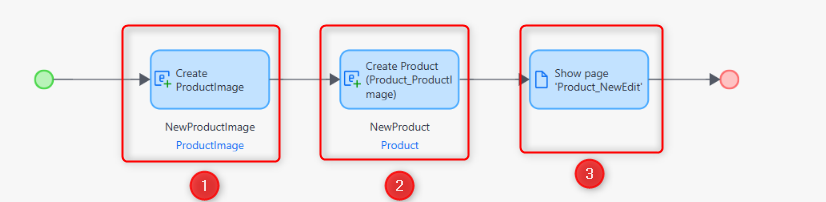
ACT_Product_Create
This microflow handles the logic for adding a product (database-oriented logic). It first creates a ProductImage object, then creates the Product entity and associates the relevant image. Finally, it displays the Product_NewEdit page, allowing the user to actually create (sell) a product by entering the necessary information.
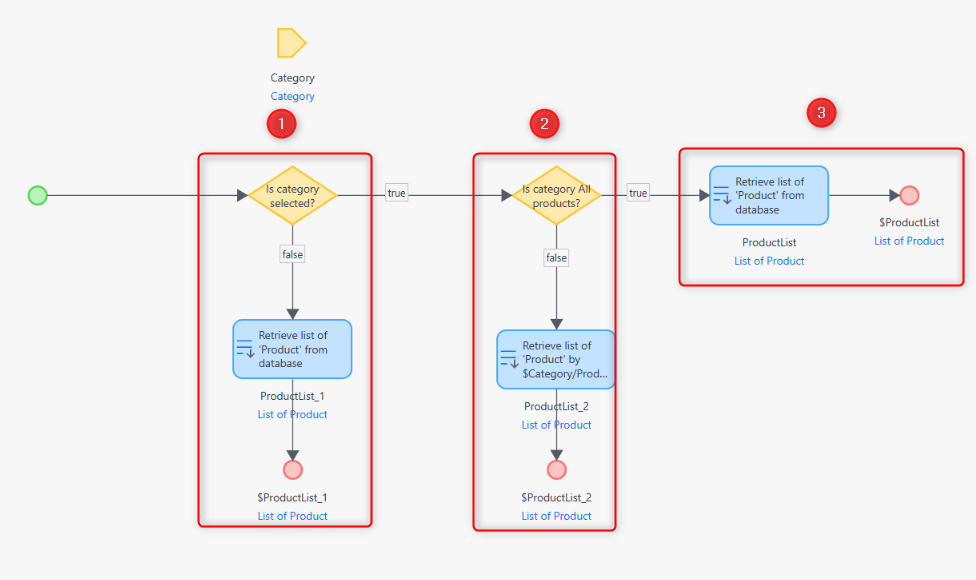
ACT_SetSelectedCategory
This microflow manages product display (presentation logic) by category type. It checks whether the user has selected a specific category. If so, it retrieves the list of products corresponding to that category; otherwise, it returns all available products. As a result, this microflow dynamically creates a filter, ensuring a view based on the user’s selection.
User Management Logic
Registration Microflow
This microflow is used to register a new user in the system. Initially, the process receives the user's data via the RegisterData object and validates that all mandatory fields - such as username, e-mail address and password - are correctly filled in. It also checks that the passwords supplied match, and that the username does not already exist in the database.
After successful validation, the flow creates a new Account object, filling it with the information validated from RegisterData. It then retrieves the default user role from the database and assigns it to the new account, ensuring that appropriate access authorizations are granted from the outset.
The account object is saved in the database to retain the user's credentials and associated data. A success message is displayed to confirm account creation, and the user is automatically redirected to the login page, completing the registration process.

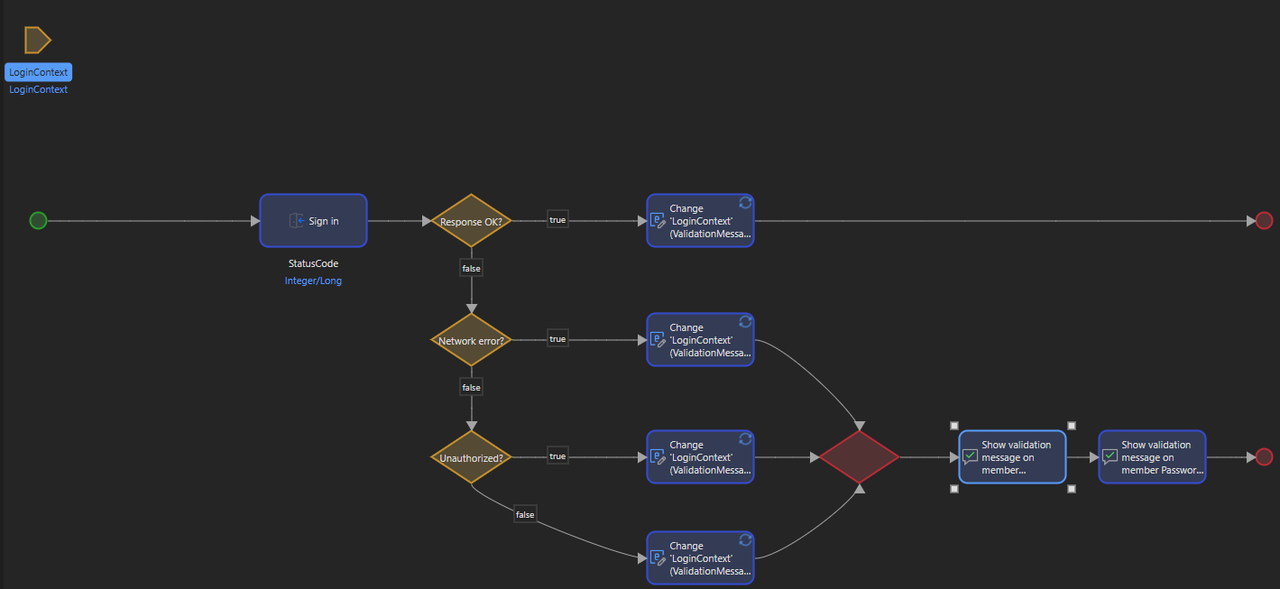
Login Microflow
This microflow is used to authenticate users during the login process. By invoking the SignIn JavaScript action provided by Mendix, the user submits their credentials on the login page. This action attempts to validate the username and password supplied against the stored account credentials.
After the login attempt, the flow checks the status of the response. If the credentials are valid and there are no network problems, the user is granted access and redirected to the home page. If the connection attempt fails due to invalid credentials or a missing account, a message is sent to the user informing them of the connection failure.
In the event of a network error or unexpected problem, a fallback error message is provided, guiding the user to retry or verify the connection. The microflow ends with the user successfully logging in or displaying a relevant error without the need for manual session management or backend logic, leveraging Mendix's secure authentication infrastructure.
Search Page
To implement search functionality effectively, we decided to create a dedicated search page instead of placing it directly on the homepage.
This choice was made because the default search bar provided by Mendix data grids doesn’t behave reliably on the homepage. Since the homepage already uses a category filter, combining it with the built-in search bar led to conflicts and inconsistent behavior.
By isolating the search on its own page, we created a more stable and predictable user experience, where users can search across all products without interference from category-based filters.
Step 1: Create a Non-Persistent Filter Entity
The first step is to create a non-persistent entity in the domain model, which will be used to store filter values for the product list.
In this entity, we added the attributes we want to filter by: Name, MinPrice, and MaxPrice.
⚠️ For the price attributes, it is better to leave the default value as null instead of 0. As we’ll see later, null values are required in microflows to apply proper filtering logic.
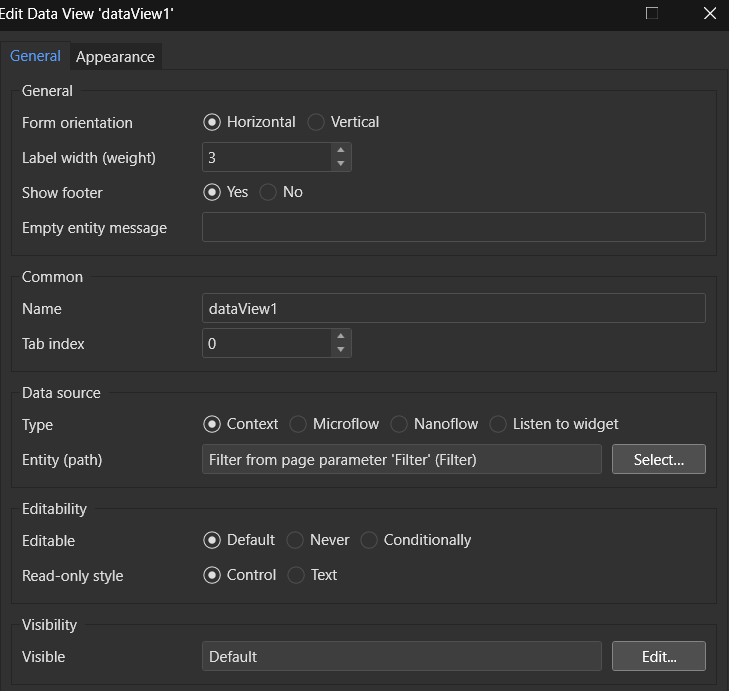
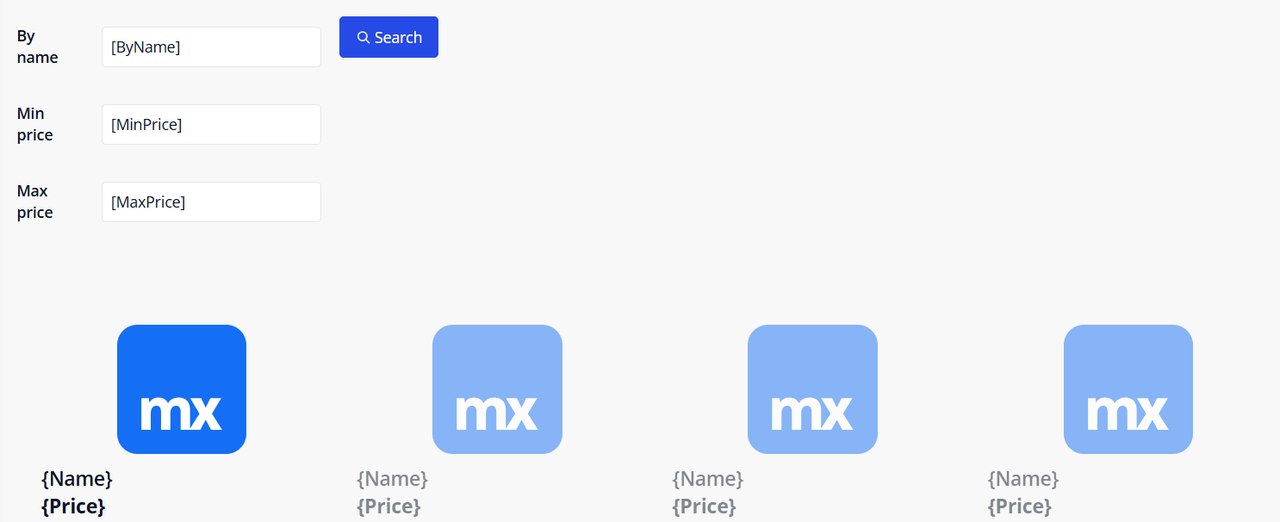
Step 2: Create the Search Page
Once the entity is in place, create a new search page and add a Data View to it. The data source of this Data View will be the Filter entity we just created.
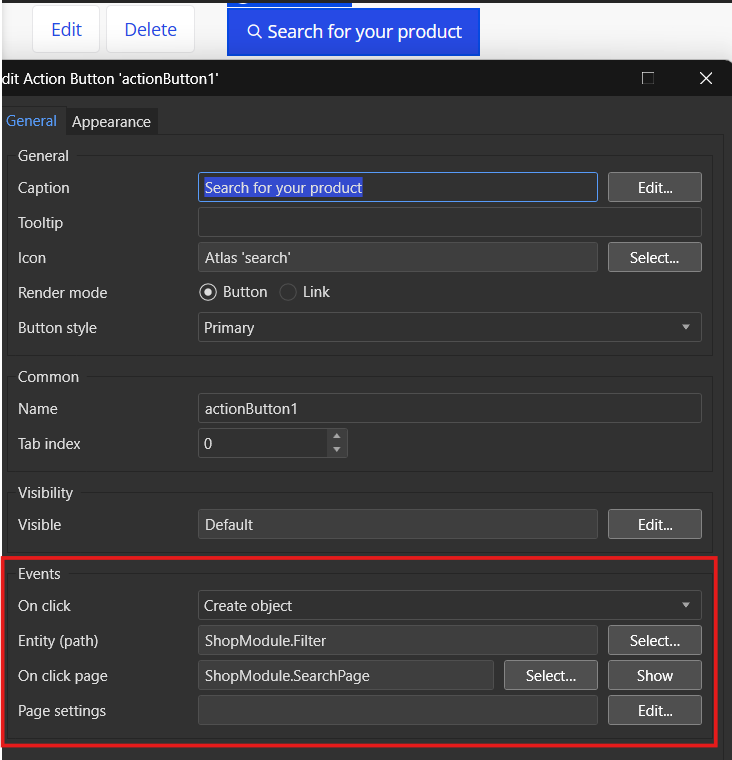
Step 3: Add Navigation from the Homepage
Now that the search page exists, we need a way to access it. Add a button to the homepage labeled "Search for your product". Set its on-click event to:
- Create an object of type Filter
- Open the Search Page
Step 4: Display Filtered Products
Back in the search page, now that it’s accessible from the homepage, we can display the filtered product list.
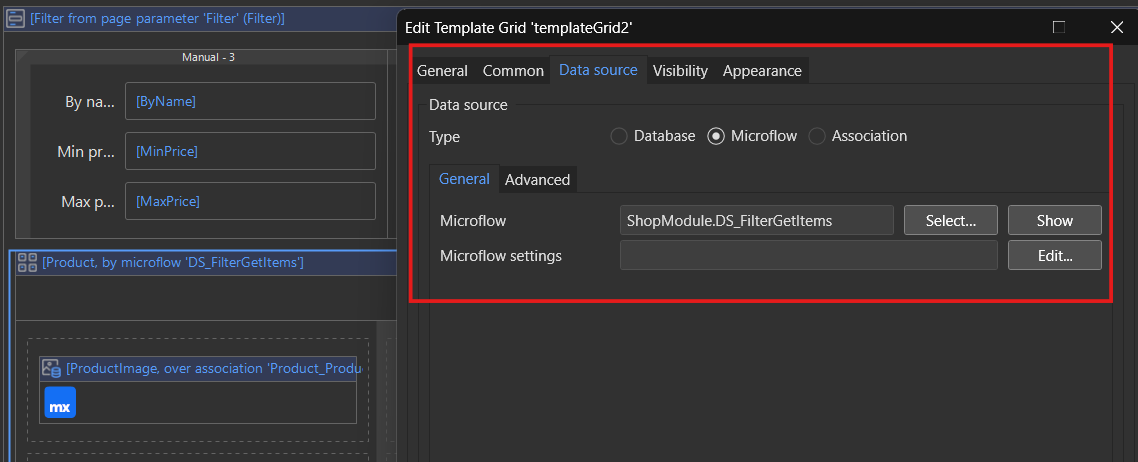
Below the Data View, add a Template Grid and set its data source to a microflow, e.g., DS_FilterGetItems.
If you already have a styled template grid on the homepage, simply copy and paste it into the search page to keep a consistent UI.
Step 5: Filtering Logic in the Microflow
The DS_FilterGetItems microflow is responsible for applying the filtering logic.
Use a Retrieve action:
- Source: From database
- Entity: Product

Set the XPath constraint as follows to allow each filter to be optional and work independently:
[
  ($Filter/ByName = '' or contains(Name, $Filter/ByName))
  and
  ($Filter/MinPrice = empty or Price >= $Filter/MinPrice)
  and
  ($Filter/MaxPrice = empty or Price <= $Filter/MaxPrice)
]
You can also add logic to enforce some filter fields to be filled before triggering the search.

Step 6: Make the "Search" Button Work
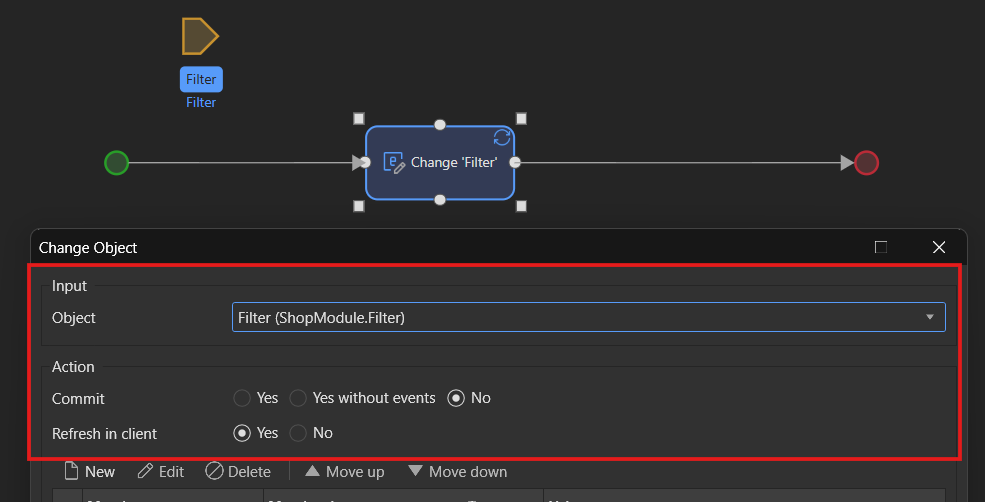
Let’s return to the Search button we added earlier. Set its on-click event to a new microflow (Refresher) that will refresh the product list after the filters are filled in.
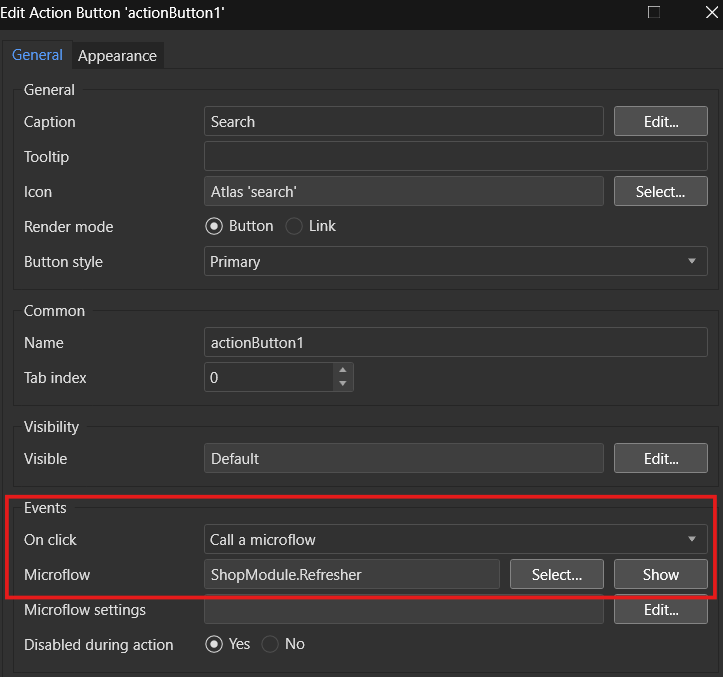
This microflow should contain a Change Object action on the Filter entity, with the "Refresh in client" option enabled. This is what updates the product grid on the page.
Cart Management
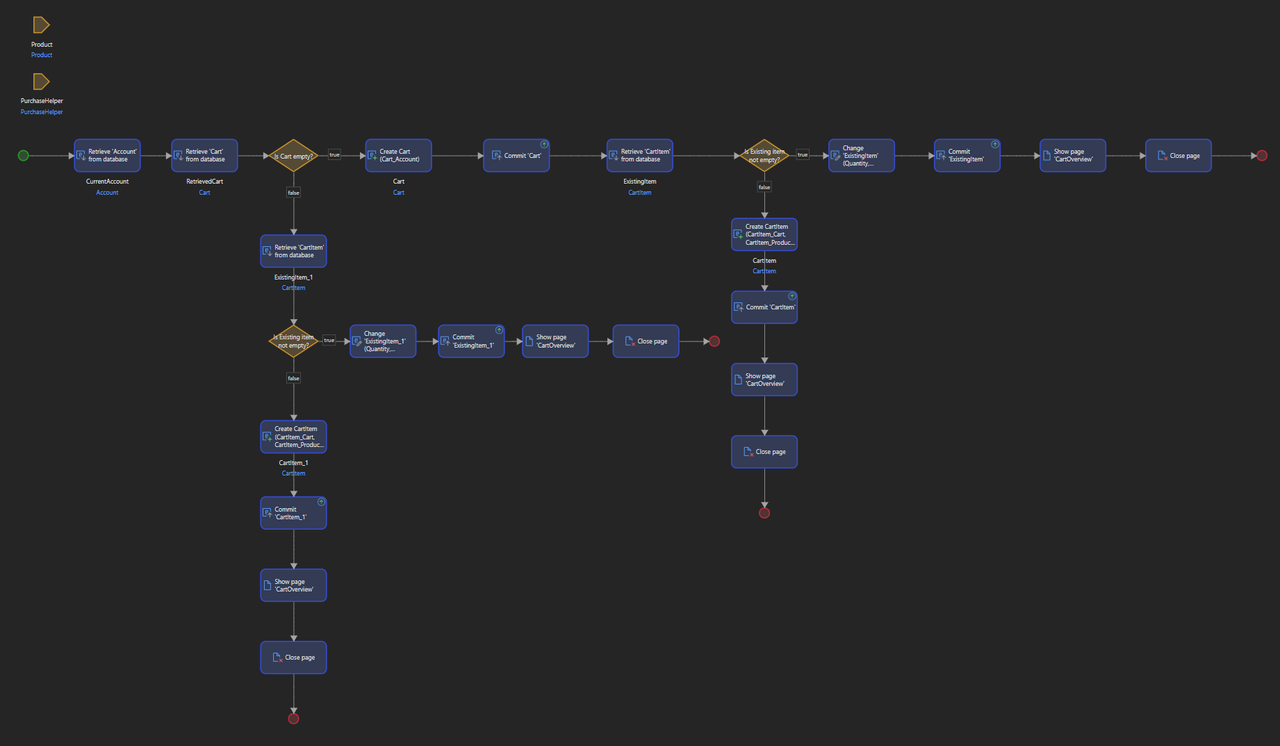
ACT_Cart_AddLine
The microflow is used to add an item in a Cart. The process begins by retrieving the current user's account and attempting to retrieve an existing Cart associated with that user. If no cart is found, a new cart is created and committed to the database. This ensures that every user interaction starts with a valid cart object.
The flow then checks if the cart is empty. If it's not, it tries to retrieve an existing CartItem that matches the selected product. If the item exists, its quantity is updated accordingly. Otherwise, a new CartItem is created and linked to the cart. This distinction ensures that duplicate items are avoided, and existing quantities are properly updated.
After updating or creating the item, the changes are committed to the database to maintain consistency. The user is then redirected to the cart overview page where they can review their items. Finally, the microflow concludes by closing the page.
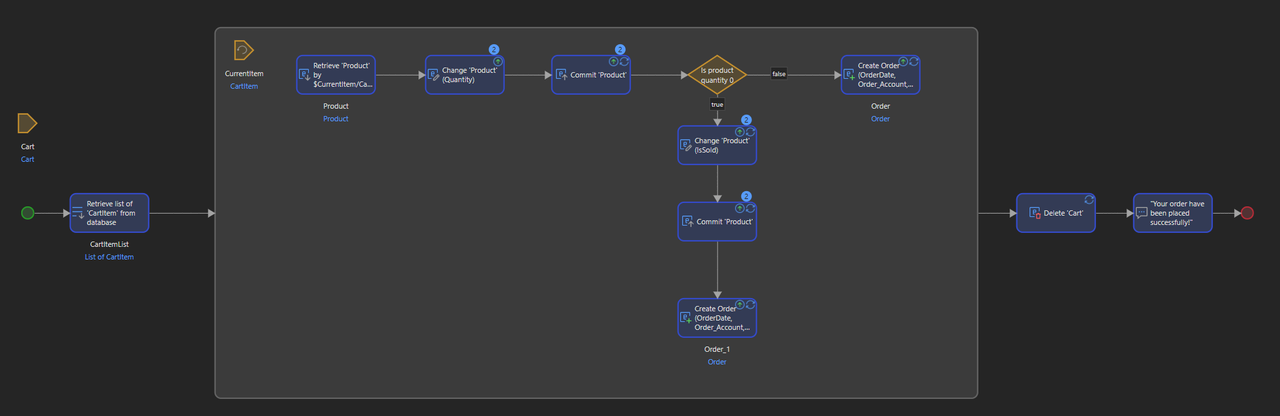
ACT_Cart_ConfirmPayment
This microflow is used to confirm the Cart created before. It handles the transition from a cart filled with items to a completed order.
It first retrieves a list of CartItems from the database that are associated with the current cart. This ensures that all items intended for purchase are correctly processed.
For each item in the CartItemList, the microflow attempts to retrieve the corresponding Product from the database. Once the product is retrieved, its quantity is adjusted based on the items present in the cart. The updated product is then committed to the database, ensuring that inventory changes are saved.
A decision step follows, where the microflow checks if the product quantity is zero. If the quantity has reached zero, the product is marked as sold (IsSold is set to true) and committed to the database. Whether the product is marked as sold or not, the microflow proceeds to create a new Order, linking it with the appropriate account, date, and other relevant details.
Once all items have been processed and orders are created, the cart entity is deleted to prevent duplicated processing. Finally, a success message is displayed to the user, indicating that the order has been placed successfully. The microflow then concludes, ensuring that the cart is cleared and the order is finalized.
Presentation Layer
For the visual part of the application, we used the Atlas_TopBar template from the Atlas_Core module, available by default on all new Mendix projects (since the 9.0.5 version in 2021), which contains a navigation bar and the application logo.
However, Mendix's Design interface, available on the right tab of the screen under Properties → Styling only allows you to edit a few elements, and therefore offers very little flexibility:
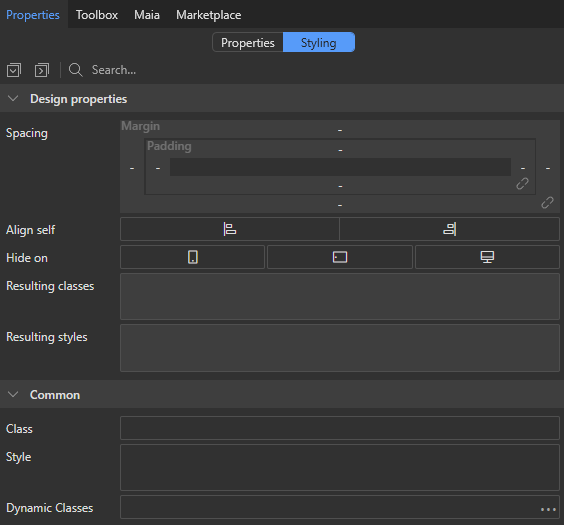

That's why we decided to use a custom SCSS in addition to this template, to achieve a more personalized design for our needs:

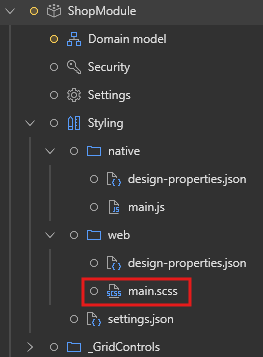
By default, custom design files are disabled by Mendix outside the App module. To enable this feature, go to App Settings → Right Click on Styling → Show Styling for → App and all modules.

A new section Styling will appear in our module, where we can edit the main.scss file to add custom design.
Deployment
In this section, we will outline the deployment strategy used for ShopInOne to push the application to the Mendix Cloud using the Mendix Team Server. This approach was chosen to enable cloud deployment and management of the application.
Like mentionned in the Collaboration section, initially, the application was linked to our GitHub repository for version control. However, Mendix only allows cloud deployment through its own Team Server. Therefore, we switched from GitHub to the Mendix Team Server to enable deployment.
Key Steps in the Deployment Strategy:
Unlinking GitHub Repository
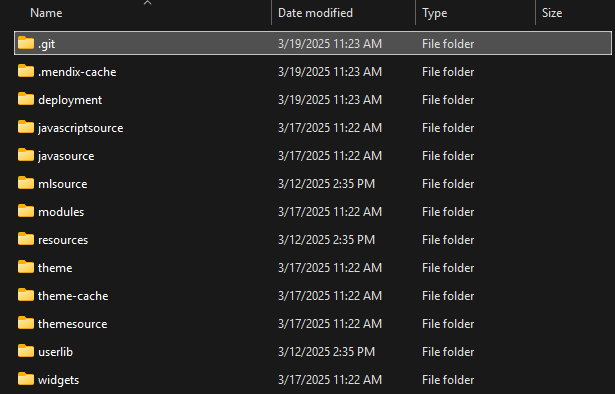
The first step is to search for the app from the local project directory and delete the .git folder, which will remove the GitHub connection.
Connecting to Mendix Team Server
Once the .git folder is removed, we can connect the application to the Mendix Team Server:
In Mendix Studio Pro, go to Version Control > Upload to Version Control Server and link the application to the Mendix Team Server.

Committing Changes to the Team Server
Before creating a deployment package, make sure all changes are committed to the Team Server:
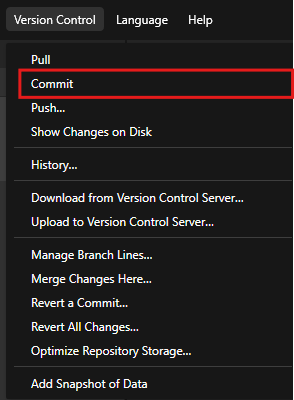
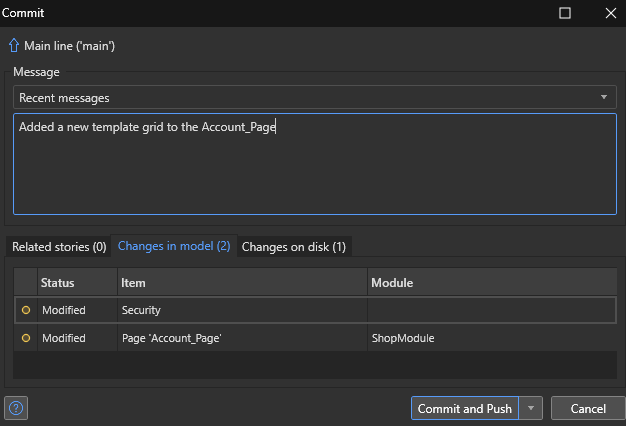
Use Version Control > Commit in Mendix Studio Pro. Write a comment for the commit and click Commit and Push
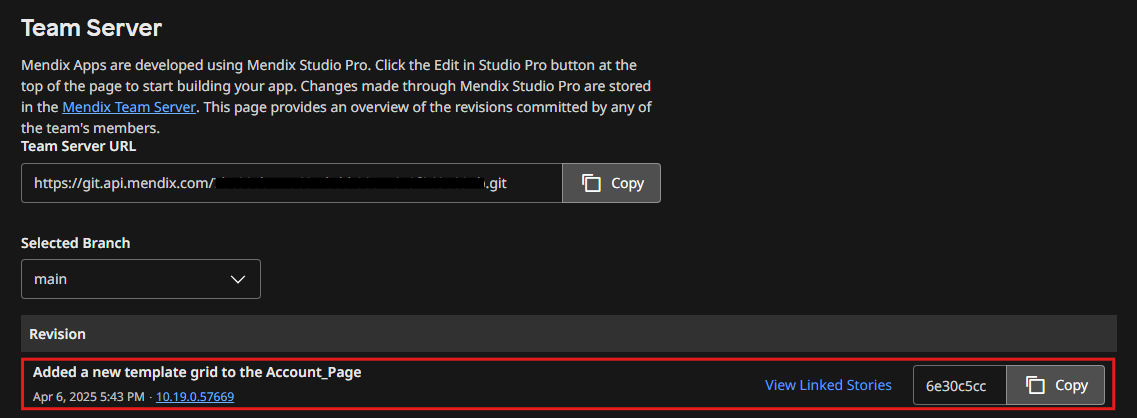
In the Mendix Web Platform, select the App and verify that all changes are pushed successfully to the Team Server.
Creating a Deployment Package
To prepare the application for deployment:
Go to App > Create Deployment Package
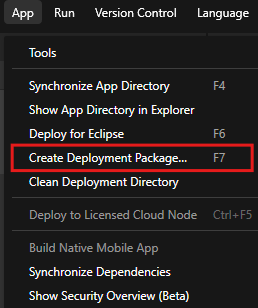
This step builds a package that can be deployed to the Mendix Cloud.
Deploying the App to the Mendix Cloud
We can now deploy our application to the cloud:
Go to App > Deploy to Licensed Cloud Node
Select the appropriate Mendix Cloud environment (in our case Free App)
TODO: Add screenshot when we deploy
Finally, click on Publish in the top right corner to complete the process.

Automatic entity creation in database
To ensure that the list of categories is not empty in the database when the application is deployed, we've created a microflow that is automatically run after app startup.
To do this, in the App Settings, under Runtime → After Startup, we can specify a microflow.
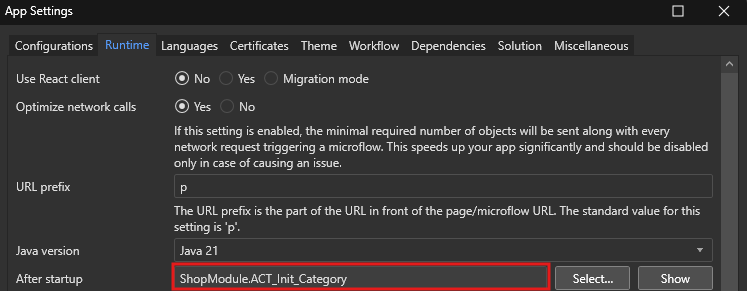
The microflow is designed to ensure certain Categories exist in the database every time the application starts (it works locally as well). The process first creates an empty list of Categories, then manually adds each Category name as a temporary item in that list. Since Mendix does not allow the creation of a list of String (or any other basic types) in a microflow, each Category is added one by one.
Next, the microflow loops through the temporary list, checks whether a Category already exists in the database, and if not, it creates it. This way, we automatically have all the required Categories in the database at startup.

Next page → Use Cases Limitations