Zigbee Temperature Sensor - Jim-tech/IoT-Developer-Boot-Camp GitHub Wiki
Table of Contents
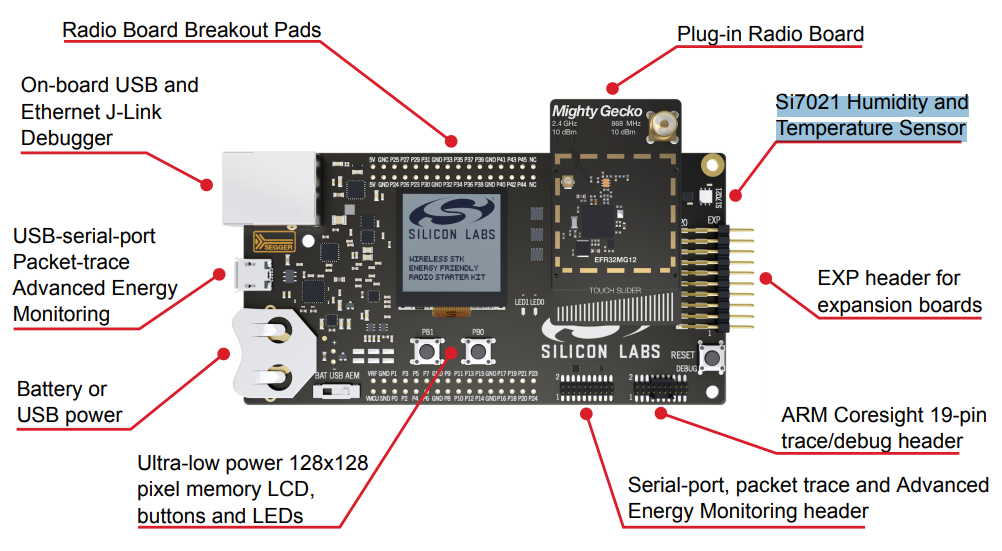
On the WSTK (Wireless Starter Kit), there is a temperature sensor Si7021. In this example, we will demostrate how we develop a Zigbee temperature sensor based on the WSTK.
Below is the hardware layout of SLWSTK600B:

Gecko SDK Suite 3.1.
- 2 pcs WSTK
Form a Zigbee network on one of the WSTK, and then join the other WSTK into the network.
-
Create a ZigbeeMinimal project, name it with "Z3TemperatureSensor" and select the "BRD4164A" (the board type of your kit) as the board.
-
In "ZCL Clusters" tab, select endpoint 1, then in "Zigbee device type" field, change it to HA devices-->HA Temperature Sensor. With this step, the server side of cluster "Temperature Measurement" is selected automatically.
-
In Zigbee Stack tab, change device type to Sleepy End Device.
-
Enable the following plugins:
- Reporting
- Idle/Sleep
- End Device Support
- Temperature Measurement Server Cluster
- Temperature Si7021
- I2C Driver
-
In plugin "Idle/Sleep", in the properties, enable the option Stay awake when NOT joined
-
In "Callbacks" tab, enable the following callbacks:
- emberAfMainInitCallback
- halSleepCallback
-
Save and generate the project.
-
Implement the two callbacks.
void emberAfMainInitCallback(void)
{
	GPIO_PinModeSet(BSP_I2CSENSOR_ENABLE_PORT, BSP_I2CSENSOR_ENABLE_PIN, gpioModePushPull, 1);
}

void halSleepCallback(boolean enter, SleepModes sleepMode)
{
	if (enter) {
		GPIO_PinModeSet(BSP_I2CSENSOR_ENABLE_PORT, BSP_I2CSENSOR_ENABLE_PIN, gpioModePushPull, 0);
	} else {
		GPIO_PinModeSet(BSP_I2CSENSOR_ENABLE_PORT, BSP_I2CSENSOR_ENABLE_PIN, gpioModePushPull, 1);
	}
}
-
Save and build.
- Flash the application into one WSTK, and join it to a Zigbee network.
- Setup binding on the sensor, so that the temperature can be reported to the bound device. e.g. with the following command, bind the cluster 0x402 of local endpoint 1 to end point 1 of the remote device 000B57FFFE07A7E3.
option binding-table set 0 0x0402 1 1 {000B57FFFE07A7E3} - After that, the device will report the temperature periodically.

This example can be used on any parts. Below are the steps of porting it to other part:
- Import the .sls file into Simplicity Studio
- Open the .isc file of each project, turn to "General" tab, hit button "Edit Architecture", then select the board and part.


