Zigbee Preparatory Course - Jim-tech/IoT-Developer-Boot-Camp GitHub Wiki
English | 中文
Table of Contents
This is a preparatory course that you should take if you are new to the Silicon Labs development environment and Zigbee solution. The document describes how to get started with Zigbee development using the EmberZNet PRO SDK and Simplicity Studio with a compatible wireless starter kit (WSTK), and also the fundamental Zigbee knowledge you should understand before beginning to study the Zigbee Boot Camp series courses.
And step-by-step instructions are provided to demonstrate how to create a basic Zigbee project for checking if the development environment is ready on your end.
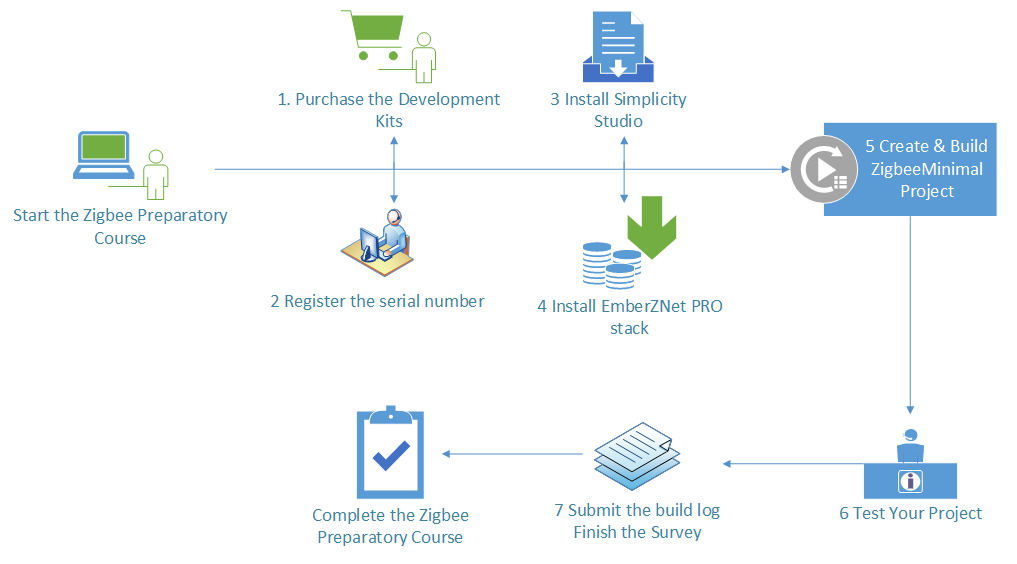
The figure below illustrates the working flow for setting up the development environment.
Before following the procedures in this guide you should have purchased one of the mesh networking development kits. You can use the EFR32MG Wireless Starter Kit, EFR32xG21 Wireless Gecko Starter Kit or EFR32xG22 Wireless Gecko Starter Kit in the boot camp series hands-on.
And then you need to create an account on the support portal, and register the serial number of your development kits on KitRegistration to grant Zigbee SDK access. Please refer to the KBA on access to Silicon Labs wireless mesh networking stacks for more information.
Below is the Kit Contents of the EFR32 Mighty Gecko Wireless Starter Kit.
3 x Wireless starter kit mainboard
3 x EFR32MG12 2.4 GHz 19 dBm radio board
3 x EFR32MG12 2.4 GHz 10 dBm radio board
AA Battery Board (supports running +19 from battery)
Cables
EFR32MG Getting Started Card
You also can use Thunderboard Sense 2 Kit which is a compact, featured-packed development platform. Be careful that you can NOT get Zigbee SDK through Thunderboard Sense 2 Kit, make sure you can get Zigbee SDK before trying to use Thunderboard Sense 2 Kit.
Note: Different Wireless Gecko Starter Kit has different contents, please make sure that you have at least two wireless starter kit mainboard with radio board mounted for finishing the hands-on.
Note: If you are going to attend Zigbee training and all of the hardware will be provided by the organizer. Please just reach out to the organizer of the training event, they will help to provide you a temporary account with Zigbee SDK access granted.
Below is the system requirements of the Simplicity Studio v4, and it's strongly recommended to prepare a working computer has at least 8GB RAM for wireless project development.
| Operating System | Version |
|---|---|
| Windows | Windows 10 (x64) |
| macOS | 10.14 Mojave |
| Linux | x64 Kernel 3.13 and above tested with Ubuntu 18.04 LTS |
| Hardware Component | Item |
|---|---|
| CPU | 1 GHz or better |
| Memory | 8 GB for Wireless Protocol development |
| Disk Space | 7 GB for Wireless Dynamic Protocol support |
To develop Zigbee applications, you will need to setting up your software development environment by installing Simplicity Studio, EmberZNet PRO stack and the compatible toolchains.
Simplicity Studio is a free Eclipse-based Integrated Development Environment (IDE) and a collection of value-add tools provided by Silicon Labs. Developers can use Simplicity Studio to develop, debug and analyze their applications.
If you do not have Simplicity Studio V4 installed, please connect to Simplicity Studio 4 to download the installation package, and run the Simplicity Studio installation application.
Note: For better wireless protocol development experience, please check the items below one by one.
- Make sure that your PC has 8 GB or more RAM memory and more than 7 GB disk space available.
- If you are using the Windows (Windows 10 is recommended), it highly recommended to install the Simplicity Studio to the C: drive. Otherwise, you need to create another workspace locates at the same drive as your Simplicity Studio installed, and switch to that workspace.
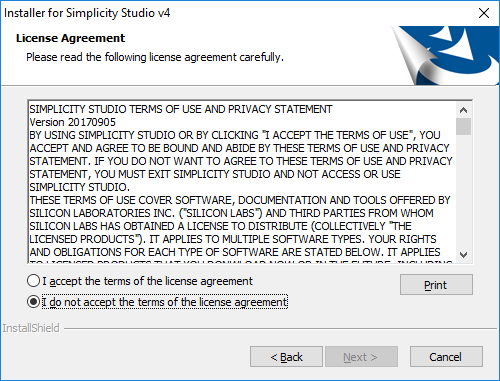
When Simplicity Studio first launches, it presents a License Agreement dialog. Accept the terms of the agreement and click [Next].
Choose a destination location, click [Next] > and then click [Install].
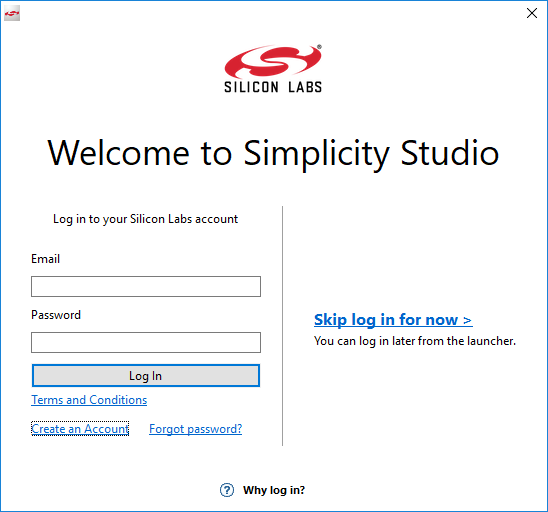
When the application launches, you are invited to log in. Please Log in using your support account that created above (or the temporary account provided by the training event organizer). Although you can skip log in here, you must be logged in to access some protected content, such as EmberZNet PRO SDK.
Note: If you don't have any WSTK yet, please feel free to ignore the two paragraph below.
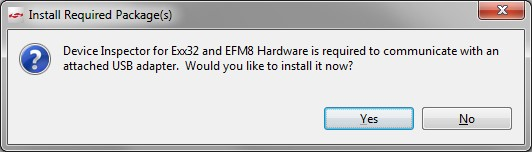
After login, the Simplicity Studio will check for connected hardware. If you have the WSTK connected by USB cable, Simplicity Studio will detect the USB cable and prompt you to download a Device Inspector. Click [Yes].
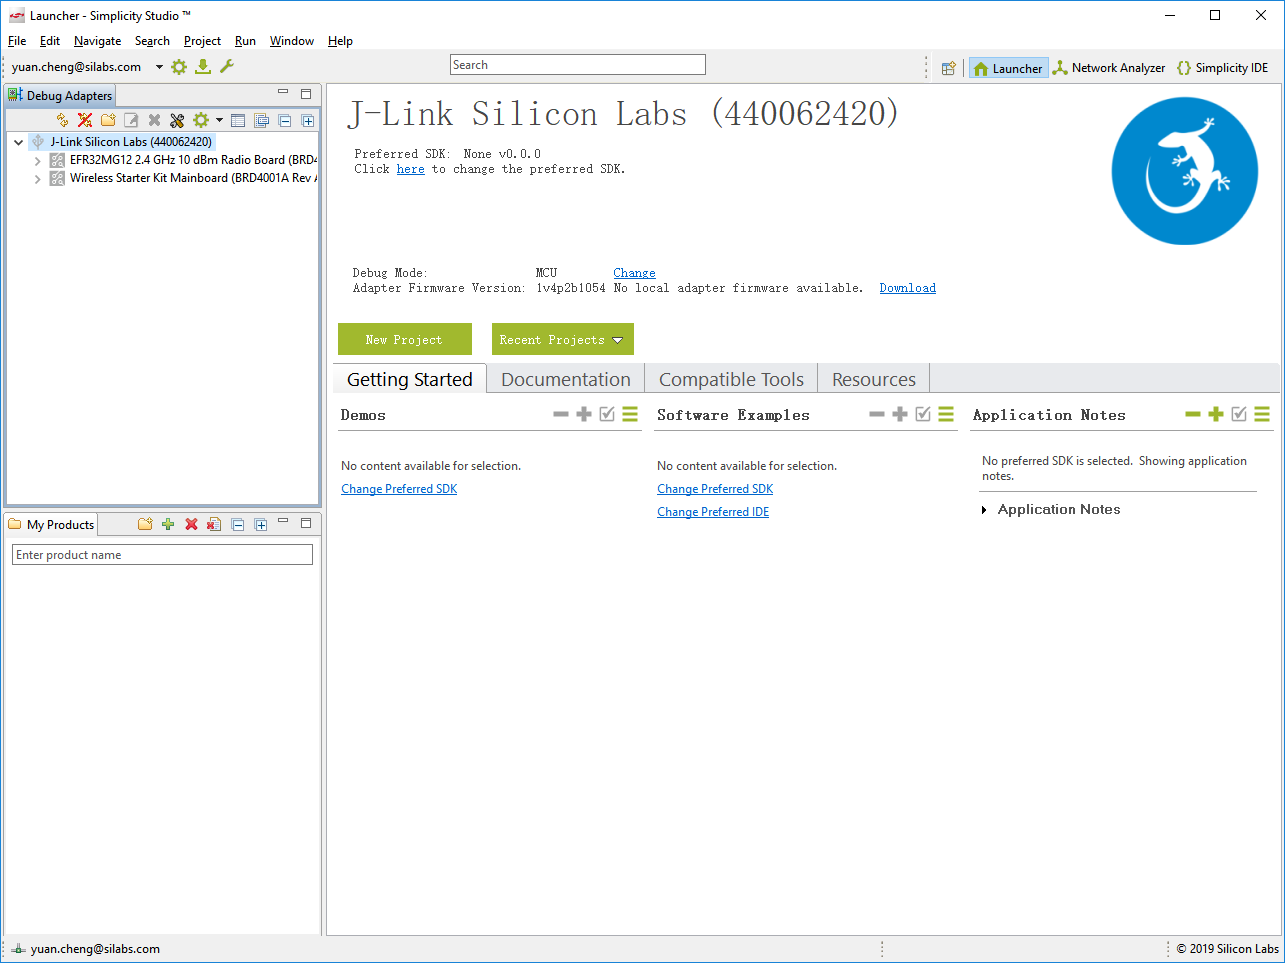
The Launcher perspective opens as below if have the WSTK connected. The connected device will be identified as J-Link devices and listed in the "Debug Adapters" tab as shown.
A Zigbee solution requires implementation of a Zigbee radio and associated microprocessor (together in a single chip or separately), and implementation of an application on top of a Zigbee stack. EmberZNet PRO is the Silicon Labs implementation of the Zigbee PRO stack.
With the Zigbee PRO stack, Silicon Labs provides both a standard networking API based on the Zigbee specification and an application framework, which gives customers a way to rapidly develop their applications based on Zigbee application profiles and the Zigbee cluster library (ZCL).
For accelerating the customer's product to marketing, Silicon Labs provides a number of built-in demos and examples covering the most frequent use cases in the EmberZNet SDK.
Supposed that you have purchased the mesh networking development kits, and also register the serial number with your own account. Log in the Simplicity Studio with the same account, and the EmberZNet PRO stack will be available for download through Simplicity Studio.
Note: If you don't have development kit yet, and didn't register your own account, please log in the Simplicity Studio with the temporary account provide by the organizer of the training event.
If you do not have EmberZNet SDK installed, please run the Package Manager as below for installing the latest EmberZNet SDKs or the SDK version specified by the training event organizer.
See the Figure 2.6 for how to install the specified version of EmberZNet SDK. After installing the specified SDK, please don't forget to change the preferred SDK to it.
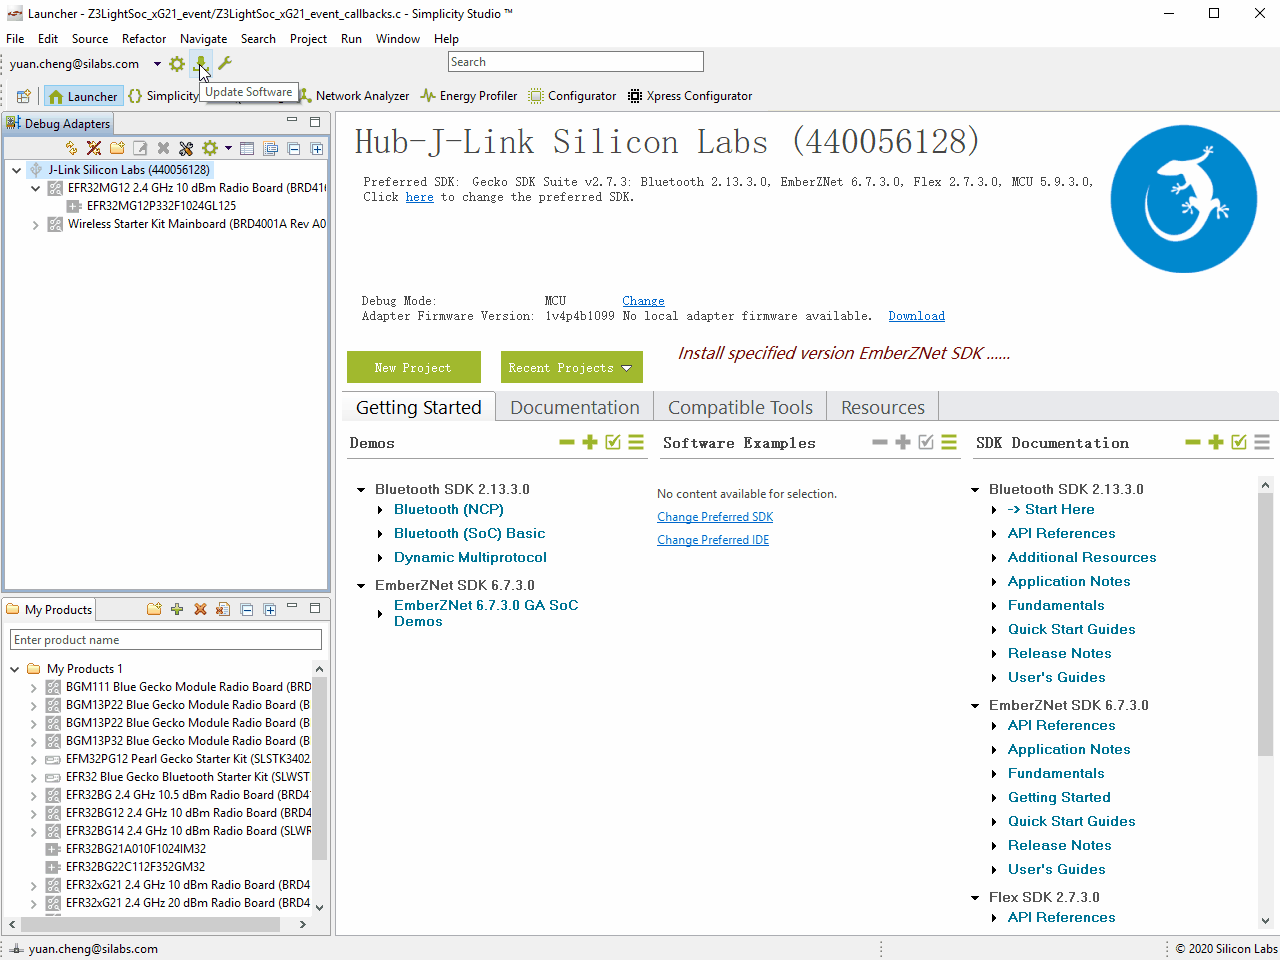
And if you have an old version EmberZNet SDK installed, it's highly recommended to update it to the latest or the required version. The method is similar as above.
After installing the SDKs successfully, click [Yes] to restart Simplicity Studio for the changes to take effect.
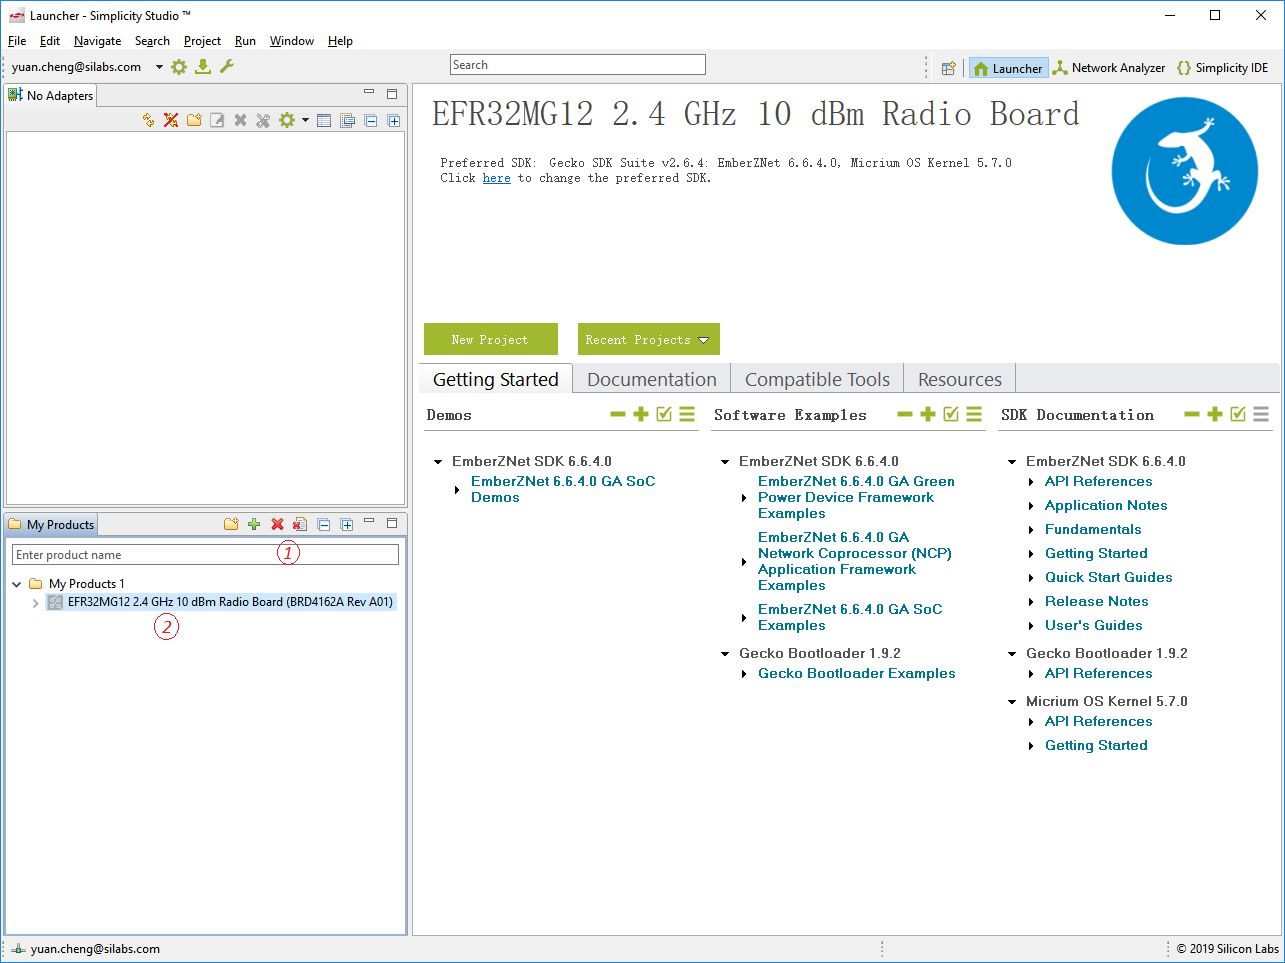
If have the WSTK connected, click the device in the [Debug Adapters] tab on the left side of the launcher, then the Launcher perspective will be populated with the software components and functionality associated with your hardware and stack.
Note: If you don't have WSTK yet, you can just type the WSTK name "BRD4162A" in the "My Products" tab on the lower-left of the launcher perspective. And select "Rev A01" if multi boards information be listed then.
-
Demos
Demos are prebuilt application examples that can be directly downloaded to your device. -
Software Examples
The software examples provide default configurations needed by the stack and a basic application structure that you can build upon. Silicon Labs recommends that you start your own development with a use case-based example and modify it according to your needs.
If none of the use case-based examples meet your needs, you can start with the ZigbeeMinimal example. And we will also use the ZigbeeMinimal as the starting point for the Zigbee boot camp series hands-on. -
SDK Documentation
The SDK Documentation lists documentation about the stack, it includes SDK release note, API reference, etc.
GCC (The GNU Compiler Collection) is provided with Simplicity Studio, and it will be installed automatically while installing the EmberZNet SDK in the first time.
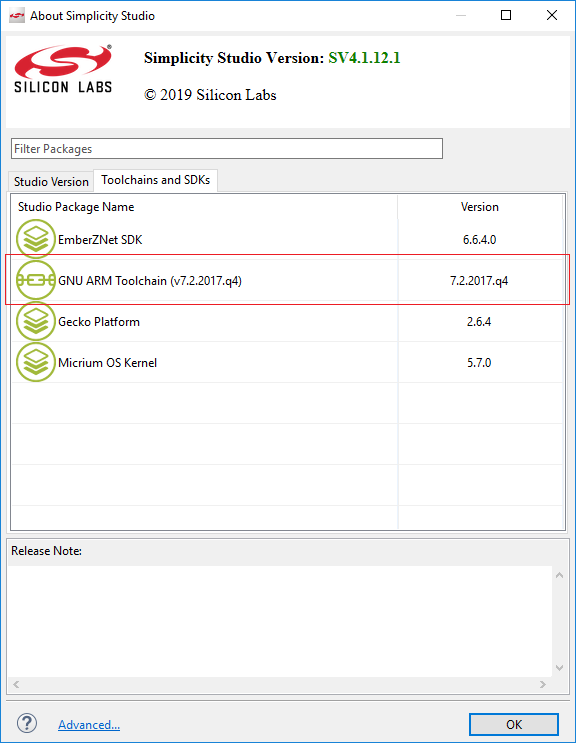
You can check the installed GCC toolchain (as well as SDKs) version information by clicking [Help] > [About Simplicity Studio] > [Toochains and SDKs] from the launcher perspective.
GCC is recommended in the boot camp series training material, and of course you also can use IAR to compile the projects. Please see the EmberZNet SDK Release Notes for the compatible IAR version.
For Silicon Labs customer, you can get a 30-day evaluation license for IAR:
• Go to the Silicon Labs support portal at https://www.silabs.com/support.
• Scroll down to the bottom of the page, and click Contact Support
• If you are not already signed in, sign in.
• Click the Software Releases tab. In the View list select Development Tools. Click Go. In the results is a link to the IAR-EWARM version named in the release notes.
• Download the IAR package (takes approximately 1 hour).
• Install IAR.
• In the IAR License Wizard, click Register with IAR Systems to get an evaluation license.
• Complete the registration and IAR will provide a 30-day evaluation license.
• Once IAR-EWARM is installed, the next time Simplicity Studio starts it will automatically detect and configure the IDE to use IAREWARM.
As the IoT-Developer-Boot-Camp is a open source project, we use the github to maintain all of the source code and documentations, every participating in it can provide your comments on it, submit your pull request for bug fix, new feature implementation or documentation improvement.
A valid github account is the prerequisite for joining this project, please Create your github account if you do not have that.
As a preparatory course, the purpose of this section is providing a step-by-step instructions to demonstrate how to get start with the ZigbeeMinimal example project to verify that the development environment is setting done on your side.
Note: If you don't have development kit yet, please just type the board name "BRD4162A" in the "My Products" tab on the lower-left of the launcher perspective. And jump to the section Create and Build the Zigbee project.
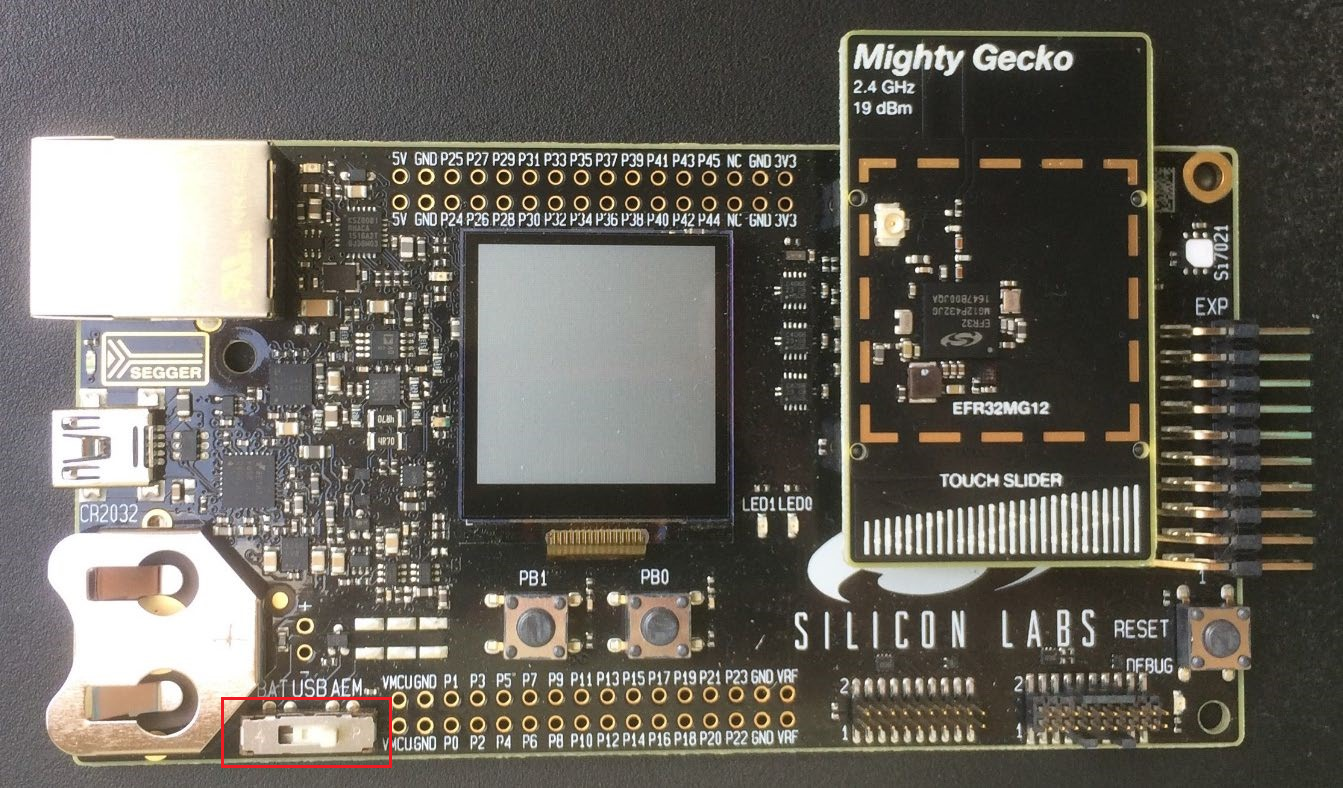
Connect your WSTK using a USB cable to the PC on which has Simplicity Studio installed. For best performance in Simplicity Studio, please be sure that the power switch on the lower left of the WSTK is in the "AEM" (Advanced Energy Monitoring) position.
A bootloader is a program stored in reserved flash memory that can initialize a device, update firmware images, and possibly perform some integrity checks. If the application seems to do not running, always check the bootloader, because lack of it causes program crash.
There are two possible way to have a bootloader application.
- Use Silicon Labs pre-built image (not for all boards).
- Create your own bootloader project.
The 1st option is the easiest solution. Each Gecko SDK contain pre-built bootloader images for different boards. The most suitable for a Zigbee application is the “Internal Storage Bootloader (single image on 1MB devices)”. It fits for the flash size of the device, furthermore it can contribute in OTA firmware update. If there is no any special requirement regarding the bootloader, I recommend using this.
It can be found at c:\SiliconLabs\SimplicityStudio\v4\developer\sdks\gecko_sdk_suite\v2.6\platform\bootloader\sample-apps\bootloader-storage-internal-single\efr32mg12p332f1024gl125-brd4162a\
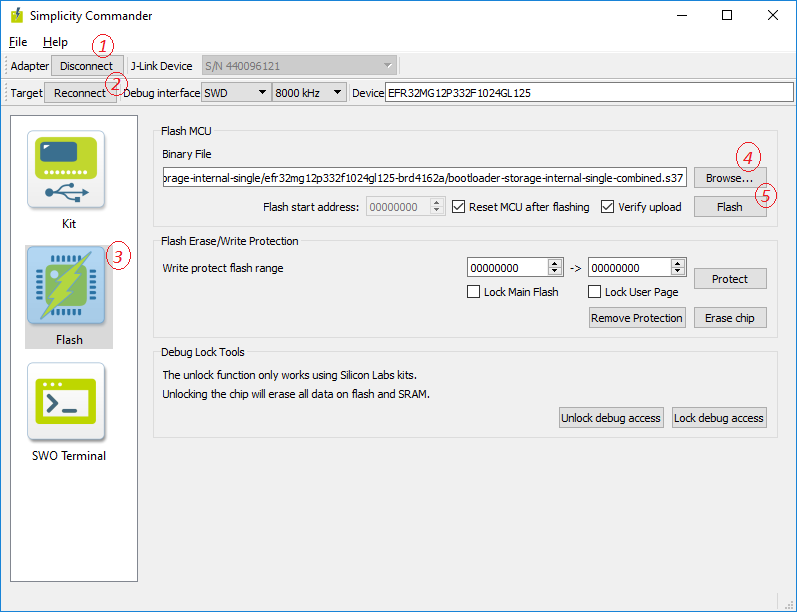
Open the Simplicity Commander for programming the pre-built bootloader image to the device.
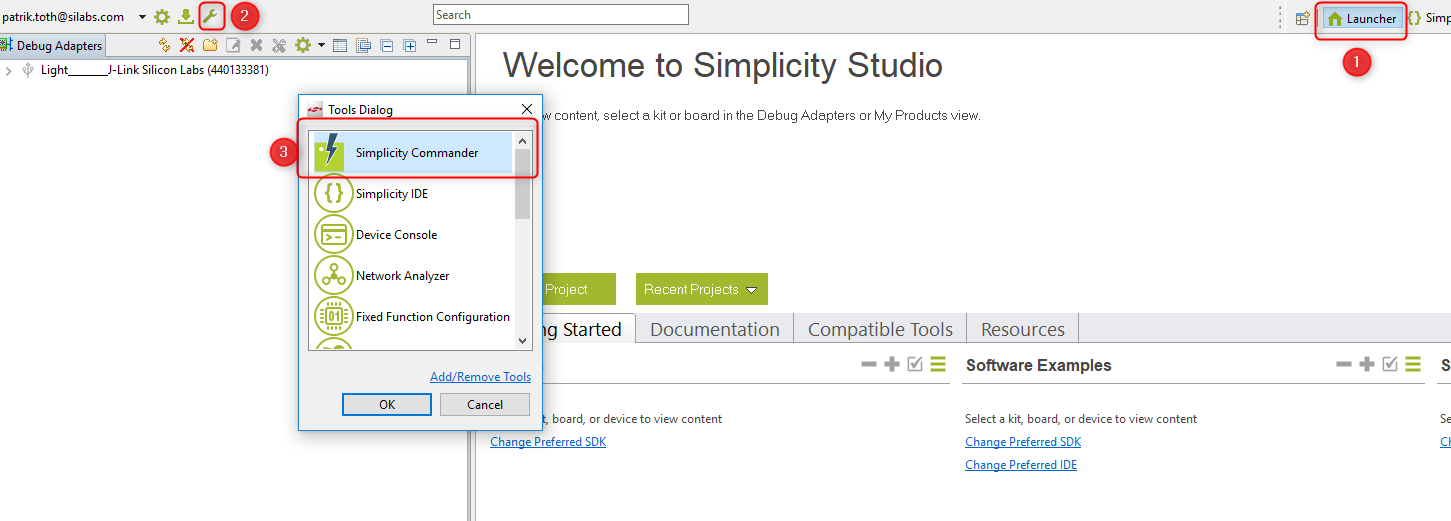
Click the [Connect] button to connect to the J-Link Adapter, then click [Connect] to connect to the Target device, after that the Simplicity Commander will detect the part number of the device as EFR32MG12xxx. Browse the pre-built image, and click the [Flash] button to start the flashing process.
Note: The following 2nd way is non-required if you have programmed the pre-built bootloader image to your starter kit successfully. You can just jump to the section Create and Build the Zigbee project.
The 2nd way is to use the AppBuilder to create-, generate-, and build your own application. It is possible to customize and add new features to it, but the current lab doesn’t detail these possibilities.
- Go to File -> New -> Project. This will bring up the New Project Wizard
- Select “Silicon Labs AppBuilder Project”. Click Next.
- Select “Gecko Bootloader”. Click Next.
- Select the latest version. (Gecko Bootloader 1.9.2). Click Next.
- Select “Internal Storage Bootloader (single image on 1MB devices)”. Click Next.
- Name your project (Whatever name you want). Click Next.
- Select board and compiler. Then finish.
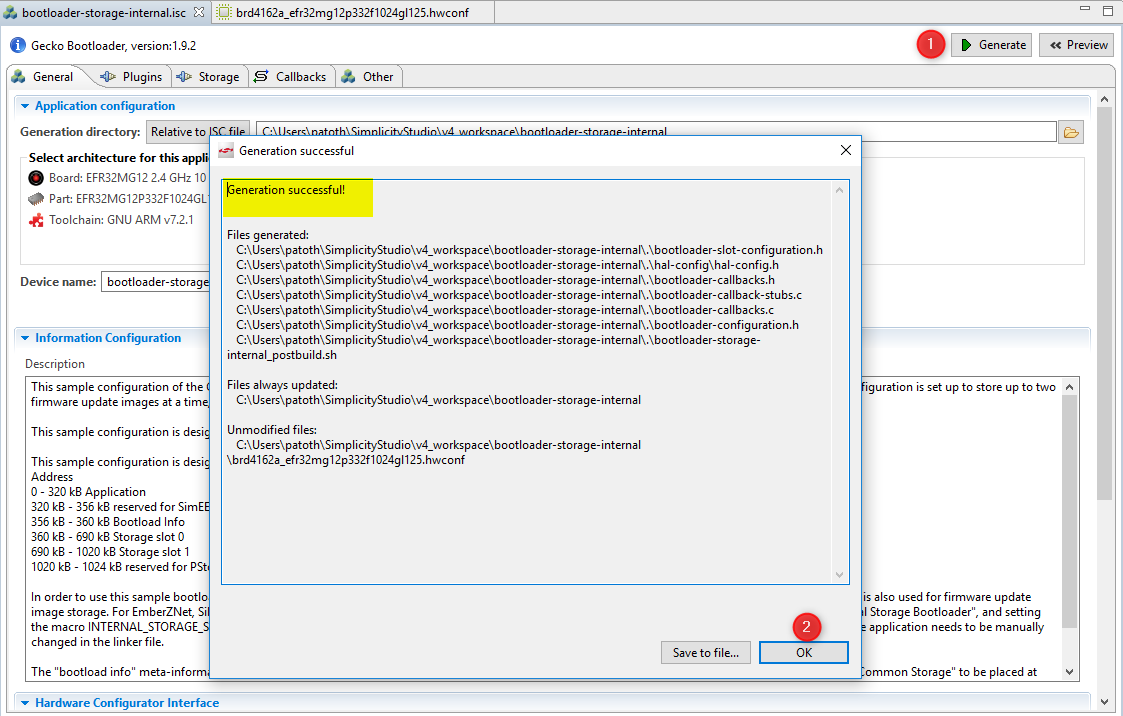
- The new project should have been created now, with the project configuration file (an .isc file) open.
- Click “Generate”. Notice the project files appearing in Project Explorer. A window saying Generation successful will appear. See the figure below.
- Select the project in Project Explorer window and compile your project by clicking on the [Build]
 . Ensure that the build completes without any errors.
The output bootloader-storage-internal-single-combined.s37 file should be downloaded to the target device. I recommend to use the .s37 or .hex, since these files already contain the address where to flash.
Use the Simplicity Commander as what you did above to download the output file.
By having the WSTK connected, the Simplicity Studio will automatically list the available example application in the launcher perspective, click an example project, the Simplicity Studio will new a project based on the selected example.
Note: If you don't have WSTK yet, you also can just type the WSTK name "BRD4162A" in the "My Products" tab on the lower-left of the launcher perspective. The Simplicity Studio will automatically list the available example application in the launcher perspective as well.
Below is the step-by-step instructions.
- Select you Device in the "Debug Adapters" or "My Products" tab on the left. And check the selected SDK version is the required one.
- Expand the Software Examples, find and click the "ZigbeeMinimal" under the group of "EmberZNet 6.6.x.x GA SoC Examples".
- You are asked if you want to switch to the Simplicity IDE, click [Yes].
- Simplicity IDE opens with the new project in AppBuilder view.
- In the Simplicity IDE, click [Generate] on the upper right of the perspective.
- If get any warning that "AppBuilder has determined..., All selected files will be overwritten", click [OK].
- Once generation successfully, click [OK].
- Build you project by clicking [Build] in the top tool bar.
- The build should complete with no errors.
- Right-click the generated hex file, go to [Flash to Device...] and select the device for programming.

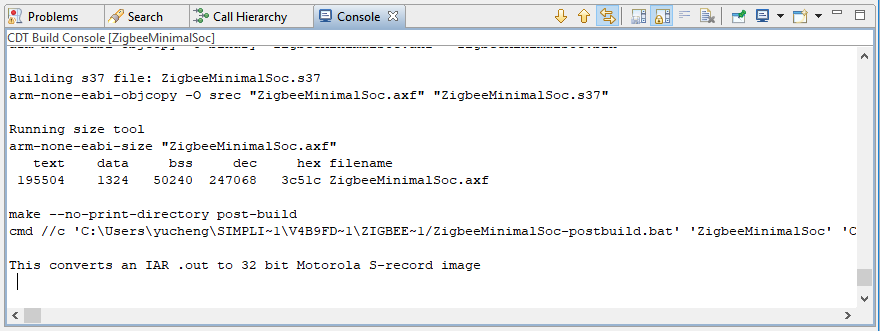
Note: As a small quiz for ensuring that you have finished the preparatory course, please submit the build log of your ZigbeeMinimal project to the 5th item of the Zigbee Preparatory Course feedback.
Due to the size limitation of the feedback form, please just capture the snippet similar as below at the end of the build log in the build console, and submit it.
Running size tool
arm-none-eabi-size "ZigbeeMinimalSoc.axf"
   text	   data	    bss	    dec	    hex	filename
 195504	   1324	  50240	 247068	  3c51c	ZigbeeMinimalSoc.axf

make --no-print-directory post-build
cmd //c 'C:\Users\xxxxxx\SIMPLI~1\V4B9FD~1\ZIGBEE~1/ZigbeeMinimalSoc-postbuild.bat' 'ZigbeeMinimalSoc' 'C:/Users/xxxxxx/SimplicityStudio/v4_workspace/ZigbeeMinimalSoc' '' 'C:\SiliconLabs\SimplicityStudio\v4'
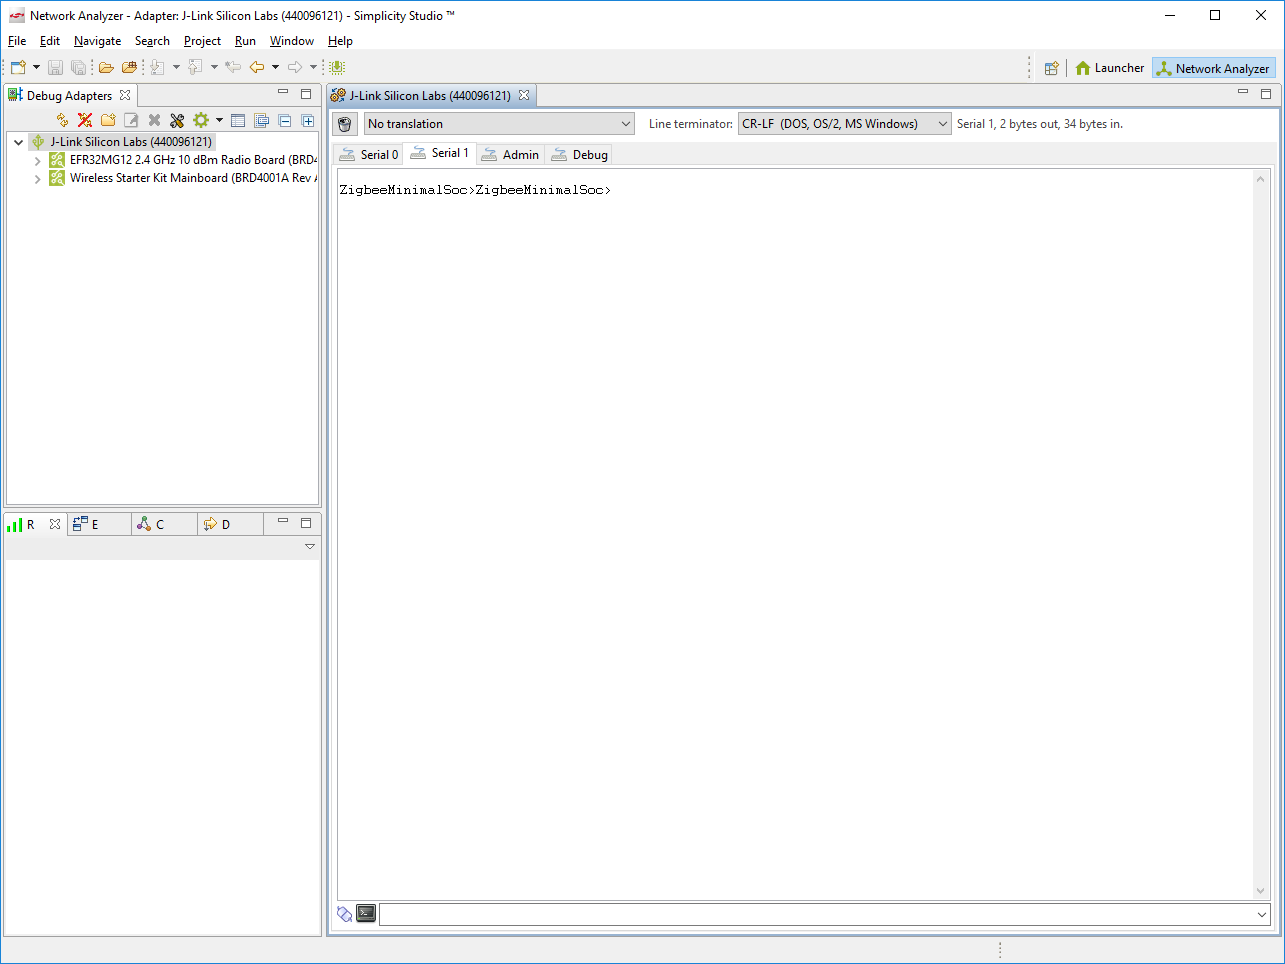
After the image has been downloaded to your development kit, it's possible to communicate with the device. For this purpose, open the Launch console, which is a built-in serial port terminal in the Studio.

If the serial console is opened, switch to "Serial 1" and press "Enter", the console should output the project name similar as "ZigbeeMinimalSoc".
The Zigbee boot camp series training will cover the topics of Zigbee Basic Knowledge, EmberZNet SDK and WSTK introduction, how to form and join the Zigbee mesh network, how to send onoff command over the network, how to use event mechanism and how to access the non-voltage data storage objects.
Although this series of training are designed for new to Silicon Labs Zigbee solution, it highly recommended to go though the documentations below before attending this series course.
UG103.2: Zigbee Fundamentals
Below are some frequently asked questions and the debug guideline.
Simplicity Studio cannot run on my computer.
Please check if your computer has 8GB or more RAM since the SSv4 requires at least 8 GB RAM for Wireless Protocol development.
Why cannot create/generate the project correctly?
Make sure that there is no "-" and no any Chinese characters in your project name. Underscore '_' is the only acceptable characteristic for separating multiple words in the project name.
Why can not build the example project ZigbeeMinimal successfully?
There are lots of linked file in the wireless project, please make sure that your working workspace is in the same drive as Simplicity Studio installed.
Cannot access the github, or it doesn't display the picture
If you are facing some network issue for accessing github in some region, there are abundant workaround solution available for your reference.
We hope that you have completed the preparatory course well, and set up the development environment as the preparation for the coming boot camp series training course. And please fill the Zigbee Preparatory Course feedback after finishing this course, any feedback is appreciated and we will take action for improvement based on the survey result.
 Home |
 ![]() Zigbee |
Zigbee | ![]() Bluetooth |
Bluetooth | ![]() ZWave |
ZWave | ![]() Proprietary |
Proprietary | ![]() Thread |
Thread | ![]() Matter |
Matter | ![]() Hardware |
Hardware | ![]() Common
Common
All resources of this repository are released under license CC BY-NC-ND 4.0 