Homekit over OpenThread - Jim-tech/IoT-Developer-Boot-Camp GitHub Wiki
Table of Contents
Homekit over OpenThread is supported in Gecko SDK suit 3.2 released in 2021Q2. The following two samples are provided:
- homekit_lightbulb_thread
- homekit_lightbulb_dmp
Users can try these samples after reading QSG179 and AN1327. To try homekit over OpenThread, users need to set up the OpenThread Border Router. The steps described in section 7.3 of AN1327 is outdated as the OpenThread project developped so fast.
This page will describe the steps to set up the OpenThread Border Router on RaspberryPi for homekit applications.
To test the homekit applications over OpenThread, users need to keep the homekit controller and the accessories in the same IPv6 subnet. The homekit controller could be any of the following:
- The App
Homeon an ios device. - The
HAT (Homekit Accessory Tester)tool on an macOS device.

Please refer to https://www.raspberrypi.com/documentation/computers/configuration.html#setting-up-a-routed-wireless-access-point for the detailed steps. As a summary, the brief steps are listed below:
-
Install AP and Management Software.
Install
hostapdwhich is an WiFi AP management tool:sudo apt install hostapd
Enable the service, so that
hostapdcan start up automatically.sudo systemctl unmask hostapd sudo systemctl enable hostapdInstall
dnsmasqwhich is an DHCP server and DNS server:sudo apt install dnsmasq
Install
netfilter-persistentand its pluginiptables-persistent, so that the iptables settings can be saved.sudo DEBIAN_FRONTEND=noninteractive apt install -y netfilter-persistent iptables-persistent
-
Set a static IP address for the WLAN interface on the WiFi AP.
Run commandsudo vim /etc/dhcpcd.confto modify the config file, add the following content to the end of the file.interface wlan0 static ip_address=192.168.44.1/24 static ip6_address=fd11:44::1/64 nohook wpa_supplicant -
Enable IP forwarding.
Run commandsudo vim /etc/sysctl.confto uncomment the following lines.net.ipv4.ip_forward=1 net.ipv6.conf.all.forwarding=1 -
Config DHCP and DNS services.
Run commandsudo mv /etc/dnsmasq.conf /etc/dnsmasq.conf.origto backup the original config file, then run commandsudo vim /etc/dnsmasq.confto create a new config file and add the following content to it.interface=wlan0 # Listening interface dhcp-range=192.168.44.100,192.168.44.200,255.255.255.0,24h # Pool of IP addresses served via DHCP domain=wlan # Local wireless DNS domain address=/gw.wlan/192.168.44.1 # Alias for this router enable-ra dhcp-range=fd11:44::1000, fd11:44::fc00, 64, 24h -
Configure the AP software.
Run the following command to ensure the WiFi radio is not blocked by Raspberry Pi.sudo rfkill unblock wlan
Run command
/etc/hostapd/hostapd.confto configure the WiFi AP.country_code=GB interface=wlan0 ssid=NameOfNetwork # config the SSID here hw_mode=g channel=7 macaddr_acl=0 auth_algs=1 ignore_broadcast_ssid=0 wpa=2 wpa_passphrase=AardvarkBadgerHedgehog # config the password here wpa_key_mgmt=WPA-PSK wpa_pairwise=TKIP rsn_pairwise=CCMP -
Configure the iptables to forward the IP packets between eth0 and wlan0.
sudo iptables -t nat -A POSTROUTING -o eth0 -j MASQUERADE
sudo iptables -A FORWARD -i eth0 -o wlan0 -m state --state ESTABLISHED,RELATED -j ACCEPT
sudo iptables -A FORWARD -i wlan0 -o eth0 -j ACCEPT
Then run command
sudo netfilter-persistent saveto save the iptable settings. -
Connected eth0 to the internet, reboot the Raspberry Pi, then connect to the WiFi AP and check if it's working.
- Make sure the client can get both IPv4 address and IPv6 address.
- Make sure you can access the internet when you connect to the WiFi AP.
Please refer to https://openthread.io/guides/border-router/build.md for the detailed steps.
**!!Important:**as the bind9 service will be installed when you install the otbr, and the bind9 service has some conflict with the dnsmasq service. Here we need to stop the dnsmasq service first, then restart that after otbr installation complete.
sudo systemctl stop dnsmasq.service
As a summary, the brief steps are listed below:
-
Clone the OTBR repository:
git clone https://github.com/openthread/ot-br-posix -
Install dependencies:
cd ot-br-posix ./script/bootstrap -
Compile and install OTBR. As we have already set up the WiFi AP, no need to install network manager here.
NETWORK_MANAGER=0 ./script/setup -
Disable the
bind9service.sudo systemctl stop bind9.service sudo systemctl disable bind9.service -
Start
dnsmasq. Then restart the dnsmasq service.sudo systemctl start dnsmasq.service
!!Note:!!
Please note that the latest OTBR repo is not compatible with the RCP sample in Gecko SDK Suite. We need to build the RCP with the github repo https://github.com/openthread/ot-efr32.git. Please refer to https://github.com/openthread/ot-efr32/blob/main/src/README.md to build the RCP.
After you have flashed the RCP to the kit, please connect the kit to the Raspberry Pi, then reboot it, then verify the status of the otbr services.
Run command sudo systemctl status to check the services, and make sure the following services is running:
- otbr-agent.service
- otbr-web.service
-
On the Border Router, run command
sudo ot-ctlto enter the CLI mode. Run the following command to form a thread network.dataset init new dataset commit active ifconfig up thread start -
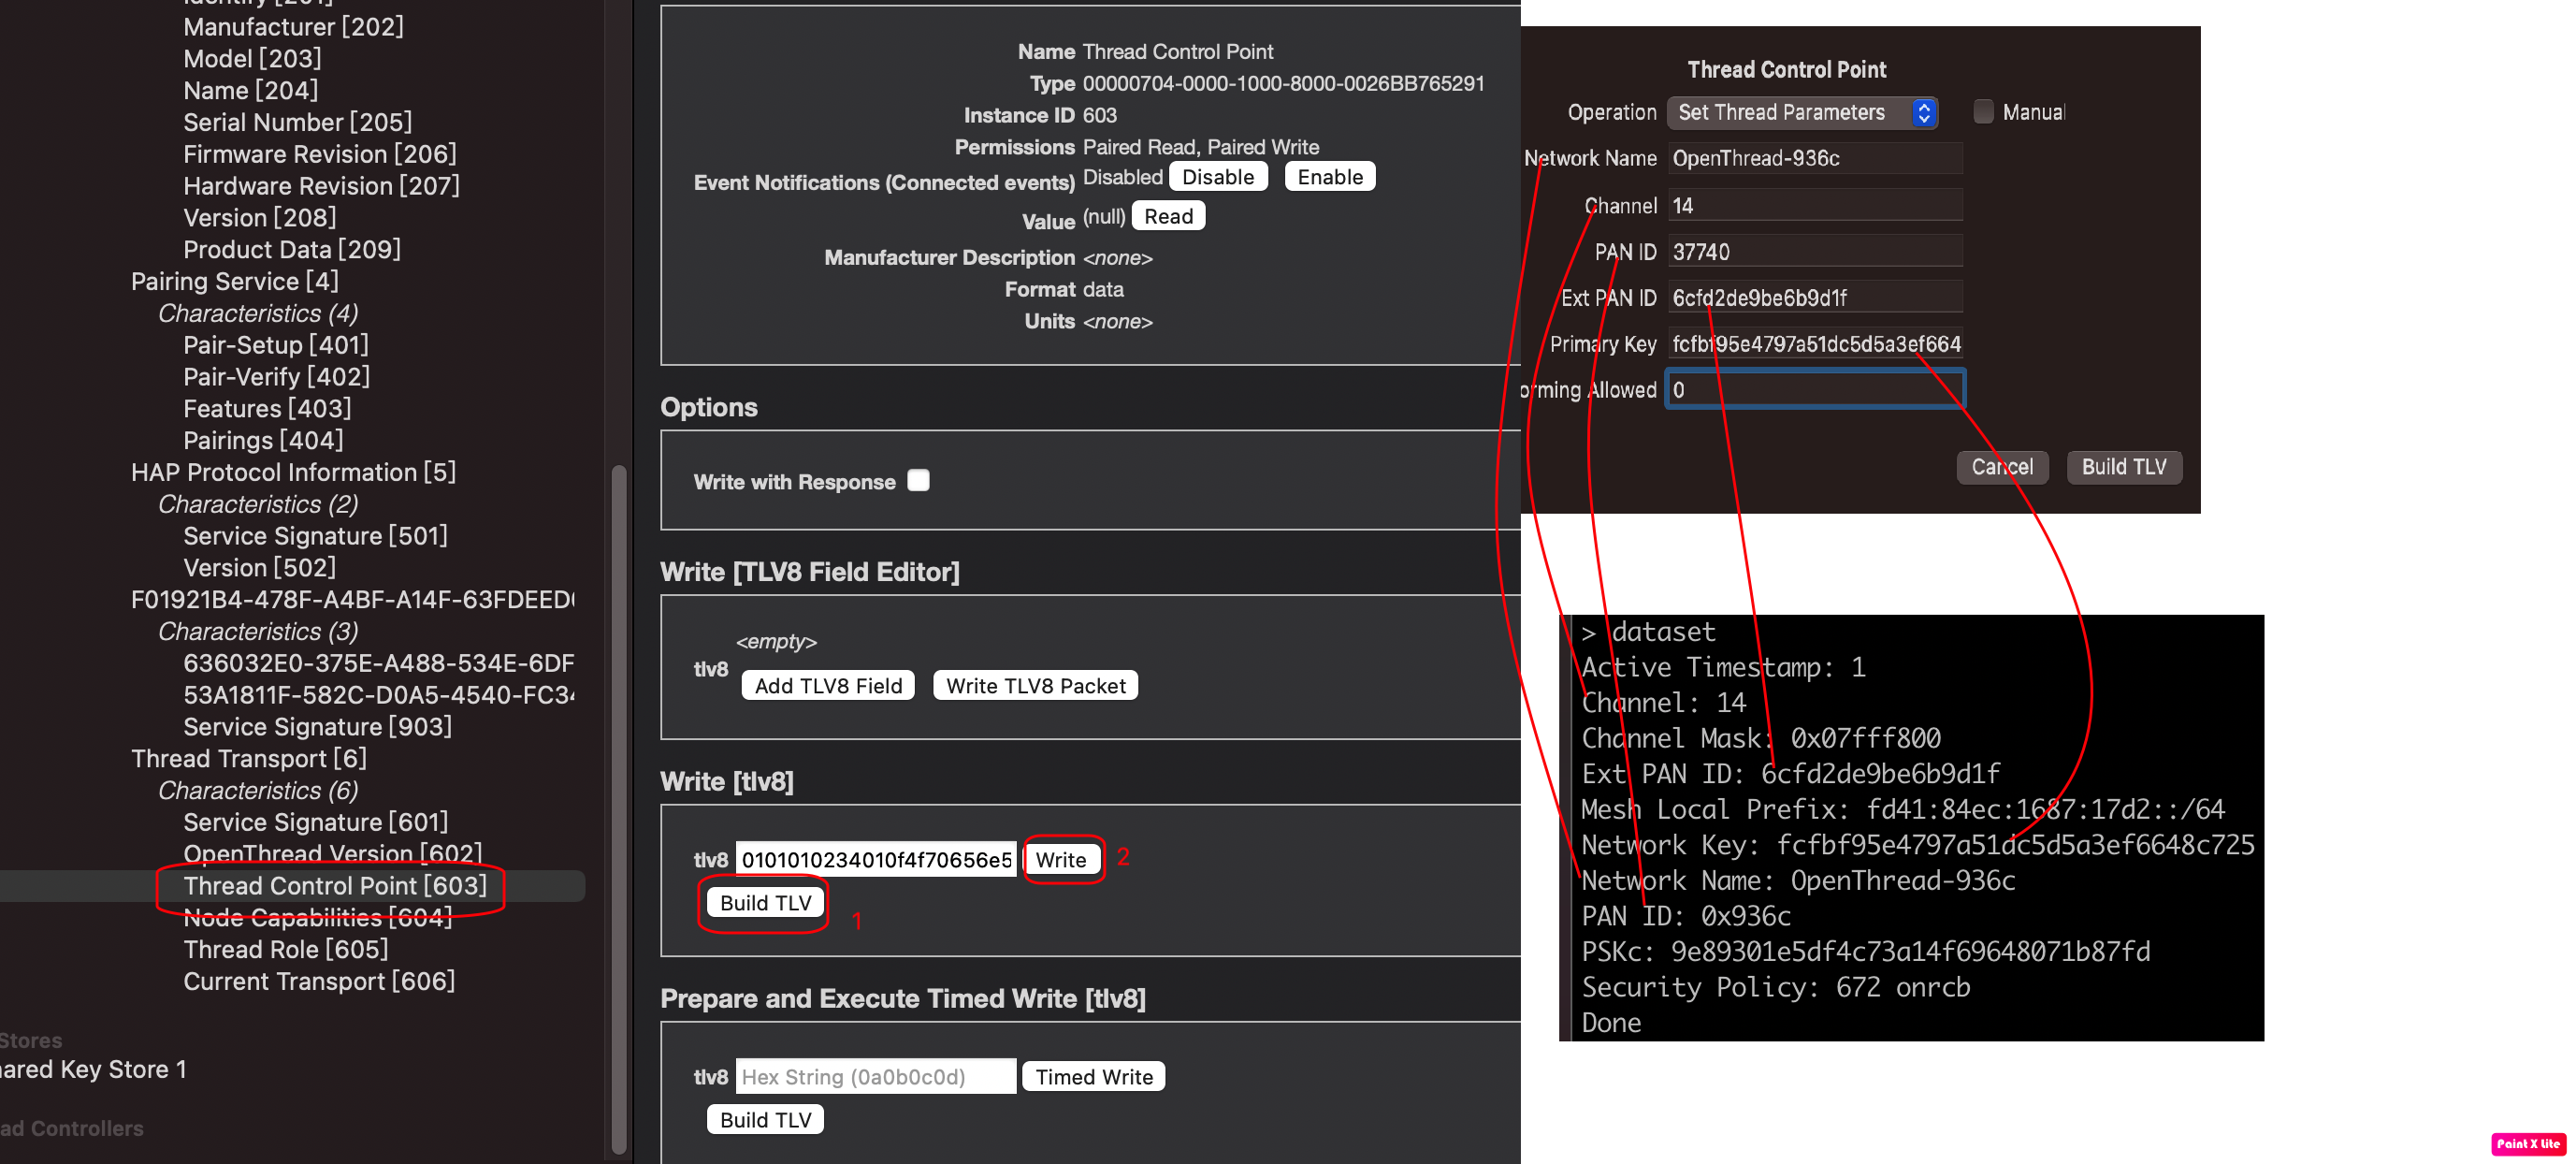
Use command
stateto check the status of the border router until it turns toleader. Then run commanddatasetto get the current dataset. e.g.> dataset Active Timestamp: 1 Channel: 14 Channel Mask: 0x07fff800 Ext PAN ID: 6cfd2de9be6b9d1f Mesh Local Prefix: fd41:84ec:1687:17d2::/64 Network Key: fcfbf95e4797a51dc5d5a3ef6648c725 Network Name: OpenThread-936c PAN ID: 0x936c PSKc: 9e89301e5df4c73a14f69648071b87fd Security Policy: 672 onrcb Done -
Run the lightbulb device, run the following command to join the device.
dataset channel 14 dataset networkkey fcfbf95e4797a51dc5d5a3ef6648c725 dataset commit active ifconfig up thread start -
Check the IP address for the two thread devices with command
ipaddr.> ipaddr fd41:84ec:1687:17d2:0:ff:fe00:fc11 fd41:84ec:1687:17d2:0:ff:fe00:fc10 fd41:84ec:1687:17d2:0:ff:fe00:fc38 fd83:b10f:72f2:f77f:d358:30bf:4fc2:d065 fd41:84ec:1687:17d2:0:ff:fe00:fc00 fd41:84ec:1687:17d2:0:ff:fe00:a800 fd41:84ec:1687:17d2:25d:4e4b:bd7c:2926 fe80:0:0:0:644d:d033:d0e5:f062 Done
- Connect the iPhone/iPad to the WiFi AP of the Raspberry Pi
- Check the IPv6 address of the iPhone/iPad. Ping the IPv6 address from the lightbulb device. Make sure the ping is OK.
- Follow the steps of section 2.1.1 of QSG179 to test.
- Connect the Mac to the WiFi AP of the Raspberry Pi
- Check the IPv6 address of the Mac. Ping the IPv6 address of the lightbulb device. Make sure the ping is OK.
- Follow the steps of section 3.5 of QSG179 to test the DMP sample.
- QSG179 homekit sdk quick start guide
- AN1327 homekit sdk configuring project
- UG493 homekit developers guide
- OpenThread Border Route Build and Configuration
- Setting up a routed wireless access point on Raspberry Pi
 Home |
 ![]() Zigbee |
Zigbee | ![]() Bluetooth |
Bluetooth | ![]() ZWave |
ZWave | ![]() Proprietary |
Proprietary | ![]() Thread |
Thread | ![]() Matter |
Matter | ![]() Hardware |
Hardware | ![]() Common
Common
All resources of this repository are released under license CC BY-NC-ND 4.0 