S2S Azure VPN from Home (Strongswan) - Istrueorwhat/Azure-S2S-VPN-with-Strongswan GitHub Wiki
Why StrongSwan?
I had become in a dilemma about how to test Azure VPN in an S2S way instead of vnet to vnet in order to be as much as possible to the real business topology and really often used VPN connections to Microsoft cloud with the purpose of the Hybrid topologies.
The big challenge with this setup is normally regular people don't have a Home router with a VPN feature or even it is not possible to enable NAT/IP Forwarding (This is going to be required for this guide, if you don't have it you may want to contact your ISP provider in order to get a most recent or advanced Router).
Fortunately digging into different contents over the internet I have found the strongSwan software which is a multiplatform IPsec-Based implementation and most importantly it is open source. Check out more about it here. Remember this is not the only software available for this purpose there is also Openswan or Libreswan however which also may work with S2S connection to Azure.
NOTE: Establishing a VPN connection over the public internet is not a best practice for business purposes and Microsoft also offers ExpressRoute. Learn more about it here.
So this is what this wiki is meant to explain a whole step by step on how to set up an S2S VPN connection from home with strongSwan to Azure Virtual Network Gateway.
Topology
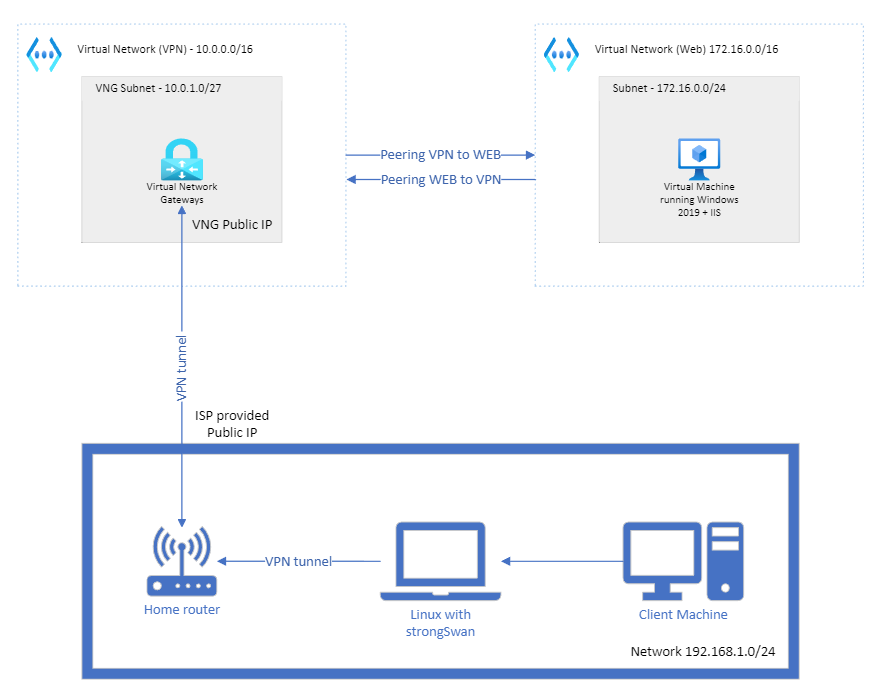
Resource Summary
Azure:
- 2 x Virtual networks (Virtual Network Gateway VNET/Subnet && Web VNET/Subnet)
- 1 Virtual network gateway + PIP (Public IP)
- 1 Windows server 2016 with IIS
IIS is not completely necessary for VPN creation it is just to make the deployment practical having a separate Virtual Network inside azure to test the VPN from the Client machine on-premises accessing the web content.
On-premises:
- 1 ISP router with advanced settings (NAT required)
- Linux machine (where to install StrongSwan)
- Client machine
Azure Resource Creation
NOTE: I am going to be using Azure Powershell this is also possible to be done with Azure CLI and Portal.
Step 1 (VNG creation)
I will start by creating the Virtual Network Gateway diagram side resources VNET/Subnet, VNG + PIP using Azure Powershell from Sample, modified some variables to accommodate with our diagram IP ranges:
#Connect to Azure with powershell
Connect-AzAccount
# Declare variables
  $RG = "strongSwan"
  $Location = "North Europe"
  $VNetName  = "VPN-vnet"
  $FESubName = "default"
  $VNetPrefix1 = "10.0.0.0/16"
  $FESubPrefix = "10.0.0.0/24"
  $GWSubPrefix = "10.0.1.0/27"
  $GWName = "GW"
  $GWIPName = "GWPIP"

# Create a resource group
New-AzResourceGroup -Name $RG -Location $Location
# Create a virtual network
$virtualNetwork = New-AzVirtualNetwork `
  -ResourceGroupName $RG `
  -Location $Location `
  -Name $VNetName `
  -AddressPrefix $VNetPrefix1
# Create a subnet configuration
$subnetConfig = Add-AzVirtualNetworkSubnetConfig `
  -Name $FESubName `
  -AddressPrefix $FESubPrefix `
  -VirtualNetwork $virtualNetwork
# Set the subnet configuration for the virtual network
$virtualNetwork | Set-AzVirtualNetwork
# Add a gateway subnet
$vnet = Get-AzVirtualNetwork -ResourceGroupName $RG -Name $VNetName
Add-AzVirtualNetworkSubnetConfig -Name "GatewaySubnet" -AddressPrefix $GWSubPrefix -VirtualNetwork $vnet
# Set the subnet configuration for the virtual network
$vnet | Set-AzVirtualNetwork
# Request a public IP address
$gwpip= New-AzPublicIpAddress -Name $GWIPName -ResourceGroupName $RG -Location $Location -AllocationMethod Dynamic
# Create the gateway IP address configuration
$vnet = Get-AzVirtualNetwork -Name $VNetName -ResourceGroupName $RG
$subnet = Get-AzVirtualNetworkSubnetConfig -Name GatewaySubnet -VirtualNetwork $vnet
$gwipconfig = New-AzVirtualNetworkGatewayIpConfig -Name gwipconfig1 -SubnetId $subnet.Id -PublicIpAddressId $gwpip.Id
# Create the VPN gateway
New-AzVirtualNetworkGateway -Name $GWName -ResourceGroupName $RG `
-Location $Location -IpConfigurations $gwipconfig -GatewayType Vpn `
-VpnType RouteBased -GatewaySku VpnGw2
Step 2 (Windows Server 2019 + IIS)
I will use the following Azure PowerShell script to create the Windows Server 2016 Datacenter and after creation, I invoke the command to install the IIS service. As you could see on the Script I am creating the VM with a public IP and allowing ports 80 (HTTP) and 3389 (RDP). This is only to test after creation as soon we have the S2S VPN we are going to be accessing the WEB over private IP.
# Declare variables
  $RG = "strongSwan"
  $VMname = "WebServer"
  $Location = "North Europe"
  $VNetName  = "WEB-vnet"
  $FESubName = "default"
  $VNetPrefix1 = "172.16.0.0/16"
  $FESubPrefix = "172.16.0.0/24"

# Create a virtual network
$virtualNetwork = New-AzVirtualNetwork `
  -ResourceGroupName $RG `
  -Location $Location `
  -Name $VNetName `
  -AddressPrefix $VNetPrefix1
# Create a subnet configuration
$subnetConfig = Add-AzVirtualNetworkSubnetConfig `
  -Name $FESubName `
  -AddressPrefix $FESubPrefix `
  -VirtualNetwork $virtualNetwork
# Set the subnet configuration for the virtual network
$virtualNetwork | Set-AzVirtualNetwork
#Create VM
New-AzVm `
    -ResourceGroupName $RG `
    -Name $VMname `
    -Location $Location `
    -VirtualNetworkName $VNetName `
    -SubnetName $FESubName `
    -SecurityGroupName 'myNetworkSecurityGroup' `
    -PublicIpAddressName 'myPublicIpAddress' `
    -OpenPorts 80,3389
While the script it is running it is going to pop up with the following window:
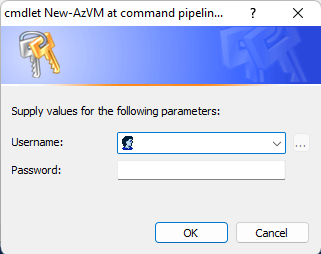
You have to enter the UserName and Password for the admin user of the Web VM and save them you will need it if RDP is required.
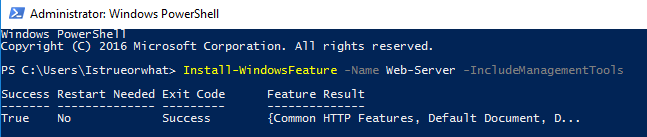
As soon VM is created we have to run the following command on Powershell to install the IIS service for that we are going to RDP on the VM using the Public IP and run it on PowerShell as Admin, as soon finishes we could go and try to access the website over the public IP of the VM to make sure the Web server is running correctly:
Install-WindowsFeature -Name Web-Server -IncludeManagementTools
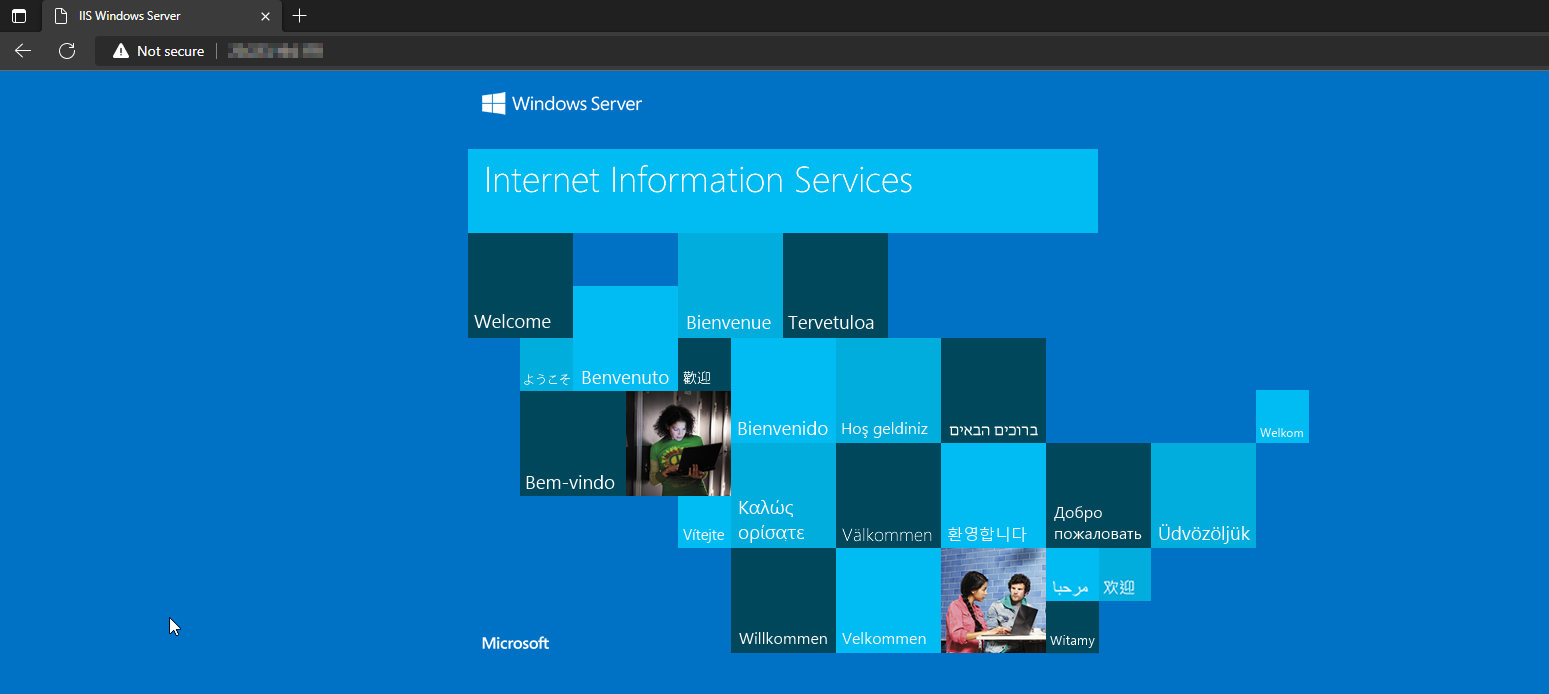
Open your preferred browser and navigate to http://PublicIPofVM should retrieve the default website of IIS as follow:
Step 4 (Make sure of communication between VNET's)
Now that we have the Azure resources created and prepared to go and configure the On-premises side we need to make sure there is a connection between the VNET's.
For that I am going to be using the portal and creating a peering between VPN-vnet and WEB-vnet, if this is not done as soon as we are connected with the S2S VPN connection we wouldn't be able to establish a connection to the WEB server internally
Open the portal https://portal.azure.com and go to Resource Groups -> strongSwan -> VPN-vnet -> Peerings
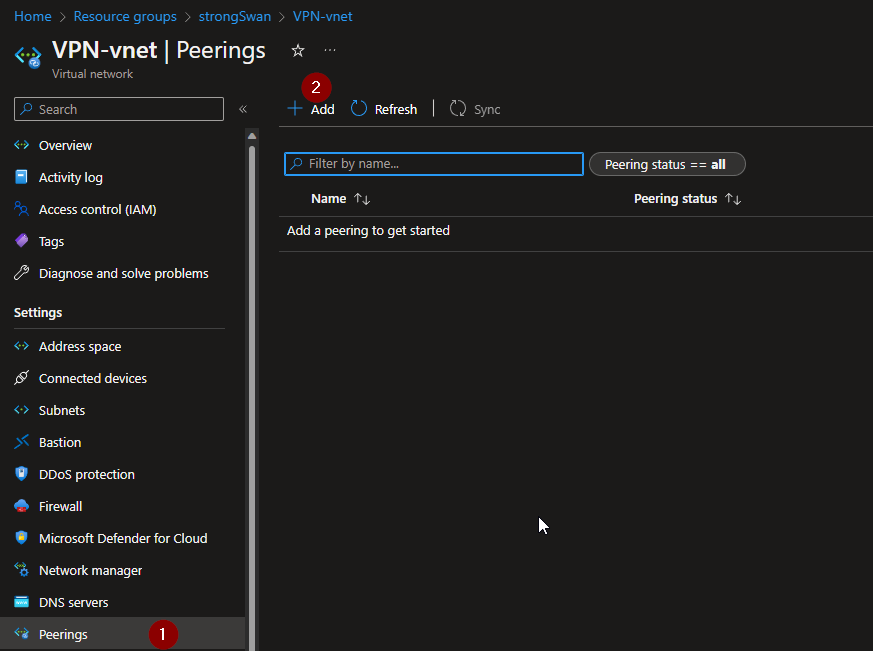
As shown in the picture click on add, as soon as you get the add peering page fill all the required information as follows:
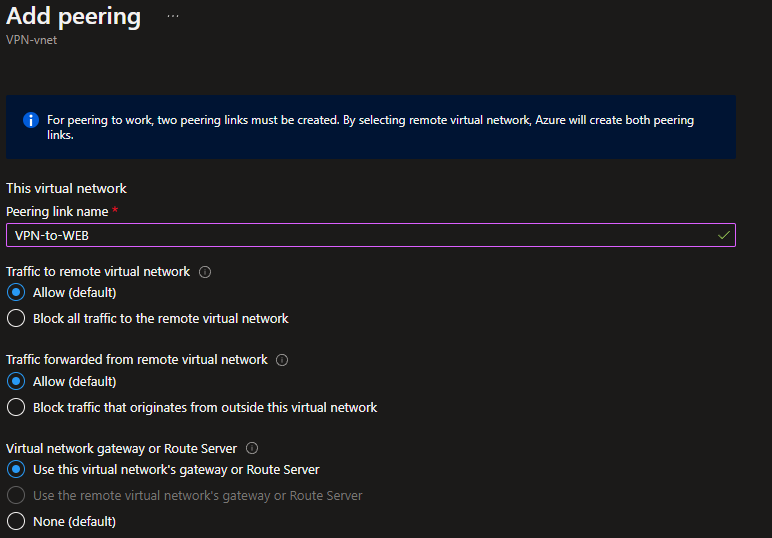
It is important for the VPN-vnet side to select the option "Use this virtual network's gateway or Route Server" since we are going to use the VNG as the Gateway for our internal VNETS to communicate with on-premises
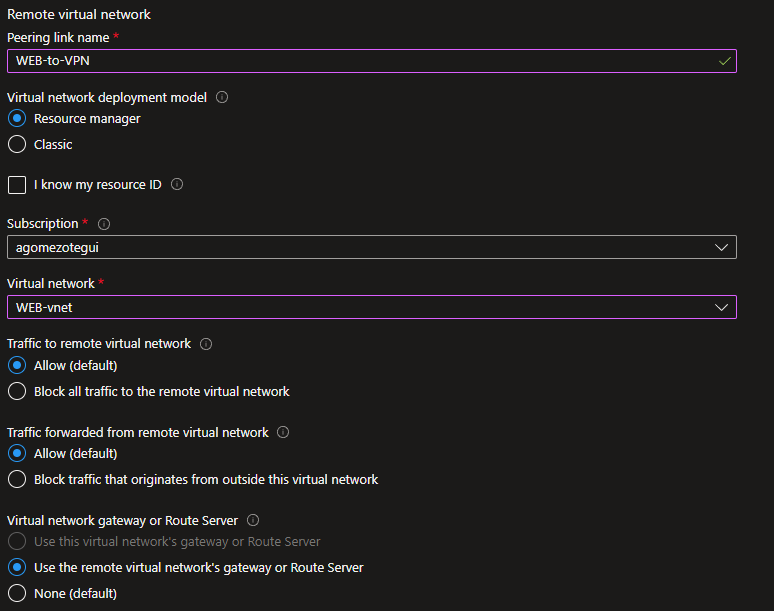
Also on the WEB-vnet side it is important to set the option "Use the remote virtual network's gateway or Route Server" so any communication out of the Azure vnet ranges is going to be using the VNG.
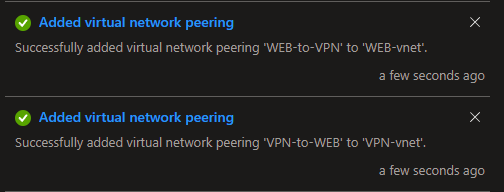
With everything verified we should be good to click on add and get the notification confirming both peerings had been created correctly:
if there is any issue please refer to the error message, which normally provides help on what needs to be done to solve the issue, in case you get stuck and it is not possible to find any solution open a support request with Microsoft support.
Now that we are done with Azure side lets move on to install and check what it is required in on-premises.
On-premises Setup
From an on-premises perspective now we are going to need some quick steps to get ready, first of all, it is needed to have a Linux bases system to install strongSwan, I personally had a Laptop with a Kali distro installed on it and will use it for this test however if you do not have any physical machine it is possible to create a Virtual one using VirtualBox or VMware virtualization software (or any other).
Also, you need a client machine your personal computer running Windows 10 or Windows 11 should be fine.
Last but not least we need to get to know which is our home network range and how to access the home router, normally Home ranges are 192.168.0.0/24 or 192.168.1.0/24 and usually, the Router configuration could be accessed over the first IP of this ranges which is also the gateway of all the devices connected to the network.
Now that we know that I am moving to the Linux machine to install strongSwan for that I am going to connect over SSH to my Kali machine and install the service:
Login with ssh user@privateIP as soon you have logged in elevate the privileges to root user sudo su.
install the strongSwan software with the following command:
apt install strongswan
It is required to enable some configuration on the system in order to be able to forward the packets to the VPN network as soon it is established since the VM by default it is not configured with such a feature.
we are going to modify the system variable file located on /etc for that we could use one of our terminal text editors (I am going to use nano):
nano /etc/sysctl.conf
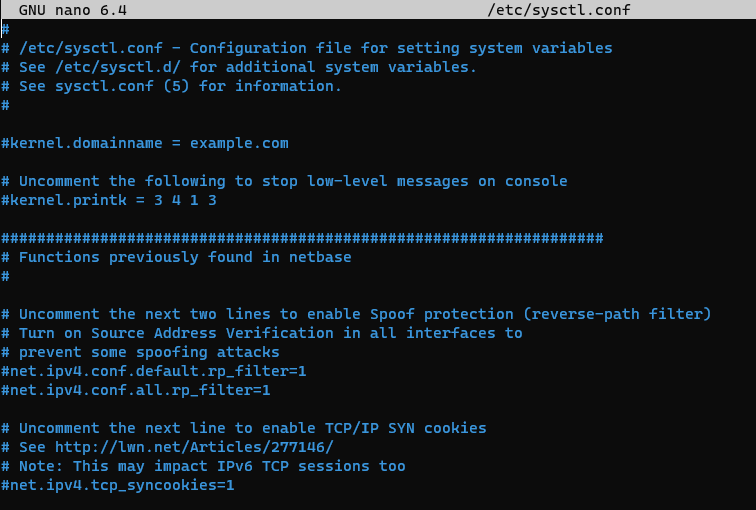
Let's move to the end of the file with the down arrow and add the following lines:
net.ipv4.ip_forward = 1
net.ipv4.conf.all.accept_redirects = 0
net.ipv4.conf.all.send_redirects = 0
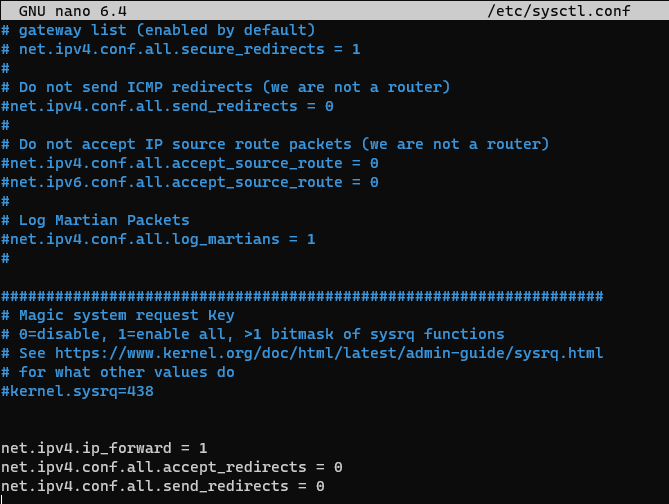
should look something like this:
Save the file and move on to the next step which is going to modify the IPsec config files required for the VPN connection /etc/ipsec.conf and /etc/ipsec.secrets before changing any setting lets make a backup of the current configuration so in case there is any issue we could recover the files easily:
cp /etc/ipsec.conf /etc/ipsec.conf.bk
cp /etc/ipsec.secrets /etc/ipsec.secrets.bk
Now it is time to configure the /etc/ipsec.conf for that let's use nano again and add the following lines to the file:
nano /etc/ipsec.conf
add the following:
config setup
        charondebug="ike 1, knl 1, cfg 0"
        uniqueids=no
        charondebug="all"

conn vpn
        type=tunnel
        keyexchange=ikev2
        aggressive=no
        authby=psk
        auto=add
        ike=aes256-sha1-modp1024
        esp=aes128-sha1
        ikelifetime=480m
        left=<PUBLIC_IP_VNG>
        leftsubnet=<Subnet in azure>
        right=<PRIVATE_IP_LINUX>
        rightsubnet=192.168.1.0/24 (Change this with your on-premises subnet)
        dpddelay=300s
        dpdtimeout=45s
        dpdaction=restart
        rekey=no
        keylife=3600s
        closeaction=restart
With the previous step, we have configured the VPN connection name as "vpn" and all the settings this ones should be equal to the same configuration we are going to set up on Azure VNG.
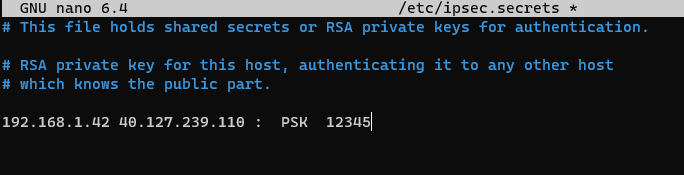
Now that we have the config file done we need the last step modify the ipsec.secrets where we are going to save the shared secret to establish the connection, again we are going to use nano:
´nano ipsec.secrets´
I am going to be using a simple shared secret "12345" however it is important to set the exactly same number of spaces on the syntax of the file:
192.168.1.42 40.127.239.110 : PSK 12345
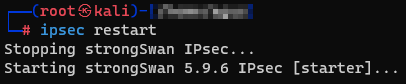
with this, we have completed the configuration and we should restart the IPsec service and check there are no issues with what we have configured, to restart the service let's use ipsec restart. We should get something like:
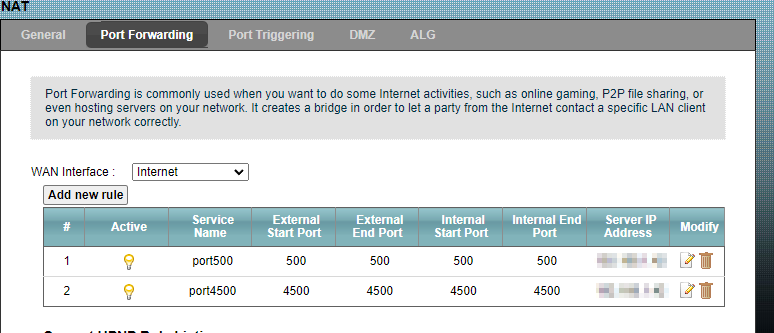
As our last step before connecting to the VPN on the on-premises side, we need to configure a NAT rule on the home router so we will be setting the ports 500 and 4500 used for IKEV2 and IPsec. As shown in the following picture of netstat -nao these ones are in UDP Listening on the Linux machine with strongSwan installed:

in order to set the NAT rule on the Home router I have identified the IP of the configuration page on my case 192.168.1.1 and accessed it over HTTP on any browser, started the advanced console and configured the NAT rules for the Linux machine IP as backend server:
Create a connection on Azure VNG
Now that we have all the settings configured and all the resources created on Azure, we are still missing the VPN connection on the Azure VNG, in order to create this we are going to run the following Powershell script:
#Declare Variables
$LNGName = "Onpremises-VPN"
$RG = "strongSwan"
$Location = "North Europe"
$GWName = "GW"
# Create the local network gateway
New-AzLocalNetworkGateway -Name $LNGName -ResourceGroupName $RG `
 -Location $Location -GatewayIpAddress 'PublicIPofISP' -AddressPrefix @('192.168.1.0/24')
# Configure your on-premises VPN device
# Create the VPN connection
$gateway1 = Get-AzVirtualNetworkGateway -Name $GWName -ResourceGroupName $RG
$local = Get-AzLocalNetworkGateway -Name $LNGName -ResourceGroupName $RG
New-AzVirtualNetworkGatewayConnection -Name VNet1toSite1 -ResourceGroupName $RG `
-Location $Location -VirtualNetworkGateway1 $gateway1 -LocalNetworkGateway2 $local `
-ConnectionType IPsec -ConnectionProtocol IKEv2 -RoutingWeight 10 -SharedKey '12345'
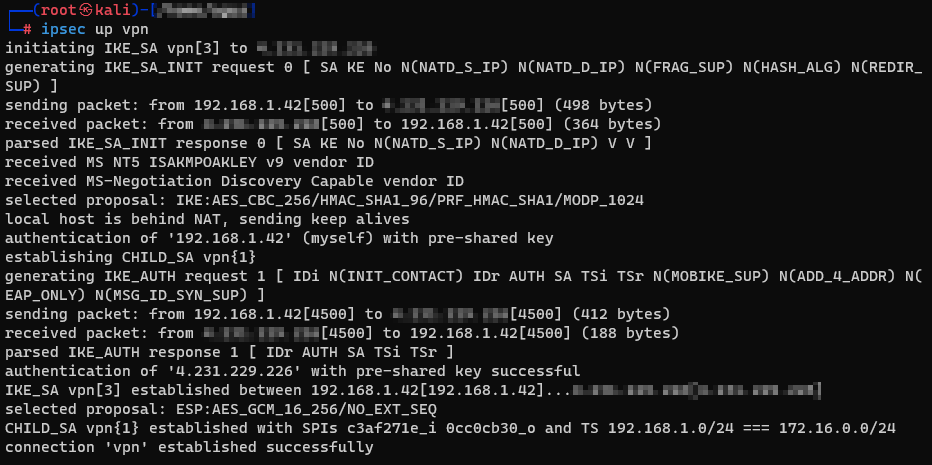
As soon as the script completes and if there has not been any issue we should be fine to start the VPN connection from the Linux machine in order to do that we could go to the Linux VM and run the following command:
ipsec up vpn
if everything is fine we should get the following output confirming it is connected successfully:
Testing connectivity
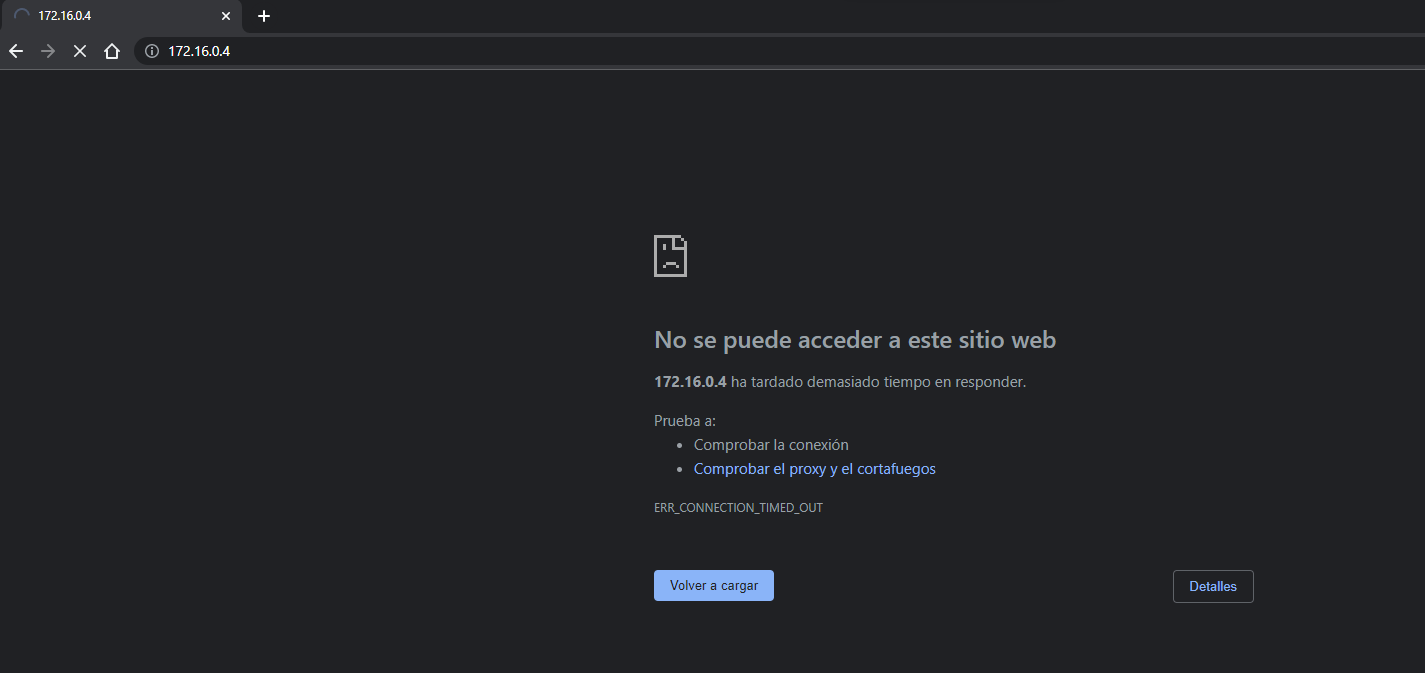
Now that we have connectivity it is time to try accessing the Website however this time using the internal IP of the Web server from the client machine on-premises. By checking the Private IP on the portal we see it is 172.16.0.4 I do open a browser and attempt to reach http://172.16.0.4 however I am still unable to connect:
and this is because the Client machine in on-premises by default it is using as a gateway the Home router IP 192.168.1.1 and doesn't know how to reach this other internal subnet. If we check on Windows the routes we do see all of them are going to the home router:
Command route print

We need to add a route for destination 172.16.0.0/24 to go over the Linux VPN machine, this is possible to accomplish with the following command in Powershell as administrator:
route add 172.16.0.0 mask 255.255.255.0 192.168.1.42

and route print looks like this:

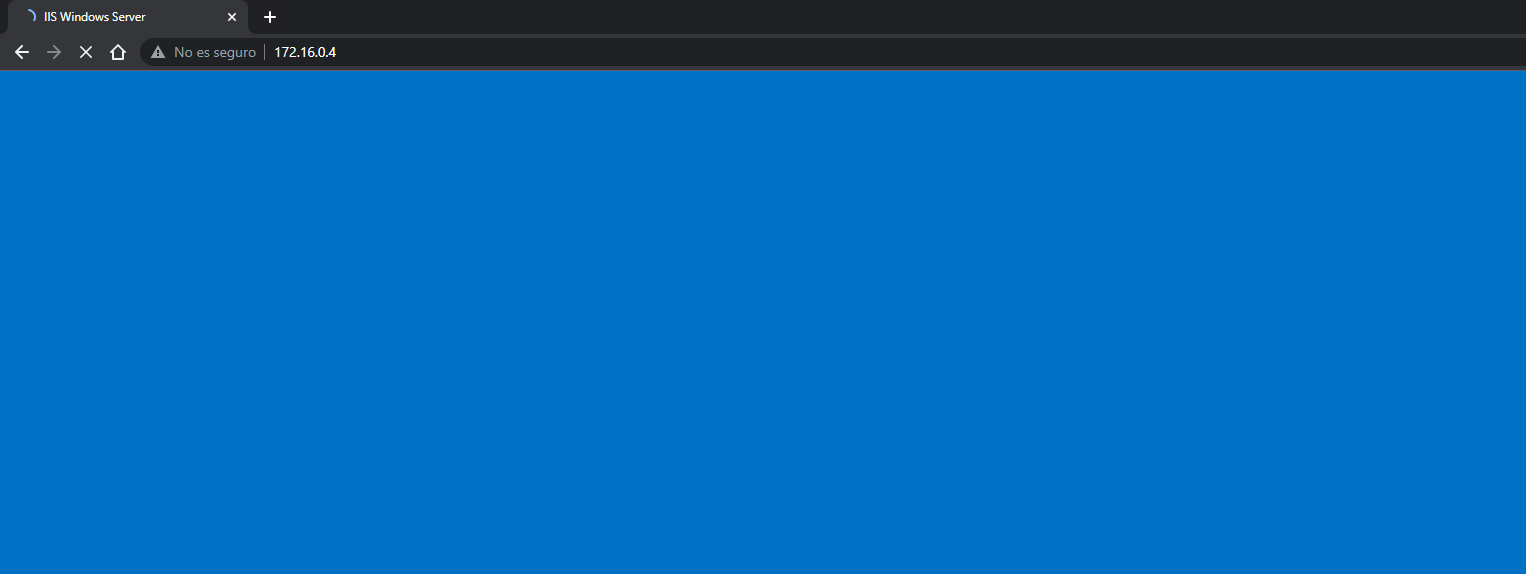
Looking back to the browser now I am able to access the website content:
Congrats you reached the end successfully!! 👍