Building the Environment - IronMansDaughter/Sys-255 GitHub Wiki
Lab 1:
Assign Interfaces on Firewall
-
Firewall-Right click-edit-change network adapter 1 to WAN and make second network adapter to LAN All the other machines should stay on the LAN Make note of adapter 1's(WAN) MAC address and adapter 2's(LAN) MAC address
-
Power on Firewall and open web console
-
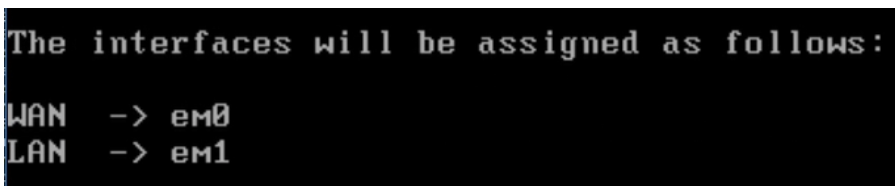
In terminal-"Enter an option" -1 - WAN = em0 and LAN = em1 (if asked for another interface-just hit enter)
-
If successful it should look like this-
Set Interface IP Address
Select 2 to Set interface IP Address
-
Select 1 again to pick the WAN interface - Do not use DHCP for the WAN IPv4 address
-
You are using a 24 bit subnet mask
-
For the WAN, your upstream gateway is 10.0.17.2 - Use the gateway as your IPv4 name server as well - We will not be using IPv6, respond no when asked about DHCP.
-
Press ENTER to bypass IPv6 configuration - When asked about HTTP for the GUI, respond no (we want to use secure https)
Select 2 again to configure the other Interface's IP Address
-
Select 2 to pick the LAN interface - We are not using DHCP
-
Your LAN IP Address is 10.0.5.2.
-
You are using a 24 bit subnet mask
-
Press ENTER - You do not have an upstream LAN gateway (you are the gateway for the LAN).
-
No DHCP - Press to bypass IPv6 configuration
-
Do not enable a LAN DHCP Server - Do not revert to HTTP
Set up Local Admin Account
-
Open lusrmgr.msc in wks01
-
Create a new user with your first and last name - Description = New Local Admin Acct - check Password never expires
-
Right click on your new user - go to properties - member of - object=group - location=wks01-NAME - object names=wks01-NAME\Administrators
-
Select ok and then log out and log in
Windows 10 - Work Station Set up
-
Make sure the adapter is set to your LAN
-
Open File Explorer - Right-click on “This PC” - Click “Properties” - Click on “Change Settings” - Click “Change” next to “To rename this computer…” - Then type: wks01-yourfirstname - Check “firstname” to your real first name.
-
run whoami and hostname to make sure you're in your local account
-
Network Configuration - Ethernet - adapter - IPv4 - The follwing info should look this the photo below

fw01 gui configuration
-
Navigate to fw01's IP LAN IP address (bypass any certificate warning). - Type 10.0.5.2 in web browser in url search
-
pfsense - user = "admin" and password = "pfsense"
-
Skip over the wizard and leave the setting checked to override the DNS server on PPP/WAN
System Wizard: General Information
Hostname: fw1-yourfirstname
Domain: yourfirstname.local
Primary DNS: 8.8.8.8
System Wizard: Configure WAN Interface
RFC1918 Networks: Uncheck "Block private networks from entering via WAN"
System / User Manager: Set Root Password
Lab 2:
-
Make sure ad01 is on LAN for Network Adapter
-
Change admin password to whatever you want - This local password will end up being the Domain Administrator's password!
Host and Network Configuration
-
Open and start server manager- either config this way or the way in #2
-
Click the network icon in the bottom right of your screen and change the internet settings to the following:
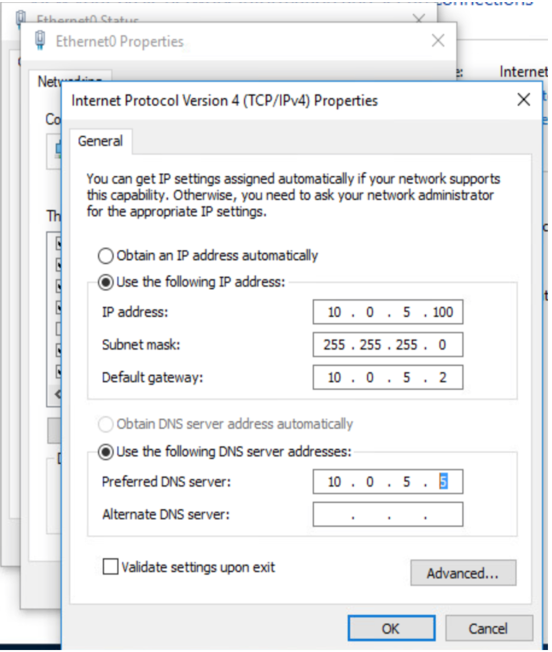
IP Address: 10.0.5.6
Netmask: 255.255.255.0
Gateway 10.0.5.2 (Make sure fw01 is running).
DNS 10.0.5.
-
Select "yes" to discoverable option if prompted
-
Reboot
Network Checking
- Use powershell to run "whoami" and ping google.com to test external connectivity
Installing ADDS Role
-
Open Server Manager - click "manage" in menu - select "Add roles and Features"
-
Select Active Directory Domain Services->Add Features. Pick Active Directory Domain
-
Choose "restart" - select "yes" on the confirmation dialog
Promoton
-
Click the warning icon by the flag in the server manager
-
Click "Deployment Configuration" and then select "add new forest"
-
Root Domain Name = your first name.local
-
Enter a DSRM password
-
You'll see a DNS error, that's fine - click through to install and reboot
-
Log in as your domain administrator(name in all caps\Administrator), not your local administrator
DNS You can check to see the change in the DNS server address - optional
Adding a DNS Record
-
Go to your DNS - right click on ad01-yourname 10.0.5.6 - select DNS manager
-
Find and expand the forward lookup zone for your new domain
-
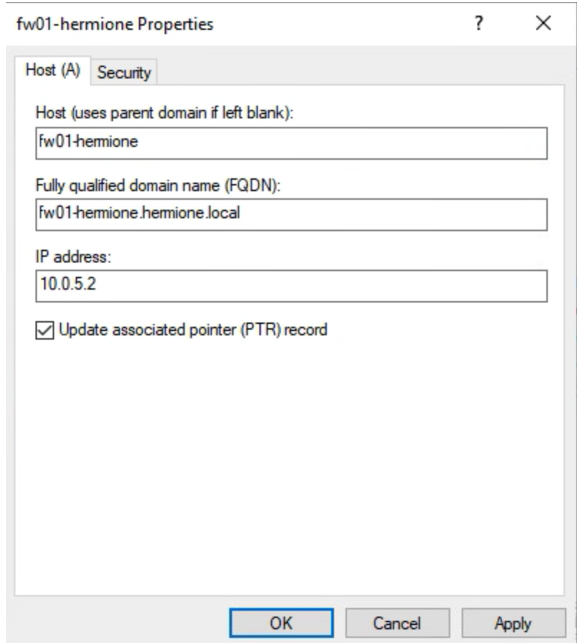
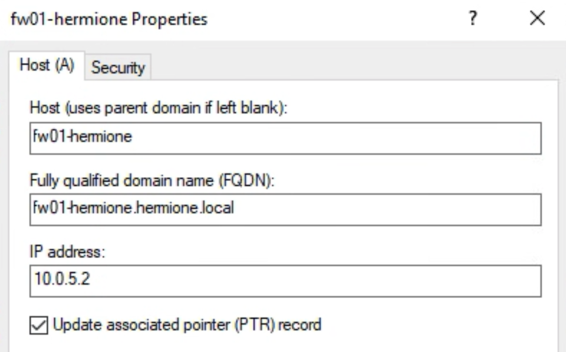
Right click yourname.local and select "New Host (A or AAAA)"
-
Host = "fw01-yourname" - Fully Qualified Domain Name = "fw01-yourname.yourname.local." - ip address = "10.0.5.2" - check update PTR
Reverse DNS
-
In DNS manager right click "Reverse Lookup Zones" - new zone - use the default, but add a Network ID 10.0.5
-
Create a new PTR record from the A record of fw01-yourname and ad01-yourname by unchecking, applying checking the update PTR record check box, and re-applying fw01's properties.
- Refresh the view by hit the green icon at the top bar
Create Named Domain Users on ad01
-
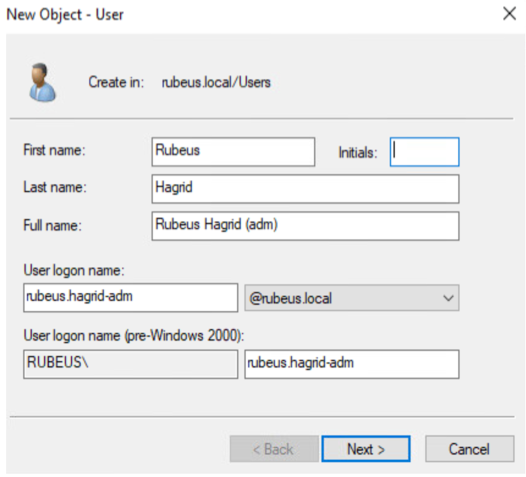
On AD01, find the Active Directory Users and Computers option. - right click user folder - add a new User.
-
Full name = fist last (adm) - user logon name = [email protected] - pre-Windows2000 = "FIRST"(all caps) - first.last-adm
-
Uncheck user must change password at next login.
-
Right click new adm acct - add to group - object type = "Groups or Built..." - local = "yourname.local" object name = "Domain Admins"
-
Create a non-privileged account (Skip the addition to Domain Admins) for user first.lastname
Preparing wks01 to join yourname.local
- Set wks01's DNS to 10.0.5.6 (ad01's address), since our DNS has those 2 new A and PTR records created earlier.
- Quickly run "nslookup 10.0.5.2" - "nslookup fw01-fistname.firstname.local" - "ping fw01-fistname.firstname.local" "ping firstname.local"
Joining WKS01 to your new domain
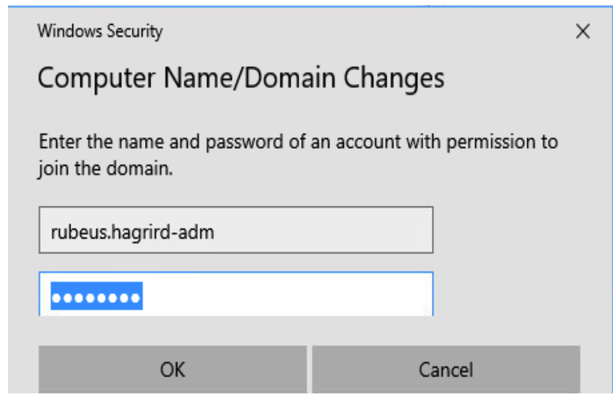
- System Properties - computer name - change - Change name to = "wks01-firstname" - member of domain = firstname
-
For password use the one you created in AD01
-
Once welcomed into domain - restart
Lab 3
Networking dhcp01
-
Config dhcp machine to be the LAN and take a snapshot
-
Log into root: default pass word: Centos | root | Ch@mpl@1n!22
-
Type command: "nmtui" (use arrow keys to navigate.) - change IPv4 from auto to manual - click hide to show and then change the settings
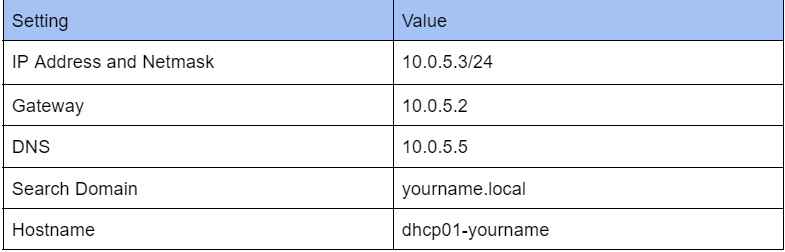
4.. set dhcp01 network settings to the following:
lastly make sure there is an "X" in the automatically connect option
-
Navigate back to menu and change hostname and hit ok and then back to menu and then hit "quit"
-
type command in terminal: "systemctl restart network"
-
Exit and then get back into root
Adding a privileged user
-
Type command: "useradd "firstname"" - type command: "passwd "firstname"" and then set your new password
-
Type command: "usermod -aG wheel "firstname"" - then exit and log in with your new user in terminal
-
ping google.com, ad01, and fw01 t test if you did it correctly
DNS - Add A and PTR records for dhcp01 to the DNS configuration on ad01.
-
Go to your DNS - right click on ad01-yourname 10.0.5.6 - select DNS manager
-
Find and expand the forward lookup zone for your new domain
-
Right click yourname.local and select "New Host (A or AAAA)"
-
Host = "dhcp01-yourname" - Fully Qualified Domain Name = "dhcp01-yourname.yourname.local." - ip address = "10.0.5.2" - check update PTR
Reverse DNS
-
In DNS manager right click "Reverse Lookup Zones" - new zone - use the default, but add a Network ID 10.0.5
-
Create a new PTR record from the A record of dhcp-yourname and ad01-yourname by unchecking, applying checking the update PTR record check box, and re-applying dhcp's properties.
- ping -n 1 dhcp01-rubeus to test if it worked
Remote Access from ad01
-
Type command in terminal: "ssh firstname@dhcp01-firstname"
-
Type: "mkdir sys255" enter "cd sys255/" enter "pwd" enter "sudo yum install tree" enter - input password
-
When installation is complete exit ssh if you want/ we need to re-ssh right back in to install dhcp services
Lab 4
-
ssh from ad01 to dhcp01
-
login as yourfirstname user("janelle") - input password
-
Type command: "sudo yum install dhcp"
-
Type "y" for yes - and stay in the terminal
Configuring DHCP Services
-
Type: "sudo -i" and input password
-
Type: "vi /etc/dhcp/dhcpd.conf" enter
-
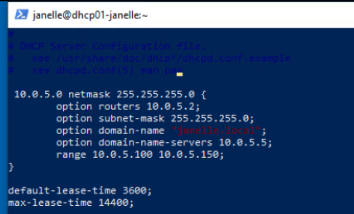
Enter the following into your new file below the comments (# denotes a comment). Change the domain-name to yourname.local.

- When down save and quit by hitting escape and typing :w - enter - then hit escape again and type :quit or :quit!
Starting DHCP Services
- Make sure you're in root and then type the command: "systemctl start dhcpd" enter - stay in the same terminal
Enabling the service to start at boot.
- While in root type: "systemctl enable dhcpd"
Configuring the Firewall to allow incoming DHCP requests
-
(root)Type command: "firewall-cmd --list-all"
-
"firewall-cmd --add-service=dhcp --permanent"
-
"firewall-cmd --reload"
-
"firewall-cmd --list-all" - the services section should look like this now:

- Exit root and then exit again
Windows 10 DHCP Client
-
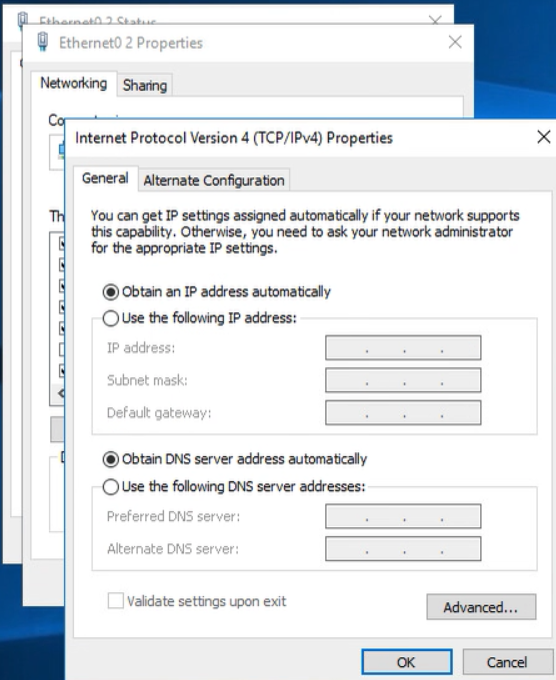
As a privileged user, you will now re-configure networking on WKS01 to use dynamic addressing rather than static addresses.
-
Go to ethernet settings - change adapter - properties - click on IPv4 - click "obtain an IP address automatically" - and DNS automatically
Changing the Lease Time
In order to change this you must enter your vim file for DHCP config and then type the two lines "default-lease-time 3600;" next line "max-lease-time 14400;".
-
ssh into ad01 ("ssh firstname@dhcp01-firstname")
-
Type: "sudo -i" and input password
-
Type: "vi /etc/dhcp/dhcpd.conf" enter
-
Enter the following into your new file - "default-lease-time 3600;" next line "max-lease-time 14400;" - place these lines below the other info
Lab 5
I don't think he wants us to do week 5, but if he does or you feel like you want to, here's the link to the lab:
https://docs.google.com/document/d/1x9crY4B8ykKc1JTd3JYN8G-cKPt9YJsb_GH1wrTxhoo/edit