Team Workflow Reference Page - IanMcC123/Stoopify GitHub Wiki
This page documents the proper workflow for git as collectively established by our team.
Git Setup
Ensure Git is downloaded on yourr machine. Refer to the downloads page for reference. Download the applicable version according to your operating system. Once you have downloaded and installed, open a terminal and confirm that it has been properly installed with git --version.
-
To get the latest development version via Git if it is already installed, use
git clone https://github.com/git/git.
-
If VS Code is open during download, restart the application to recognize newly installed Git.
-
Open a new terminal and log into git using the following commands:
- Add username -
git config --global user.name "Your-User-Name" - Add email -
git config --global user.email "Your-Email" - Confirm username -
git config user.name - Confirm email -
git config user.email
- Add username -
-
Once you have confirmed your username and email have been properly configured,
cdinto a directory where you woudl like your Stoopify repo to live locally. When you have reached that directory on your machine, simply executegit clone https://github.com/IanMcC123/Stoopify.git- This command will provide you with the most up to date main branch of the stoopify repo for working purposes.
General/Common Commands
In order to add your changes to a repo, you must follow three steps:
- Make sure that all modified files are saved locally on your computer. Simply hit control + S to save all files before this process.
- Stage all modified files for commit
git add .
- Commit staged files to repo and add a descriptive commit message.
get commit -m "<descriptive message here>
- Finally, push using
git push
Refer to this section for stage + commit + push instructions when referenced subsequently.
Branches
Branches will be used in order to maintain mutual exclusivity among team members work. Consider the 'main' branch to be just that, the central line. Branches are used to add functionality to main without messing main's functionality up.

Branches should be specific. They should be used to add features incrementally, in the same idea that code programs should be tested incrementally to uncover bugs and deficiencies. A branch should follow naming conventions. Our naming convention will be the following: feature-description-with-dashes-between-words. The branch name should start with the word 'feature', and then include a short desccription of the feature that the branch adds with dashes in between words.
Note that many branches will be merged into main over the course of this project. We will NOT, have a singular branch for front end and backend development, respectively. That defeats the purpose. For instance, a branch should be created to establish connection with our backend Mongo database. Said branch could be called feature-backend-initialization for example.
The following are some relevant commands to be used in you rtermianl to navigate the git workflow with branches.
Note: 'checking out' is synonymous with switching branches.
Branch Creation
-
Create new branch and checkout
git checkout -b <new-branch-name>
-
Add your changes in that new branch
-
Stage, commit, and push changes to new branch.
-
You will not be able to view your new branch or its changes until there is a push to it. Do not worry if it is not visible in the GUI initially.
-
If you wish to avoid manually setting branch upstream when creating new branch, you can enable a flag to do it for you when you create branches off of main.
git config --global push.autoSetupRemote true- If you do this, you will be able to push to new branches immediately.
-
You can manually do this in order to push to a new branch if needed:
git push --set-upstream origin <new-branch-name>
Branch Command Overview
- Recommended for new branches Create new branch + checking out
git checkout -b <new-branch-name>
- Create new branch without checking out
git branch <branch-name>
- Delete specified branch ('safe' delete - git does not allow if there are unmerged changes)
git branch -d <branch-name>
- Delete specified branch ('unsafe' delete - git allows deletion if there are unmerged changes)
git branch -D <branch-name>
- Delete remote branch
git push origin --delete <branch-name>
- Rename current branch to
<new-branch-name>git branch -m <new-branch-name>
- List all remote branches
git branch -a
Sometimes, while you are working on a feature in a branch, changes are made to 'main' by other developers. In order to make sure that your working feature is still compatible with the updated main branch, you must follow the following steps:
- Stage, commit, and push your changes to the current branch (refer to previous section for add, commit, and push commands).
- Checkout main branch using
git checkout main - Pull main using
git pull - The pull command should show updates to the main branch. If this was done successfully, you are now ready to go back to your working branch.
- Use git checkout to return to the original branch that you were working on.
- Now, merge main into the current branch by executing
git merge main - You now have an updated working branch with changes in main reflected in current branch.
Merge Requests
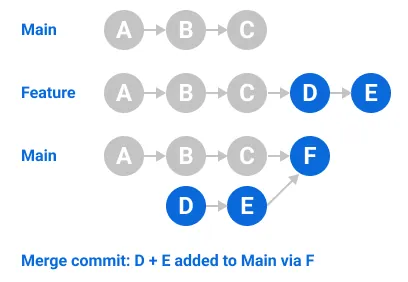
Now that we know how to use branches to compartmentalize our feature work, we need to know how to add the changes into main. This is done through Merge Requests (alternatively known as pull requests). The image below details how a pull request works. the changes in the pull request are pulled into main, and in doing so, you allow the opportunity to assign teammates code reviews. This means that teammates are able to checkout the branch associated with the pull request, test, confirm functionality, and comment on more required changes.
A pull request is created by going to the pull request tab in the GitHub GUI. On the compare dropdown, select your branch that contains a completed feature. The arrow on the create pull request page should point from the feature branch to main. Once Git verifies that the branch can be merged into main, it will show you what changes there are, with additions being highlighted green and deletions being highlighted red. Click 'Create Pull Request'. Write a descriptive title, as well as a description of what is contained in the pull request. Also note the option to create a draft pull request rather than a regular one. This is for early stage features, and we will most likely not have any use for these during our project.
Once assigned reviewers have reviewed the PR, it will be good to merge. After that, the branch changes will be in main!