User Manual - HoneyHazard/PixelMatchSwitcher GitHub Wiki
- Getting Started
- Pixel Match Filter
- UI Elements Overview
- Basic Concepts
- Image Capture Walkthrough
- UI Details
- Helpful Plugins and Strategies
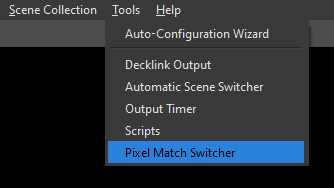
Pixel Match Switcher Dialog is how you interact with the plugin. You can bring it up by going to the "Tools" menu of OBS and selecting Pixel Match Switcher:
When you try the plugin for the very first time, you will see a notification like this:
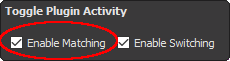
You turn on the Enable Checkbox of Global Plugin Controls:
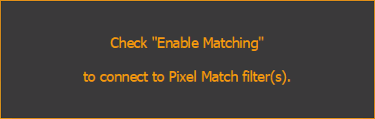
And you will probably see a notification like this:

This is because Pixel Match Switcher requires Pixel Match Filter to be installed on at least one of your video sources.
Unlike typical video filters available in OBS, the Pixel Match Filter does not (directly) alter the video that goes through it. Instead, the Pixel Match Filter serves as a point for interception of video content, so the video pixels become accessible to the plugin for image matching.
You install Pixel Match Filter like you would install any other video filter in OBS:
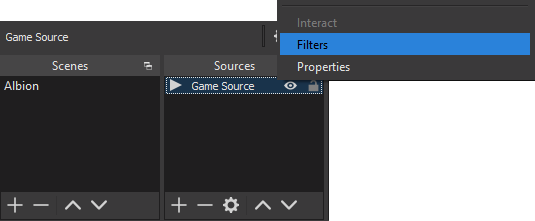
Begin by locating your video source in the Sources list. Right click your source name and select Filters to enter the Filters view.
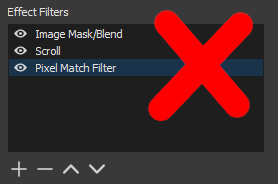
In the Filters dialog that shows, click on the Plus icon in the Effect Filters area (bottom left). In the menu that shows, select Pixel Match Filter to finish adding the filter.
![]()
The newly added filter should now be in the list of Effect Filters:
![]()
This is pretty much it! You can open the Pixel Match Switcher dialog by selecting the newly added filter and clicking the Open Settings button. You should see the same video that enters the filter we have installed.
In the future you can access the Pixel Match Switcher dialog by going into OBS Tools menu and selecting Pixel Match Switcher. (Make sure the scene with the source we just modified is selected)
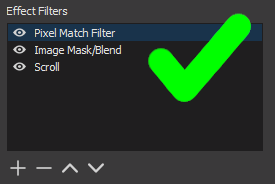
In the event you need to have other, regular effect filters attached to the same video source, it is recommended to have Pixel Match Filter be the first in the order of effect filters. This way, the pixel content to be matched will be more consistent. Remember, Pixel Match Filter does not alter the video, so consecutive effect filters will be oblivious the activity of Pixel Match Filter.
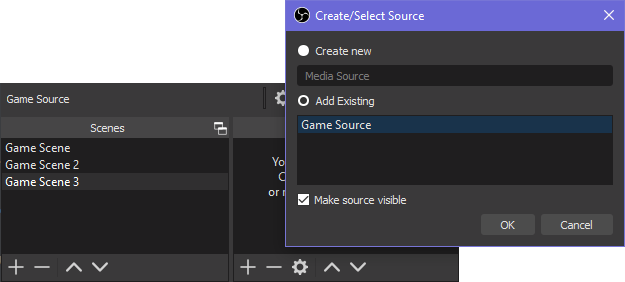
As long as the same video source is being reused in all scenes, you need to install Pixel Match Filter only once. An easy way to reuse a source in multiple scenes is to choose the "Add Existing" option in Create/Select Source dialog.
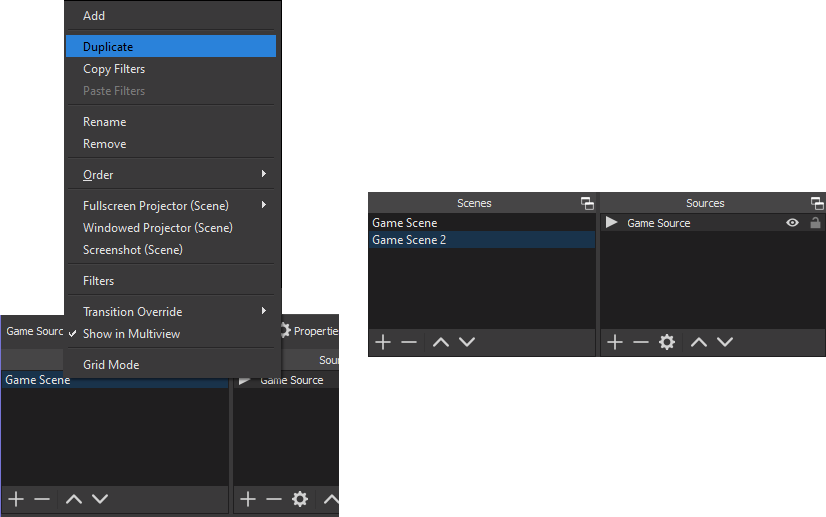
Choosing "Duplicate" after right-clicking a scene is another easy alternative. It will, similarly, give you a new scene containing a reused source + filter:
You should now be good to go to start playing with the plugin. If you want to skip ahead and try to learn by example, jump to Image Capture Walkthrough, which will walk through a typical use case of the plugin.
| Item | Description |
|---|---|
|
|
Save/load/manage persistent matching presets |
|
|
Add, remove, label, prioritize, select match entries and control switching behavior |
|
|
Configure match image and match parameters for the selected match entry |
|
|
Displays detailed match result status for the selected match entry |
|
|
Top-level on/off switches of plugin's main activities |
|
|
Control what is being shown in the Preview Area |
|
|
Show information about the plugin, activate debugging tools and (eventually) show user help |
|
|
Can show match image or state of the matching in the video, and allows selection of a region for capturing a match image |
- Match Entry
- Match Image
- Match Image Mask
- Match Parameters
- Match Image Capture
- Match Result
- Target
- Match List
- No-match Target
- Linger Delay
- Preset
Describes how individual elements in video are being identified and reacted to. Each match entry:
- compares pixels based on its match image and match parameters
- will produce a match result when comparing video on every frame
- when matched, will try to make (and keep) its target scene current
A match entry can be selected by user for editing of its parameters, changing its match image, visualizing its matching activity, checking result, and more. Only one is selected at a time.
A match image is like a template for scanning a specific region in video for a pattern of interest. The pixels of the match image are being compared to the pixels of the video to determine a match.
Operations on match images are activated by the Image Operation Buttons of Match Entry Configuration UI. Images can be loaded from any file available to user. More conveniently, match image can be extracted from video by the process of Match Image Capture.
A match image will typically have a background/masked-out region. The pixels in the background area are not participating in matching comparisons. This masked-out region can be defined by a designated color, or by having the alpha channel values of the image being set to 0 to indicate transparency. See mask mode.
The match parameters describe how the match image is being used to perform matching.
The parameters are configured by the Match Parameters Controls of Match Entry Configuration UI. The visualization options provided by the Preview Area, and the Match Entry Result viewer are useful to finding optimal parameters.
Describes how the background/masked-out areas of the match image are indicated. Mask value/condition has to match exactly for pixel to be considered masked out.
| Mask Mode | Alpha | Green | Magenta | Black | Custom |
|---|---|---|---|---|---|
| Mask-Out Value | alpha = 0 | 0x00FF00 | 0xFF00FF | 0x000000 | Custom |
| Match Image Example | 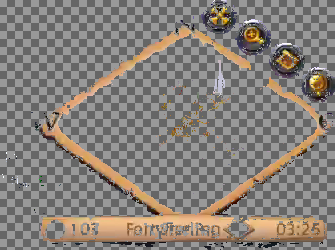 |
 |
 |
 |
 |
This is the X and Y location, in pixels, where the top left of the match image will be placed in video, for matching.
This is a percentage rating of how close an individual pixel value of a match image has to be to a pixel of video - in order to be considered matched.
- 0% would mean pixel color value has to match exactly for the pixel to be considered "matched". Any difference in pixel value, no matter how small, will result in "no match".
- 100% would mean any difference is tolerated, which will be useful only in limited cases.
- 5-20% can provide adequate levels of pixel error tolerance in many scenarios.
| Allowed Pixel Error | 1.0% | 3.0% | 5.0% | 10.0% |
|---|---|---|---|---|
| Region Preview | ||||
| % Comparisons Matched | 7.6% | 49.9% | 80.5% | 98.0% |
This is a percentage rating of how many of the compared match image pixels (that are not part of the match image mask), have to match, so that the match entry is considered "matched".
- 0% would mean any comparison of pixels, no matter how few, will always make the entry "match", which will not be useful at all.
- 100% would mean every pixel comparison has to match for the entry to be "matched", which will be useful only in limited cases.
- 70-95% can be a good place to start in many cases.
- The right value for match threshold is affected by specifics of the match image, match image mask, and user's choice for allowed pixel error.
This will invert the normal matching logic. The match result will be considered matched when the match percentage is below the match threshold, not above it.
This refers to the process of extracting match image data from a user-defined region in the video frame. Upon completion of capture the extracted image is saved to a file. The filename, and the XY location of where the image aligns become assigned to the currently selected match entry.
Snapshot capture instantaneously grabs pixels from a region. The resulting image has NO mask.
Automask capture is a dynamic process where a user-defined region is monitored for a duration of time. When finished, elements of the region where graphics have been changing become masked out areas of captured match image.
The image capture functionality is crucial to making the plugin user friendly. Automask, specifically, is to be extremely useful in isolating persisting overlay/HUD elements in game graphics.
Both modes of image capture are triggered by the Capture Image Controls. We describe image capture in further detail in Image Capture Walkthrough, where all steps for example captures are described.
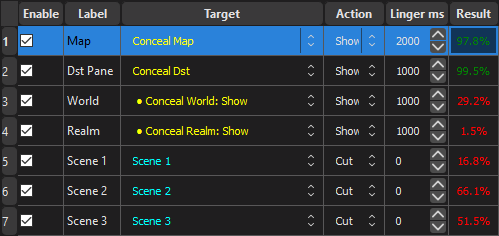
For each active match entry the software presents percentage of pixels that have matched. If this percentage is greater than (or equal to) the match threshold - the result is considered MATCHED. Otherwise, the result is NOT MATCHED.
To elaborate, when the plugin is active, every enabled match entry with a valid match image will perform matching of the image at its assigned XY location in the video, at every frame of plugin operation. Some number of pixels will be compared (as determined by image mask, or absence thereof). Some pixels will match and some will fail the comparison with pixels in the video's region, as per allowed pixel error criteria. Ratio of matched pixels to total compared pixels gives you the percentage from which MATCH vs NO MATCH is determined.
Together with Match Result Display, the Video and Region modes of the Preview Area reveal details of how the result is computed for the selected match entry. Additionally, the Match List Table shows the match result in brief for all match entries.
Targets for switching behavior specify what happens when a match entry is matched.
Match List Table lets you configure a target and target action for each entry.
Target Scene will be made (and keep current) while a match entry is matched.
It is possible to specify which of the scene transitions (Cut, Fade, or other) will be used at the moment of activating the target scene.
See OBS Scenes and Sources Overview.
Note: As mentioned before, Pixel Match Filter must be present on at least one source in the current scene for the plugin to be operational. If you want an automated setup with minimum user interaction, make sure all target scenes contain at least one source with the filter attached, so you don't stuck in a scene that the plugin cannot automatically switch out of. The easier way to do so is reuse the same source in all scenes, as described earlier.
Target Scene Item can be shown or hidden while a match entry is matched. When unmatched the opposite action will be taken.
See OBS Scenes and Sources Overview.
Target Filter can be shown or hidden while a match entry is matched. When unmatched the opposite action will be taken.
See OBS Filter Guide.
Match list is an collection of match entries.
When using target scenes the higher priority entries should be in the beginning of the list, and the lower priority entries in the back of the list. This switching priority for scenes just means that, at every frame of operation, any target scene entry that matched earlier in the list is higher priority, and will take precedence over any target scene entry that matched later in the list, which would have lower priority. Thus, the first target scene entry in the list that matches will decide which scene will be made (or kept) current.
For target scene items or target filters the order does not matter, as each entry functions independently.
Match list is shown and managed by the Match List Table. The entries can be labeled so they are easier to identify.
In summary, the match list of entries allows users to have multiple, distinct regions of video frames be identified by multiple match entries. Each individual entry scans its own region of video with its own match image and its own match parameters for comparing that image with the video region and determining the entry's match result. When matched, each entry can toggle its target scene items or target filters on or off, or switch to its target scene (must be first target scene entry that matches). The higher priority match entries are expected in the beginning of the list. So, users could, for example, make sure that the most sensitive element in their stream gets the highest priority to trigger a scene that will obscure it immediately.
Note: To reduce confusion in some mixed-use cases, the plugin enforces the entries with target scenes to appear after entries with target scene items or target filters. The latter act independently from each other and from the target scene items, so we can pretend they are higher priority in the list.
When configured, a no-match target scene is made current, and kept current, for as long as none of the match entries in the match list have matched.
No-match target and transition can be configured by the No-Match Selector of the Match List Table.
Note: As mentioned before, Pixel Match Filter must be present on at least one source in the current scene for the plugin to be operations. If you want an automated setup with minimum user interaction, make sure the no-match target contains at least one source with the filter attached, so you don't stuck in a scene that the plugin cannot automatically switch out of. The easier way to do so is reuse the same source in all scenes, as described earlier.
When a matching entry goes from matched to unmatched, a specified linger delay causes an entry's target scene to remain current for some time after the entry is no longer matched.
This is useful because fades and other transient in-game effects can disrupt matching and, consequently, hiding of sensitive in-game content by target scenes. For example, a lobby screen of a game contains sensitive in-game content that is being concealed by Pixel Match Switcher. As players exits the lobby and enters the game world, the fading of pixels disrupts matching of the sensitive content. The concealing target scene is deactivated, and the content is made visible briefly until fade completes. This can be long enough to be observed by stream viewers and put the streaming player at a disadvantage. Linger delay combats this problem by making the concealment scene stick around; long enough to not be defeated by the fade.
Match List Table can be used to configure milliseconds of linger delay.
A preset is basically a Match List, together with no-match configuration, that is persistent and saved under a preset name.
This unburdens you from rewriting your carefully constructed matching and switching recipes every time OBS is restarted, and you can quickly switch between several presets that target different games or different presentations of content.
Preset Controls let you save, load, switch between presets, and more. Additional functionality is being planned to expedite sharing and retrieval of presets.
- Summary
- Prerequisites
- Add and Configure a Concealment Target
- Add a New Match Entry to the Match List
- Initiate Image Capture
- Select a Match Region in Video
- Snapshot Capture
- Automask Capture
- Consider Pre-recording Video Footage for Image Captures
- Tweak and Verify Match Parameters
- Configure the Match Target
- Configure Linger Delay
- Add More Match Entries
- Save the Preset for Reuse
- Open a Saved Preset
- Export Presets to XML
- Import Presets from XML
Lets put it all together. In this tutorial example we will:
- Begin with a scene containing video source that has a Pixel Match Filter attached
- Add a new scene that will cover up a sensitive UI element in game
- Add a new match entry to an empty match list
- Use the process of image capture to obtain a match image and save it. Both snapshot and automask types of capture will be demoed.
- Tweak the match parameters for optimal matching
- Configure the match target of the match entry to activate a concealment target that will hide our sensitive info
- Use linger delay to make sure sensitive region is never leaked during fades
- Save our configuration to a preset to make it persistent and manageable
- Backup our preset into an XML for safekeeping
Obviously, you will need a Pixel Match Switcher plugin. Presently, a build of the special OBS fork is required as well to support the plugin. Get an installer containing both here.
After successful installation follow earlier instructions to setup your video source with an attached Pixel Match Filter.
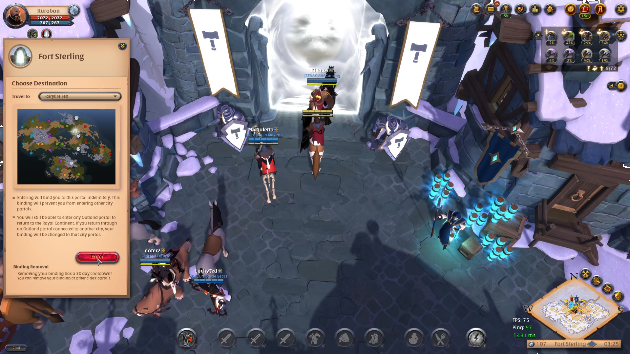
Here we have a single scene with a single video source, which receives video from the game of Albion Online. The Pixel Match Filter has already been added to the effects list:
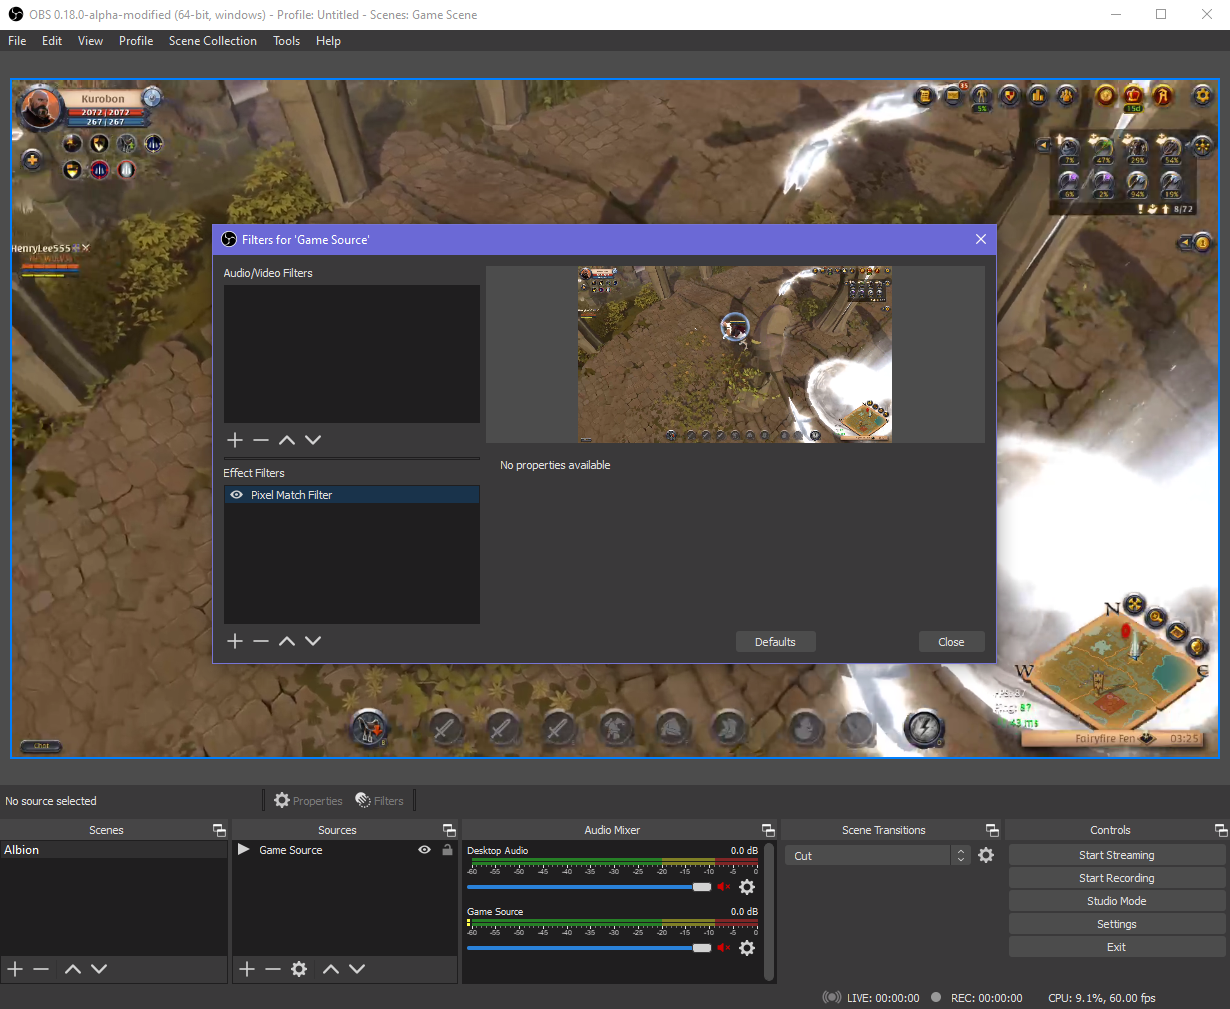
The goal of the demo tutorial will be to automatically conceal the map in the bottom right of the game UI.
This describes creating a target scene item to conceal the map by obscuring it with an image. This will be the easiest and recommended way to accomplish the task of hiding the map.
-
Select the scene containing the game source (Albion)
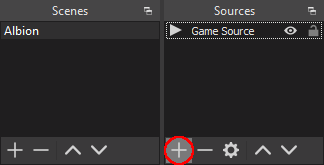
-
In the Sources list, hit Plus icon to Add a new source:
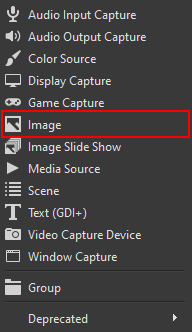
-
Select Image:
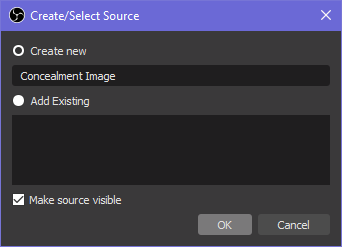
-
Select "Create new" and provide a name. I called mine "Concealment Image":
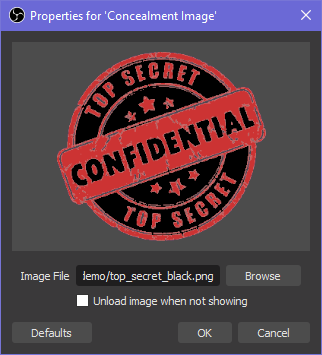
-
Locate a desired image on disk:
-
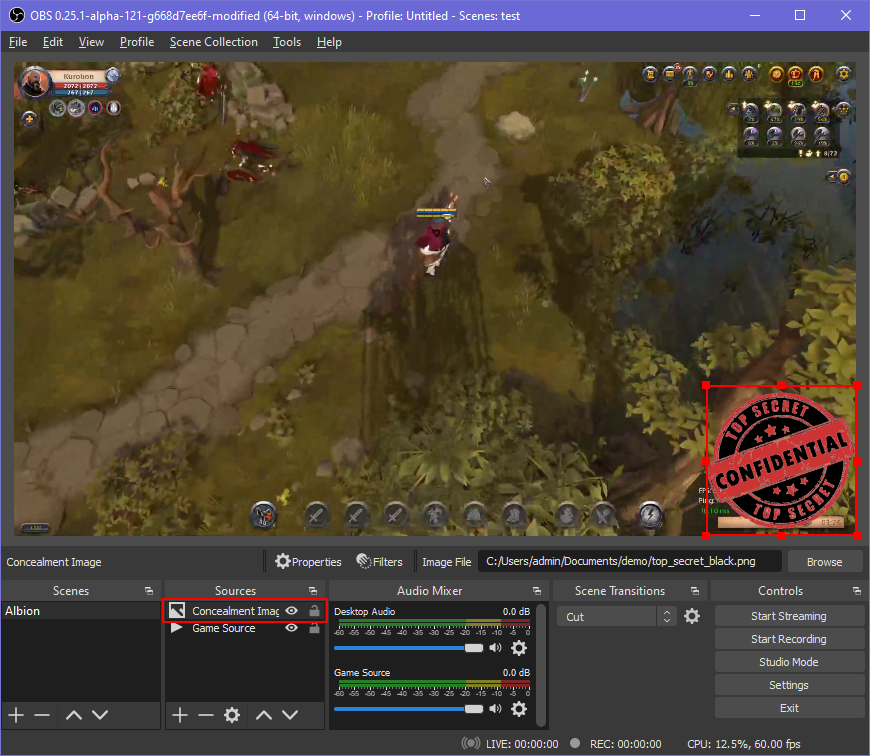
Place the image source over the UI element to be concealed (map). Make sure that the newly created image appears first in the order of Sources for our scene - before the game source:
Work in Progress
In the Filters dialog that shows, click on the Plus icon in the Effect Filters area (bottom left). In the menu that shows, select ____.
An alternative to creating a target scene item or target filter for concealing the map is creating a target scene in which the map is concealed. This can be less robust because only one scene can be current in OBS, and when there are multiple UI elements to conceal things can get complicated. Nonetheless, we provide the example for those wishing to use target scenes in similar and not-so-similar use cases.
Show Details for Creating a Target Scene
Create a scene that will include the original source plus an image source at the location of the map, on top of the video:
- Duplicate the original scene. I named my new scene "Albion: Conceal Map".
- Right click the original scene (Albion)
- Select "Duplicate" from menu
- Provide name
- In the new scene, add an image source that will conceal the map.
- Select the new scene (Albion: Cover Map)
- In the Sources list, hit Plus icon to Add a new source
- Select Image.
- Select "Create new" and provide a name. I called mine "Concealment Image".
- Locate a desired image on disk
- Place the image source over the UI element to be concealed (map)
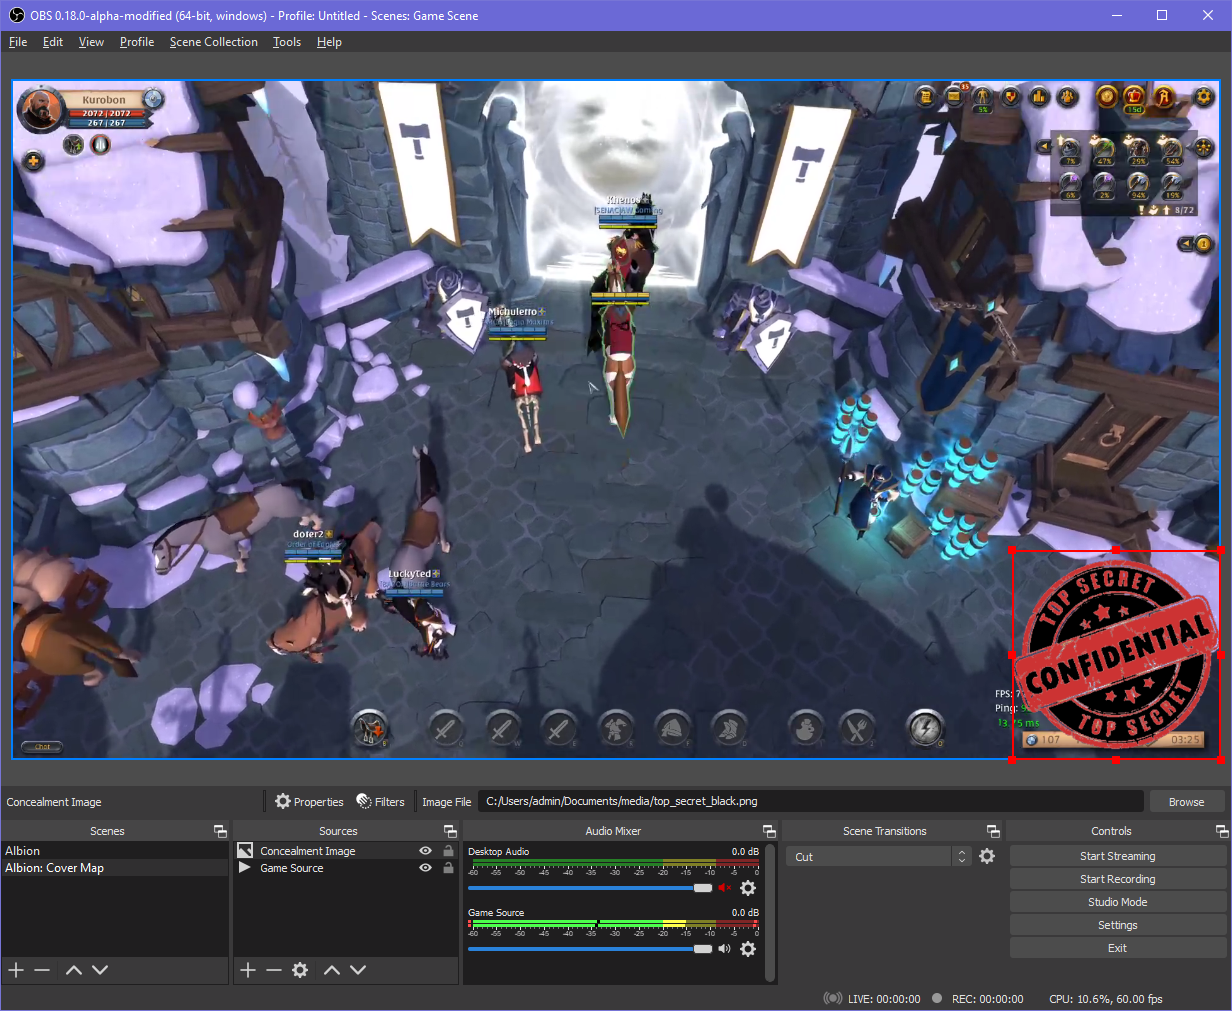
My resulting concealment scene looks like this:
-
Open the plugin's dialog
-
Click the Add ("Plus") button of the List Actions:

-
Double click the new entry's cell in the Label column to begin editing the label:
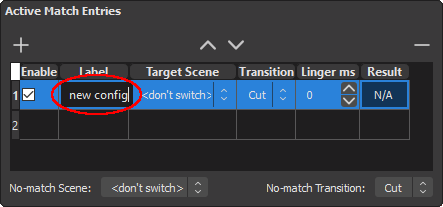
-
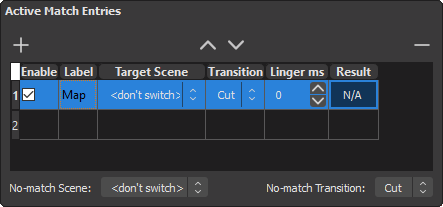
Assign a descriptive name. Mine will be called "Map":
With the newly added match entry ("Map") selected, press the Capture button (one of the Image Configuration Buttons).
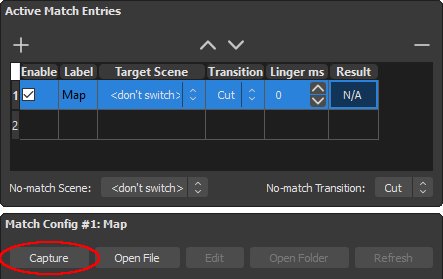
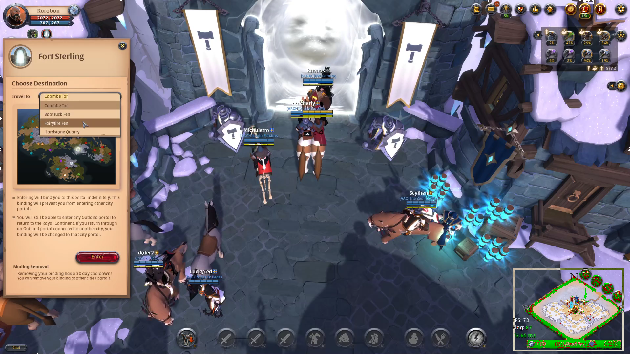
Capture Image Controls will be shown:
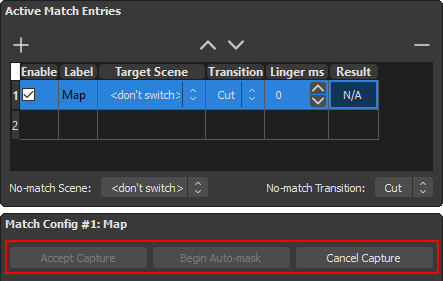
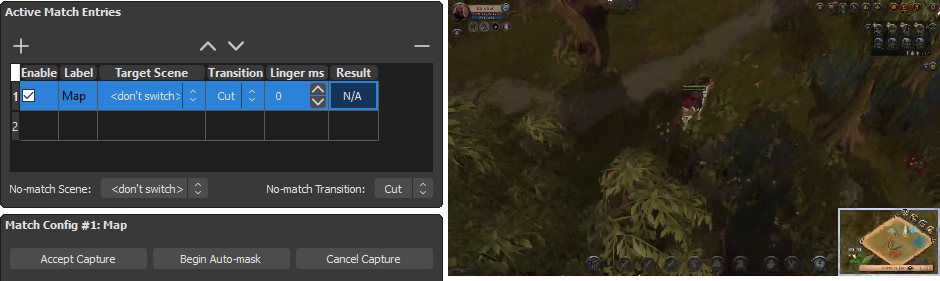
After initiating the image capture, the mouse cursor will also change to a cross, and the Preview Area will go dimmer to indicate it has entered the Selection Mode.
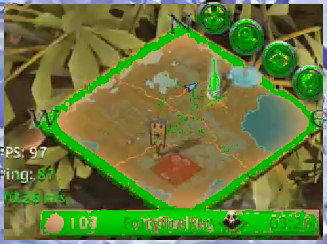
In this mode, you select a rectangular region like you would in a typical image editor. Use this to select the region of the video where the match image will be extracted.
To make sure your selection is accurate, bring your video source (or wait for it, if possible) to be in a state where the graphics element to be matched is prominently shown - In this example, the player will be sure to be in-game and have the default screen shown, where the map is visible.
Notice that Accept Capture and Begin Auto-mask buttons are now available in the Capture Image Controls area.
The snapshot Capture is instantaneous, and will have no image mask. There are situations where a simple snapshot capture, without a match mask, can be sufficient for the task at hand (such as rectangular elements with no transparency). Snapshot capture is, thus, presented here as a quick but less robust alternative to automask capture.
To perform a snapshot capture:
-
Make sure you have completed the previous step of selecting a video region, with your video source prominently showing the graphics element your want to capture (map):
-
Click the Accept Capture button of the Capture Image Controls:

-
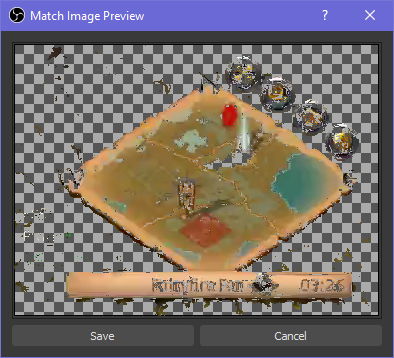
Match Image Previewer will be shown:
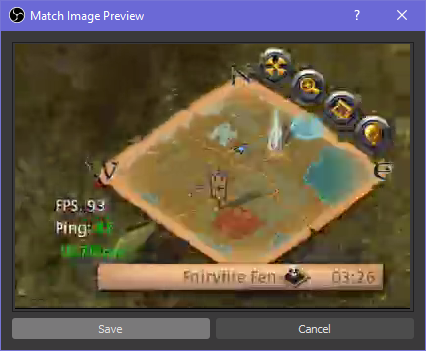
- Press Save if the image is satisfactory and you want to go forward in the process
- Press Cancel if you want to go back and select a different region in video, or if you want the game to show a presentation of graphics element to be matched.
-
After accepting preview the Save File Dialog will be shown:
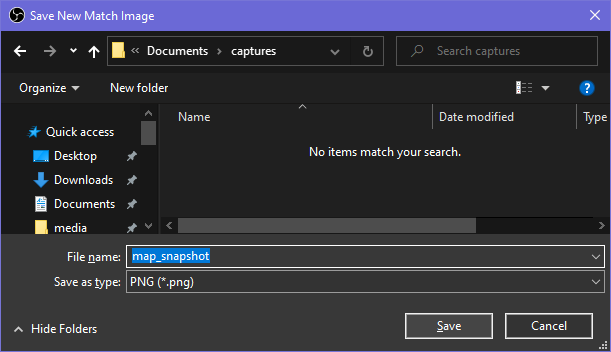
- Find a good home for the image file and press Save to finish the Snapshot Capture process.
- Press Cancel to go back to preview.
-
With the newly captured match image saved, the Snapshot Capture is now complete! The Image File Path display of the Match Entry Configuration UI will be updated, and the Video Mode of the Preview Area will be visualizing the newly captured match image:
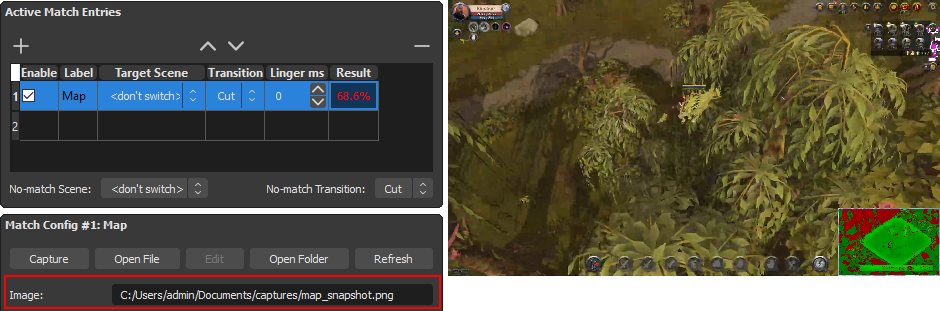
Snapshot-captured match images may work fine for rectangular, opaque graphics elements of a video, like a QR code. However, they are poorly suited for regions where significant background activity occurs (anything dynamic that is not part of the graphics element being identified).
To demonstrate, lets use the Preview Mode Selector to activate the Region Preview Mode, and also observe the Match Entry Result Display at two different frames of the video. As you can see, differences in the region's background makes the match results vary significantly, and thus, makes our snapshot-captured match images poor predictors of the map element.
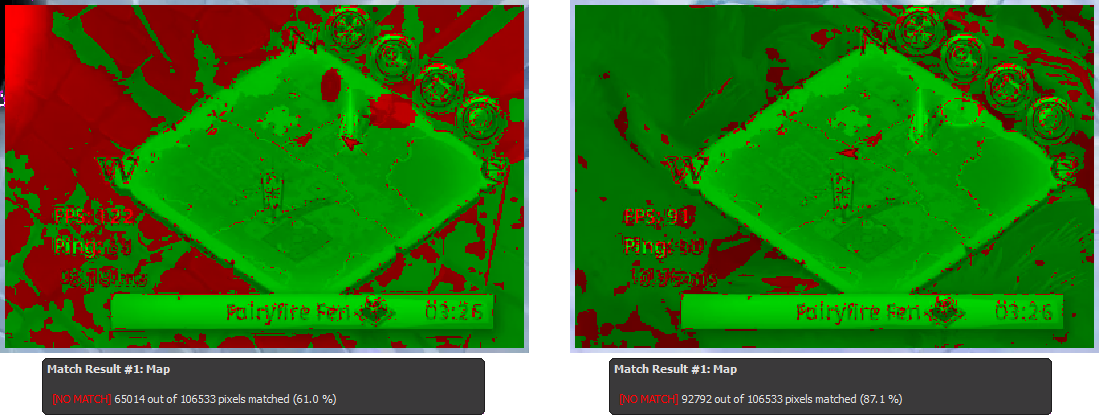
It may be possible to tackle this wildly unstable matching by carefully tweaking the match parameters. But the optimal and easier way of identifying graphics elements during changing background is with the help of the automask capture.
Automask capture is a powerhouse tool for creating match images in regions where background changes significantly. Much of the steps are similar to the snapshot capture. But instead of being instant, the automask generation requires more careful timing by the user. It is not much more complicated, and well worth it, as the resulting match image should have a very neat image mask.
To perform an automask capture:
-
Make sure you have completed the previous step of selecting a video region, with your video source prominently showing the graphics element your want to capture (map).
-
Make sure that before the automask capture starts - you anticipate, or you are ready to produce, a changing background behind the graphics element being captured. Sometimes, a game will do that by itself, such as when there is a background effect or animation behind a UI element of a game lobby. Other times, creating background activity behind a HUD element can be as simple as panning the camera in the game world.
- In this example, the broadcaster has entered a zone in the game and is now ready to move around a little, so the map region of the video does not stay static.
-
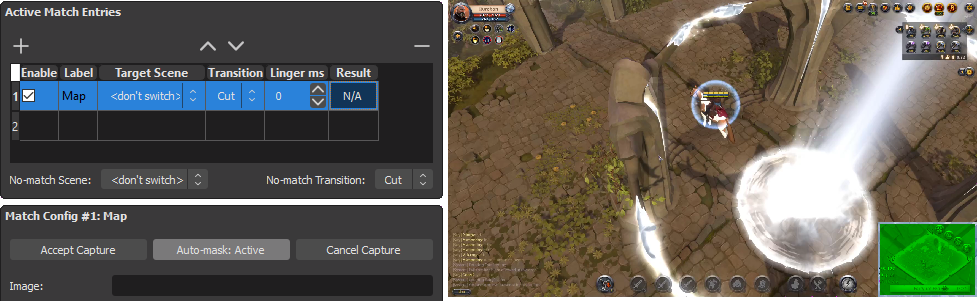
Click the Begin Auto-mask button of the Capture Image Controls:

-
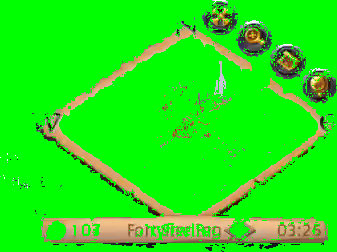
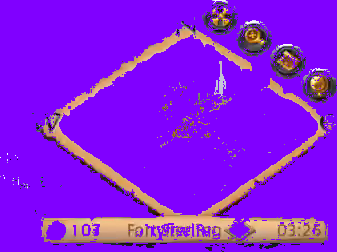
Automask capture is now active! The automask button now says Auto-mask: Active. And the Preview Area has exited the Selection Mode, and is no longer dimmed. Before any background motion occurs, the video region will be shown in all green in the Preview Area, signifying the fact that no part of the region has yet moved enough to be deemed dynamic and become masked-out.
-
Do whatever it takes to produce dynamic changes in the region being captured.
- In our example, the player begins moving around the game world, which causes the background behind the map to change
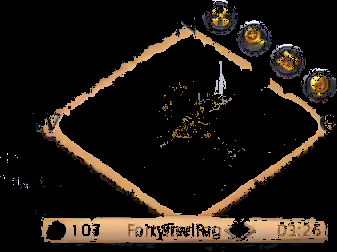
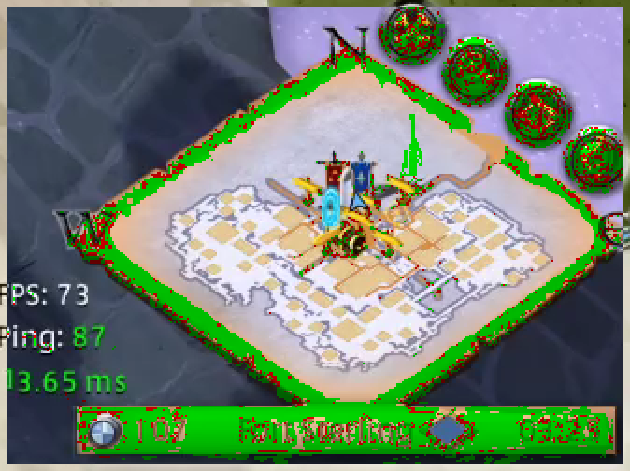
As dynamic changes continue in the region, more and more regions around the static element (map) will be different from the initial capture frame. These will no longer be shown in green, indicating they will become masked out in the match image being constructed:
Zoomed in view of the region:
The simple approach of moving around can be taken further. If you travel long enough in one direction, the middle of the map will shift and also reveal itself as a dynamic area. This can result a neatly masked-out match image like this one:
-
Click the Accept Capture button of the Capture Image Controls:

-
Match Image Previewer will be shown:
- Press Save if the image and mask are satisfactory and you want to go forward in the process
- Press Cancel if you want to go back and select a different region in video, or to restart the automatic detection of the dynamic areas when the element to be captured is better presented.
-
After accepting preview the Save File Dialog will be shown:
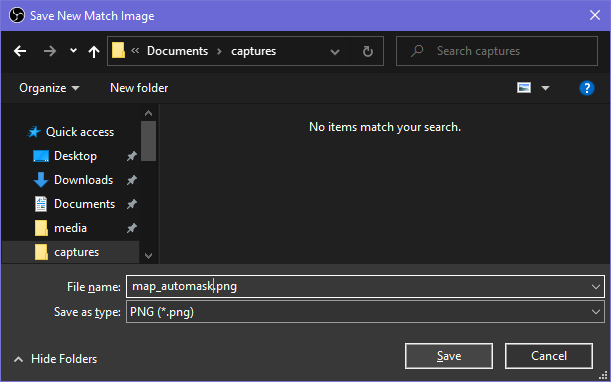
- Find a good home for the image file and press Save to finish the Automask Capture process.
- Press Cancel to go back to preview.
-
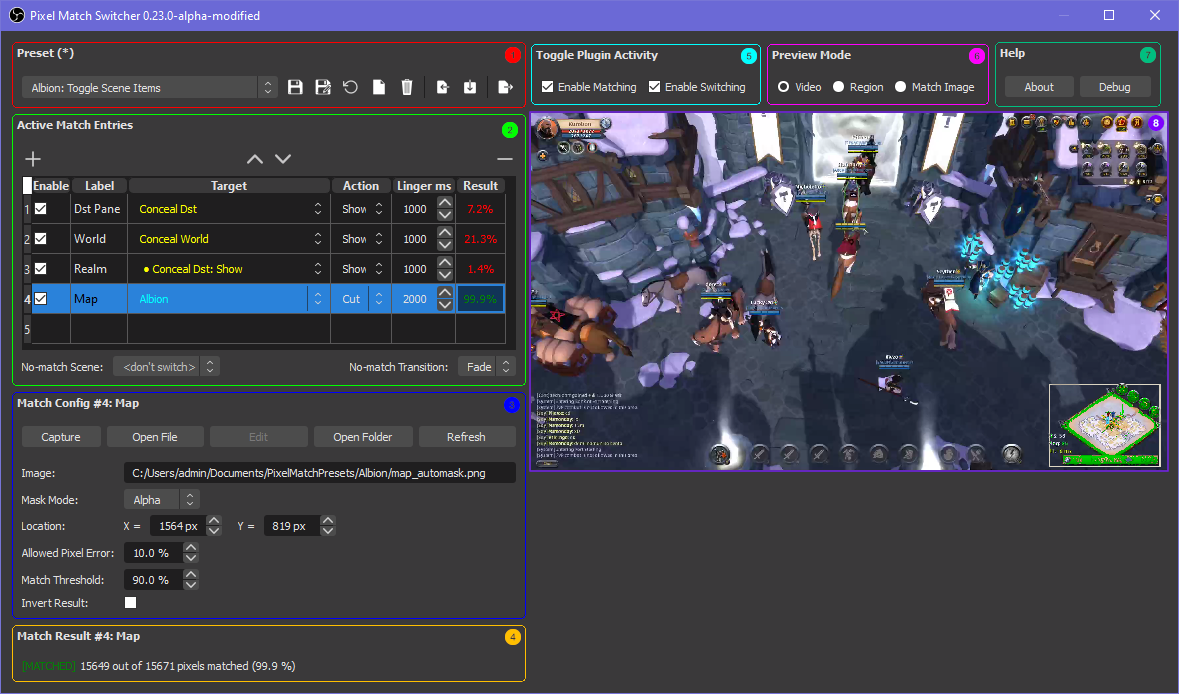
With the newly captured match image saved, the Automask Capture is now complete! The Image File Path display of the Match Entry Configuration UI will be updated, and the Video Mode of the Preview Area will be visualizing the newly captured match image:

Some of the match paramaters play role in in the automask.
We have previously defined allowed pixel error in the context of comparing match image pixels with the pixels of a video region. In automask capture we also compare remaining unmasked pixels with the region of the video, at every frame. (Every pixel that fails the test is masked out from then on).
Rather than introducing a new parameter into software, specific to automask, we will reuse allowed pixel error as the unified parameter to describe the level of scrutiny when comparing pixels. Before initiating the automask capture, set the value to represent how aggressively the pixels will be masked out.
- 0% would mean pixels would have to match exactly, frame to frame, to stick around and not become part of the mask-out area.
- 100 would mean all pixels will stick around, which will make automask process effectively useless
- Similar to regular comparison of match-image pixels against the video, values of 5-20% can be a good place to start
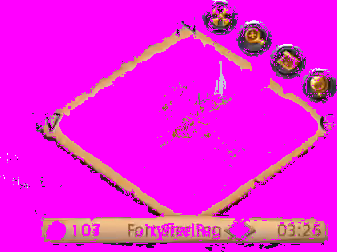
Mask mode describes how the masked-out areas of the image are indicated. Select the mode you prefer, and the masked out regions at the end of the automask process will be filled the color or alpha values corresponding to your selection.
Automask (and snapshot) capture works just fine for extracting masked match images from a live video source. Considerable effort has been put into making automask a quick, user-friendly, and self-sufficient process that will handle many use cases.
Advanced users, who desire more precise control, can use a preplanned strategy of first recording and then playing back some footage of your video source for "offline" image captures:
- One benefit is that, while recording, you are freed up to naturally interact with your game or video source. You can, uninterruptedly, activate every condition that you want your matching rules to handle and have it all recorded.
- After recording, import the video as a media source. Good timing is beneficial to the automask process, and by having a prerecorded video you can, for example, control playback speed. A media source in OBS can even be paused and let you control individual frame advancement manually, if desired. You can produce automask-generated match images strategically, frame by frame, until they look great.
- Finally, replace the recorded source with a live video source and you are ready for streaming with very refined match images.
Be careful to use the same scale and positioning across live and recorded video, and minimize reduction of quality in the recorded video, as much as possible.
After you have performed an automask or snapshot capture, you can tweak the allowed pixel error and match threshold using the Match Parameters Controls:
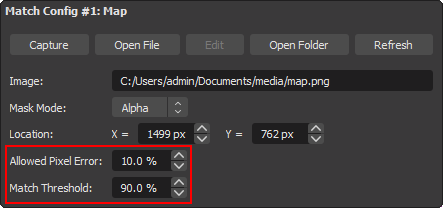
Review allowed pixel error
This is a percentage rating of how close an individual pixel value of a match image has to be to a pixel of video - in order to be considered matched.
- 0% would mean pixel color value has to match exactly for the pixel to be considered "matched". Any difference in pixel value, no matter how small, will result in "no match".
- 100% would mean any difference is tolerated, which will be useful only in limited cases.
- 5-20% can provide adequate levels of pixel error tolerance in many scenarios.
| Allowed Pixel Error | 1.0% | 3.0% | 5.0% | 10.0% |
|---|---|---|---|---|
| Region Preview | ||||
| % Comparisons Matched | 7.6% | 49.9% | 80.5% | 98.0% |
Review match threshold
This is a percentage rating of how many of the compared match image pixels (that are not part of the match image mask), have to match, so that the match entry is considered "matched".
- 0% would mean any comparison of pixels, no matter how few, will always make the entry "match", which will not be useful at all.
- 100% would mean every pixel comparison has to match for the entry to be "matched", which will be useful only in limited cases.
- 70-95% can be a good place to start in many cases.
- The right value for match threshold is affected by specifics of the match image, match image mask, and user's choice for allowed pixel error.
The rest of the parameters do not, usually, need to be changed from their default values
- After an automask capture was used the mask mode should not be changed, so it remains consistent with the mode you have selected when masking out dynamic areas. For snapshot captures keep the mask mode set to the default value of "Alpha", so accidental masking-out of pixels based on color value can be prevented.
- X and Y locations are set automatically after completing an automask or snapshot capture. These controls are available to allow greater flexibility to users, so images manually loaded from disk can be properly positioned. Typically, you do need to adjust the values after a match image capture from video.
The goal is precise matching of the element or condition when it's there, and no false positives at other times.
-
Use the video or region modes of the Preview Area to visualize the effect of changing the allowed pixel error values.
-
Use the Match Result Display to observe and improve the status and details of matching:

As mentioned before, working on a prerecorded video can a helpful strategy for fi image captures. It can also be a good option for strategically tweaking and verifying your match parameters, since playback speed can be controlled or paused, and various points of interest in the video can be jumped to in order to examine, improve, and verify your match rules.
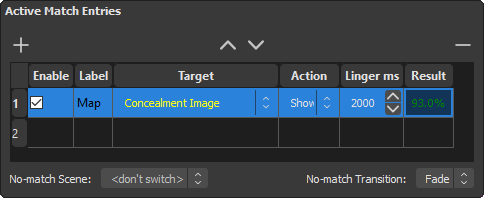
Now lets configure the concealment target we created earlier to be the match target that is activated whenever out entry is matched.
-
In the Match List Table click the entry's cell under the Target Scene Column:
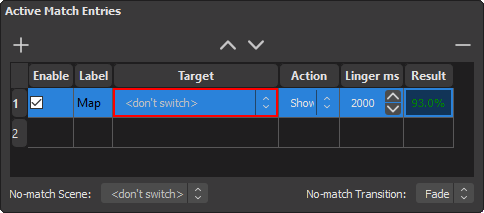
-
Select our previously created concealment target from the dropdown:

-
The Match List Table will be updated to show the selected target:
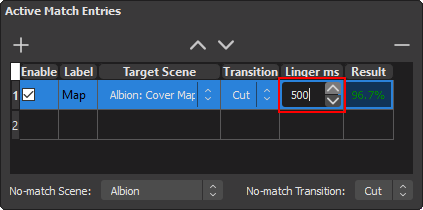
Linger delay can help prevent fades and other transient effects in games from revealing a sensitive element covered by the concealment scene. If specified, the delay will cause the match entry's target scene to stick around for some time after the entry no longer matches.
You edit the linger delay value, in milliseconds, using the entry's cell under the Linger Delay column. Either click the cell to manually enter a value using a keyboard, or use the up/down buttons on the right to nudge the value incrementally:
You are likely to have more than one sensitive element in-game that you want to cover. Repeat these previously described steps for every unique element you want to handle:
- Add and configure a concealment scene
- Add a new match entry to the match list
- Initiate image capture
- Select a match region in video
- Perform the automask capture or snapshot capture
- Tweak and verify match parameters
- Configure the match target
- Configure the linger delay
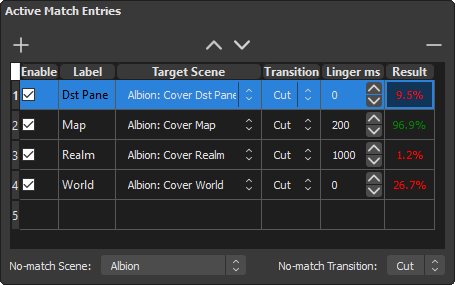
As a reminder, when you use target scenes the Match List Table shows the match list entries with the higher priority entries shown on top. This means you should put your most important target scene entries (covering most sensitive content) on top, and the least important entries on the bottom. Use the Up/Down buttons of the List Actions Area to move the currently selected entry, so the list can be arranged in appropriate order:

We've finished crafting our matching and switching rules, and we should now save them as a preset, so we don't lose our work and we can switch back and forth between presets, freely.
-
Click the Save icon of the Presets Controls:

-
Enter a descriptive name for the preset and press OK:
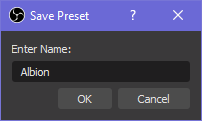
You are done! You have a persistent match rule preset.
You can pull up a previously saved preset from the dropdown in the Preset Controls:
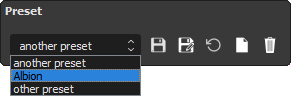
Check the Presets Controls section for other operations you can do on preset. (Save As, Remove, etc.)
XML imports and exports are still being improved at the time of writing, but they are already useful to backup your preset configurations.
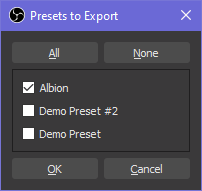
After saving a preset, click on the Export Preset(s) button of the Preset Controls:

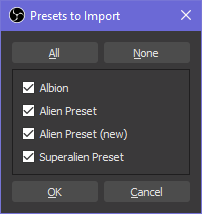
You will have a choice to export one, several, or all of your presets to an XML:
Choose a good place to save an XML:
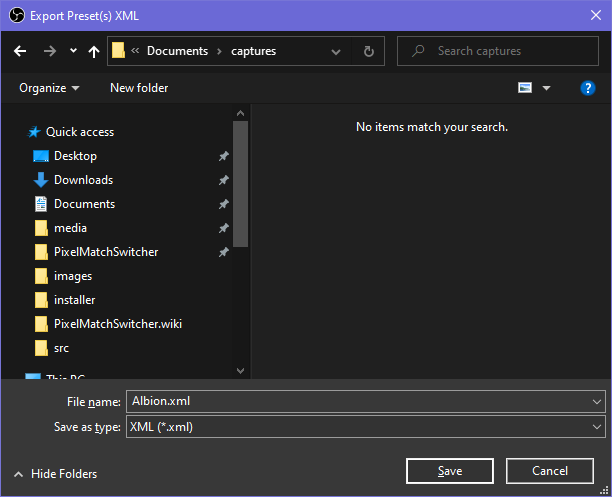
Click Save.
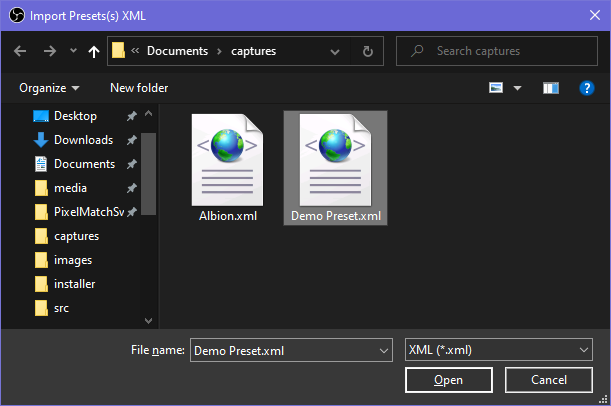
Click on the Import Preset(s) button of the Preset Controls:

Locate the preset XML file and press Open:
You will have a choice to import one, several, or all of the presets saved in the XML. Press OK after making as selection:
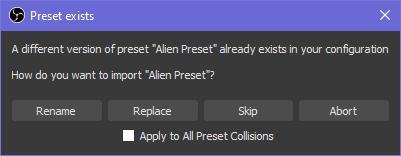
It is possible you will have presets in your configuration that have same name as some of the ones being imported. For these situations a dialog will be shown to resolve these collisions:
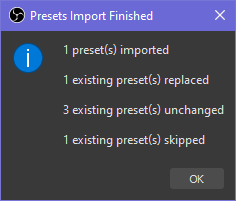
Finally, a dialog will be shown upon import completion. It will include details of how collisions were resolved, if any were encountered:
This section describes UI elements in greater detail.
- Presets Controls
- Match List Table
- Match Entry Configuration
- Capture Image Controls
- Match Image Preview
- Match Entry Result
- Plugin Activity Toggles
- Preview Mode Selector
- Preview Area
Use Preset Controls widget to save/load/manage persistent match rule presets.

| Item | Description |
|---|---|
|
|
Shows an asterisk when unsaved changes were made to matching and switching configuration |
|
|
Use the dropdown to select a saved preset |
|
|
Save active configuration to a preset |
|
|
Allows saving changes under a different preset name |
|
|
Discards unsaved changes made to a preset |
|
|
Switch to a new, blank configuration |
|
|
Deletes a configuration preset |
|
|
Import one or more presets from an XML file |
|
|
Downloads one or more presets from a URL |
|
|
Export one or more presets to an XML file |
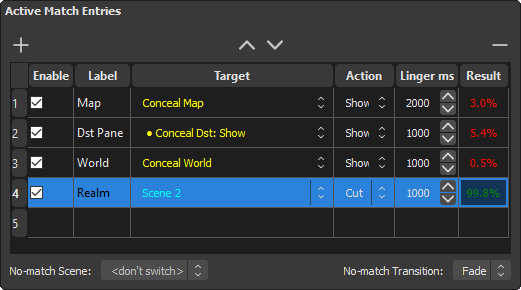
Use the Match List Table to add remove, label, select match entries, reorder the entries in the match list, and control the switching behavior for each entry.
Let you add, remove, and reorder the entries of the match list:

| Button | Description |
|---|---|
|
|
Insert a new match entry at the currently selected location |
|
|
Move the currently selected entry up, making it higher priority |
|
|
Move the currently selected entry down, making it lower priority |
|
|
Removes the currently selected entry |
- shows the match list, with the higher priority entries shown on top
- lets you select an entry for editing, match image preview and match visualization
- lets you label and toggle the entries
- lets you configure the target scene for each entry, with a corresponding transition and optional linger delay
- shows you live result for each entry, in brief
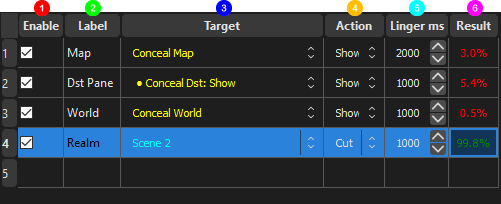
| Column | Description |
|---|---|
|
|
Toggle the checkbox to enable or disable an entry |
|
|
Displays entries' labels. Double-click a cell to assign a descriptive label |
|
|
Use the dropdown to select a target scene for switching, or a scene item or filter to toggle |
|
|
Use the dropdown to select which transition is activated for a target scene (Cut, Fade, or other), or whether a scene item or filter should be shown or hidden |
|
|
When an entry goes from "matched" to "not matched", specify how many milliseconds the "matched" state will linger. Useful when you don't want sensitive information be uncovered during transitions. Click to type in a value or use arrows to increase/decrase values. |
|
|
Shows what percentage of the compared pixels have matched in the match result, and whether this percentage is sufficient to indicate a "match" (in green) vs "no match" (red) |
Only one entry can be selected at a time, and its row appears highlighted in the table. Selected entry becomes target for insert, remove, move up or move down actions, and the focus of Match Result Display and Region and Match Image previews.
Lets you configure an optional fallback target.

| Item | Description |
|---|---|
|
|
Use the dropdown to select which scene, if any, is activated when none of the entries in the match list have matched |
|
|
Use the dropdown to specify which transition (Cut, Fade, or other) will be used when switching to the no-match scene |
This widget provides controls for configuring the match image and all of the match parameters for the selected match entry.
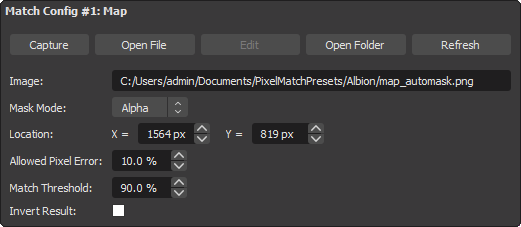
This area provides controls for and displays status of the match image.

| Item | Description |
|---|---|
|
|
Press to show the Capture Image Controls for extracting a match image from video |
|
|
Press to obtain a match image from a file on disk |
|
|
Not implemented; reserved for possibly activating a basic image editor in the future |
|
|
For an existing match image show the file's folder so it can be opened in an external editor |
|
|
For an existing match image, allows reloading that image into plugin after it has changed on disk |
|
|
Displays the file path for an existing match image. Will indicate error if the file is missing or has failed be open. |
This area provides controls for configuring the match parameters.
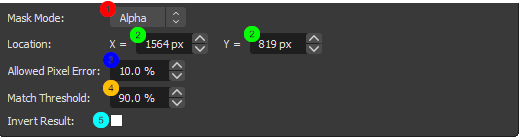
| Item | Description |
|---|---|
|
|
Select a mask mode from a dropdown |
|
|
Location in the video, in pixels, where the top left of the match image will be placed for matching. Normally, does not need to be manually assigned when using the Capture Controls. |
|
|
Set percentage for allowed pixel error |
|
|
Set percentage for match threshold |
|
|
When checked, the entry is considered matched when the match percentage is below the match threshold, not above it |
Once the Capture button of Match Entry Configuration is pressed, the Preview Area goes into Selection Mode, and the Capture Image Controls are shown to perform the Match Image Capture.

| Button | Description |
|---|---|
|
|
After a region is selected in the Preview Area, will signal going forward with using that region as the source for match image, and Match Image Preview will be shown. Can be used to trigger instant (and maskless) snapshot captures, or to complete the automask mode of image capture. |
|
|
After a region is selected in the Preview Area, will initiate the automask process for match image capture. During the process, the button will appear pressed and be labeled "Auto-mask: Active" |
|
|
Will hide the Capture Image Controls, so the capture request is cancelled and the Match Entry Configuration widget goes back to its normal, non-capture state |
Once user has clicked the Accept button of Capture Image Controls, this dialog is shown to preview the match image and verify it's good.
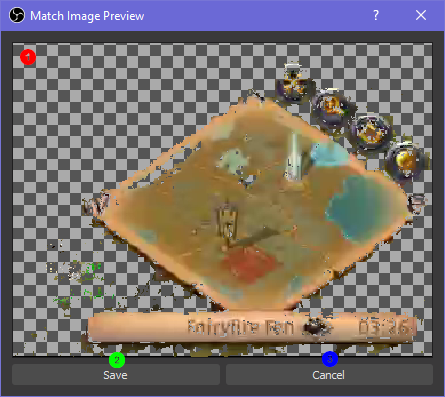
| Item | Description |
|---|---|
|
|
Displays the captured match image to user. In the event Automask process was used, the masked-out regions will be filled with either a background color or with a checkboard pattern indicating alpha transparency (depending on the Mask Mode). |
|
|
If the image is good, press Save to activate a file save dialog. Upon successful save, Match Image Configuration for the selected entry will be updated with the saved file location, as well as X and Y coordinates for placing the image in the video |
|
|
Press Cancel to go back and select a different region in the video, restart the Automask process, or cancel the capture request altogether |
This widget displays detailed match result status for the selected match entry.
The details shown are:
- How many pixels of the match image were compared with video (not masked out)
- How many individual pixel comparisons have matched, as dictated by the allowed pixel error.
- MATCH or NO MATCH status, based on whether the percentage of matched pixels to compared pixels has exceeded the match threshold.
The widget provides top-level on/off switches of plugin's main activities. The behavior for each switch is described below.
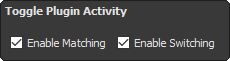
| Enable Matching | Behavior |
|---|---|
| ON | Plugin connects to the Pixel Match Filter, the match images are loaded into memory, and matching is active |
| OFF | Plugin detaches from the Pixel Match Filter, the match images are unloaded, and NO matching is active |
| Enable Switching | Behavior |
|---|---|
| ON | Switching is active. The highest priority entry that matched will cause a switch to the target scene. No-match target, if specified, will also be causing scene transitions in the absence of matched entries. |
| OFF | No scene switching occurs |
The selector controls what is being shown in the Preview Area. Jump to Preview Area for more details of each mode.
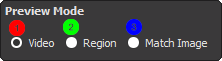
| Preview Mode | Description |
|---|---|
|
|
The Preview Area shows video as it goes through the plugin, as well as live visualization of matching for a selected match entry. |
|
|
Given a selected match entry, the Preview Area will show a live visualization of matching in the video that is centered on the match region |
|
|
Given a selected match entry, the Preview Area will show the entry's match image. If the mask mode is Alpha, the masked-out areas of the image will be indicated by a checkerboard pattern. |
The Region and Match Image preview modes are only available when a match entry is selected that has an assigned and valid match image.
The Preview Area is used to show match image or state of the matching in the video, and allows selection of a region for capturing a match image.
The Video, Region, and Match Image modes can be switched between using the Preview Mode Selector. The Selection Mode is activated when the Capture button of Match Parameters Controls is clicked.
The Selection Mode is activated when the Capture button of the Match Parameters Controls is clicked, and the Capture Image Controls are shown.
You use this mode to select a rectangular region of the video where a match image will be captured. Use the mouse to select a region like you would with a typical rectangular selection tool of an image editor.
Any part of the video outside of the selection rectangle will be dimmed, so that the region being selected stands out:

In Video Mode the Preview Area shows video as it goes through the plugin:
Given a match entry has been selected in the Match List that has a valid match image, the Preview Area will also show a live visualization of matching for the selected match entry. When pixels, that are to be compared, have "matched" (as defined by the allowed pixel error parameter), they are highlighted green. Otherwise, the compared and "unmatched" pixels will be highlighted red:
The Region Mode will show a live matching visualization in the video that is centered on the match region. Color visualization is the same as in Video Mode, with compared and matching pixels highlighted green, and compared but unmatched highlighted red:
The Region Mode is only available when a match entry has been selected in the Match List and has an assigned and valid match image.
The Match Image Mode simply shows the match image. If the mask mode is Alpha, the masked-out areas of the image will be indicated by a checkerboard pattern:
The Match Image Mode is only available when a match entry has been selected in the Match List and has an assigned and valid match image.
Here we list strategies that can be helpful to users and community's other plugins that could complement our plugin and help get things running.
Move Transition Plugin by Exceldro is action-packed with functionality. Among other things, the plugin's Move Value filter enables advanced, timed control of any parameter on other filters. When such a Move Value filter is chosen as a target filter for a match entry, it provides an ability to do extremely customizable transitions on filters. For those looking for advanced control of target filters the Move Transition plugin can be an excellent companion to Pixel Match Switcher.
Special Thank You goes out to Exceldro for allowing to include his plugin with our installer builds.
Several scene items can bundled into a source group. The source group can then be a selected as a target scene item, which would expedite turning all of the parented scene items on or off, simultaneously.
- Manual image import, edit and refresh
https://commons.wikimedia.org/wiki/File:Top_secret.png
| Item | Description |
|---|---|