Native Ads Integration For iOS - Hiroaki-Shinoda/Geniee-iOS-SDK GitHub Wiki
ネイティブ広告では、完成した広告レイアウトを提供するのではなく、広告コンテンツ(部品)を提供することにより、オリジナルデザインで広告を配信する事ができます。タイトルや説明テキスト、アイコンなど、好きなデザインで配信する事が可能です。 広告インプレッション、広告クリックのトラッキングは、広告SDKで処理します。
ネイティブ広告の実装準備は、下記スタートガイドから行ってください。
Geniee SDK をプロジェクトにインストールする必要があります。
スタートガイド
iOS ネイティブ広告配信には、下記クラスを使用します。
- GNNativeAdRequest 非同期でネイティブ広告を取得するためのクラス
- GNNativeAd ネイティブ広告の情報を提供するためのクラス
- GNNativeAdRequestDelegate ネイティブ広告のロード結果を受け取るためのプロトコル
-
GNAdSDK.frameworkをプロジェクトに追加します。スタートガイド -
GNNativeAdRequest.hとGNNativeAd.hをインポートします。#import <GNAdSDK/GNNativeAdRequest.h> #import <GNAdSDK/GNNativeAd.h>
-
GNNativeAdRequestDelegateプロトコルを利用します。@interface TableViewController () <GNNativeAdRequestDelegate> { }
-
GNNativeAdRequestの変数を宣言します。GNNativeAdRequest *_nativeAdRequest;
-
GNNativeAdRequestのインスタンスを初期化します。_nativeAdRequest = [[GNNativeAdRequest alloc] initWithID:@"YOUR_SSP_APP_ID"];
-
GNNativeAdRequestのdelegateを設定します。
ネイティブ広告ロードイベントの結果は、delegate経由で通知されます。
GNNativeAdRequestDelegateプロトコルを実装したインスタンス変数を設定します。_nativeAdRequest.delegate = self;
-
ネイティブ広告をロードします。
[_nativeAdRequest loadAds]; -
GNNativeAdRequestDelegateプロトコルの実装
GNNativeAdRequestDelegateのコールバック関数を実装し、
ネイティブ広告のロードイベントの結果を受け取ります。- (void)nativeAdRequestDidReceiveAds:(NSArray*)nativeAds; - (void)nativeAdRequest:(GNNativeAdRequest *)request didFailToReceiveAdsWithError:(NSError *)error;
受信したネイティブ広告GNNativeAdは、配列のnativeAds引数で渡されます。
複数ネイティブ広告の振り分け処理には、GNNativeAdのzoneID情報で行います。
配列nativeAdsの要素数:
- 1個 GNNativeAdRequest 初期化時、APP_IDを1つ指定した場合
- 複数個 GNNativeAdRequest 初期化時、APP_IDを複数指定した場合
-
GNNativeAdRequestのインスタンスをリリースする際に、delegateをnilに設定します。- (void)dealloc { _nativeAdRequest.delegate = nil; }
- UITableViewControllerの実装例:
#import <GNAdSDK/GNNativeAdRequest.h> #import <GNAdSDK/GNNativeAd.h> @interface TableViewController () <GNNativeAdRequestDelegate> { GNNativeAdRequest *_nativeAdRequest; } @property (nonatomic, strong) NSMutableArray *cellDataList; @end @implementation TableViewController - (void)viewDidLoad { [super viewDidLoad]; _nativeAdRequest = [[GNNativeAdRequest alloc] initWithID:@"YOUR_SSP_APP_ID"]; _nativeAdRequest.delegate = self; [_nativeAdRequest loadAds]; } - (void)nativeAdRequestDidReceiveAds:(NSArray*)nativeAds { for (GNNativeAd *nativeAd in nativeAds) { // You can identify the GNNativeAd by using the zoneID field of GNNativeAd. //if ([nativeAd.zoneID isEqualToString:@"YOUR_SSP_APP_ID"]) { // [_cellDataList addObject:nativeAd]; //} [_cellDataList addObject:nativeAd]; } } - (void)nativeAdRequest:(GNNativeAdRequest *)request didFailToReceiveAdsWithError:(NSError *)error { NSLog(@"TableViewController: didFailToReceiveAdsWithError : %@.", [error localizedDescription]); }
-
複数枠の広告を同時に取得するためには、複数枠の APPID を指定してインスタンスを初期化する必要があります。
-
最大10枠の広告を同時取得できます。
-
各 APPID をカンマで区切り、APPID の間はスペースを入れないでください。
_nativeAdRequest = [[GNNativeAdRequest alloc] initWithID:@"APPID1,APPID2,APPID3,...,APPID10"];
受信したネイティブ広告の情報に基づいて、ネイティブ広告をレンダリングします。
-
情報データの型は、
GNNativeAd.hクラスの定義を参照します。 -
情報データ(NSString型)の値が未設定の場合、
nilとなります。 -
情報データ(int、double型)の値が未設定の場合、
0となります。情報の名前 型 情報の内容 zoneID NSString Geniee内での枠の管理ID advertiser NSString 広告主の名前 title NSString feed広告のタイトル description NSString 広告説明 cta NSString call to actionの文言 icon_aspectRatio double icon画像の横縦比 icon_url NSString icon画像のURL icon_height int icon画像の高さ icon_width int icon画像の幅 screenshots_aspectRatio double screenshot画像の横縦比 screenshots_url NSString screenshot画像のURL screenshots_height int screenshot画像の高さ screenshots_width int screenshot画像の幅 app_appName NSString アプリの名前 app_appid NSString アプリのID(ios:数値、Android:パッケージ) app_rating double アプリの評価 app_storeURL NSString アプリのストアのURL app_targetAge NSString アプリの対象年齢、ios-appでいうとrating -
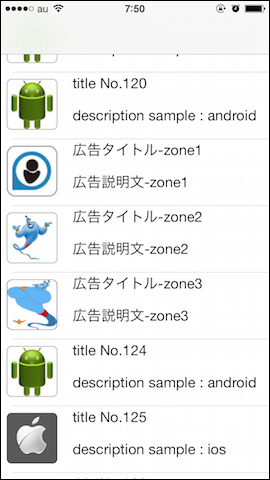
UITableViewControllerの実装例:
管理画面に下記ネイティブ広告の情報を設定した場合- title
- description
- icon image URL
- (NSInteger)numberOfSectionsInTableView:(UITableView *)tableView
{
    return 1;
}

- (NSInteger)tableView:(UITableView *)tableView numberOfRowsInSection:(NSInteger)section
{
    return _cellDataList.count;
}

- (UITableViewCell *)tableView:(UITableView *)tableView cellForRowAtIndexPath:(NSIndexPath *)indexPath
{
    static NSString *CellIdentifier = @"SampleDataCell";
    TableViewCell *cell = [tableView dequeueReusableCellWithIdentifier:CellIdentifier forIndexPath:indexPath];

    if ([[_cellDataList objectAtIndex:indexPath.row] isKindOfClass:[GNNativeAd class]]) {
        GNNativeAd *nativeAd = (GNNativeAd *)[_cellDataList objectAtIndex:indexPath.row];
        if (nativeAd != nil) {
            cell.nativeAd = nativeAd;
            cell.title.text = nativeAd.title;
            cell.description.text = nativeAd.description;
            cell.icon.image = nil;
            NSURL *url = [NSURL URLWithString:nativeAd.icon_url];
            [TableViewController requestImageWithURL:url completion:^(UIImage *image, NSError *error) {
                if (error) return;
                cell.icon.image = image;
            }];
            [nativeAd trackingImpressionWithView:cell];
        }
    } else {
        // GNNativeAd以外のセルの表示処理
    }
    return cell;
}
-
UITableViewController実装例のイメージ
-
ネイティブ広告がレンダリングされた時、広告のインプレッションを報告します。
-
インプレッション報告済みのネイティブ広告に対して、再度報告ができません。
-
新しい広告表示には、ネイティブ広告を再取得する必要があります。
[nativeAd trackingImpressionWithView:cell];
-
ネイティブ広告がクリックされた時、広告のランディングページを外部ブラウザで起動します。
[nativeAd trackingClick:cell]; -
UITableViewControllerの実装例:
-(void)tableView:(UITableView *)tableView didSelectRowAtIndexPath:(NSIndexPath *)indexPath
{
    TableViewCell *cell = (TableViewCell*)[tableView cellForRowAtIndexPath:indexPath];
    if (cell.nativeAd != nil) {
        [cell.nativeAd trackingClick:cell];
    } else {
        // GNNativeAd以外のセルのクリック処理
    }
}
広告のランディングページは、デフォルトで外部ブラウザで起動しますが、
GNNativeAdRequestDelegateのコールバック関数を実装し、
ランディングページのURLを使ってアプリ内ブラウザで起動することが可能です。
また、関数の戻り値によって、外部ブラウザの起動を制御します。
-
YES 外部ブラウザを起動します。
-
NO 外部ブラウザを起動しません。
- (BOOL)shouldStartExternalBrowserWithClick:(GNNativeAd *)nativeAd landingURL:(NSString *)landingURL;
-
新しい広告表示には、ネイティブ広告を再取得する必要があります。
[_nativeAdRequest loadAds]; -
UITableViewControllerの実装例:
- (void)scrollViewDidScroll:(UIScrollView *)scrollView
{
    [_nativeAdRequest loadAds];
}
-
GNNativeAdRequestDelegateのコールバック関数で取得結果を受け取ります。- (void)nativeAdRequestDidReceiveAds:(NSArray*)nativeAds; - (void)nativeAdRequest:(GNNativeAdRequest *)request didFailToReceiveAdsWithError:(NSError *)error;
SwiftからiOS SDK (Objective-C) クラスを利用するには、Objective-C bridging headerと呼ばれるファイルに ヘッダファイルのインポート文を書く必要があります。
-
<プロジェクト名>-Bridging-Header.hファイルをプロジェクトに追加します。 -
<プロジェクト名>-Bridging-Header.hファイルにインポート文を記述します。#import <GNAdSDK/GNNativeAdRequest.h> #import <GNAdSDK/GNNativeAd.h>
-
ファイル名をプロジェクトの「Build Settings」に設定します。
プロジェクトルートでターゲットを選択し、「Build Settings」->「Swift Compiler - Code Generattion」->「Objective-C bridging header」に<プロジェクト名>-Bridging-Header.hを設定します。
