Virtual Controller Setup - HipsterSloth/PSMoveSteamVRBridge GitHub Wiki
Overview
PSMoveService's originally purpose was to track PSMoveControllers. A core part of this work involves tracking colored spheres. One might ask if you can track a colored sphere on a psmove controller, why not on some other controller? Could you construct your own tracked controller by attaching an illuminated ping pong ball to it? That is what VirtualControllers are. You can attach a colored ping pong ball to any gamepad that uses the DirectInput API. Buttons can be mapped to SteamVR buttons. Basically a cheap alternative to a PSMoveController.
XBox Controller Setup
Since the XBox 360 Controller is one of the most common DirectInput based controllers for Windows, I'll use that as my example here. But any controller that supports the DirectInput API should work with this method.
Attaching a ping pong ball
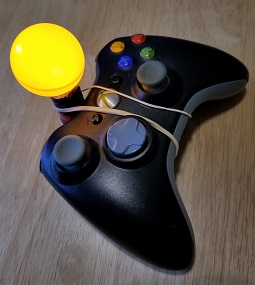
The first step is to attach a ping pong ball to your controller with a light. The simplest way to do this is to use a cheap LED flashlight and hot glue a ping pong ball to it. The flashlight can then be rubber banded to your controller:
images/VirtualController/ControllerWithBulb.jpg
One potential problem with LED flash lights is that though they may appear to produce a steady stream of light when on, they are actually pulsing on and off very rapidly. You'll see this show up as a flickering light in in the video stream. Therefore you should test any flashlight in the video feed before bothering with gluing a ping pong ball to it.
Alternatively you can build your own custom lighting rig. Chris Daley has a great video outlining how to build a custom lit LED bulb for VirtualHMDs here:
Open of USB controller tool
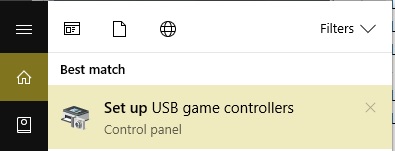
Before trying to use your gamepad, make sure it's actually supports the DirectInput API. You can verify this with the Windows game pad tool here:
images/VirtualController/OpenSetUpUSBController.jpg
Verify Controller
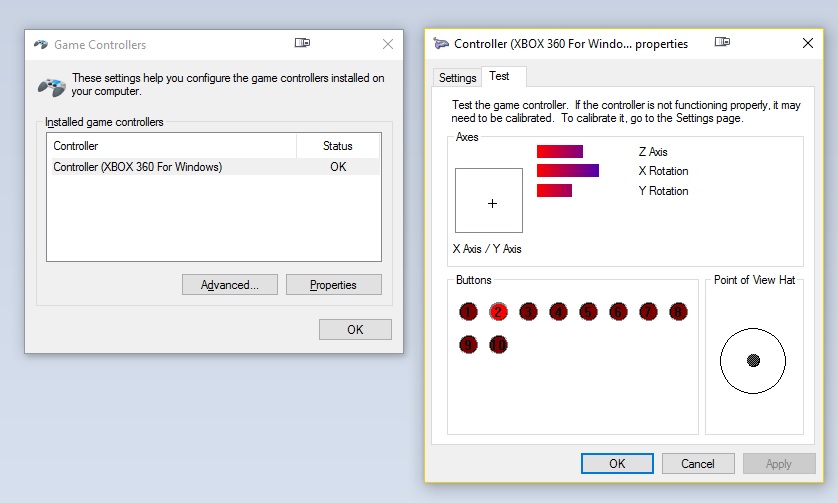
Hopefully your controller shows up in this panel. You can then test the buttons in the properties menu. Make sure all the buttons and triggers you want to use work correctly:
images/VirtualController/VerifyXBoxController.jpg
Virtual Controller Setup
Once you have your controller ready, you need to configure PSMoveService to use virtual controllers. By default virtual controllers are not enabled. This is because PSNavi support is also routed through the same gamepad api. That also means that if you are currently using PSNavi controllers in PSMoveService they will show up as "VirtualControllers" instead of PSNavi controllers when this feature is turned on.
Initial PSMoveService Setup
- Set "gamepad_api_enabled" to "true" in
%appdata%\PSMoveService\DeviceManagerConfig.json - Set "virtual_controller_count" to "1" in
%appdata%\PSMoveService\ControllerManagerConfig.json - Launch and then shutdown PSMoveService. This will create
%appdata%\PSMoveService\VirtualController_0.json - Open
VirtualController_0.jsonand set the "bulb_radius" to the appropriate size- 2cm for a regulation ping pong ball
Assigning a gamepad
When you relaunch PSMoveService and then open PSMOveConfigTool you should see a new VirtualController entry like so. By default it has will have no gamepad assigned.
images/VirtualController/VirtualControllerConfig.jpg
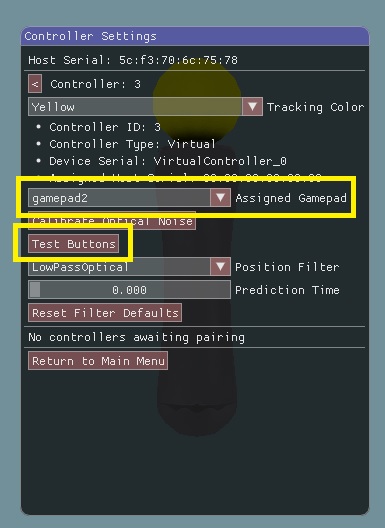
You'll want to select a controller and then go to the "Test Buttons" menu to see if the buttons work like you expect. If they don't try changing the assigned gamepad and testing the buttons again.
images/VirtualController/VirtualGamepad.jpg
In the button testing menu you'll see a generic button and axis list. The gamepad API doesn't provide any context about what the buttons or axis are so we'll need to figure that out ourselves. Test each button and axis and make note of what button and axis correspond to on the controller.
images/VirtualController/VirtualControllerButtons.jpg
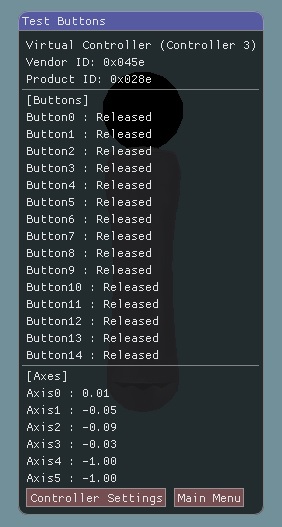
For example, the XBox 360 controller button mappings look like this:
- button0 - DPad Up
- button1 - DPad Down
- button2 - DPad Left
- button3 - DPad Right
- button4 - Start
- button5 - Back
- button6 - Left Thumbstick Click
- button7 - Right Thumbstick Click
- button8 - Left Bumper
- button9 - Right Bumper
- button10 - A
- button11 - B
- button12 - X
- button13 - Y
- button14 - Jewel
And the XBox 360 controller axis mappings look like this:
- Axis0 - Left Thumbstick X [-1,1]
- Axis1 - Left Thumbstick Y [-1,1]
- Axis2 - Right Thumbstick X [-1,1]
- Axis3 - Right Thumbstick Y [-1,1]
- Axis4 - Left Trigger [-1,1]
- Axis5 - Right Trigger [-1,1]
Configure steamvr.vrsettings
Assuming you have already done the Steam-VR-Setup we can add button mapping for out new virtual controller in the SteamVR configuration file C:\Program Files (x86)\Steam\config\steamvr.vrsettings
Virtual Controller to SteamVR Button Mapping
The following virtual controller buttons are available to map from:
- "gamepad_button_0"
- "gamepad_button_1"
- ...
- "gamepad_button_31"
The following SteamVR buttons are available to map to:
- "system"
- "application_menu"
- "grip"
- "dpad_left"
- "dpad_up"
- "dpad_right"
- "dpad_down"
- "a"
- "button_8"
- "button_9"
- ...
- "button_30"
- "button_31"
- "touchpad"
- "trigger"
- "axis_2"
- "axis_3"
- "axis_4"
The Virtual Controller button re-mappings need to be in their own "virtual_button" section. Here is an example setup for an XBox 360 controller:
    "virtual_button" : {
        "gamepad_button_4":"system",
        "gamepad_button_13":"application_menu",
        "gamepad_button_8":"grip",
        "gamepad_button_9":"grip",
        "gamepad_button_2":"dpad_left",
        "gamepad_button_0":"dpad_up",
        "gamepad_button_3":"dpad_right",
        "gamepad_button_1":"dpad_down",
        "gamepad_button_10":"a",
        "gamepad_button_6":"touchpad",
        "gamepad_button_7":"touchpad"
    },
Virtual Controller to SteamVR Axis Mapping
We also need to specify which axis correspond to the trigger and thumbpad. On an XBox 360 controller if I wanted to map right trigger and right thumbstick these are the button axis mappings I would use
    "virtual_axis" : {
        "trigger_axis_index" : 5,
        "touchpad_x_axis_index" : 2,
        "touchpad_y_axis_index" : 3
    },
Special Virtual Controller Properties
We also need to assign which gamepad button fires of the HMD recenter action (used when first starting SteamVR). We can assign this button using the "hmd_align_button" field.
We can also set which controller model to use for the virtual controller inside the SteamVR compositor. By default we use "vr_controller_01_mrhat", but if you want something that looks more like a gamepad use "generic_controller".
    "virtual_controller" : {
        "hmd_align_button" : "gamepad_button_5",
        "override_model" : "generic_controller"
    },
Controller Orientation
Since the gamepad has no IMU you can't get an orientation from the controller. However a virtual controller in SteamVR isn't very useful if it's always locked pointing forward. I was working on trying to get a simple IK solution using the HMD and the position of the controller, but had mixed results. So for now we have to mirror the orientation from the HMD instead. This seems to work ok. If you really don't want any sort of orientation on the controller you'll want to set "enable_ik" to false. There are a bunch of other IK related settings, but none of them are in use at the moment.
    "virtual_controller_ik" : {
        "enable_ik" : true,
        "first_hand": "right",
        "second_hand": "left",
        "neck_length" : 0.2,
        "half_shoulder_length" : 0.22,
        "upper_arm_length" : 0.3,
        "lower_arm_length" : 0.35
    }