Legacy Steam VR Setup - HipsterSloth/PSMoveSteamVRBridge GitHub Wiki
Using The (Legacy) PSMove SteamVR Driver
NOTE Only follow these instructions if you are using the 1.5.1 build or earlier. For all later builds consult the Steam-VR-Setup wiki page.
Install SteamVR
It is under "Tools" in everyone's Steam Library. steam://install/250820
Downloading pre-built PSMoveSteamVRBridge Binaries
The easiest way to get started is to use a pre-built binaries from the Releases page.
Building PSMoveSteamVRBridge from source
If you build the project from source in Win10 using the instructions from Building from source, make sure you build the auto-generated "INSTALL" project in the PSMoveSteamVRBridge.sln. This will generate a win64/bin folder with all of the binaries and scripts in it you need to get started.
One Time Initial Setup
If you haven't registered your OpenVR folder yet, run SteamVR_InitialSetup.bat and point it at your steam install folder (usually C:\Program Files (x86)\Steam\). This generates a batch file that contains path to your SteamVR folder that the driver install and uninstall scripts use.
Shutdown Everything
- Close PSMoveService if it's running.
- Close SteamVR if it's running.
- Run process explorer and make sure there isn't a zombie vrserver.exe running
Configure steamvr.vrsettings
- Open
C:\Program Files (x86)\Steam\config\steamvr.vrsettings - Set "activateMultipleDrivers" to true. This is what allows the psmove driver to co-exist with any HMD.
- [Optional] If you are trying to use the psmove driver without an HMD, you might want to enable driver_null (no HMD) or set "requireHmd": false.
- [Optional] Override the default button mappings.
- [Optional] Add virtual touch pad mappings.
- [Optional] Set controller model offsets.
- [Optional] Set controller filter for 3rd HMD controller.
PSMove to SteamVR Button Mapping
The following ps move buttons are available to map from:
- "ps"
- "move"
- "select"
- "start"
- "trigger"
- "triangle"
- "circle"
- "square"
- "cross"
The following SteamVR buttons are available to map to:
- "system"
- "application_menu"
- "grip"
- "dpad_left"
- "dpad_up"
- "dpad_right"
- "dpad_down"
- "a"
- "button_8"
- "button_9"
- ...
- "button_30"
- "button_31"
- "touchpad"
- "trigger"
- "axis_2"
- "axis_3"
- "axis_4"
The PSMove button re-mappings need to be in their own "psmove" section. This is the default button mapping:
   "psmove" : {
      "ps" : "system",
      "move" : "touchpad",
      "trigger" : "trigger",
      "triangle" : "application_menu",
      "square" : "grip",
      "circle" : "a",
      "cross" : "button_8",
      "select" : "button_9",
      "start" : "button_10"
   },
PSNavi to SteamVR Button Mapping
If you have setup a PSNavi controller using these instructions you can setup PSNavi button mappings. Once a PSNavi is assigned to a PSMove controller button pressed on the PSNavi will get sent to the PSMove controller in SteamVR. As far as SteamVR is concerned it will be as if the PSMove controller has all the buttons that the PSNavi has:
   "psnavi_button" : {
      "l1" : "grip",
      "l2" : "trigger",
      "l3" : "touchpad",
      "circle" : "application_menu",
      "cross" : "system",
      "trigger" : "trigger"
   },
   "psnavi_touchpad" : {
      "dpad_down" : "touchpad_down",
      "dpad_left" : "touchpad_left",
      "dpad_right" : "touchpad_right",
      "dpad_up" : "touchpad_up"
   },
Virtual Touchpad
The PSMove controller does not have a touch pad like the SteamVR controller has, just buttons. This is problematic for SteamVR games like Space Pirate Trainer or apps like TiltBrush where a touch pad is needed. There are two ways you can emulate a touch pad depending on your needs. You and either emulate pressing the corners of the touch pad or do continuous touch pad emulation
To map the four corners of the touchpad to buttons, you can add the following to the psmove_touchpad_directions block:
   "psmove_touchpad_directions" : {
      "circle" : "touchpad_right",
      "cross" : "touchpad_left",
      "triangle" : "touchpad_up",
      "square" : "touchpad_down"
   },
or diagonals:
   "psmove_touchpad_directions" : {
      "circle" : "touchpad_down-right",
      "cross" : "touchpad_down-left",
      "square" : "touchpad_up-left",
      "triangle" : "touchpad_up-right"
   },
Additionally, if you want to have continuous motion over the touchpad, rather than just snapping to the four corners, you can map the motion of the controller to motion on the touchpad when the touch pad button is held down. In order to do this, you first need to have a psmove button mapped to the "touchpad" button (the "move" button is the most common one to use). Then you need to set the "use_spatial_offset_after_touchpad_press_as_touchpad_axis" flag to true (don't put true in quotes!). You can optionally set the "meters_per_touchpad_units" scale to set how much controller movement corresponds to how much touchpad movement:
   "psmove" : {
      "move" : "touchpad",
      "meters_per_touchpad_units" : 0.075,
      "use_spatial_offset_after_touchpad_press_as_touchpad_axis":true
   },
Or for touchpad operations like scrolling where it's touched but isn't pressed, use "touchpad_touched" to map the touch and press onto two separate buttons:
   "psmove" : {
      "move" : "touchpad_touched",
      "cross" : "touchpad",
      "meters_per_touchpad_units" : 0.075,
      "use_spatial_offset_after_touchpad_press_as_touchpad_axis":true
   },
For controller specific mapping use the following sections where # is the controller Id number (remember it starts from zero):
   "psmove_#" : {
      // mappings
   },
   "psmove_touchpad_directions_#" : {
      // mappings
   },
Controller Model Offsets
There are some game where you want to offset the controller position. This can happen in particular for games where you need one controller to get close to another controller. The most common case is to extend the controller position along the controllers +Y axis like so:
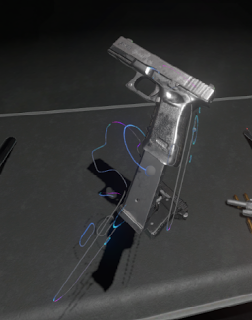
The other case is extending the controller along the +Z axis like so:
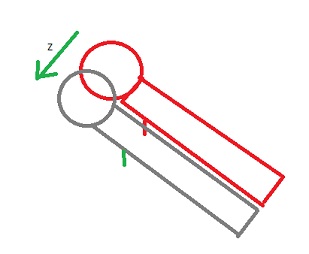
These can be done with the psmove_extend_y and psmove_extend_z values in the psmove_settings section. Units are in meters.
   "psmove_settings" : {
      "psmove_extend_y" : 0.05
      "psmove_extend_z" : 0.01
   },
HMD Controller (3rd controller) filtering
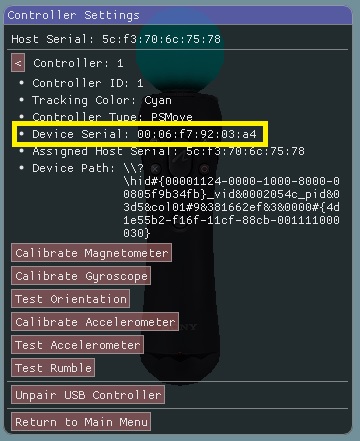
Some people use a third psmove controller for head tracking (GearVR or Cardboard) in conjunction with FreePIE. In this instance you don't want SteamVR to use the controller used for the HMD since some games will arbitrarily pick a controller to use for a hand. If this is a case for you, you can use psmove_filter_hmd_serial to tell SteamVR to ignore a controller with a given serial number. The "serial number" is actually the Bluetooth MAC address of the controller. You can find the serial number for a given controller in the controller settings page
images/Controller_MAC_Address.jpg
You can then put this serial number into the steamvr.vrsettings block:
   "psmove_settings" : {
      "psmove_filter_hmd_serial" : "00:06:f7:92:03:a4"
   },
Rumble Suppression
Sometimes you may want to turn off rumble (Typically for debugging purposes). This can be done with the "rumble_suppressed" flag:
   "psmove" : {
      "rumble_suppressed" : true
   },
Throwing Power
Sometimes you may want to be able to throw objects further (or make it more difficult to throw objects). This can be done with the "linear_velocity_exponent" and "linear_velocity_multiplier" flags:
   "psmove_settings" : {
      "linear_velocity_exponent" : 0.0,
      "linear_velocity_multiplier" : 1.0
   },
Example steamvr.vrsettings
Here is what my steamvr.vrsettings file looks like. You don't need to mirror this, but just make sure the "activateMultipleDrivers" option and "psmove" section are in the right place. Be sure to mind your commas. I strongly recommend pasting your settings file at JSONLint.com to make sure you didn't mess up the formatting. I put this in bold because I just messed this up myself.
Check vrserver.txt log to see if there were parse errors. Many of the settings are described at https://developer.valvesoftware.com/wiki/SteamVR/steamvr.vrsettings.
{
   "camera" : {
      "enableCamera" : false,
      "enableCameraForCollisionBounds" : false,
      "enableCameraForRoomView" : false,
      "enableCameraInDashboard" : false
   },
   "collisionBounds" : {
      "CollisionBoundsStyle" : 4
   },
   "jsonid" : "vrsettings",
   "keyboard" : {
      "TutorialCompletions" : 1
   },
   "perfcheck" : {
      "heuristicActive" : true
   },
   "steamvr" : {
      "activateMultipleDrivers" : true,
      "allowReprojection" : true,
      "directMode" : true,
      "directModeEdidPid" : 43521,
      "directModeEdidVid" : 53794
   },
   "version" : "1",
   "psmove" : {
      "ps" : "system",
      "move" : "touchpad",
      "trigger" : "trigger",
      "triangle" : "application_menu",
      "square" : "grip",
      "circle" : "a",
      "cross" : "button_8",
      "select" : "button_9",
      "start" : "button_10",
      "rumble_suppressed" : false,
      "use_spatial_offset_after_touchpad_press_as_touchpad_axis":true
   }
}
Installing the PSMove SteamVR drivers
- Register the driver with the SteamVR runtime via the
SteamVR_ReinstallDriver.bat. - Launch the
PSMoveService.exe - Launch SteamVR.
You should see a new green base station icon for every PS EYE tracker you have connected and a green controller icon for every PS Move controller connected. When you put on your HMD and are in the SteamVR lobby you should see tracker and controller models close to where they are in the real world.
You can use "vrcmd" (with no arguments) to see a list of devices to verify things are working. use "vrcmd" to verify things are loading. You should see entries for PSMove controllers.
You can also use "vrcmd --pollposes" (followed by an index number to limit the output) to see things are working.
Uninstalling the PSMove SteamVR drivers
- Stop SteamVR
- Run
SteamVR_UninstallDriver.bat - Run SteamVR. The additional base station and controller icons in the SteamVR status window should now be gone.
Launching SteamVR
If all the setup worked correctly when you launch SteamVR you should see a tracking camera icon for each ps3eye camera attached and a controller icon for each controller attached in the SteamVR status window (minus one controller if you are filtering one out to use for HMD tracking). When you put on your headset you'll be greeted with a green instructional overlay asking you to hold the controller to your face and then press start+select. This will align the HMD and PSMove tracking spaces (hopefully). Every time you restart SteamVR you'll be re-prompted with this overlay. You can also redo the select+start alignment at any time. This can also be trigger by an associated PSNavi dpad_up if nothing is assigned to it in the steamvr.vrsettings file.
If the icons and instructional overlay didn't appear try installing the Visual C++ Redistributable for Visual Studio 2015 (probably the x64 version).
Orientation Re-centering
If you want to recent a controller that has drifted orientation, point the controller down the forward direction of the calibration mat (the -Z direction) and hold the select button for a quarter second. This can also be trigger by an associated PSNavi dpad_down if nothing is assigned to it in the steamvr.vrsettings file.