2. Making the virtual machine - HikariKnight/vfio-setup-docs GitHub Wiki
Note: If you have been following this guide until now, reboot your computer to make sure all your changes get applied and libvirt and QEmu gets properly started.
-
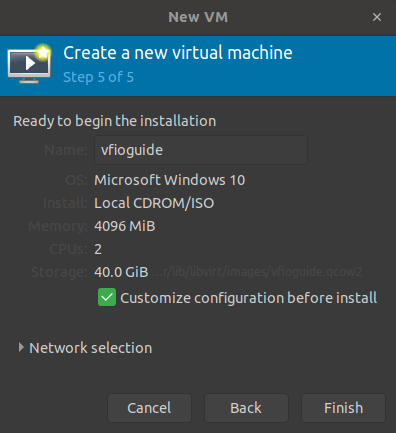
Open the Virtual Machine Manager and make a new virtual machine.
Note: if you are planning to use a physical disk device, make a small qcow2 disk as you will need it later.
-
At the end of the configuration wizard, make sure you check the box for
Customize configuration before install.
-
Switch the firmware from BIOS to UEFI (this cannot be changed through the gui once the virtual machine is created!)
-
Make sure the chipset is set to i440FX (q35 can work but is a lot harder to setup)
-
Click on CPUs and click Topology and check the checkbox for Manually set CPU topology.
-
The best topology varies from system to system and use case to use case, but on my personal system (Threadripper 1920x) I use 1 socket with 6 cores and 1 thread per core.
On most systems it might be preferable to use 1 socket with 2 or 4 cores and 1 thread per core.
-
Click on IDE Disk 1 and change the disk bus to SATA for now.
-
Click Begin Installation and install windows as usual, then turn off UAC(User Account Control)if you are planning to use LookingGlass.
Note: Force off the virtual machine if you are planning to use a physical disk then read the next section before actually installing windows.
Warning: I have gotten extremely mixed results with usb (both 2.0 and 3.x) attached disks (including those in powered docking stations!) and would not recommend it due to the potential of data corruption, only use disks attached directly to the motherboard through sata, m.2 or pci-e!
- Open the configuration file for the virtual machine.
This guide will assume you are using nano as your editor, if you are comfortable using any of the other editors then use those, nano is just the easiest for beginners to use.
Note: replace yourvirtualmachinename with the name of your virtual machine.
| virsh edit yourvirtualmachinename |
- Locate this part of the file that is talking about disk and qcow2, this is the disk you made in the configuration wizard.

- To make the virtual machine use the raw disk of your choice you want to replace it with this, and remember to use the same file you added to the apparmor configuration as the source device.
<disk type='block' device='disk'>
  <driver name='qemu' type='raw'/>
  <source dev='/dev/disk/by-id/ata-SAMSUNG_MZ7TD128HAFV-000L1_S14TNSAD626520'/>
  <target dev='sda' bus='sata'/>
</disk>- WARNING: If you are using an SSD as the physical device, it is very important you head to the Enabling TRIM support for SSD passthrough section of this guide once Windows and the VirtIO drivers are installed. Otherwise your SSD will be detected as a HDD by Windows 10 and will slowly get destroyed by unnecessary read/writes by the windows defragmentation tool schedule, plus your SSD will never run TRIM which is a bad thing!
-
After Windows (preferably Windows 10 if you plan to use LookingGlass) is installed, install the Latest VirtIO drivers from https://docs.fedoraproject.org/en-US/quick-docs/creating-windows-virtual-machines-using-virtio-drivers/index.html
If you mount the iso through the virtual machine or directly in windows is up to you.
-
Install all the drivers, especially the VIO drivers
Note: Drivers without an exe or msi file for install come as .inf files, right click on the .inf file and choose install in order to install it on your system.
-
Download virtio-win10-prewhql-0.1-161.zip, extract it and navigate to
/Win10/amd64/and find ivshmem.inf and right click it and choose installNote: Without this spesific driver, looking-glass will not work as it is not included in the latest virtio drivers yet!
-
Shut down (not reboot) your virtual machine.
-
Open your Virtual Machine’s hardware details in Virtual Machine Manager and click Add Hardware.
-
Add a new storage disk image (or reuse the one from the configuration wizard if you are using a physical disk instead).
-
Set the Bus type to VirtIO and click finish.

-
Start your Virtual Machine, once Windows has finished loading, shut the machine down again and change the Bus type for Disk 1 to VirtIO.
-
Start your Virtual Machine again, if Windows loads without issues, then VirtIO is working fine, if not then set the Disk 1 Bus type back to SATA and re-install the VirtIO drivers for storage while Disk 2 set to VirtIO is present on the machine.
-
Once everything is working, set your virtual network card to use virtio as the device model.
Note: Make sure you have installed the VirtIO drivers and configured your Disk 1 to use the VirtIO bus. If the defragmenting tool in windows detects your SSD as "Thin Provisioned" you can skip changing the bus in step 4 and skip step 5 entierly.
-
Shut down the Virtual Machine.
-
Open the Virtual Machine configuration.
| virsh edit yourvirtualmachinename |
- Locate your physical disk configuration, it should look something like this now.
<disk type='block' device='disk'>
  <driver name='qemu' type='raw' cache='none' io='native'/>
  <source dev='/dev/disk/by-id/ata-SAMSUNG_MZ7TD128HAFV-000L1_S14TNSAD626520'/>
  <target dev='sda' bus='virtio'/>
  <address type='drive' controller='0' bus='0' target='0' unit='0'/>
</disk>- Add discard='unmap' to the end of the driver tag and edit bus='virtio' to bus='scsi'
The end result should look something like this.
<disk type='block' device='disk'>
  <driver name='qemu' type='raw' cache='none' io='native' discard='unmap'/>
  <source dev='/dev/disk/by-id/ata-SAMSUNG_MZ7TD128HAFV-000L1_S14TNSAD626520'/>
  <target dev='sda' bus='scsi'/>
  <address type='drive' controller='0' bus='0' target='0' unit='0'/>
</disk>- Now we need to add a SCSI controller to our configuration, add this below the last </controller>.
<controller type='scsi' index='0' model='virtio-scsi'>
</controller>-
Press CTRL+X to save when done.
-
What this does is mark the disk as a Thin Provisioned Storage, which has TRIM capability (through the SCSI interface, if needed) and the discard='unmap' part from the driver tag for our disk tells the physical disk to unmap data marked for deletion when TRIM is run, this is currently the only way I know of to mark a physical disk as an “SSD” with libvirt successfully.
Once you have installed Windows, installed the virtIO drivers and verified everything is working. It is finally time to pass the GPU to the virtual machine.
-
If the virtual machine is on, shut it down
-
Open the Virtual Machine Manager and go to your virtual machines hardware details
-
Click Add Hardware and choose PCI Host Device
-
Locate the Graphic card you have stubbed earlier and click it, then click Finish
-
Do the same (step 3 and 4) for the Graphic Cards High Definition Audio Controller.
-
Turn on the computer to verify that the device has been passed to the Virtual Machine
Note: You can check this in the device manager in Windows
-
If you have passed through an AMD Graphics card, you are done and can install the graphic card driver, if you passed through an Nvidia card you will have to read the next section first before installing the graphics card drivers.
The Nvidia driver will check to see if it is running in a hypervisor and will disable the GPU driver if it detects it, so we will need to hide the hypervisor from it
-
If the virtual machine is on, shut down the virtual machine.
-
If you are passing through an Nvidia graphic card, you will need to make the Nvidia driver believe it is not running on a hypervisor, we can do this by doing a slight edit to our virtual machine configuration.
| virsh edit yourvirtualmachinename |
- Locate the tag ending
</hyperv>and add this line above it.
<vendor_id state='on' value='anything'/>Note: the value
anythinghas a max length, if you get an error using a custom value, try shorten it.
- Then add these lines below the
</hyperv>line.
<kvm>
  <hidden state='on'/>
</kvm>- Save the file with CTRL+X when you are done.