윈도우10에서 Xilinx 14.7 설치 및 환경 구축 - Hgeun/Digital-Logic GitHub Wiki
-- 공식 xilinx 안내 => xilnix
-- 사용 fpga = xc3s2000
xilinx ISE 개발툴에 대하여
ISE와 Vivado
xilinx는 ISE에 대한 지원을 2013.10.13까지 하고 종료.
이후부터는 Vivado로 올인.
따라서, 모델에 따라 어느 개발툴을 사용할 수 있는지 고려 필요.
ISE 지원 모델 및 지원 운영체제
지원모델
Spartan®-6, Virtex®-6, CoolRunner™ devices 포함 이전 모델들
지원운영체제
리눅스, 윈도우 xp/7/server,
*윈도우 10 (아래 설치 항목에 있는 별도 설정 과정을 거쳐야 사용가능)
xilinx 설치
xilinx 14.7
xilinx 14.7 download
다운로드전 xilinx 가입 필요
- Install 과정 중 select products to install에서 ISE Design Suite Logic Edition 선택
- Install 과정 중 select destination directory에서 원하는 설치 경로에 설정
- 다른 과정은 전부 그대로 두거나 동의 후 넘김 + winPcap설치
윈도우10에서 설정
Fixing Project Navigator, iMPACT and License Manager
Note: I am assuming you are using ISE 14.7 and have installed it to the default location
- Open the following directory: C:\Xilinx\14.7\ISE_DS\ISE\lib\nt64
- Find and rename libPortability.dll to libPortability.dll.orig
- Make a copy of libPortabilityNOSH.dll (copy and paste it to the same directory) and rename it libPortability.dll
- Copy libPortabilityNOSH.dll again, but this time navigate to C:\Xilinx\14.7\ISE_DS\common\lib\nt64 and paste it there
- In C:\Xilinx\14.7\ISE_DS\common\lib\nt64 Find and rename libPortability.dll to libPortability.dll.orig
- Rename libPortabilityNOSH.dll to libPortability.dll
Fixing PlanAhead not opening from 64-bit Project Navigator
PlanAhead will not open when you are running 64-bit Project Navigator (e.g. for I/O Pin Planning), it just displays the splash screen but never opens.
To fix it, we have to force PlanAhead to always run in 32-bit mode.
- Open C:\Xilinx\14.7\ISE_DS\PlanAhead\bin and rename rdiArgs.bat to rdiArgs.bat.orig
- Download win8planaheadfix.zip
- Extract it. You should now have a file named rdiArgs.bat
- Copy the new rdiArgs.bat file to C:\Xilinx\14.7\ISE_DS\PlanAhead\bin
출처 : Guide: Getting Xilinx ISE to work with Windows 8 / Windows 10 (64-bit)
ISE 라이센스
- ISE에서 지원하는 모든 모델을 한시적으로 이용하고 싶다면 30일 라이센스 사용
- ISE webpack edition에서 지원하는 모델만 이용한다면 webpack 라이센스 사용
ISE 30일 라이센스로 등록하기
- ISE Project Navigator에서 메뉴바에서 Help -> Manage License... 클릭
- Xilinx License Configuration Manager 창이 켜지고, Acquire a License 탭에서 Start 30 Day Evaluation 선택 후 Next 클릭
- Connect Now 클릭 후 로그인
- Product Licensing - Name and Address Verification 항목 채우고 Next
- Vivado Design Suite (No ISE): 30-Day Evaluation License 선택하고 Generate Node-Locked License 클릭
- 메일로 라이센스 파일을 저장
- Xilinx License Configuration Manager에서 Manage Licenses 탭으로 이동
- Load License... 클릭하여 저장한 라이센스 파일을 로드
ISE webpack 라이센스 지원 모델
단, all이라 표시된 모델도 ISE 지원이 종료된 시점 이후로
출시된 모델은 다시 찾아볼 필요 있음.
또한, xilinx의 라이센스 정책에 따라 변경될 수 있으므로
공식 홈페이지에서 정확한 확인이 필요함.

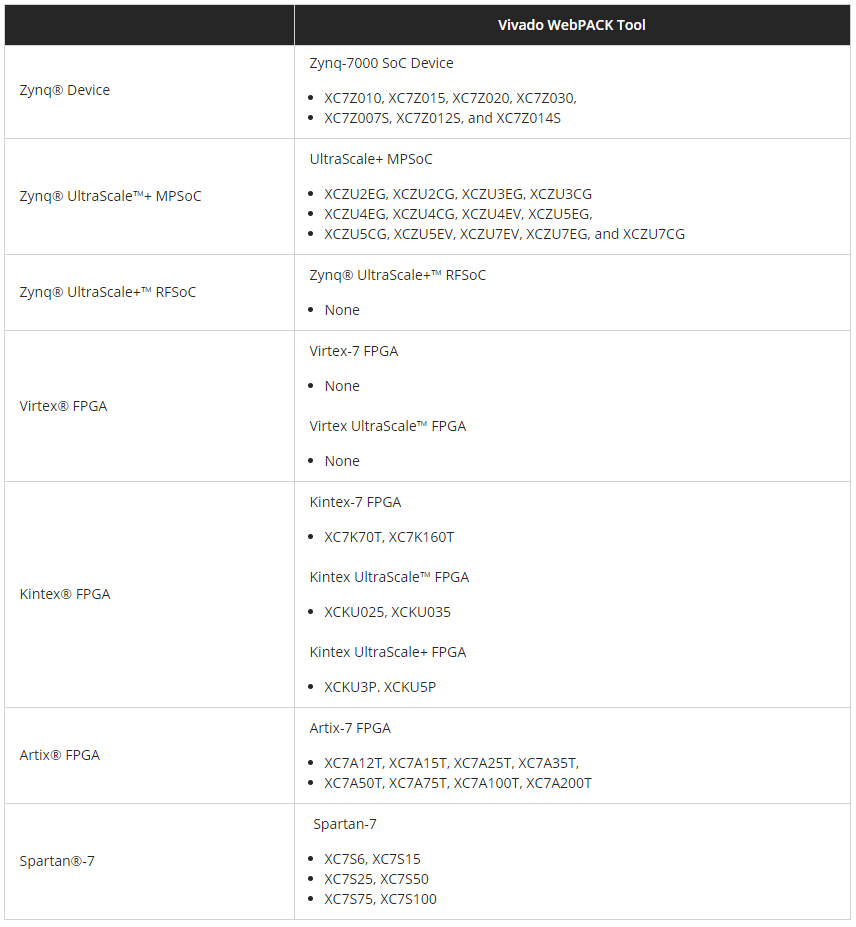
Vivado webpack 라이센스 지원 모델