Tyrosaur Combat Field Guide 1.21.1 - Herbertofury/Advent-of-Ascension GitHub Wiki
Tyrosaur: break the armour and turn away from the roar
Open normal stats and illustrated loot · Prepare the Bone Horn · Boss entry · Trophy progression
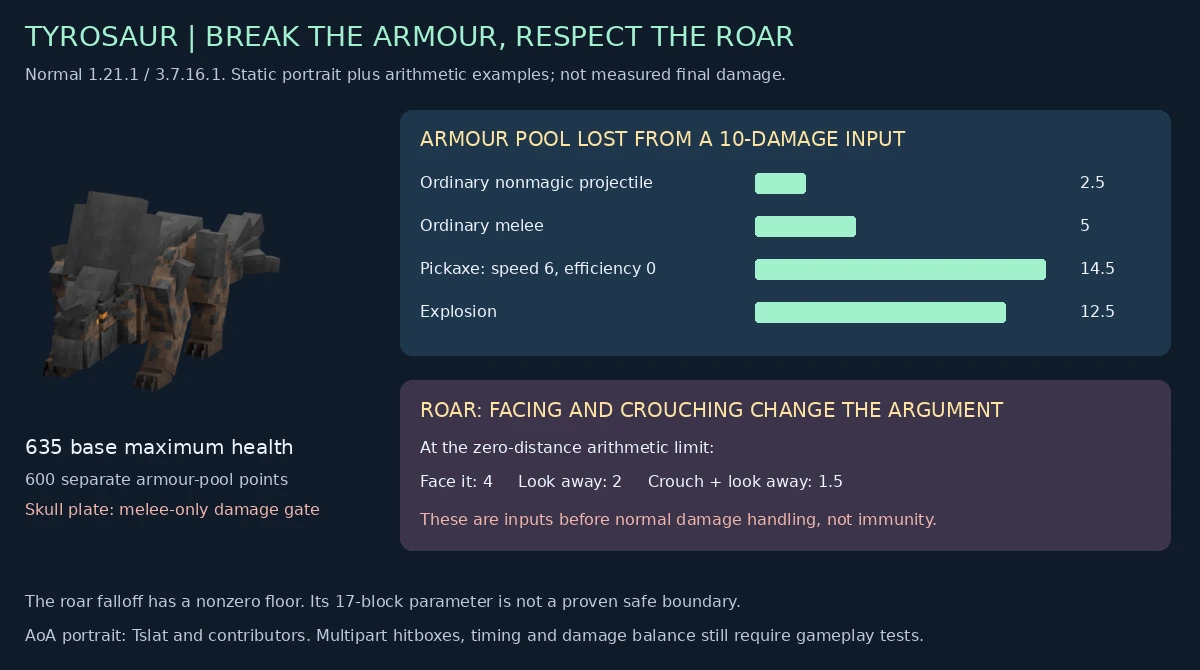
Scope: normal Tyrosaur in Minecraft 1.21.1 / AoA 3.7.16.1. Five released classes, pinned sources and independent arithmetic examples support this guide. Wounded Tyrosaur and Elite Tyrosaur have separate behavior and are not covered by these combat promises. Tactics below need live acceptance in the exact build.
There are two resources to understand
The released base builder specifies 635 maximum health, 15 base melee strength, 10 armour and 15 armour toughness. A separate synchronized armour pool starts at 600. While that pool remains, Tyrosaur adds up to 60 armour and 60 toughness as transient modifiers.
Thus the base builder's 10/15 defensive attributes are not the whole active encounter. With the normal full-pool modifiers applied and no other changes, the arithmetic is 70 armour and 75 toughness before Minecraft's damage calculations. These attributes are not percentages or guaranteed damage reductions.
The pool is clamped between 0 and 600. Its fraction scales both added modifiers. Crossing one of the quarter-stage boundaries triggers crumble effects, but does not by itself certify that every model layer or animation is restored correctly. Save data records the pool fraction under ArmourPercent and restores the modifiers from it.
What removes armour efficiently?
The following examples use an input damage amount of 10, before this handler's armour-depletion adjustments. They describe pool loss, not health lost or final damage per second.
| Source classification | Pool loss in the independent example |
|---|---|
| Ordinary nonmagic projectile, not Heavy Gun | 2.5 |
| Magic-classified projectile | 10 |
| Heavy Gun damage type | 10 |
| Ordinary melee, no pickaxe action | 5 |
| Melee pickaxe action, stone destroy speed 6, mining-efficiency attribute 0 | 14.5 |
| Same pickaxe example, mining-efficiency attribute 5 | 16.5 |
| Explosion, without the earlier projectile reduction | 12.5 |
| Armour-bypassing source | 0 pool loss through this branch |
| Environmental source | 0 pool loss through this branch |
The pickaxe multiplier uses the held item's PICKAXE_DIG action, its destroy speed against stone and the attacker's mining-efficiency attribute. An item merely named “pickaxe” is not the test. A real weapon comparison also needs attack speed, reach, enchantments, hit acceptance and survival risk, so the table is not a claim that a particular vanilla pickaxe is always best.
The armour update occurs before the superclass health-damage call in the inspected handler. Test rejected/repeated hits and modded damage hooks explicitly rather than assuming pool changes and accepted health damage are always one-to-one.
Aim around the skull plate
Tyrosaur uses multipart entities. The special skull plate rejects non-melee damage in its own damage handler and supplies projectile deflection. That is a specific part's rule, not blanket projectile immunity for every part of the creature.
Other declared parts include tail segments with 0.85 and 0.5 damage modifiers. A screenshot of the body cannot show all of these effective hit regions. Practical tactic to test: watch which part your attacks strike, and avoid continuing to fire at a deflecting plate while assuming the weapon is broken. A safe melee approach still has to account for bite, horn attacks and the enlarged attack bounding box.
Roar: look away and crouch, but do not assume immunity
The roar's damage calculation combines distance with the target's viewing direction. Facing toward the boss raises a hearing modifier; looking directly away lowers it. Crouching subtracts another 0.25 from that modifier.
At the zero-distance arithmetic limit, the damage arguments before ordinary damage handling are:
- Facing the boss, standing: 4.
- Looking directly away, standing: 2.
- Facing the boss, crouching: 3.5.
- Looking directly away, crouching: 1.5.
These are illustrative formula values, not a recommendation to stand inside the boss or a guaranteed final health loss. The damage helper, defensive effects and actual target geometry still apply.
After successful roar damage, the hearing modifier also controls Mining Fatigue and Weakness application. The inspected thresholds are strictly greater than 0.5 and 0.8 respectively; Weakness is not re-added by this branch if already present.
Important range detail: 17 is the distance-falloff parameter, not a proven immunity boundary. The strength expression has a nonzero floor, and the entity retrieval call uses a broader 32-range argument. Moving just beyond 17 must not be advertised as guaranteed safety. Exact helper boundaries and obstacles require runtime testing.
Bite, horn and earthquake cues
The melee states distinguish a bite from a horn attack. The horn path can launch the target and apply Bleeding. Keep recovery space rather than backing yourself against a ledge or wall.
The earthquake behavior starts a slam animation, temporarily immobilizes Tyrosaur and schedules expanding terrain-following rings. The generated earthquake entities use sampled block appearances and are configured with an 8-damage value for the normal encounter. Their collision damage path can apply Slowness after a successful hit.
Do not replace this with the simpler advice “jump and you are immune.” These are moving collision entities, with terrain sampling above or below the initial ring positions. Timing, hitbox height and the actual course of the ring matter.
An unreachable target can clear the special-attack cooldown, and unreachable-target state changes roar timings. A tower is therefore not an established safe strategy. The sensor setup also considers owned creatures; leave valuable pets out of an untested boss arena.
A cautious encounter loop
- Prepare the correct token route, supplies and enough manoeuvring room.
- Identify armour-pool progress separately from the health bar.
- Test an appropriate armour-breaking attack and aim away from the rejecting skull plate.
- On roar cues, turn away and crouch where positioning permits; keep an escape route.
- Reposition for horn and slam attacks instead of treating immobilization as automatic safety.
- After victory, inspect the normal boss loot and original trophy before modifying or discarding it.
Restoration acceptance
Verify each multipart hit region, skull deflection, pool depletion versus accepted damage, quarter-stage visuals, save/reload modifier reconstruction, roar facing/crouch calculations and earthquake cleanup. The inspected earthquake entity has empty additional-save readers/writers; its persistence, owner, damage and appearance after unload/reload need explicit acceptance rather than being assumed correct.
Released methods, nine armour examples, twelve roar examples and five armour stages · Pinned normal boss source · Roar source · Image provenance.
AoA artwork and mechanics are credited to Tslat and contributors. This independent diagram and walkthrough are source-based documentation, not a completed gameplay certification.