Demonstration Procedure - HendrikVE/swp-telematik-ws-20-21 GitHub Wiki
How to setup and demonstrate this project
This project provides three different attacks. For demonstration you will need the Raspberry Pi and 4 flashed esp32 like the following:
- esp32-1 (with signature check) and ESP32-2 (without signature check) for the OTA update attack
- esp32-3 for the WLAN deauthentication attack
- another esp32 with a duplicated ID, e.g. esp32-1 for the spam attack
You will also need to connect a speaker (mandatory) and a monitor (optional, but then you will need ssh access) to the Raspberry Pi.
Our openHAB setup provides two sitemaps, one for the OTA attack and one for the WLAN deauthentication attack. For the third attack you can simply reuse the OTA sitemap. The sitemaps are located at http://[IP]:8080/basicui/app.
The security system has 3 levels:
- 0 -> idle
- 1 -> warning
- 2 -> alarm
When changing to alarm, an alarm sound will be played until the level is switched back to Idle. An alarm will be triggered while the Security System is active and an ESP sends a window status "OPEN" to openHAB. The system goes in to the warning level when the ESP32-1 publishes a value on topic openhab/alarm/warning. It will also publish a value on its error topic. The reason of the warning will then be displayed on the sitemap. The warning message will be cleared when changing the alarm level back to idle.
Warning! When the demo should be shut down, then please always shutdown the Raspberry Pi properly with sudo shutdown 0. Never just unplug it, as it could harm the data on the SD-card.
OTA Attack
First explain the motivation behind over the air. In a real scenario, the ESPs might be in a hard to reach location or we are just lazy, so we would like to push potential updates from our computer and the ESP grabs them automatically. The Pi is our OTA server, the esp will ask it periodically if there are new updates. But then what happens if someone gets access to the OTA server through a vulnerability? They could put a malicious update onto the server (for example one that always reports the window as closed even if it is open). And this is where secure boot adds an extra level of protection, because it insures the esp only runs code we have signed.
On the Pi, if you have it preflashed, there should be binaries in /var/www/html. If not, then you will have to move them there yourself. Either create you own binaries, or use the binaries provided in the repository in the precompiled_binaries directory. Make sure that the corresponding certificates are setup on the Pi, as they were compiled into the binaries.
/var/www/html/ is organized like the following:
esp32-1/1/: the initial version 1.0.0 (1), signed and secure boot enabled2/: OTA update version 1.0.1 (2), signed and secure boot enabled3/: either ... (needs to be placed manually with e.g. SSH access. Thats part of showing your "hack" to the user)- faulty OTA update version 1.0.2-HACK (3), unsigned (
3_no_signatureinprecompiled_binaries) - same binary as in 1 (
3_reset_back_to_1inprecompiled_binaries)
- faulty OTA update version 1.0.2-HACK (3), unsigned (
esp32-2/(binaries are all unsigned and secure boot is disabled)1/: the initial version 1.0.0 (1),2/: OTA update version 1.0.1 (2)3/: faulty OTA update version 1.0.2-HACK (3)4/: same binary as in 1- OTA mechanism will enter a new cycle after loading 4 (which is 1). To stop this cycle simply rename
esp32-2/4e.g. toesp32-2/4_paused
- OTA mechanism will enter a new cycle after loading 4 (which is 1). To stop this cycle simply rename
Then go to the OTA sitemap. esp32-1 and esp32-2 should both be flashed with images APP_VERSION_CODE == 1 and APP_VERSION_NAME == 1.0.0. Then you can plug in esp32-1 and afterwards esp32-2. Both will update to 1.0.1, but esp32-1 will reject the "hacked" version because secure boot is enabled and will give a warning on the sitemap that secure boot failed, while esp32-2 will update to the hacked version.
You should also explain how the secure boot works. You generate a public private key pair. So something encrypted with the private key can only be decrypted with the public key and vise versa. In the ESP the public key is stored (either burned in with genuine secure boot, or stored in flash which only protects against OTA attacks but not physical attacks), the private key you keep somewhere secret. An image is signed by calculating a hash of the binary file and then encrypting that hash with your private key. This so called "digital signature" is then appended to the image. On the ESP, the signature is once again decrypted with the ESP's public key. The ESP then computes the hash of the image, and compares the computed hash with the one from the digital signature. If they match, the image is valid. This works because if an attacker encrypted the hash with a different key or no key at all, then "decrypting" it with the public key on the ESP would result in a nonsense result.
Spam attack
You turn on the spam attack at make menuconfig, spam attack. Reuse the OTA sitemap which displays two ESPs. Chose device esp32-1 and topic window-sensor-1. Chose type random. Explain the point of the attack. Remember to put the APP_VERSION_CODE high before so that it doesn't update itself before.
You want the window topic to change to open so that the annoying alarm is played. Plug a speaker into the Pi so that the alarm can be played.
Important:
The alarm is played if the security status changes to ALARM. This happens if the Group Window topic changes from CLOSED to OPEN. It will not happen if the Group Window topic is open from startup. The Group Window is open if any of the three ESP ESP32-1 WindowSensor1, ESP32-2 WindowSensor1 or ESP32-3 WindowSensor1 is open. So if your window topic changes to open, but any of the other window topics was already open, there will be no alarm. So before the demonstration close all the topics by ssh into the pi and running mosquitto_pub -d -h localhost -p 1883 -t "myhome/esp32-2/window-sensor-1" -u <mqtt username> -P <mqtt password> -m "CLOSED" for the three ESPs. Then Group Window is closed.
WLAN deauthentication attack
See the section How to Attack at Attack-via-WLAN-Deauthentication-Attack
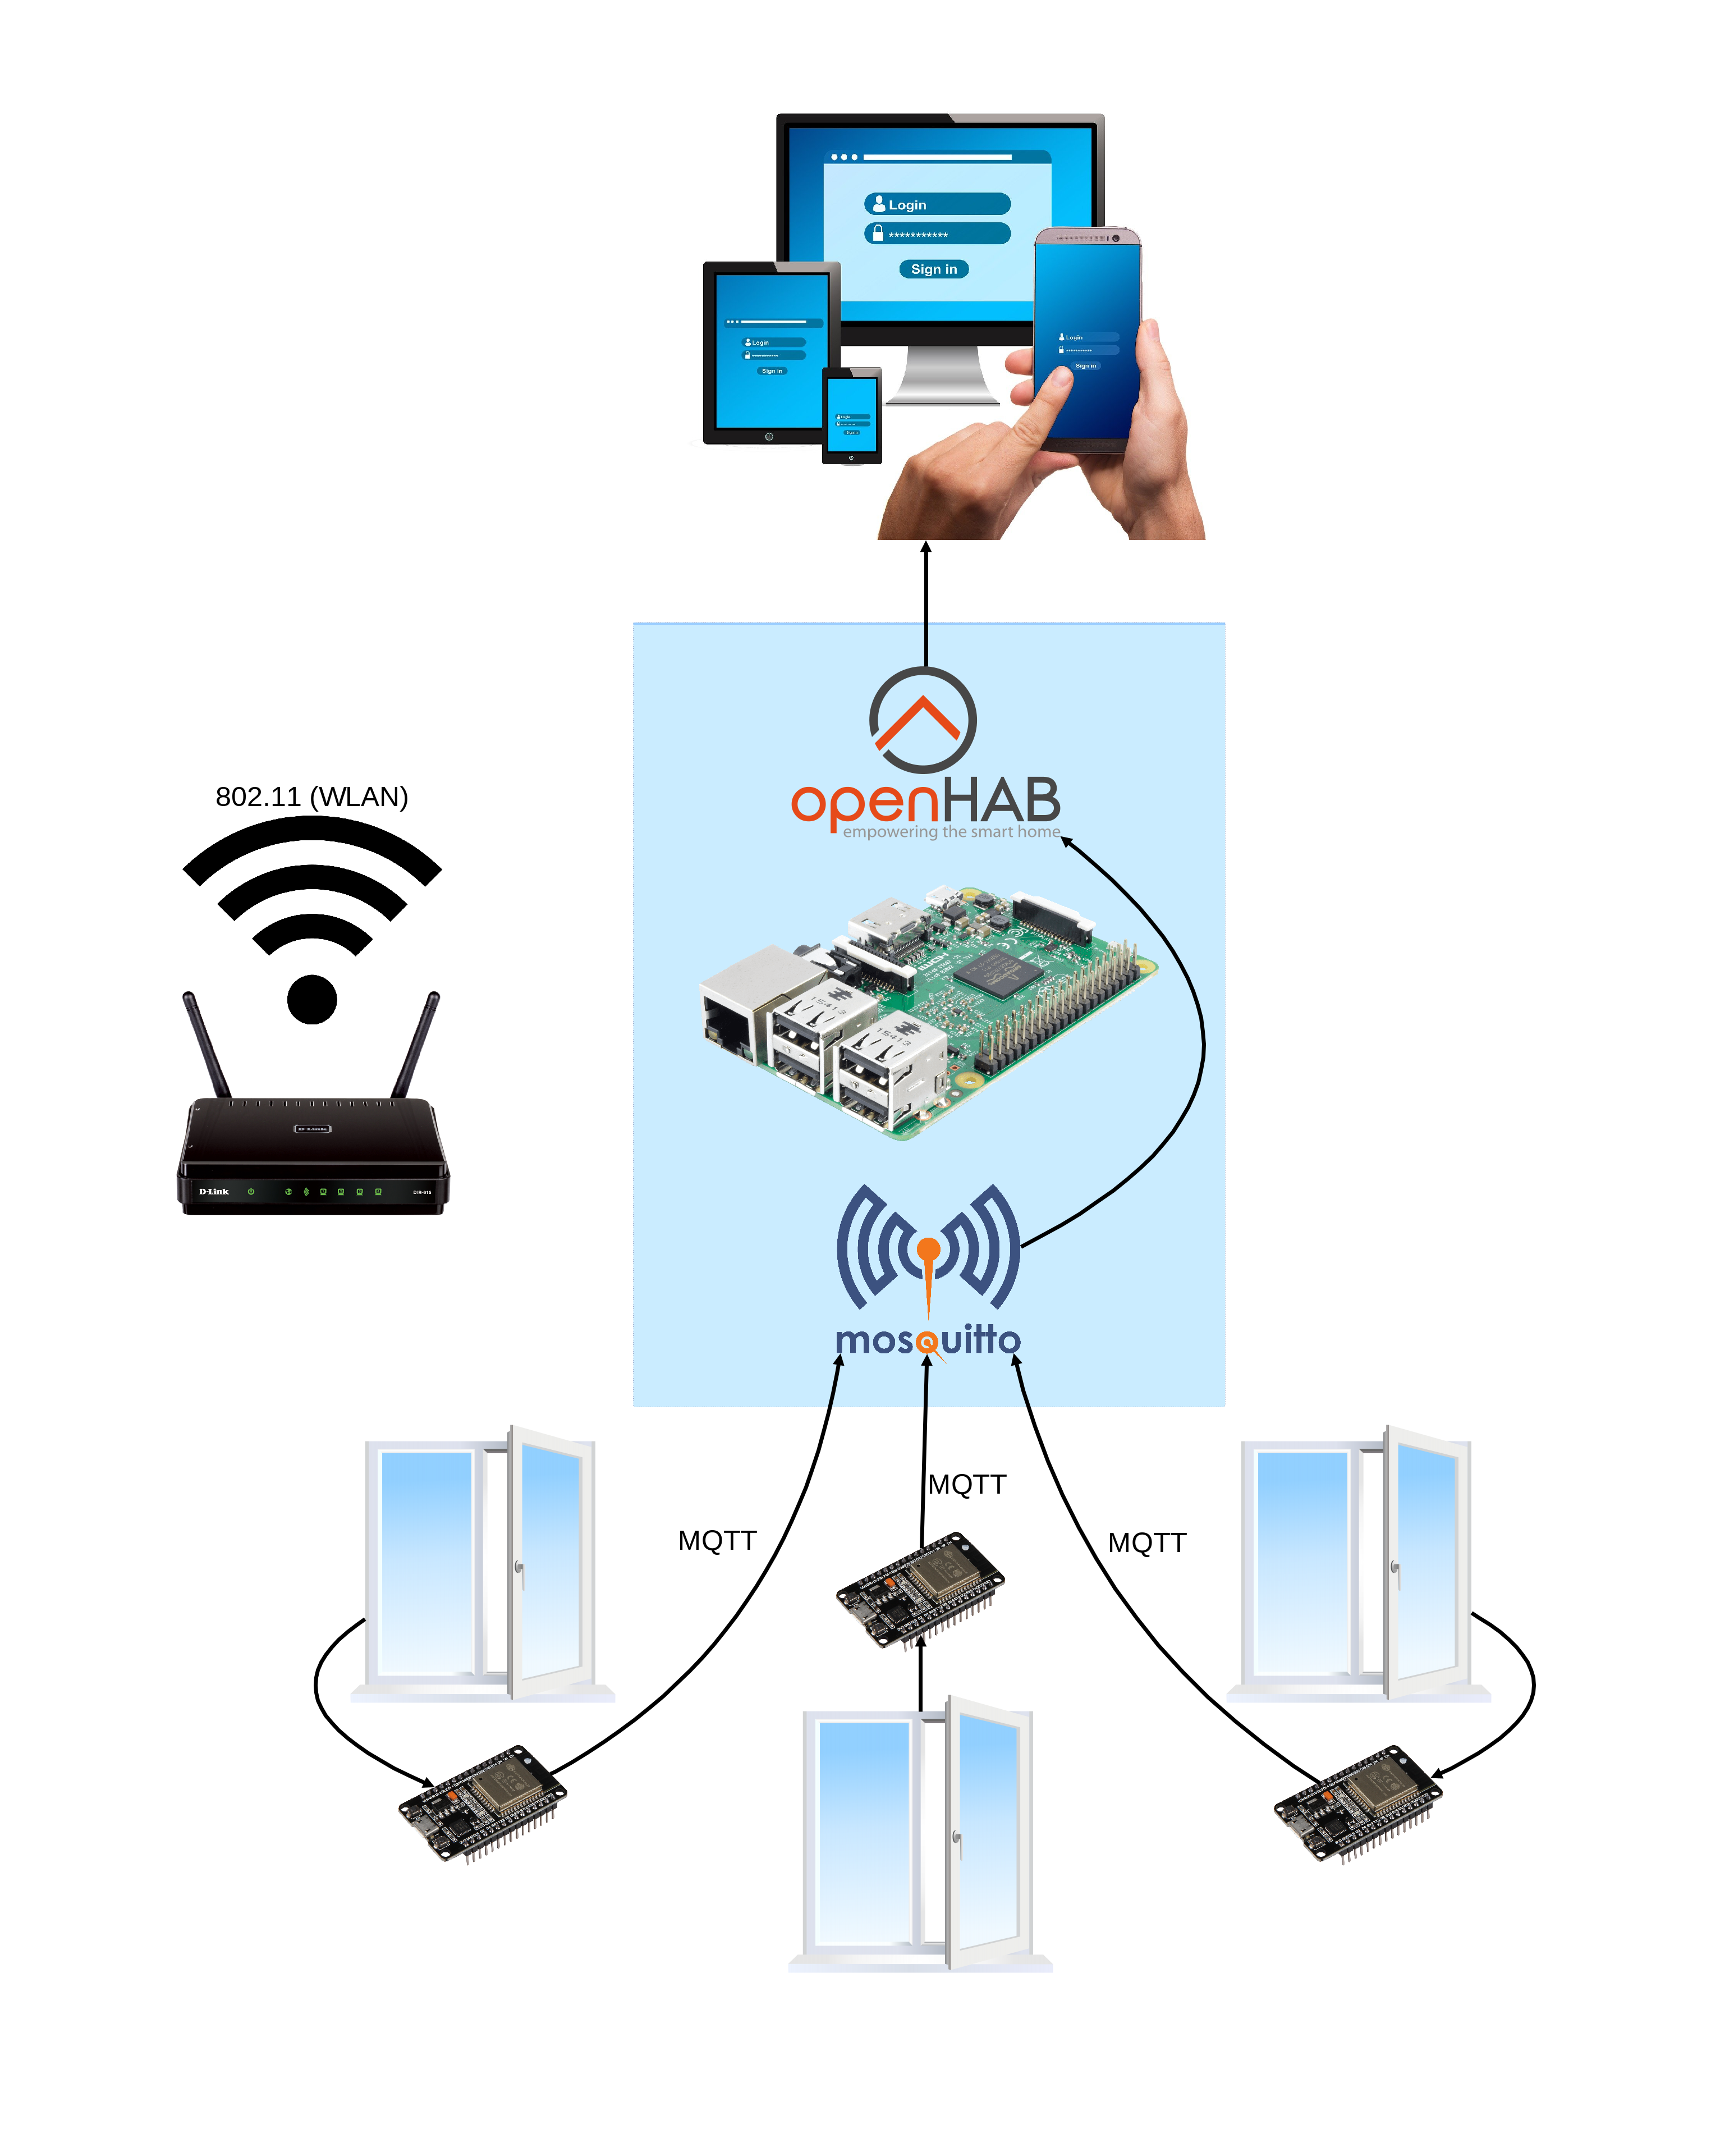
Diagram
Here is a diagram which can be used to explain the setup to people: