useless machine 2 - H-division-2022-2023-even/Repo12 GitHub Wiki
The Useless Lantern
 The project presented on this page is the result of the work of a group of 5 students carried out during the last two sessions of the "Rapid Prototyping" course given in the 2nd year of the engineering cycle at the Ecole des Ponts ParisTech. It is part of the line of useless machines, initiated by MIT professor Marvin Minsky in 1952, and his famous "useless box". In addition to the offbeat concept of the object, the approach was mainly carried out in a didactic concern, allowing us to exploit the manufacturing machines that we had at our disposal (3D printer and laser cutter), to familiarize ourselves with programmable electronics (arduino boards) and to discover uncommon electronic components.
Supplies
To make your own lantern, you will need the following material:
The project presented on this page is the result of the work of a group of 5 students carried out during the last two sessions of the "Rapid Prototyping" course given in the 2nd year of the engineering cycle at the Ecole des Ponts ParisTech. It is part of the line of useless machines, initiated by MIT professor Marvin Minsky in 1952, and his famous "useless box". In addition to the offbeat concept of the object, the approach was mainly carried out in a didactic concern, allowing us to exploit the manufacturing machines that we had at our disposal (3D printer and laser cutter), to familiarize ourselves with programmable electronics (arduino boards) and to discover uncommon electronic components.
Supplies
To make your own lantern, you will need the following material:
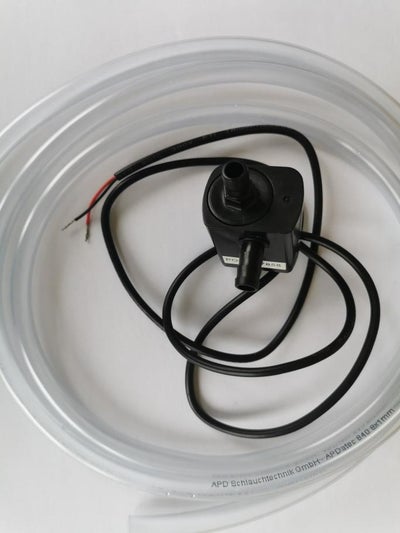
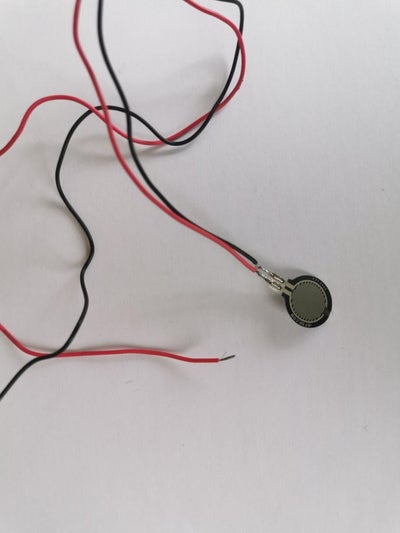
Electronics
Arduino board Breadboard Relay module Flame sensor module 12V water pump Resistance force sensor (FSR) 12V Power Adapter 9V Battery with an adapter for arduino Structure
PLA filament for 3D printing Plexiglass plate for laser cutting Other
A candle
Some tarpaulin
It would also be useful to have some basic tools (screwdriver, hammer, ...) as well as glue and sanding material (sandpaper, file, ...).
Step 1: Design
 As with most projects the first step is to designate our final product. To do this, several factors were taken into account and several designs were created before selecting the one that best fit our needs. Among these factors we find:
1. The way to extinguish the candle
At the beginning we had only one idea, to create a product that detects when a candle is lit and puts it out. For this we thought of different methods to extinguish the candle. The first method was to pinch and release the wick of it. The second method was to use a small fan that will blow out the flame. Finally, the third method was to extinguish the candle using water. We quickly dropped the first method because it is the most complex and needs to be readjusted as soon as the size of the candle changes. The other two methods had their advantages and disadvantages but we nevertheless decided to use water to extinguish the flame just because we liked this way better.
2. The number of candles
We hesitated for a long time about the number of candles that our final product will have, which led us to consider different designs and not just lanterns. But in view of our choice to use water and therefore a pump with pipes, and our desire not to make something too big we agreed on the use of a single candle.
3. The mobility of the product
Finally, the factor of product mobility allowed us to eliminate all the remaining designs leaving only one. Indeed, we wanted to make a relatively small product, which can be carried and moved. This required us to put the candle and water tank inside the product along with the rest of the components and that's when we went from a simple idea of "Detecting when a candle is lit and turning it off" to our lantern design.
 Since the goal of the project was to extinguish a flame once detected, we started by browsing the school's Makerspace's component offering to choose how we would proceed. It provided us a water pomp and a flame sensor module, which constituted, along with the Arduino board, our first prototype. On second thoughts, we decided to add a force sensor on the lantern handle to turn it off only when it is carried, while keeping the flame sensor to ensure that the flame has actually been extinguished. The final code and electronic assembly are given at the end of this section.
Flame Detection
The flame sensor we used has an infrared receiver and detects flames by sensing their light emissions. This type of sensor is widely used in fire detection systems. In our case, the sensor offers the possibility of adjusting its sensitivity, in order to ensure the detection of the flame at the height imposed by the assembly, and returns digital and analog data. Here, we will only use the digital output to indicate whether or not there is a fire. The first tests we performed were aimed at getting to know this sensor and answering the main question: at what distance can we detect the flame? The few tests we conducted reassured us that these sensors cover a very large distance. Thanks to the 60° angle of detection, we were able to detect the flame at a distance of more than 40 cm without any problem. We were able to set the height of our lantern accordingly, keeping in mind the transportability criterion that it must meet.
Extinguishing the flame
The extinction of the flame is done with a water pump. The pump we had at our disposal only works when it is immersed. When we realized this, we modified our design, making sure that the pump had enough room in the lower basin of the lantern and that we could run a hose up over the flame to extinguish it when needed. Beyond these considerations, the operation of the pump is quite simple: we power an electric motor that draws water through one pipe and rejects it through another. Finally, as the Arduino board is not powerful enough to power such a component, we had to provide ourselves with a power adapter and control the pump's operation using a relay module. This relay acts as a switch and is directly controlled in 5V by an output of the Arduino board. It is this component that allows us to separate the control part from the power part of our circuit.
Adding a force sensor
The force sensor is an improvement idea that we had during the design of the object. It prevents the water pump from putting out the flame too soon and adds a direct link between the object and the user. The sensor we used, commonly called FSR or Force Sensitive Resistor, consists of a conductive polymer whose resistance property changes with pressure. Thus, when we exert no pressure on the sensor, its resistance approaches infinity and when we press on it, its resistance decreases. Similarly, when the sensor is connected to an analog input of the Arduino board, the value read is initially zero and increases with the pressure we apply on the sensor. The few experiments carried out have allowed us to set a threshold value from which to assume the grip of the lantern handle. ied to fix this problem by sanding a little and forcing but it didn't work so we decided to change the pillar dimensions and reprint them. After that, all the pieces interlinked correctly. We thus completed the assembly of the final product by adding the acrylic plate that we cut. We also added the electronics into the small drawer (be careful there are a lot of wires so you need to do some wire managment to make sure everything fit nicely and is well connected) and here was our lantern ready to be tested.
Add TipAsk QuestionCommentDownload Test and Conclusion As shown in the video the device works pretty well and completes all the intended goals. We are happy from our work as it meets our expectations.
Despite the fact that the final product works as intended there are some improvements that can be done. Indeed, although we have reduced the size of the model, this lantern is still quite massive and a possible source of improvement would be to think of a new, more compact design. Our lantern must also be located near a power outlet, so another improvement would be to make it an embedded system, using a battery. In addition to these two improvements we noticed during our testing that draining our water tank is quite cumbersome and thus another way to improve the product is to find a way to easily drain that water tank without having to disconnect the electronics. Finally, from an aesthetic point of view we think we could have come up with a prettier design if we had more time but this doesn't affect the functionning of our lantern.
Thanks to this project, we had to show inventiveness and perseverance to overcome the many unforeseen difficulties that mark the design of an object. We also learned the hard way that it is necessary to think carefully about the dimensioning and the realization of machining parts, and that it is better to linger on this than to have to rebuild everything. Our efforts were rewarded, however, and the final result is a great source of pride for the five of us.