Microedition Game API - GuidebeeGameEngine/Raindrop GitHub Wiki
Not long time ago when Java ME still dominated the mobile device world, a lot of games were written use Java ME Game API. Most of the Game API is defined in package javax.microedition.lcdui.game. The Game API package provides a series of classes that enable the development of rich gaming content for wireless devices.
#API Overview The API is comprised of five classes:
##GameCanvas
This class is a subclass of LCDUI’s Canvas and provides the basic ‘screen’ functionality for a game. In addition to the methods inherited from Canvas, this class also provides game-centric features such the ability to query the current state of the game keys and synchronous graphics flushing; these features simplify game development and improve performance.
##Layer The Layer class represents a visual element in a game such as a Sprite or a TiledLayer. This abstract class forms the basis for the Layer framework and provides basic attributes such as location, size, and visibility.
##LayerManager For games that employ several Layers, the LayerManager simplifies game development by automating the rendering process. It allows the developer set a view window that represents the user’s view of the game. The LayerManager automatically renders the game’s Layers to implement the desired view.
##Sprite A Sprite is basic animated Layer that can display one of several graphical frames. The frames are all of equal size and are provided by a single Image object. In addition to animating the frames sequentially, a custom sequence can also be set to animation the frames in an arbitrary manner. The Sprite class also provides various transformations (flip and rotation) and collision detection methods that simplify the implementation of a game’s logic.
##TiledLayer This class enables a developer to create large areas of graphical content without the resource usage that a large Image object would require. It is a comprised of a grid of cells, and each cell can display one of several tiles that are provided by a single Image object. Cells can also be filled with animated tiles whose corresponding pixel data can be changed very rapidly; this feature is very useful for animating large groups of cells such as areas of water.
If you were an experienced Java ME game developer or you have games from Java ME platform need to port to Android Platform, Guidebee Android Game Engine provides similar Game API for microedition ,which defined in com.guidebee.game.microedition. GameCanvas was abandoned ,you may use ScreenAdapter instead. and Since Layer ,and LayerManager are derived from Actor and Stage respectively. you can still use Stage-Actor pattern’s enhanced features. Here is the class hierarchy of microedition Game API.

I copied some of Java ME Game API document here, because guidebee microedtion Game API provides similar interfaces :
#Sprite Frames The raw frames used to render a Sprite are provided in a single Image object, which may be mutable or immutable. If more than one frame is used, the Image is broken up into a series of equally-sized frames of a specified width and height. As shown in the figure below, the same set of frames may be stored in several different arrangements depending on what is the most convenient for the game developer.
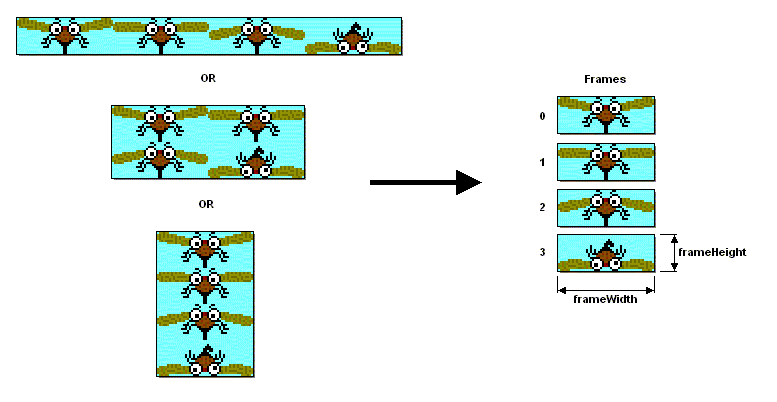
Each frame is assigned a unique index number. The frame located in the upper-left corner of the Image is assigned an index of 0. The remaining frames are then numbered consecutively in row-major order (indices are assigned across the first row, then the second row, and so on). The methodgetRawFrameCount() returns the total number of raw frames.
#Frame Sequence A Sprite’s frame sequence defines an ordered list of frames to be displayed. The default frame sequence mirrors the list of available frames, so there is a direct mapping between the sequence index and the corresponding frame index. This also means that the length of the default frame sequence is equal to the number of raw frames. For example, if a Sprite has 4 frames, its default frame sequence is {0, 1, 2, 3}.
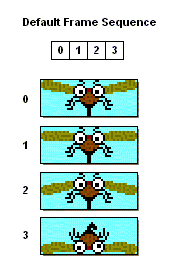
The developer must manually switch the current frame in the frame sequence. This may be accomplished by calling setFrame(int), prevFrame(), or nextFrame(). Note that these methods always operate on the sequence index, they do not operate on frame indices; however, if the default frame sequence is used, then the sequence indices and the frame indices are interchangeable. If desired, an arbitrary frame sequence may be defined for a Sprite. The frame sequence must contain at least one element, and each element must reference a valid frame index. By defining a new frame sequence, the developer can conveniently display the Sprite’s frames in any order desired; frames may be repeated, omitted, shown in reverse order, etc.
For example, the diagram below shows how a special frame sequence might be used to animate a mosquito. The frame sequence is designed so that the mosquito flaps its wings three times and then pauses for a moment before the cycle is repeated.
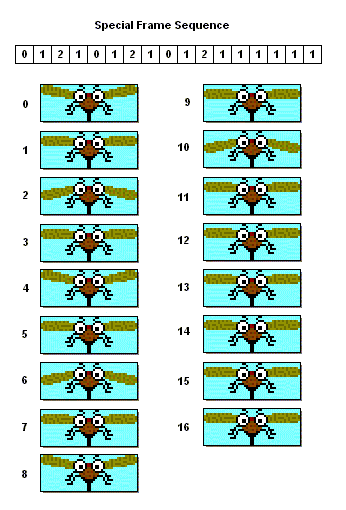
By calling nextFrame() each time the display is updated, the resulting animation would like this:

#Sprite Transforms Various transforms can be applied to a Sprite. The available transforms include rotations in multiples of 90 degrees, and mirrored (about the vertical axis) versions of each of the rotations. A Sprite’s transform is set by calling setTransform(transform).
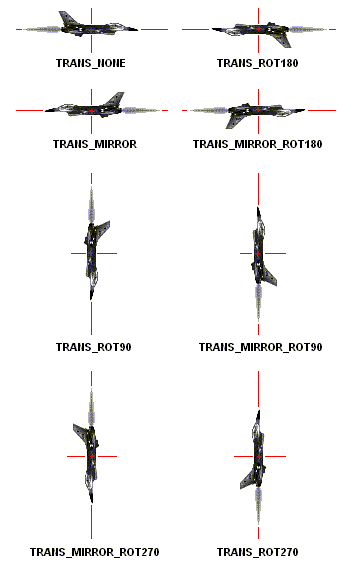
When a transform is applied, the Sprite is automatically repositioned such that the reference pixel appears stationary in the painter’s coordinate system. Thus, the reference pixel effectively becomes the center of the transform operation. Since the reference pixel does not move, the values returned by getRefPixelX() and getRefPixelY() remain the same; however, the values returned by getX() and getY() may change to reflect the movement of the Sprite’s upper-left corner. Referring to the monkey example once again, the position of the reference pixel remains at (48, 22) when a 90 degree rotation is applied, thereby making it appear as if the monkey is swinging from the branch:
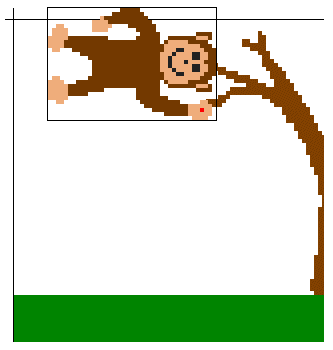
#Sprite Drawing Sprites can be drawn at any time using the paint(Graphics) method. The Sprite will be drawn on the Graphics object according to the current state information maintained by the Sprite (i.e. position, frame, visibility). Erasing the Sprite is always the responsibility of code outside the Sprite class.
Sprites can be implemented using whatever techniques a manufacturers wishes to use (e.g hardware acceleration may be used for all Sprites, for certain sizes of Sprites, or not at all).
For some platforms, certain Sprite sizes may be more efficient than others; manufacturers may choose to provide developers with information about device-specific characteristics such as these.
A TiledLayer is a visual element composed of a grid of cells that can be filled with a set of tile images. This class allows large virtual layers to be created without the need for an extremely large Image. This technique is commonly used in 2D gaming platforms to create very large scrolling backgrounds,
#Tiles The tiles used to fill the TiledLayer’s cells are provided in a single Image object which may be mutable or immutable. The Image is broken up into a series of equally-sized tiles; the tile size is specified along with the Image. As shown in the figure below, the same tile set can be stored in several different arrangements depending on what is the most convenient for the game developer.
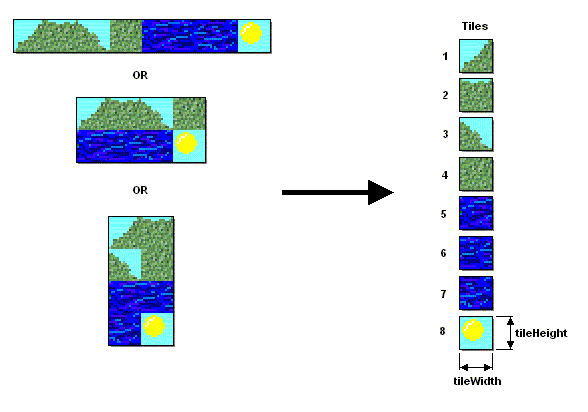
Each tile is assigned a unique index number. The tile located in the upper-left corner of the Image is assigned an index of 1. The remaining tiles are then numbered consecutively in row-major order (indices are assigned across the first row, then the second row, and so on). These tiles are regarded as static tiles because there is a fixed link between the tile and the image data associated with it. A static tile set is created when the TiledLayer is instantiated; it can also be updated at any time using the setStaticTileSet(javax.microedition.lcdui.Image, int, int) method.
In addition to the static tile set, the developer can also define several animated tiles. An animated tile is a virtual tile that is dynamically associated with a static tile; the appearance of an animated tile will be that of the static tile that it is currently associated with.
Animated tiles allow the developer to change the appearance of a group of cells very easily. With the group of cells all filled with the animated tile, the appearance of the entire group can be changed by simply changing the static tile associated with the animated tile. This technique is very useful for animating large repeating areas without having to explicitly change the contents of numerous cells.
Animated tiles are created using the createAnimatedTile(int) method, which returns the index to be used for the new animated tile. The animated tile indices are always negative and consecutive, beginning with -1. Once created, the static tile associated with an animated tile can be changed using the setAnimatedTile(int, int) method.
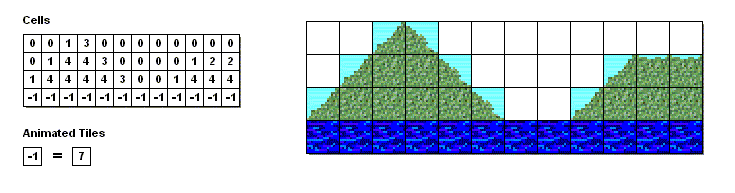
#Cells The TiledLayer’s grid is made up of equally sized cells; the number of rows and columns in the grid are specified in the constructor, and the physical size of the cells is defined by the size of the tiles.
The contents of each cell is specified by means of a tile index; a positive tile index refers to a static tile, and a negative tile index refers to an animated tile. A tile index of 0 indicates that the cell is empty; an empty cell is fully transparent and nothing is drawn in that area by the TiledLayer. By default, all cells contain tile index 0.
The contents of cells may be changed using setCell(int, int, int) and fillCells(int, int, int, int, int). Several cells may contain the same tile; however, a single cell cannot contain more than one tile. The following example illustrates how a simple background can be created using a TiledLayer.
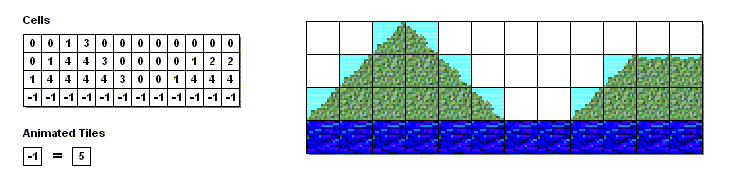
In this example, the area of water is filled with an animated tile having an index of -1, which is initially associated with static tile 5. The entire area of water may be animated by simply changing the associated static tile using setAnimatedTile(-1, 7).
#Rendering a TiledLayer A TiledLayer can be rendered by manually calling its paint method; it can also be rendered automatically using a LayerManager object.
The paint method will attempt to render the entire TiledLayer subject to the clip region of the Graphics object; the upper left corner of the TiledLayer is rendered at its current (x,y) position relative to the Graphics object’s origin. The rendered region may be controlled by setting the clip region of the Graphics object accordingly.
The LayerManager manages a series of Layers. The LayerManager simplifies the process of rendering the Layers that have been added to it by automatically rendering the correct regions of each Layer in the appropriate order.
The LayerManager maintains an ordered list to which Layers can be appended, inserted and removed. A Layer’s index correlates to its z-order; the layer at index 0 is closest to the user while a the Layer with the highest index is furthest away from the user. The indices are always contiguous; that is, if a Layer is removed, the indices of subsequent Layers will be adjusted to maintain continuity.
The LayerManager class provides several features that control how the game’s Layers are rendered on the screen.
The view window controls the size of the visible region and its position relative to the LayerManager’s coordinate system. Changing the position of the view window enables effects such as scrolling or panning the user’s view. For example, to scroll to the right, simply move the view window’s location to the right. The size of the view window controls how large the user’s view will be, and is usually fixed at a size that is appropriate for the device’s screen.
In this example, the view window is set to 85 x 85 pixels and is located at (52, 11) in the LayerManager’s coordinate system. The Layers appear at their respective positions relative to the LayerManager’s origin.
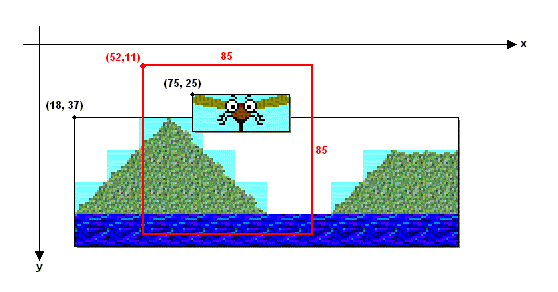
The paint(Graphics, int, int) method includes an (x,y) location that controls where the view window is rendered relative to the screen. Changing these parameters does not change the contents of the view window, it simply changes the location where the view window is drawn. Note that this location is relative to the origin of the Graphics object, and thus it is subject to the translation attributes of the Graphics object.
For example, if a game uses the top of the screen to display the current score, the view window may be rendered at (17, 17) to provide enough space for the score.
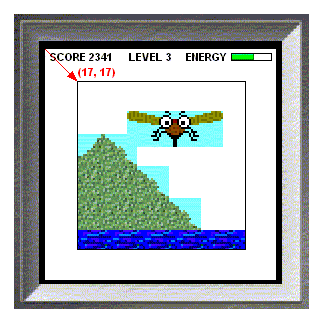
Note: The only major differences is the coordinate system, while Java microedtion Game API uses an Y-Down coordinate system, but Guidebee microedtion Game API uses a Y-Up coordinate systems. so when porting your Java ME Games, you need to pay a bit attention on the coordinate system transformation.
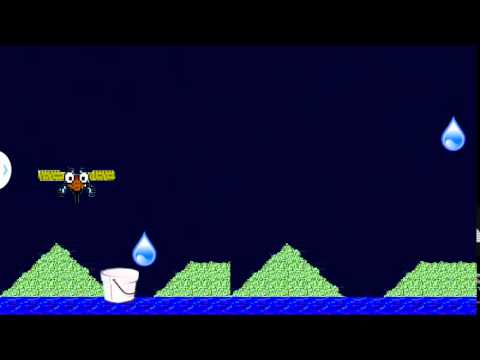
We created a RainDrop game using microedition game API ,and add the fly and the river background.
Background is a TiledLayer ,since we still use 800X480 resolution , each tile is 32X32 size. so we need 25X4 line to represent all the cells. pay attention the line int r = 3 – index / 25; since we use Y-Up Coordinate system, this 3- index/25 is different from what used in Java ME Game API, normally it should be r = index/25 for a Y-Down coordinate system.
package com.mapdigit.game.tutorial.microedition.actor;


import com.guidebee.game.graphics.Batch;
import com.guidebee.game.graphics.Texture;
import com.guidebee.game.graphics.TextureRegion;
import com.guidebee.game.microedition.TiledLayer;

import static com.guidebee.game.GameEngine.*;


public class Background extends TiledLayer {

    private int[] cells = new int[]{
            0, 0, 1, 3, 0,
            0, 0, 0, 0, 0,
            0, 0, 0, 0, 1,
            3, 0, 0, 0, 0,
            0, 0, 0, 0, 0,
            0, 1, 4, 4, 3,
            0, 0, 0, 0, 1,
            2, 2, 0, 1, 4,
            4, 3, 0, 0, 0,
            0, 1, 2, 2, 2,
            1, 4, 4, 4, 4,
            3, 0, 0, 1, 4,
            4, 4, 1, 4, 4,
            4, 4, 3, 0, 0,
            1, 4, 4, 4, 4};

    private final int animatedIndex;

    private int animatedCount = 0;

    public Background() {
        super(25, 4, new TextureRegion(
                assetManager.get("tiles.png", Texture.class)),
                32, 32);
        setPosition(0, 0);
        for (int index = 0; index < cells.length; index++) {
            int c = index % 25;
            int r = 3 - index / 25;

            setCell(c, r, cells[index]);
        }
        animatedIndex = createAnimatedTile(5);

        for (int i = 0; i < 25; i++) {
            setCell(i, 0, animatedIndex);
        }

    }

    @Override
    public void draw(Batch batch, float alpha) {
        paint(batch);

    }

    @Override
    public void act(float delta) {
        animatedCount = animatedCount + 1;
        if (animatedCount > 10) {
            if (getAnimatedTile(animatedIndex) == 5) {
                setAnimatedTile(animatedIndex, 7);
            } else {
                setAnimatedTile(animatedIndex, 5);
            }

            animatedCount = 0;
        }

    }

}
Fly is a sprite .
package com.mapdigit.game.tutorial.microedition.actor;


import com.guidebee.game.graphics.Batch;
import com.guidebee.game.graphics.Texture;
import com.guidebee.game.microedition.Sprite;

import static com.guidebee.game.GameEngine.*;

public class Fly extends Sprite {

    public Fly() {
        super(assetManager.get("fly.png", Texture.class), 128, 64);
        setName("Fly");
        setBounds(getX(), getY(), getWidth(), getHeight());
        setPosition(128 / 2, 200);
        setFrameSequence(new int[]{0, 1, 2, 1, 0, 1, 2,
                1, 0, 1, 2, 1, 1, 1, 1, 1, 1});

    }

    @Override
    public void draw(Batch batch, float alpha) {
        paint(batch);
    }

    @Override
    public void act(float delta) {
        nextFrame();
    }
}
The bucket and Raindrop also derived from Sprite ,they have similar act with previous version:
package com.mapdigit.game.tutorial.microedition.actor;


import com.guidebee.game.Input;
import com.guidebee.game.graphics.Batch;
import com.guidebee.game.graphics.Texture;
import com.guidebee.game.microedition.Sprite;
import com.guidebee.math.Vector3;

import static com.guidebee.game.GameEngine.*;

public class Bucket extends Sprite {


    public Bucket() {
        super(assetManager.get("bucket.png", Texture.class));
        setName("Bucket");
        setBounds(getX(), getY(), getWidth(), getHeight());
        setPosition(800 / 2 - 64 / 2, 20);

    }


    @Override
    public void draw(Batch batch, float alpha) {
        paint(batch);
    }


    @Override
    public void act(float delta) {
        if (input.isTouched()) {
            Vector3 touchPos = new Vector3();
            touchPos.set(input.getX(), input.getY(), 0);
            getStage().getCamera().unproject(touchPos);
            setX(touchPos.x - 64 / 2);
        }
        if (input.isKeyPressed(Input.Keys.LEFT)) {
            setX(getX() - 200 * graphics.getDeltaTime());
        }
        if (input.isKeyPressed(Input.Keys.RIGHT)) {
            setX(getX() + 200 * graphics.getDeltaTime());
        }

        if (getX() < 0) setX(0);
        if (getX() > 800 - 64) setX(800 - 64);
    }
}
For RainDrop, we get rid of RainDropGroup, since microedition doesn’t have a concept of group.
package com.mapdigit.game.tutorial.microedition.actor;

import com.guidebee.game.GameEngine;
import com.guidebee.game.graphics.Batch;
import com.guidebee.game.graphics.Texture;
import com.guidebee.game.microedition.Sprite;
import com.guidebee.math.MathUtils;
import com.guidebee.math.geometry.Rectangle;
import com.guidebee.utils.Pool;
import com.guidebee.utils.Pools;
import com.guidebee.utils.TimeUtils;

import java.util.ArrayList;
import java.util.Iterator;

import static com.guidebee.game.GameEngine.*;

public class RainDrop extends Sprite {

    private long lastDropTime = 0;
    private ArrayList<Rectangle> raindrops = new ArrayList<Rectangle>();

    private Rectangle bucketRect = new Rectangle(0, 0, 64, 64);
    Pool<Rectangle> rectPool = Pools.get(Rectangle.class);


    public RainDrop() {
        super(assetManager.get("droplet.png", Texture.class));
        setName("RainDrop");
        spawnRaindrop();


    }


    private void spawnRaindrop() {
        Rectangle raindrop = rectPool.obtain();
        raindrop.x = MathUtils.random(0, 800 - 64);
        raindrop.y = 480;
        raindrop.width = 64;
        raindrop.height = 64;
        raindrops.add(raindrop);
        lastDropTime = TimeUtils.nanoTime();
    }

    @Override
    public void draw(Batch batch, float alpha) {
        int len = raindrops.size();
        for (int index = 0; index < len; index++) {
            setPosition(raindrops.get(index).x, raindrops.get(index).y);
            paint(batch);
        }
    }

    @Override
    public void act(float delta) {
        // check if we need to create a new raindrop
        if (TimeUtils.nanoTime() - lastDropTime > 1000000000) spawnRaindrop();
        Bucket bucket = getStage().findActor("Bucket");


        Iterator<Rectangle> iter = raindrops.iterator();
        while (iter.hasNext()) {
            Rectangle raindrop = iter.next();

            raindrop.y -= 200 * graphics.getDeltaTime();
            if (raindrop.y + 64 < 0) iter.remove();
            if (bucket != null) {
                bucketRect.x = bucket.getX();
                bucketRect.y = bucket.getY();
                if (raindrop.overlaps(bucketRect)) {

                    iter.remove();
                    rectPool.free(raindrop);

                }
            }

        }

    }


}