UG_Preferences_Training - GoldenCheetah/GoldenCheetah GitHub Wiki
Preferences: Training (Version 3.7)
Preferences
Train View preferences include:
Workout and VideoSync Library- the folder where imported Workouts and VideoSyncs are stored.Simulate Speed from Power- enables fully parameterized, energy based, virtual bicycle simulation used to compute speed, instead of relying on data from a speed sensor, to have a more realistic speed and distance virtual ride experience. Parameters for the simulation model are found in Virtual Bicycle Specifications, see below.Simulate Relative Hipoxia- enables realtime altitude power adjustment.Allow multiple devices in Train View- is intended to combine sensors using different protocols (e.g. ANT+ FE/C Smart Trainer plus BTLE HRM), in this case one device needs to be created for each protocol with its corresponding sensors, and both devices selected before start.Auto-connect devices in Train View- allows you to automatically connect a selected device. Beware to use this option only if you are sure the required hardware will be connected each time you switch to Train View. Otherwise, leave it disabled and connect the device using the bottom bar when the hardware is ready to avoid errors.Auto-hide bottom bar in Train View- automatically hides the training control bar when the session starts to maximize vertical screen space for video and/or charts, and restores it when the session is stopped (Escape key, stop media key or remote control can be used for that purpose).Play sound before new lap- a sound is played 3 seconds before the end of the current lap/before start of the next one.Coalesce contiguous sections of same wattage- automatically combines neighbouring blocks in theworkoutdiagram that have exactly the same wattage. The workout file is not changed. Example: A workout with the sequence: First block: 5 minutes at 200 watts and next block: 10 minutes at 200 watts is shown in the diagram as a single block with 15 minutes at 200 watts.Enable Tooltips- Showing Tooltips for theWorkout Control.Start Countdownif greater than 0 seconds, the countdown will be displayed in notifications panel after start, and workout will begin when it reaches 0.Telemetry font scaling:Fit to height only- The font is only adjusted in height to the telemetry diagram dimensionsFit to height and width- The height and width of the font is adapted to the telemetry diagram dimensions
Train Devices
List defined Train Devices, available operations are:
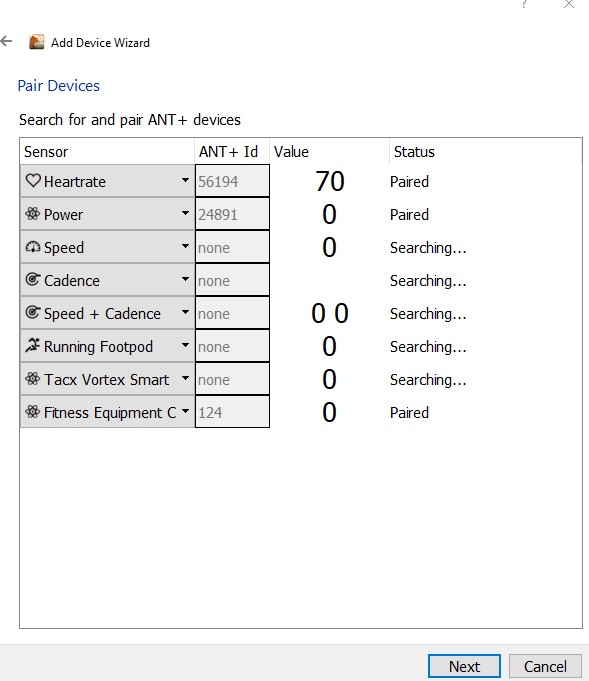
-button to remove the selected device.+button to open theAdd Device Wizard.
Add Device Wizard
When you use the Add Device Wizard, the first step will show a list of available options:

Most are self-explicative but there are a couple with more options described below, Robot may not be included in release builds. :memo: Note: If you have problems connecting to ANT+ or Bluetooth devices, please see ANT and BTLE Troubleshooting
ANT+ and FE-C devices
ANT+ and FE-C includes support for a large number of ANT+ sensors (Power, Heart Rate, Speed, Cadence, SmO2 and Running Footpods) and generic support for FE-C enabled smart trainers plus specific support for Tacx Vortex Smart trainers. Both Garmin and Suunto ANT+ USB sticks are known to work with GoldenCheetah and USB extender cables are recommended to minimize interferences.
:memo: Note: that if you try to connect when starting a train session to a device set up with ANT+ without the ANT+ USB stick connected, Golden Cheetah will terminate.
When devices are recognized/paired Status will change to Paired and ANT+ Id will not be None anymore. It will pair Heart rate monitors as well. And if you are wearing HR monitor and/or start pedaling, you should see some numbers (HR, Speed, Cadence, etc.).
Currently only one data stream of each kind is supported, please don’t pair sensors generating the same information to avoid data problems. For example if your trainer already provide Speed via the FE-C channel you shouldn’t pair separate Speed channels for the same device or an external Speed sensor. Exceptions are:
- Up to 2 power meters on ANT+ are supported, the second is displayed as alternate power.
- An external Cadence sensor on ANT+ is used with priority respect to Power Meter Cadence data.
Bluetooth (BTLE) devices
GoldenCheetah supports sensors with Bluetooth Low Energy (BTLE) protocol.
:memo: Note:
In v3.5 there is no support to control smart trainers via BTLE.
In v3.6 we currently have full capabilities control for the Wahoo Kickr (Core), load and gradient control using ANT+ over BTLE for TACX trainers including the Flow Smart, and Kurt Kinetic Smart Control.
In v3.7 is are explicit pairing of BTLE sensors.
Supported sensor types:
- Power
- Heart Rate
- Speed and Cadence
- Speed
- Cadence
- Wahoo Kickr
- Tacx Neo
- Tacx Trainers (using ANT+ over BLE)
- Kurt Kinetic Inride
- Smart Trainer
Connecting Sensors:
Ensure your sensors are active before initiating the connection process. This is typically done by clicking the connect button in the Train Bottom Bar, unless you have enabled auto-connect in the preferences. Detection status will be displayed in the Train bottom bar notifications panel, and data from connected sensors will begin to appear automatically.
Troubleshooting Device Issues:
Any errors that occur during device startup are logged in the goldencheetah.log file, located in parallel to the athlete's folder. For more detailed debugging information, you can launch GoldenCheetah form the console with the command-line parameter --debug , which will display additional output in the console.
Adding Devices:
- Make sure that your Bluetooth module supports Bluetooth Low Energy.
- Switch on the Bluetooth module before starting the Device Wizard.
- The sensor must be switched on.
- To prevent data conflicts, GoldenCheetah automatically disables dedicated Speed & Cadence sensors when a Power sensor is present, as the Power sensor often includes the Cadensce information.
- GoldenCheetah offers explicit pairing for BTLE sensors.
To start adding a Bluetooth sensor, hit the + button to start the Wizard and thhen clicked on Bluetooth 4.0.
GoldenCheetah will scan for available Bluetooth devices, which can take a while until the list of available sensors is displayed.
After completing the search, the required sensor can be selected from the list and clicked on Next.
Virtual Power Curve (only for dumb trainers used without power meters)
You will then be presented with the dialogue to set up Virtual Power, as explained below. Enter the data or, if use of Virtual Power is not required because your trainer already provides power data or you have a power meter, just click Next.
GoldenCheetah v3.5 includes the ability to estimate power from speed data using dumb trainers power-speed curves, if your trainer is included in the list of pre-configured ones, you can just select it in the last step of Add Device Wizard to enable virtual power.
New in v3.6 is the ability to enter a group of speed/power points to automatically fit a curve and enable virtual power for any dumb trainer, this video explains the setup: https://www.youtube.com/watch?v=wMuf8Zavjvw
:memo: Note: Do not forget to add a Custom Virtual Power Curve Name and click Create and select the newly created curve, otherwise the custom power curve won't be applied to the device.
Rotational Inertia Field: Trainer inertia will be modelled if you provide a value in the Rotational Inertia box. For wheel on trainer this should be the combined inertial moment of bicycle wheel and trainer, which can be computed as: (trainerI * (trainerFlywheelRevolutionsPerWheelRevolution)^2) + bicycleWheelI). A good way to test the power curve and inertial value is to coast down from 30kph and see that predicted power hovers just above 0. If value is consistently below zero your value for I is too large, if it is consistently above 0 it is too small.
Finally you will be presented with the confirmation dialogue, enter a name for the Train Device you have just configured and click Finish.
:memo: Note: It may take some time to save the configuration for a slower computer.
Remote Controls
This tab allows to define mappings for the remote control supported commands.
There are a couple of hardware devices in this category s.t. the "O-Synce ANT+ remote" and Garmin Edge Ant+ Remote (for this one you just need to hold any 2 buttons for a few seconds to start the pairing process every time you start the ant+ in train view).
There is an Android App useful for phones with ANT+ support: https://github.com/dresco/ANTRemote
Virtual Bicycle Specifications
Allows to configure the parameters used in Train View simulation rides, for an explanation of the theoretical basis see Exploiting the trainer capabilities to simulate the physics of a bicycle ride
Workout Tags
New in v3.7
As the workouts can be tagged in Train View, this is the central place to see all currently available tags and the number of associated workouts. This dialog can be used to create new tags as well as to remove them. Removing tags will update all associated workouts. There is no default set of tags.
BACK: Preferences: Overview
BACK: Table of contents