FAQ TRAIN - GoldenCheetah/GoldenCheetah GitHub Wiki
TRAIN
Which devices are supported by GoldenCheetah Train?
When you use the Add Device Wizard in the Train view, the first step will show a list of available options:

Most are self-explicative but there are a couple with more options:
- ANT+ and FE-C includes support for a large number of ANT+ sensors (Power, Heart Rate, Speed, Cadence, SmO2 and Running Footpods) and generic support for FE-C enabled smart trainers plus specific support for Tacx Vortex Smart trainers. Both Garmin and Suunto ANT+ USB sticks are known to work with GoldenCheetah and USB extender cables are recommended to minimize interferences.
- Bluetooth 4.0 includes support for BTLE enabled sensors (Power, Heart Rate and Speed/Cadence) and it is available on macOS and Linux in v3.5, and Windows in v3.6. There is no support to control smart trainers via BTLE in v3.5, for v3.6 we currently have full capabilities control for the Wahoo Kickr (Core), load and gradient control using ANT+ over BTLE for TACX trainers including the Flow Smart, and Kurt Kinetic Smart Control.
- Robot may not be included in release builds.
How to "pair" BTLE sensors?
See Preferences - Bluetoth devices for details and ANT and BTLE Troubleshooting for additional information.
How can I use multiple sensors in a Train session?
There are 2 scenarios to use multiple sensors s.t. Smart Trainer plus HRM:
- Sensors use the same protocol (e.g. ANT+ FE/C Smart Trainer plus ANT+ HRM), in this case all sensors need to be added to the same device, if you want to add new sensors to an existing device, that device has to be stopped removed and re-created with all connected sensors.
- Sensors use different protocols (e.g. ANT+ FE/C Smart Trainer plus BTLE HRM), in this case one device needs to be created for each protocol with its corresponding sensors, and
Allow multiple devices in Train Viewenabled inOptions/Preferences > Training > Preferencesso both devices can be simultaneously selected before start.
Warning: Currently only one data stream of each kind is supported, please don’t connect multiple sensors generating the same data to avoid data problems. For example if your trainer already provides Speed via the FE-C channel you shouldn’t pair separate Speed channels for the same device or an external Speed sensor. Exceptions are:
- Up to 2 power meters on ANT+ are supported, the second is displayed as alternate power.
- An external Cadence sensor on ANT+ is used with priority respect to Power Meter Cadence data.
- BTLE Speed&Cadence sensors are automatically disabled when a Power sensor is present.
How can I recover my data after an abnormally terminated session?
During training, data is saved to disk each second using a file with yyyy_MM_dd_hh_mm_ss.csv name in the records folder under the athlete's directory informed in About... On session end this file is the one offered for import.
In the event of abnormal termination you can manually import that file using the standard procedures for Importing from a file.
Can I use the keyboard to control the Train session?
If your keyboard has multimedia keys, some of these can be used to control the Train session:
- Media Previous Button = Connect and Rewind Back in workout
- Media Stop Button = End the workout
- Media Play/Pause Button = Play/Pause the workout
- Media Next Button = Fast forward through workout
- Key 0 = New lap/interval
- Key C = Calibration
- Key + = increase load by 5w or gradient by 0.1% in manual mode, +5% in a workout
- Key - = decrease load by 5w or gradient by 0.1% in manual mode, -5% in a workout
New in v3.6 is the possibility to use Escape to end the training session, and Space to pause and continue.
Can I use the Computrainer controller buttons during a workout?
The controller keys do the following when GC controls the CompuTrainer:
- STOP/Reset = End the workout
- F1 = new lap/interval (changed to Start in v3.6)
- F2 = change display size *** DEFUNCT *** (changed to new lap/interval in v3.6)
- +/- = increase/decrease load by 5w or gradient by 0.1%, in manual mode, +/-5% in a workout
- F3 = Enter/Exit Calibration Mode
How can I have remote control of the Train session?
It is possible to control the trainer session using an ANT+ Remote Control (just add a Remote Control sensor type in the pairing dialog).
The Training > Remote Controls option tab allows to define mappings for the supported commands.
There are a couple of hardware devices in this category s.t. the "O-Synce ANT+ remote" and Garmin Edge Ant+ Remote (for this one you just need to hold any 2 buttons for a few seconds to start the pairing process every time you start the ant+ in train view), other remotes implementing the ANT+ standard remote control should also work, but not the TACX 2022 which is proprietary.
There is an Android App useful for phones with ANT+ support: https://github.com/dresco/ANTRemote
A more general alternative is to use a remote control application in your phone, a user has reported good results with the free version of Unified Remote, for example.
Which workout formats are supported to control smart trainers?
GoldenCheetah Train can control smart trainers in 2 modes: ergometer (power/time) and simulation (slope/distance).
In ergometer mode a target power is sent to the trainer while in simulation mode a target gradient is sent to the trainer.
Manual Erg Mode and Manual Slope Mode predefined entries in workout list allows to do this under user control using the training intensity adjustment controls in the bottom bar or remote control.
Additionally several workout file formats are supported:
- Computrainer erg/mrc formats for ergometer mode and crs format for simulation mode
- Zwift zwo format for ergometer mode
- TACX pgmf format for both modes and tts format for simulation mode only (tts is new to v3.6)
- ErgDB.org erg2 format for ergometer mode (fixed in v3.6)
- GPX and GoldenCheetah json files for simulation mode (json is new in v3.6)
GPX, JSON and TTS formats can contain GPS coordinates allowing map display while riding and in post ride analysis, crs and pgmf format can not.
Note: slope data from some files, especially GPX, can be too jumpy due to artifacts in altitude measurement, in these cases lesser format like crs or pgmf can be more convenient even though they lack GPX data. An alternative is to import the GPX as an activity, smooth altitude and slope using GoldenCheetah edition facilities, and export the corrected file to be used in Train. The following video explains this process: https://www.youtube.com/watch?v=vqY_E6z04MU
How can I have synchronized Video in my training session?
Using Windows or Linux v3.5 or newer builds, or macOS v3.6 builds, you can use View > Add Chart > Video Player to have a Video window to reproduce the video selected on the left sidebar while you train. At the most basic level the video will start/pause/stop parallel to your workout, but video speed will be independent of trainer speed.
If you have a videosync file (currently rlv, tts, gpx and json formats are supported, tts, gpx and json are new to v3.6), you can import and select it on the left sidebar so the video is reproduced in sync with your trainer speed making the experience much more realistic, specially for slope/distance workouts.
The setting Training > Preferences > Simulate Speed from Power enables a full bike riding simulation to compute speed based on power, terrain, bike and rider characteristics instead of the measured speed, which may not consider all this factors. The parameters can be seen and modified in Training > Virtual Bicycle Specifications.
There is a library of free Ergo Planet Videos available at http://wiki.ergoplanet.de/myor/roadmovie-galerie, to be used as workouts and videosync the EPM files contain video sync plus geolocation information in XML format
The problem is altitude set to zero in those examples, likely because it is redundant when you resort to the EPP (Ergo Planet Program) for slope data, but the EPP is an unpublished binary format we don't support directly.
So the workflow to use the those synchronized videos is:
- Import the .epm file to GoldenCheetah as an activity
- Use Fix Elevation and Fix GPS to add and smooth elevation and route data
- Export the conditioned activity to GoldenCheetah JSON format
- Import the .json file as Workout and VideoSync files, plus the .avi as media in GC Train mode using Scan Workouts and Media
- Train using a Video Window with overlay widgets and simulated speed for
Video Overlay widgets are enabled by default on Windows and Linux (not macOS support yet) to display the relevant information for simulated rides:
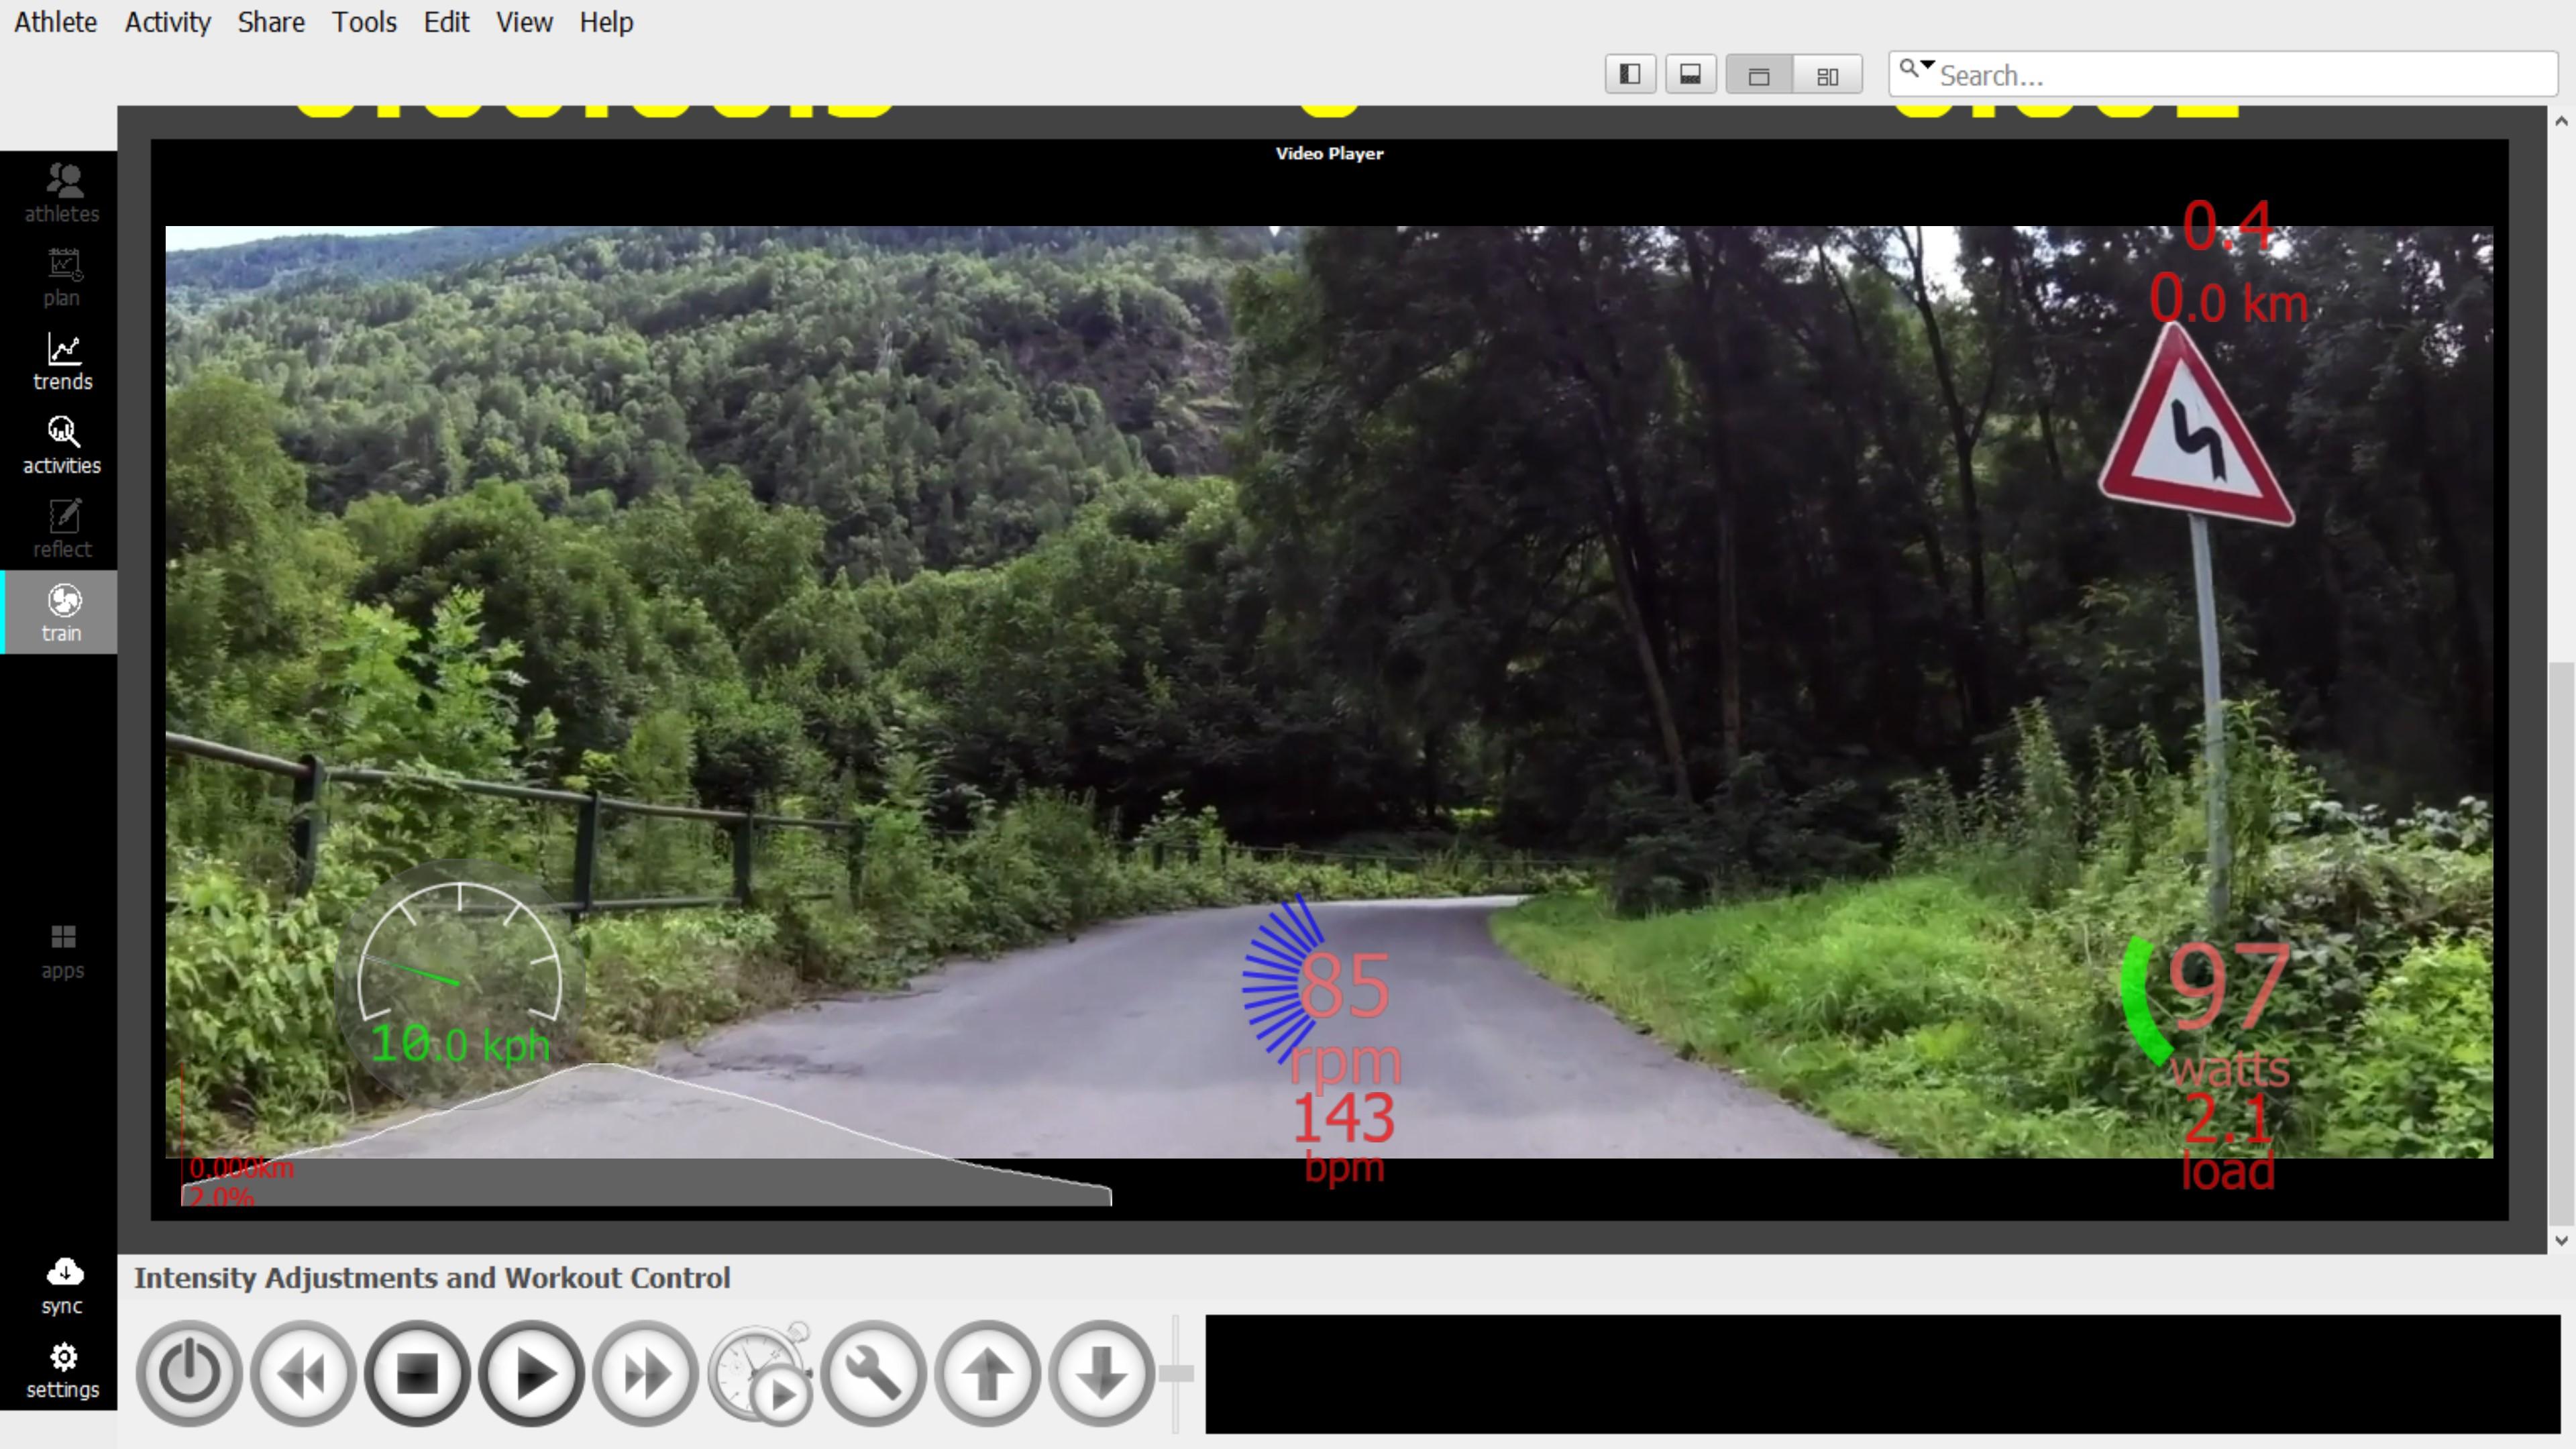
The file config/video-layout.xml in athlete directory holds the widget configuration, if you have an old version it can be removed and a new one will be created on the next start. If you don't want these widgets just delete the file contents, the presence of an empty file remove the widgets on the next start.
New in v3.6: Video Player chart options allows to select between several pre-configured layouts s.t. Graphical Meters, Graphical Meters with Live Map, Text Meters and No Meters. The Reset Meters layout to default button allows to replace this config with the latest included with the program.
Note: Most of these facilities were added or largely improved in v3.6, so the last v3.6 build may be required.
How can I train with power using a dumb trainer without a Power Meter?
GoldenCheetah v3.5 includes the ability to estimate power from speed data using dumb trainers power-speed curves, if your trainer is included in the list of pre-configured ones, you can just select it in the last step of Add Device Wizard to enable virtual power.
New in v3.6 is the ability to enter a group of speed/power points to automatically fit a curve and enable virtual power for any dumb trainer, this video explains the setup: https://www.youtube.com/watch?v=wMuf8Zavjvw
Note: Do not forget to add a Custom Virtual Power Curve Name and click "Create" and select the newly created curve, otherwise the custom power curve won't be applied to the device.
Rotational Inertia Field: Trainer inertia will be modelled if you provide a value in the Rotational Inertia box. For wheel on trainer this should be the combined inertial moment of bicycle wheel and trainer, which can be computed as: (trainerI * (trainerFlywheelRevolutionsPerWheelRevolution)^2) + bicycleWheelI). A good way to test the power curve and inertial value is to coast down from 30kph and see that predicted power hovers just above 0. If value is consistantly below zero your value for I is too large, if it is consistently above 0 it is too small.
How can I have virtual or simulated speed and distance?
v3.5 includes instant virtual speed estimated from power, slope and weight courtesy of Tom Compton (analyticcycling.com), this data field can be used in a similar way to measured speed in real time dials and charts. This value is the speed at which power and resistance are equal, and is the upper bound on speed in current state, without regard to acceleration.
v3.6 adds fully parameterized, energy based, virtual bicycle simulation in slope and erg mode. This feature is enabled by default for new users and it can be enabled/disabled in Options > Training > Preferences > Simulate Speed from Power to have a more realistic speed and distance virtual ride experience. Parameters for the simulation model are found at Options > Training > Virtual Bicycle specifications.
How is real-time W’bal is computed in Train mode?
Real-time W'bal while training is computed using an optimization of the integral method (See W’bal optimisation by a mathematician) which depends on W'bal Tau in Athlete > Model preferences and it is independent of differential/integral setting used for offline W'bal computation.
How can I see the erg mode target power in post-ride analysis?
Activities derived from Train erg mode workouts have an additional XData field with the target power to be used to in post-ride analysis, to compare with effective power. You can find it as TARGET series on TRAIN tab in Editor. It can be used as any other XData series, in particular it can be easily added to Activity chart as User Data curve using the following expression: XDATA("TRAIN", "TARGET", sparse). In v3.6 target power can also be plotted in User charts via xdata function.
How can I use my Fortius trainer on Windows 10?
On macOS and Linux you can connect your Fortius to an USB port and select the corresponding option on Add Device Wizard to look for it, but Windows 10 requires a device driver to be previously installed.
Note: An updated and easier to setup Fortius driver installer for Windows can be downloaded from https://github.com/switchabl/t19xx_usb
This Fortius Driver has been tested with newer Fortius models and can be installed disabling driver signing or adding the digital certificate so the signature can be validated using the following procedure:
- Right click on VR-Interface.cat and select properties
- On the Digital Signatures tab select the certificate (USB\VID_ etc.) and click Details
- View Certificate
- Select Details tab then Copy to File VR-Interfase.cer To install you need to run the following from an elevated command prompt
> certutil -addstore "TrustedPublisher" VR-Interface.cer
> certutil -addstore "Root" VR-Interface.cer
Then you can install the driver and the Fortius should be recognized when connected and added using Add Device Wizard.
How can I configure my Daum Ergo Bike?
GC v3.6 includes preconfigured support for several cockpits: 8008 TRS, 8008 TRS PRO, 8008 and 8080.
If the profile string in the last step of device configuration contains a number or the string sound, no automatic cockpit configuration is done, but the information from the profile string is used:
- if the string sound is present, play the sound when connecting
- if a number is present, use this number as the delay in milliseconds between commands. A reasonable number to start with is 50 in case of connection problems
This also solves the problem, if the cockpit id is not known by GoldenCheetah. In this case the profile string can be just set to e.g. 50_sound and the unknown cockpit id is ignored.
How can I fast forward or backward to specific positions in a workout?
Fast forward and rewind buttons in bottom bar can be used to move the current position in a workout by a fixed offset. New in v3.6 are next and previous lap buttons which can be used for lap markers created during the workout using the lap button, and for lap markers automatically created when the workout is imported from file, both for positioning and autolap, .
For Erg mode workouts lap markers, can be added at creation time in Workout Wizard and in Workout Editor appending L at the end of the line in QWKCODE, see the Workout editor for details, or editing the .erg/.mrc/.zwo files since they are text files.
For Slope mode workouts lap markers can be added at creation time in Workout Wizard or editing the .crs text file, when importing .tts files as workouts segments are automatically mapped to lap markers, and for .json workouts the start and end distances of each interval is added as a lap marker.
If you are using GPX files as workouts, and you want to add lap markers the workflow is:
- import the GPX as an activity
- add the intervals you want using Activity chart with distance as x-axis
- save and export in .json format
- import the .json file as workout in Train
lap markers will be automatically available when the workout starts.
Can I use a Power Meter to control my Smart Trainer?
Can I set cadence or heart rate targets for workouts?
No, but you can add guidelines as text cues.
How can I set text cues for workouts?
V3.6 supports text cues from erg, mrc and crs formats (See description in TrainerRoad documentation) and Zwift workouts. They will be displayed in the notification pane of Train Bottom Bar at the corresponding time or distance during the specified seconds or until a new notification overrides it.
What is workout scaling and how does it work?
Ergometer type workouts and express define duration vs power in absolute (watts in .erg files) or relative (% in .mrc files) to "threshold" (FTP) terms.
Relative workouts are scaled in GoldenCheetah Train using current CP for the athlete.
Absolute workouts can also be scaled if they include the reference "threshold" power. For example an erg file with FTP=300 as reference threshold power and target power 150 will be scaled to 100 for an athlete with CP=200. I you don't like this behavior you can remove the FTP line from the .erg file using a text editor.
Workout Editor works with absolute values, but the generated erg files include current athlete CP as reference threshold power, so they will be adjusted automatically when your CP changes. From v3.7 it is possible to create .mrc workouts using % in qwkcode.