1. Playing a Campaign - GlowPuff/ImperialCommander2 GitHub Wiki
If you have never played Imperial Assault before, it is advisable to play through the Imperial Commander tutorials. This will teach you basic Imperial Assault gameplay and how to use the app. Alternatively, you can also start by using the official app, Legends of the Alliance.
Imperial Commander emulates the task of an Imperial player, so all players play as Rebel heroes. Therefore, the Imperial player does not earn XP or Influence and there is no need to track it.
When starting a new campaign in Imperial Commander, perform the following steps.
Place the dice, Condition cards, and the damage, strain, and condition tokens within easy reach of all players. Place the Reference cards within easy reach of all players. Remove the card "Troop Data" from the Supply card deck and return it to the game box. Then shuffle the Supply deck and place it facedown in reach of all players.
When playing the Return to Hoth campaign, remove the Bane card Constant Advantage. When this card comes up during the campaign, replace it with a different randomly drawn Bane card.
When playing the The Bespin Gambit or Tyrants of Lothal campaigns, you can play them as expanded campaigns if you own certain figure packs. Details can be found here.
Set aside the Deployment cards, gray figures, map tiles, doors, and the objective, terminal, and crate tokens. These components are called for at various times by the app - they should be neatly organized so they can be retrieved easily during play.
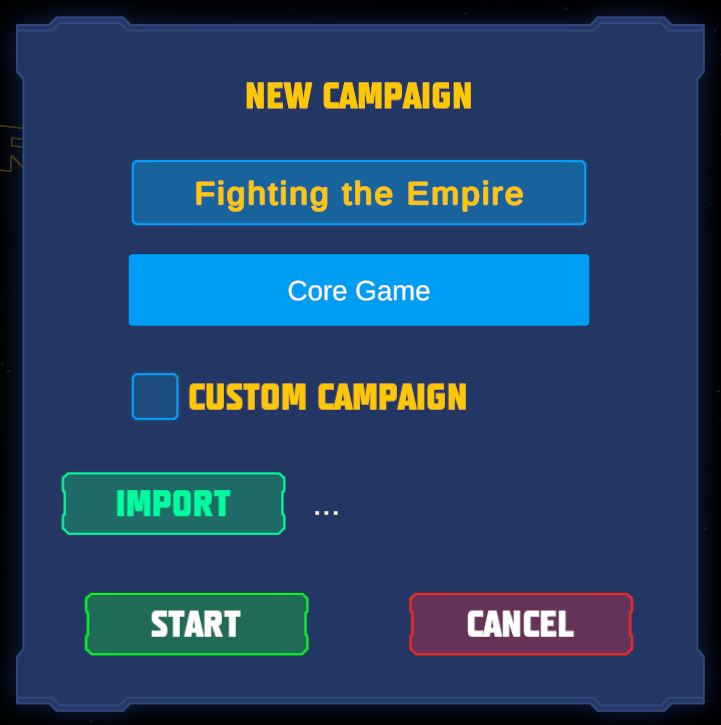
Open the app Imperial Commander and click / tap on New Campaign. Select the campaign you want to use, enter a name, and click / tap Start.
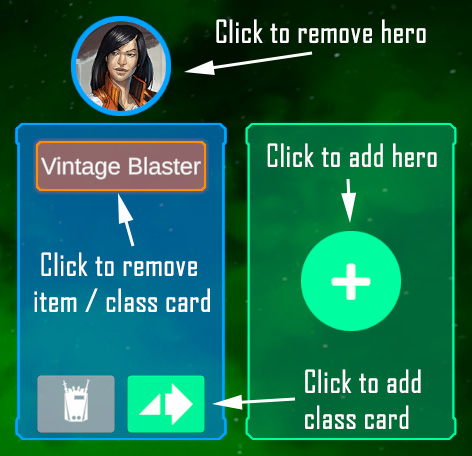
Each player selects a hero to play (at least two if playing single-player) and gathers the Hero sheet, figure, and Hero Class deck that correspond to that hero. Each player places his or her components in his or her play area. Each player retrieves the Item cards from his or her Hero Class deck that do not have an XP value in the lower-left corner, placing them faceup in his or her play area.
For a two-hero game, each player also takes a “Legendary” Reward card. For a three-hero game, each player takes a “Heroic” Reward card. These Reward cards serve as a reminder about heroes’ bonus health and activations.
In the app's campaign manager, click / tap the + icons to add heroes and the arrow icons to add hero class cards. You can remove heroes by clicking / tapping their portrait and class cards / items by clicking / tapping them.
Create the Side Mission deck that will be used during this campaign. Players first sort the Side Mission cards by the color on the face of the cards. Then they create the Side Mission deck by shuffling together the following cards:
- Each red Side Mission card (personal missions) corresponding to their heroes
- Four green cards (ally missions) of the players' choice (only 2 when playing the Return to Hoth campaign)
- Four random gray cards (general side missions) (only 2 when playing the Return to Hoth campaign)
Gather all Side Mission and Forced Mission Agenda cards. Shuffle them together to form the Imperial mission deck. Cards will be drawn from this deck as described below.
The introduction mission is listed under Introduction in the campaign manager. Click the green arrow to go to the mission setup, select a difficulty level, and start the mission.

Some campaigns require a slightly different setup. You can find more about this (and more details) in the campaign guide or the respective campaign info (click the info icon in the campaign overview).

An Imperial Assault campaign consists of multiple missions played one after the other. There are two types of missions:
- Story Missions are campaign-specific missions that advance the campaign's story.
- Side Missions are smaller missions that occur between story missions. They can be used to gain allies or other rewards.
Playing a campaign is simple. Players first resolve a mission, and then have the opportunity to purchase new Item cards and Class cards. Then they resume their narrative by choosing and resolving a new mission. They continue resolving these stages until the campaign ends with a climactic mission known as a finale.
A campaign always starts with the same mission, called Introduction. (For example, the core game campaign always starts with the mission "Aftermath".) To continue a campaign, players check the campaign log in the app and resolve the next available (unmarked) stage. The campaign log also tells you on what threat level the next mission is supposed to be played.
After a story mission ends, Imperial Commander will tell the players what Story Mission cards to put into play. They are the active story missions. The next time the campaign log tells the players to play a story mission, they choose one of the active Story Mission cards to play, then discard all remaining Story Mission cards in play. Then they open Imperial Commander, select the mission to play, choose threat level, heroes, allies and villains, and play.
After the "Introduction" mission is resolved, the players shuffle the side mission deck and draw 2 side mission cards. They are the active side missions. When the campaign log tells the players to play a side mission, they choose one of the active side missions to play. After they resolve the side mission, they draw a new side mission card, so that there are always 2 side mission cards in play.
Imperial missions are special side missions that can give a boost to the Empire. There are two types of Imperial missions.
- Imperial side missions: They are put into play in addition to the two regular side missions. The players can choose to play the Imperial side mission instead of one of their regular side missions. When they choose to play another side mission while an Imperial side mission is available, discard the Imperial side mission. The Empire automatically gains the listed reward.
- Forced missions: Some Imperial missions force players to resolve a specific mission. After one of these cards is put into play, players immediately resolve the listed mission and then discard the mission card.
The campaign log in Imperial Commander tells you when to play an Imperial mission. Some mission entries in the log feature a red icon with a stylized planet on it. Whenever you have resolved that mission completely and have performed the Rebel Upgrade Stage, click the icon. The app then decides whether you draw an Imperial mission or not.

The expansions Twin Shadows, The Bespin Gambit and Tyrants of Lothal feature "mini campaigns". Mini campaigns are special campaigns that consist of the expansions' side missions, played in a specific order. Refer to the respective rulebooks to find out how to play a mini campaign. Mini campaigns don't use a side mission deck or an Imperial mission deck.
As players resolve missions and progress through the campaign, they resolve a series of steps after each played mission. After that, they refer to the campaign log to determine their next mission.
After a mission ends, players perform the following:
- Wounded heroes flip their hero sheets to the healthy side. Heroes recover all
 (damage) and
  (strain).
 - The players shuffle all of their Supply cards back into the Supply deck.
- Unless otherwise specified by abilities or rules, all tokens (such as crate tokens) are discarded.
- Players return the Mission card corresponding to the mission that was just resolved to the game box.
- If players just resolved the introductory mission, shuffle the Side Mission deck, draw two cards, and place them faceup on the table.
- If playing the Return to Hoth campaign, also draw two cards from the Threat Mission deck (see the Return to Hoth rules), place them faceup with the Side Mission cards, then put the Bane cards they specify into play. These are now active missions.
- If players just resolved a regular (non-Imperial) Side Mission (drawn from the side mission deck), draw a random card from the Side Mission deck and place it faceup on the table. It is now an active mission.
- If there is still an Imperial Mission card in play, resolve the instructions on it.
Certain missions (usually side missions, but some story missions) give the heroes rewards for finishing them.
- Reward Cards: Many rewards come in the form of reward cards that grant the heroes certain abilities. Most can be used as written. Some reward cards, however, need to be changed. A list can be found here.
- Allies: Green side missions reward the heroes with allies. Once the players have earned an ally, they can decide to bring them on any subsequent mission. Just select them in the mission setup screen. Bringing an ally, however, increases the threat the Empire gets at the beginning of a mission, so the players need to weigh risk versus reward of bringing allies. Earned allies stay earned for the entire campaign.
The app will tell you what rewards the Empire gains. Here are the general rules to follow:
- Earned Villains: If the Imperial player gains a villain as a reward, set its card aside. Next time when playing a mission, select that villain as earned in the mission setup screen. Earned villains stay earned for the entire campaign and may show up in your missions from time to time.
- Other Imperial Rewards: If the Imperial player would gain any other reward card, the Empire does not gain that reward card. Instead, increase the threat level of the next mission (and only the next mission) by 1. During the Rebel Upgrade stage, the Rebel players can decide to spend 50 credits per hero to prevent this.
- Forced Missions: If the Rebel players lose a Forced Mission, increase the threat level of the next mission (and only the next mission) by 2. During the Rebel Upgrade stage, the Rebel players can decide to spend 100 credits per hero to prevent this.
After a mission is resolved, the players can purchase new cards during the "Rebel Upgrade Stage". They can first spend experience points to purchase new Class cards and can then spend credits to purchase new Item cards.
In the app's campaign log, you can keep track of experience points and credits as well as any rewards, villains, or allies earned and any items purchased.
To purchase Class cards, each player looks at all cards in their hero's Class deck and can purchase any number of those cards.
- In order to purchase a Class card, the hero must spend a number of XP equal to the card's cost.
- Once purchased, the hero retains the cards for the remainder of the campaign.
Players can spend earned credits on Item cards. Item cards are divided into three tiers. Each tier has its own Item deck. Players should make note of the total number of cards in each Item deck at the start of the campaign. If playing with just the core game, the number is 12 for each deck.
The campaign log tells the players which Item cards are available after a mission is resolved. To purchase Item cards, the players shuffle the Item deck listed on the campaign log and draw a number of cards equal to half the starting size (rounded up). The players may purchase any number of those cards and return any unpurchased cards to the deck.
- If multiple Item decks are listed on the campaign log, players shuffle and draw cards from each deck.
- In order to purchase an Item card, the players must spend credits equal to the card's cost.
- After purchasing an Item card, players give the Item card to the hero of their choice. Items can be re-assigned at the start of each mission.
- Immediately before purchasing Item cards, the players can sell any of the Item cards they already own. Each sold card is returned to the game box. Then the heroes receive an amount of credits equal to the card's cost.
- Item cards without a credit cost can be sold for the heroes to receive 50 credits.
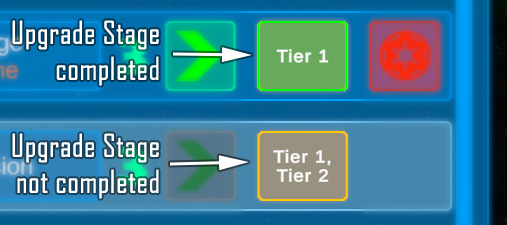
You can click / tap the item tier list in the campaign log to indicate that the Rebel Upgrade Stage has been completed.
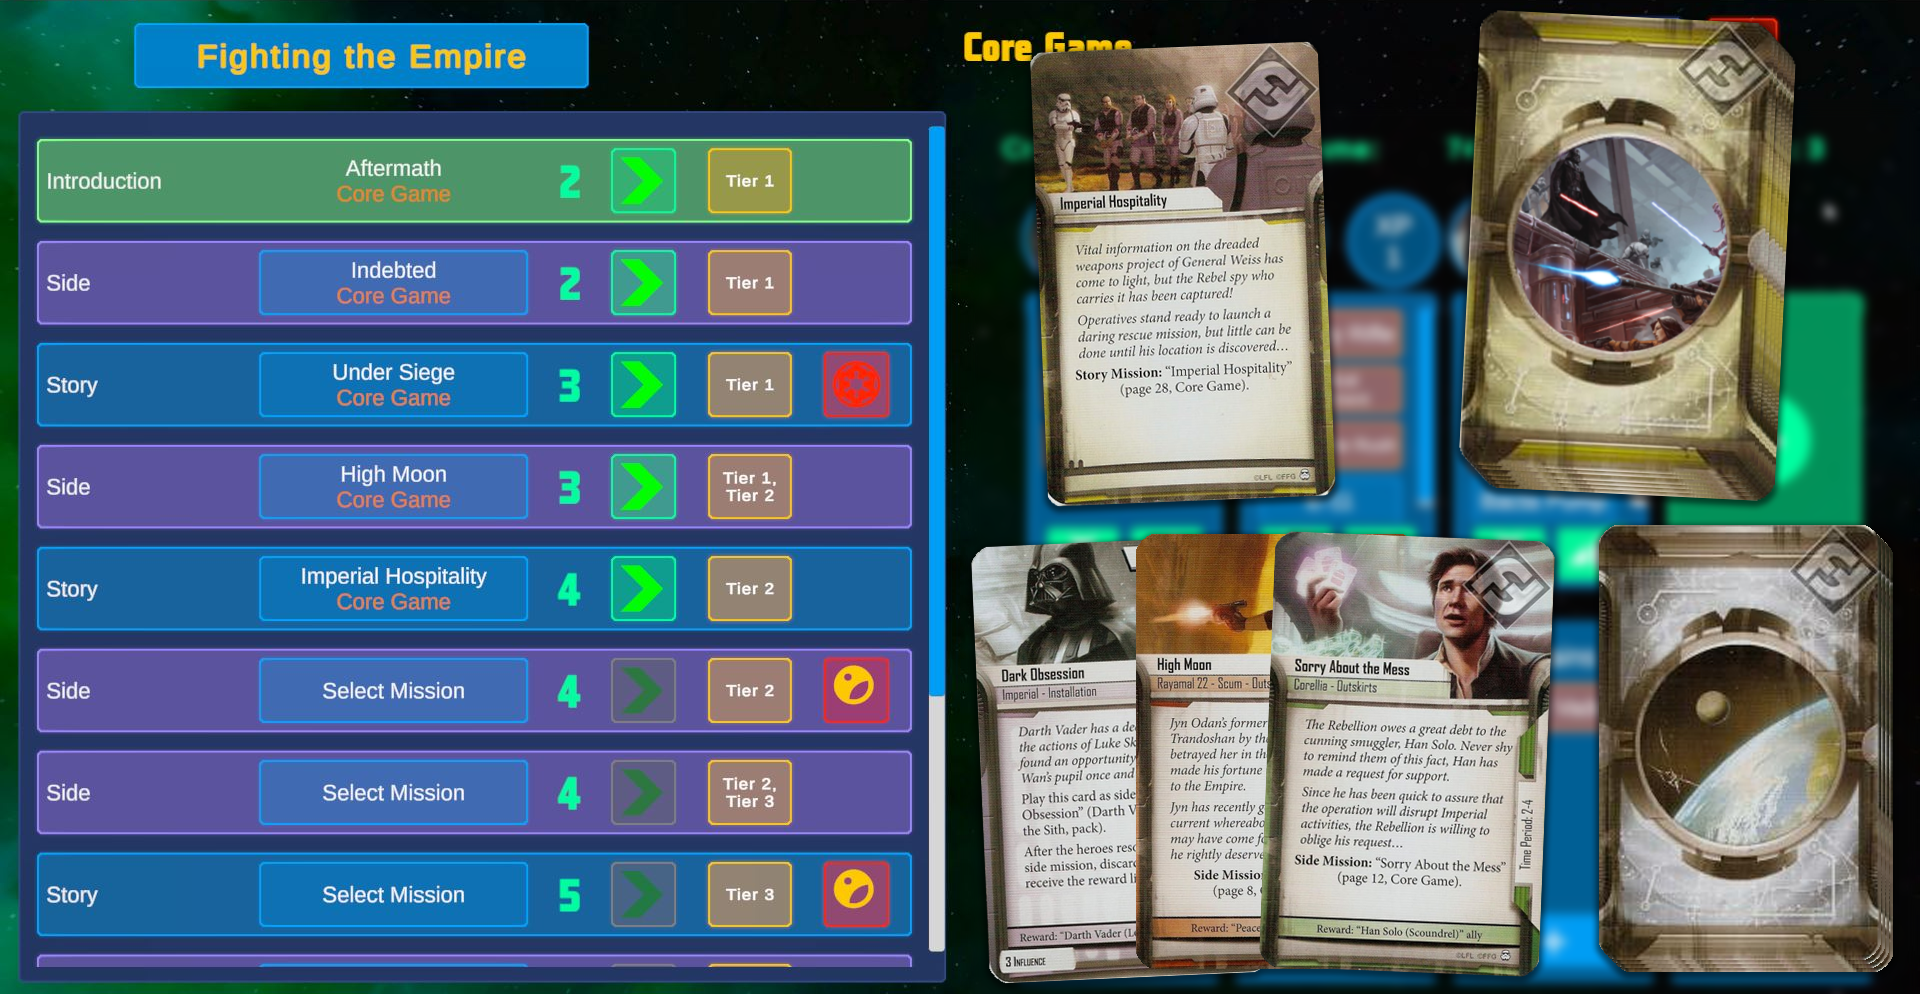
- The players have played the introduction mission Aftermath. Unfortunately, they lost it. Losing Aftermath meant the new story mission to play was Under Siege, so the players wrote the mission name down in the campaign log.
- After Aftermath, it was time to play a side mission. The players drew 2 side mission cards from the side mission deck, Indebted and Sorry About the Mess. They decided to play Indebted as their first side mission.
- After resolving Indebted, they drew a new side mission card, High Moon. Now the two active side missions were High Moon and Sorry About the Mess.
- The players managed to win Under Siege. This put the Story Mission card Imperial Hospitality (upper right) into play. Since there is only 1 active Story Mission card, the players already know they are going to play this as their next story mission, so they write it down in the campaign log.
- Before Imperial Hospitality, though, it's time to play another side mission. The players have already drawn 2 Side Mission cards from the side mission deck (bottom right). The planet icon next to the recently resolved mission also tells them it's time to see if the Empire puts an Imperial Mission into play. After clicking the icon, the app tells them to draw a mission from the Imperial Mission deck. They draw Dark Obsession, so they now have to decide whether to play High Moon for a reward card, Sorry About the Mess for Han Solo as an ally, or Dark Obsession to prevent the Empire from gaining Darth Vader as a villain. If they decide not to play Dark Obsession, the Empire automatically receives Darth Vader.
- So far, players have only been allowed to draw Item cards from Tier 1. After the next side mission, the campaign log tells them to draw Item cards from tiers 1 and 2.
- The first two missions were played at threat level 2. Under Siege and the next side mission will be played at threat level 3. Imperial Hospitality will be the first mission with threat level 4.
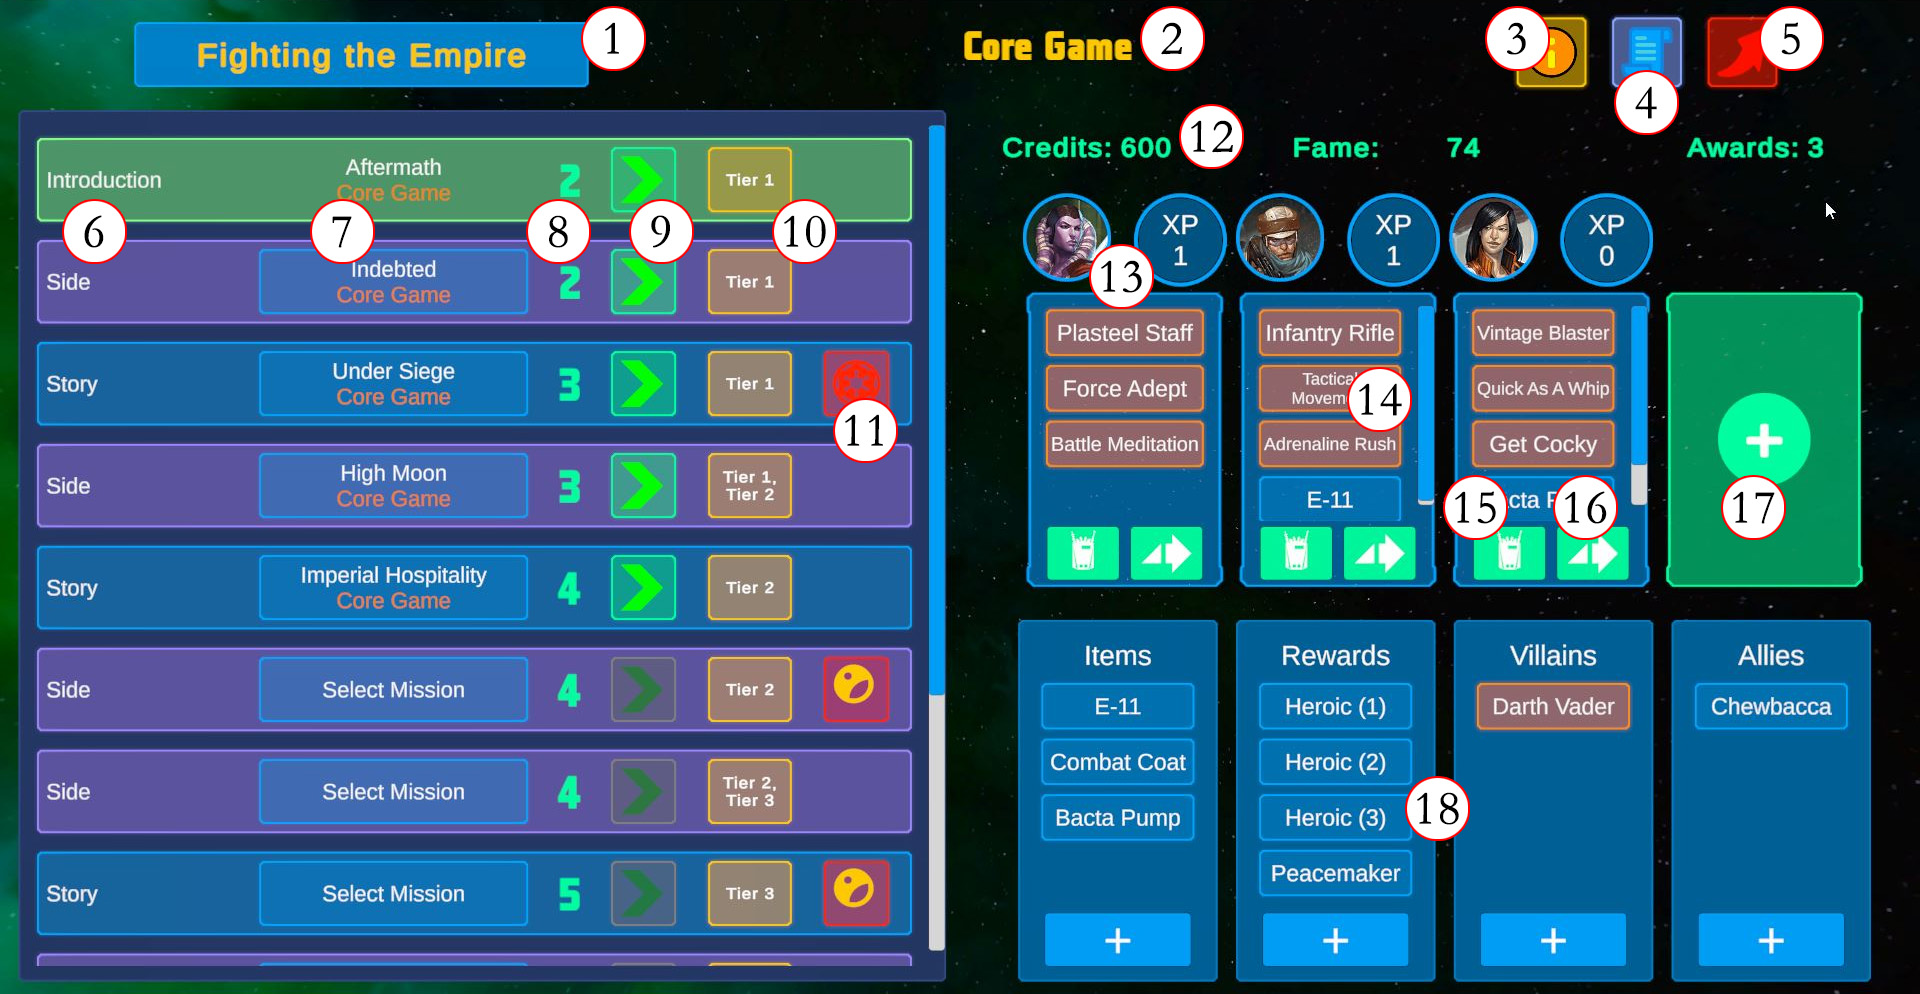
| No. | Description |
|---|---|
| 1 | Click / tap to change the custom name of the campaign. |
| 2 | The campaign currently chosen. |
| 3 | This displays the campaign information, for example special rules for the campaign and general campaign setup. |
| 4 | Opens the campaign log, a place to put notes for the campaign. |
| 5 | Return to the start screen. |
| 6 | This is the campaign log. On the left side, you see which mission type to play next. |
| 7 | The name of the mission. If no mission is pre-selected, click / tap this button to select a mission. |
| 8 | The threat level of the mission. Note: You can still change the threat level in the mission setup screen. |
| 9 | Click / tap to open the mission setup screen. |
| 10 | This shows you from which item decks to draw cards for the Rebel Upgrade Stage. Click / tap to change color to indicate the Rebel Upgrade Stage has been resolved. |
| 11 | The Imperial Mission icon. When the Rebel Upgrade Stage of this mission has been resolved, click / tap the Imperial Mission icon. The app then tells you whether to draw an Imperial Mission (Empire symbol) or not (Rebel symbol). |
| 12 | You can keep track of Credits here, as well as Fame and Awards (only relevant when playing with Adaptive Difficulty). Use the scroll wheel or click & drag / swipe to change the values. |
| 13 | The selected heroes. Click / tap a portrait to remove a hero. Use the XP slot to track XP per hero. |
| 14 | The Hero Class cards and items assigned to that hero. Click / tap an entry to remove it. |
| 15 | Click / tap the backpack icon to assign an item to the hero. Only items available in the inventory (see 17) can be assigend. |
| 16 | Click / tap the arrow icon to add a Hero Class card to the hero. XP cost will be automatically deduced from the hero's total. |
| 17 | Click / tap the + icon to add a hero. |
| 18 | The campaign inventory shows the items, rewards, villains, and allies gained during the campaign. Click / tap the + icon to add an entry. (In the bottom left of the add window, you can select between various types of items and rewards.) Click / tap an entry to remove it. Adding / removing items will automatically adjust the credits accordingly. |
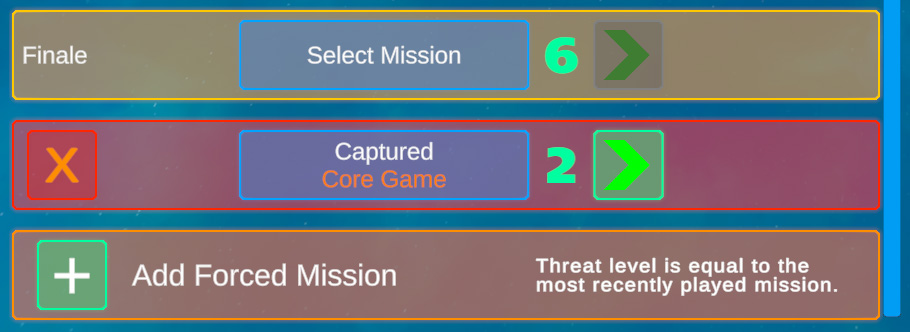
To add a forced mission, scroll down in the campaign log and click / tap the + icon to add a forced mission. Remove forced missions by clicking / tapping X.
(Work in Progress)