SSPI Kerberos Delegation - GenuineChannels/GenuineChannels GitHub Wiki
It is rather easy to delegate a user to the first server. But you need to implement a kind of Security Session management between the first server and the second server
Requirements
First of all, we are going to play a very amusing game called find-all-those-places-where-delegation-is-off. Sometimes it is a very time-consuming business since there are no good instruments that can show where the problem exactly is. The following list is not complete, but it should certainly help.
Server’s user must have rights for delegation
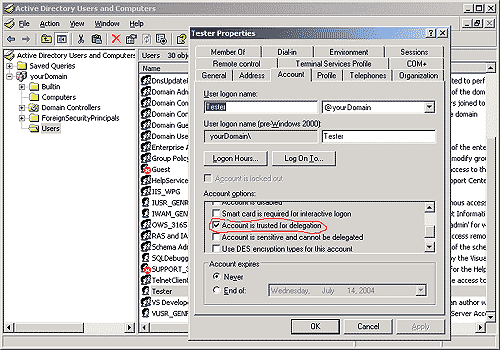
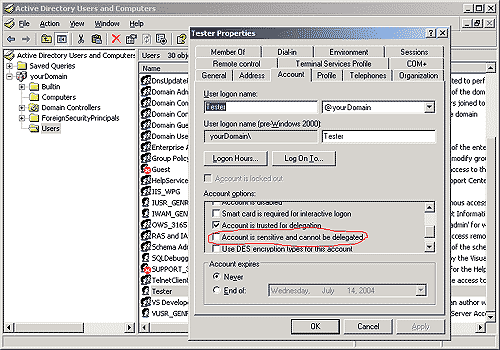
The delegated user must not be considered as sensitive.
Client’s computer must be trusted for delegation

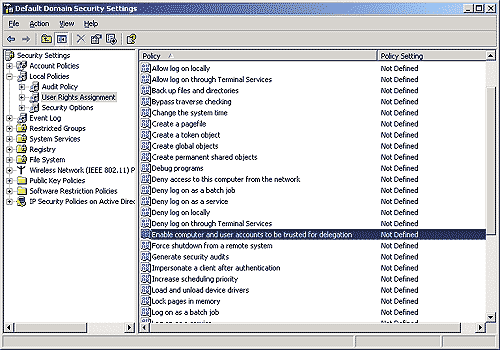
Delegation can be disabled in Local Security Policy (or Domain Security Policy)
All computers participating in delegation must have the same time settings. Otherwise, you need to increase the value of MaxClockSkew at "\Sysvol<domain name>\Policies{31B2F340-016D-11D2-945F-00C04FB984F9}\Machine\Microsoft\Windows NT\SecEdit\GptTmpl.inf"
# GptTmpl.inf

[Unicode]
Unicode=yes
[System Access]
MinimumPasswordAge = 1
MaximumPasswordAge = 42
MinimumPasswordLength = 7
PasswordComplexity = 1
PasswordHistorySize = 24
LockoutBadCount = 0
RequireLogonToChangePassword = 0
ForceLogoffWhenHourExpire = 0
ClearTextPassword = 0
[Kerberos Policy]
MaxTicketAge = 10
MaxRenewAge = 7
MaxServiceAge = 600
MaxClockSkew = 10
TicketValidateClient = 1
[Version]
signature="$CHICAGO$"
Revision=1
Check that Time Zone and "Automatically adjust clock for daylight saving changes" settings have the same value on all computers where you are going to use Kerberos delegation.

To enable automatic time synchronization with the server, type in command line:
# COMMAND LINE

net time /setsntp:AddressOfYourDomainServer
Client-Server part
Please download the demo sample here. This solution contains Client, Server and Second Server applications.
A Client application is to connect to an intermediate server called “Server”. Server delegates the established security context to the second server called “Second Server”.
The Client application asks end-user to enter his or her network credential. End-user can either use the process’s security context or enter a specific user’s credential (logon, password and name of the domain). The Server application authenticates the provided credentials with the help of SSPI Kerberos package. Then the Server application can delegate the obtained security context to the Second Server application.
Let us review all details of Client - Server exchange. This part is very simple. A Client application creates SSPI Client Key Provider, fills it up with the network credentials, enforces this Security Key Provider during the test call and invokes a Server application.
// CLIENT SIDE

// First, create SSPI Client Key Provider
using Belikov.GenuineChannels.Security;
using Belikov.GenuineChannels.Security.SSPI;

// this implementation requests the target from the server
KeyProvider_SspiClient keyProvider_SspiClient =
    new KeyProvider_SspiClient(SspiFeatureFlags.Impersonation |
                                       SspiFeatureFlags.Delegation,
            SupportedSspiPackages.Kerberos, null,
            ChatClient.IChatServer.GetAuthority(), null);

// register the created SSPI Client Key Provider
ITransportContextProvider iTransportContextProvider =
   (ITransportContextProvider) ChannelServices.GetChannel("gtcp");
iTransportContextProvider.ITransportContext.IKeyStore.SetKey
   ("/Chat/Sspi", keyProvider_SspiClient);
iTransportContextProvider.ITransportContext.SecuritySessionParameters
   = new SecuritySessionParameters("/Chat/Sspi");

// now we are asking user to enter valid credentials until the
// test call is successful

for ( ; ; ) {
  try {
    // ... Ask user to enter logon, password and the name of domain

    // either use process's security context or request the user with
    // specified credential
    if (ChatClient.UserName.Length <= 0)
      keyProvider_SspiClient.AuthIdentity = null;
    else
      keyProvider_SspiClient.AuthIdentity =
           new NetworkCredential(ChatClient.UserName,
                   ChatClient.Password, ChatClient.Domain);

    // subscribe to the chat event
    lock(ChatClient.IChatServerLock) {
      ChatClient.IChatServer = (IChatServer)
        Activator.GetObject(typeof(IChatRoom),
          ConfigurationSettings.AppSettings["RemoteHostUri"] +
          "/ChatServer.rem");

      ChatClient.IChatRoom = ChatClient.IChatServer.EnterToChatRoom
        (ChatClient.Nickname);
    }

    break;
  }
  catch (Exception ex)
  {
    // output the reason of the problem
  }
}
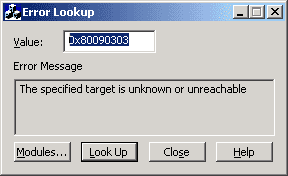
You have an endless number of attempts. Each time you receive an error, you can use Visual C++ Error Lookup utility to get the text of the error.
Once the Security Session is established, you have to destroy it at both host (see Belikov.GenuineChannels.TransportContext.HostInformation.DestroySecuritySession in Programming Guide) to initiate re-establishing of the Security Session with new credentials.
Please notice that the Client application enforces SSPI Security Key Provider for all invocations to the Server application.
// CLIENT SIDE

iTransportContextProvider.ITransportContext.SecuritySessionParameters
  = new SecuritySessionParameters("/Chat/Sspi");
The Server application creates the corresponding SSPI Server Key Provider and waits for client requests.
// SERVER SIDE

using Belikov.GenuineChannels.Security;
using Belikov.GenuineChannels.Security.SSPI;

ITransportContextProvider iTransportContextProvider =
   (ITransportContextProvider) ChannelServices.GetChannel("gtcp");
iTransportContextProvider.ITransportContext.IKeyStore.SetKey
   ("/Chat/Sspi", new KeyProvider_SspiServer
      (SspiFeatureFlags.Impersonation |
         SspiFeatureFlags.Delegation, SupportedSspiPackages.Kerberos));
Since the Server application is a console application, it always provides SAM-compatible name of the current user as a target name. The second sample will run inside IIS and we will have to use correct SPN name there.
// SERVER SIDE

public string GetAuthority()
{
  return SspiApi.GetUserNameEx();
}
Every time a Server application receives an invocation, it has all the proper means to analyze the provided security environment.
// SERVER SIDE

public string SendMessage(string message)
{
  // ...

  // get the established SecuritySession_SspiServer
  ITransportContext iTransportContext =
      GenuineUtility.CurrentRemoteHost.ITransportContext;
  SecuritySession_SspiServer currentServerSspiSession =
   (SecuritySession_SspiServer)
     GenuineUtility.CurrentRemoteHost.GetSecuritySession
      (GenuineUtility.CurrentInvocationSecuritySessionParameters.Name,
          null);

  // now it is a good idea to check the principals
  WindowsPrincipal windowsPrincipal = new WindowsPrincipal (
                   currentServerSspiSession.WindowsIdentity );

  if ( windowsPrincipal.IsInRole(@"YOURDOMAIN\Domain Admins") )
    Console.WriteLine("The user is a Domain Admin! Wow!");
  else
    Console.WriteLine("The user is not a Domain Admin.");

  // or analyze the current identity otherwise
  string identityName = WindowsIdentity.GetCurrent().Name;

  // ...
Server-Second Server part
Now that we have received a session ticket from the client, we need to delegate it to the Second Server application. That is we want to act as a client.
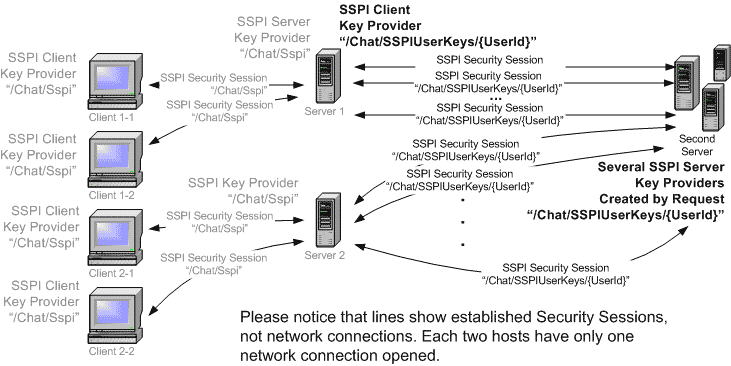
The main problem here is that we need to delegate several security contexts. We have to create a separate Key Provider for every security session. We have to release all resources straight after client disconnection. To solve this, Server creates SSPI Client Key Provider with a unique name for every client and asks Second Server to do the same.
Let us examine what is happening inside Server.ChatRoom.SendMessage.
// SERVER SIDE

public string SendMessage(string message)
{
  // ...
  // get the name of identity
  string identityName = WindowsIdentity.GetCurrent().Name;
Server constructs a name of Security Key Provider. This name is unique for each client.
// SERVER SIDE

string keyName = "/Chat/SSPIUserKeys/" +
   GenuineUtility.CurrentRemoteUri;
Then server analyzes whether the Security Session has been established. This application demonstrates how you can manage one SSPI Key Provider per client. If you need to have several SSPI Key Providers per client, just add the name of user identity into keyName being constructed.
Server stores the identity of established context in Client Session. When Server wants to understand whether the established Security Session uses the same security context, it compares names of identities. Actually, you might want to apply a lock to this transaction. I do not do this because my client application cannot send several invocations concurrently.
Please notice that Server specifies what context will be delegated during constructing Client SSPI Key Provider.
// SERVER SIDE

// ensure that the security environment is correct
string establishedSession = GenuineUtility.CurrentSession
        ["AuthorizedIdentity"] as string;
if (establishedSession == null)
{
  // if there is no security context, create it
  iTransportContext.IKeyStore.SetKey(keyName,
     new KeyProvider_SspiClient(SspiFeatureFlags.Impersonation |
     SspiFeatureFlags.Delegation | SspiFeatureFlags.Encryption,
     SupportedSspiPackages.Kerberos,
     null, this.IThirdParty.GetTarget(), currentServerSspiSession));

  this.IThirdParty.CreateSecurityContext(keyName);
}
else if (establishedSession != null &&
                                establishedSession != identityName)
{
  // if security session has been established but it uses
  // another credential, release and re-establish it
  GenuineUtility.CurrentRemoteHost.DestroySecuritySession(keyName);
  this.IThirdParty.ReleaseSecurityContext(keyName);
}

GenuineUtility.CurrentSession["AuthorizedIdentity"] = identityName;
After that, Server applies the constructed Security Key Provider to an invocation made to the Second Server.
// SERVER SIDE

// use the setup security context
using (new SecurityContextKeeper(new SecuritySessionParameters
                                               (keyName)))
{
  this.IThirdParty.MessageHasBeenSent(message);
}
Finally, Server re-sends the message to all other clients. It was a chat sample initially. I hope you have already got it.
// SERVER SIDE

  IMessageReceiver iMessageReceiver = (IMessageReceiver)
             this._dispatcher.TransparentProxy;
  iMessageReceiver.ReceiveMessage(message, nickname);

  return WindowsIdentity.GetCurrent().Name;
}
The implementation of Second Server is trivial. It constructs and deletes SSPI Server Key Providers by requests and outputs all received requests.
// SECOND SERVER SIDE

public void CreateSecurityContext(string securityProviderName)
{
  ITransportContext iTransportContext =
        GenuineUtility.CurrentRemoteHost.ITransportContext;

  iTransportContext.IKeyStore.SetKey(securityProviderName,
    new KeyProvider_SspiServer(SspiFeatureFlags.Impersonation |
     SspiFeatureFlags.Delegation | SspiFeatureFlags.Encryption,
     SupportedSspiPackages.Kerberos));
}

public void ResetSecurityContext(string securityProviderName)
{
  GenuineUtility.CurrentRemoteHost.DestroySecuritySession
                                               (securityProviderName);
}

public void ReleaseSecurityContext(string securityProviderName)
{
  // release the SS
  this.ResetSecurityContext(securityProviderName);

  // and remove the security provider
  ITransportContext iTransportContext =
                GenuineUtility.CurrentRemoteHost.ITransportContext;
  iTransportContext.IKeyStore.SetKey(securityProviderName, null);
}
Since this is a console application, we use SAM-compatible name as a target.
// SECOND SERVER SIDE

public string GetTarget()
{
  return SspiApi.GetUserNameEx();
}

public void MessageHasBeenSent(string message)
{
  Console.WriteLine("Message \"{0}\" has been sent by {1}.",
                         message, WindowsIdentity.GetCurrent().Name);
}
Security Context Management
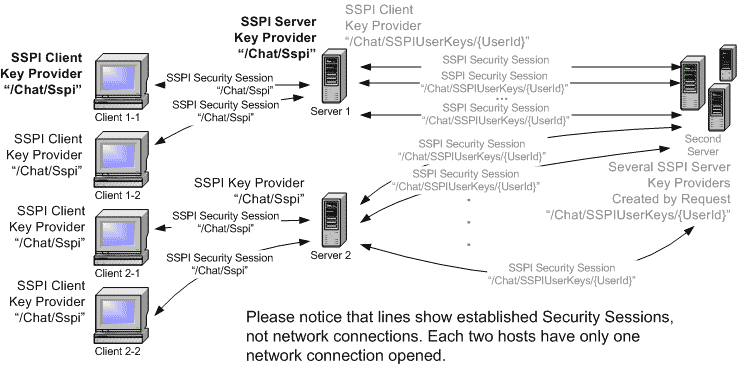
Let's take a deeper look at Security Key Provider and Security Session management taking place between Server and Second Server.
When Client invokes Server's method, SSPI Security Session is established and Server has access to SSPI Server Security Session during this invocation. Then the Server application needs to delegate a user during an operation on the Second Server. It creates SSPI Client Key Provider delegating the specified SSPI Server Security Session to Second Server. At the same time it asks Second Server to create the corresponding SSPI Server Key Provider to establish the second SSPI Security Session. The code below explains this process.
When Server invokes Second Server's method, it enforces the created SSPI Key Provider and delegates the user specified by SSPI Server Security Session.
// SERVER SIDE

public string SendMessage(string message)
{
  // When Client invokes Server's method, Server has access to
  // the established SSPI Server Security Session
  SecuritySession_SspiServer currentServerSspiSession =
      (SecuritySession_SspiServer)
          GenuineUtility.CurrentRemoteHost.GetSecuritySession (
      GenuineUtility.CurrentInvocationSecuritySessionParameters.Name,
                                         null);

  // To delegate a user, we create SSPI Client Key Provider and specify
  // the SSPI Server Security Session in constructor
  ITransportContext iTransportContext =
                   GenuineUtility.CurrentRemoteHost.ITransportContext;
  iTransportContext.IKeyStore.SetKey(keyName,
       new KeyProvider_SspiClient(SspiFeatureFlags.Impersonation |
           SspiFeatureFlags.Delegation | SspiFeatureFlags.Encryption,
           SupportedSspiPackages.Kerberos,
           null, this.IThirdParty.GetTarget(),
           currentServerSspiSession));

  // Server asks Second Server to create the corresponding
  // SSPI Security Key Provider
  this.IThirdParty.CreateSecurityContext(keyName);

  // Apply the created Security Key Provider
   using (new SecurityContextKeeper(new SecuritySessionParameters
                                                       (keyName)))
  {
    this.IThirdParty.MessageHasBeenSent(message);
  }
Second Server creates SSPI Server Key Providers with the specified name by request and receives invocations from the Server application.
// SECOND SERVER SIDE

public void CreateSecurityContext(string securityProviderName)
{
    // create the SSPI Server Key Provider by request
  ITransportContext iTransportContext =
               GenuineUtility.CurrentRemoteHost.ITransportContext;
  iTransportContext.IKeyStore.SetKey(securityProviderName,
     new KeyProvider_SspiServer(SspiFeatureFlags.Impersonation |
            SspiFeatureFlags.Delegation | SspiFeatureFlags.Encryption,
            SupportedSspiPackages.Kerberos));
}

public void MessageHasBeenSent(string message)
{
  Console.WriteLine("Message \"{0}\" has been sent by {1}.", message,
            WindowsIdentity.GetCurrent().Name);
}
After these steps we have SSPI Client Key Provider at Server, SSPI Server Key Provider at Second Server and established SSPI Security Session at both hosts.
For example, now we want to delegate another user. That is the same Client application now wants to use another user and we want to delete established Security Sessions at both hosts and set SSPI Client Key Provider's DelegatedContext property to SSPI Security Session being delegated.
// SERVER SIDE

// Destroy the local Security Session
GenuineUtility.CurrentRemoteHost.DestroySecuritySession(keyName);
// Ask Second Server to destroy its Security Session
this.IThirdParty.ReleaseSecurityContext(keyName);

// set the new delegated security session
KeyProvider_SspiClient keyProvider_SspiClient =
  (KeyProvider_SspiClient) iTransportContext.IKeyStore.GetKey(keyName);
keyProvider_SspiClient.DelegatedContext = currentServerSspiSession;

// any call made under Security Key Provider with the name "keyName"
// will establish a new Security Session delegating a user
// specified by "currentServerSspiSession"
// SECOND SERVER SIDE

public void ResetSecurityContext(string securityProviderName)
{
  // just delete the requested Security Session
  GenuineUtility.CurrentRemoteHost.DestroySecuritySession (
                                               securityProviderName);
}
Finally, we want to remove all established Security Sessions and all created Key Providers servicing security context for a disconnected client. Server catches the event about client disconnection, delete all this stuff locally and inform the Second Server application to do the same.
// SERVER SIDE

public static void GenuineChannelsEventHandler(object sender,
                                                 GenuineEventArgs e)
{
  if (e.EventType == GenuineEventType.GeneralConnectionClosed)
  {
    // destroy the Key Provider associated with this client
    string keyName = "/Chat/SSPIUserKeys/" + e.HostInformation.Uri;

    // remove the local Key Provider
    string ignoredServerUri;
    ITransportContext serverTransportContext;
    // that Key Provider was created in Server-SecondServer
    // Transport Context. Therefore, this code will work with
    // both solutions (GTCP and GHTTP).
    GenuineUtility.FetchChannelUriFromMbr((MarshalByRefObject)
                 GlobalRoom.IThirdParty, out ignoredServerUri,
                 out serverTransportContext);
    serverTransportContext.IKeyStore.SetKey(keyName, null);

    // remove the remote Key Provider
    try
    {
      // it's OK to invoke the server in this thread
      // because Genuine Channels manage event threads right
      IThirdParty iThirdParty = GlobalRoom.IThirdParty;
      iThirdParty.ReleaseSecurityContext(keyName);
    }
    catch
    {
      // but if we do not catch all exceptions here
      // all other our event consumers won't get this event
    }
   }
The Second Server application unregisters the SSPI Key Provider and deletes the established Security Session by request from the Server application.
// SECOND SERVER SIDE

public void ReleaseSecurityContext(string securityProviderName)
{
  // release the SS
  this.ResetSecurityContext(securityProviderName);

  // and remove the security provider
  ITransportContext iTransportContext =
                  GenuineUtility.CurrentRemoteHost.ITransportContext;
  iTransportContext.IKeyStore.SetKey(securityProviderName, null);
}
GHTTP sample
The only change we need to implement is the name of the target. Our application works inside IIS and therefore we need to specify a real SPN name. You can download the source-code here.
You can create a SPN name (http://www.microsoft.com/windows2000/techinfo/reskit/tools/default.asp)
# COMMAND LINE

Setspn.exe -A tcp/gench yourdomain
and then provide it to the client
// SECOND SERVER SIDE

public string GetTarget()
{
  return @"tcp/gench";
}
Alternatively, you can use Kerberos Tray and take one of the defined SPN:
// SECOND SERVER SIDE

public string GetTarget()
{
  return @"host/yourhost.yourdomain@YOURDOMAIN";
}
Please notice that in the first solution Server has the only Transport Context. Here we use GHTTP Transport Context to receive requests from Clients and GTCP Transport Context to delegate the security ticket to the Second Server. It is important to create SSPI Key Providers at right context.
// SERVER SIDE

//Global.asax.cs
// Remember the Transport Context
GenuineTcpChannel genuineTcpChannel = new GenuineTcpChannel
                                            (properties, null, null);
Global.SecondServerTransportContext =
                                 genuineTcpChannel.ITransportContext;
ChannelServices.RegisterChannel(genuineTcpChannel);

// use it during creation of Security Key Provider
ITransportContext iTransportContext =
                                 Global.SecondServerTransportContext;

// ...
iTransportContext.IKeyStore.SetKey ( keyName,
       new KeyProvider_SspiClient(SspiFeatureFlags.Impersonation |
         SspiFeatureFlags.Delegation | SspiFeatureFlags.Encryption,
         SupportedSspiPackages.Kerberos, null,
         this.IThirdParty.GetTarget(), currentServerSspiSession));
You can use GenuineUtility.FetchChannelUriFromMbr to fetch Transport Context directly from ChatRoom.IThirdParty.
The use of the established Security Session
You can get and store the established Security Session on the server side:
// SERVER SIDE

// get the established SecuritySession_SspiServer
SecuritySession_SspiServer currentServerSspiSession =
  (SecuritySession_SspiServer)
    GenuineUtility.CurrentRemoteHost.GetSecuritySession (
      GenuineUtility.CurrentInvocationSecuritySessionParameters.Name,
      null);
In general, you can impersonate the context of execution at any moment:
// SERVER SIDE

try
{
  SspiApi.ImpersonateSecurityContext (
   currentServerSspiSession.SspiSecurityContext._phContext);
  // ...
}
finally
{
  SspiApi.RevertSecurityContext (
    currentServerSspiSession.SspiSecurityContext._phContext);
}
You can always use its WindowsIdentity property. You have access to obtained handles if you want to use it in your code (currentServerSspiSession.SspiSecurityContext._ptsExpiry, currentServerSspiSession.SspiSecurityContext._phContext, currentServerSspiSession.SspiSecurityContext._credHandle).