Intro to the GUI Part 1
This tutorial details the process used to create a new module with a console. This includes the basics involved with adding a GUI. Consider this an introduction to modules and the GUI system in Torque 2D. By the end of this tutorial, you will understand what is meant with the phase "Have a firm grasp of the obvious." Now that doesn't sound very desirable at first, but stick around and you'll be glad you did!
There is a lot of information to cover within the scope of a single tutorial. To make best use of this tutorial the Getting Started Guide is recommended as a prerequisite. All of the basics are covered there on how to get T2D up and running in the first place, and much of the content of this tutorial reinforces concepts you initially learn there.
This tutorial section will not go into great detail about all the settings or placement of GUI elements. The purpose of this tutorial is to show beginners how to create a brand new project and add a console overlay which can be brought up while your game is running. Understanding this is a good first step towards GUI mastery! By following this process, the user will understand very well the workings 'under the hood' to get future projects off the ground faster.
When we are finished with this tutorial and launch the new Console module that we have created, this is the order that things will need to take place for it to work. This is also the order in which the sections of this guide are roughly organized.
AppCore Module -> setup Canvas, load Console -> Console Module -> setup GuiControls and GuiProfiles, scripts to toggle console dialog
Understanding and following the workflow above will serve you well, and by the end of this tutorial you will have a good understanding as to how this all ties together.
We are going to create a completely new project outside of the T2D directory. Here I will not go into great detail about the contents of every file; in the Review section we will discuss the relevant code.
1 - Create a new folder on your desktop and name it 'Root'.
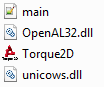
2 - Navigate to your main Torque2D directory and if you are using Windows copy the following files. Place them in your 'Root' folder:
For OSX users, you would need to copy Torque2D.app and main.cs to the 'Root' folder.
3 - Create a new folder inside the 'Root' folder and name it 'modules'.
4 - Navigate to 'Torque2D-2.0\modules' and copy the 'AppCore' folder. Place it in your newly created 'Root\modules' folder.
Now we have our first module called AppCore installed! This is the very least that is required in order to have the Torque2D.exe/Torque2D.app generate any sort of output. Double click the Torque2D.exe/Torque2D.app now, it should popup a window with the Cornflower Blue background. Before moving to the next step, let's pop the hood and see what really just happened. It's this sort of exploration that will lead to a greater understanding of the engine.
When we double clicked the binary, the engine looks first for instructions from the main.cs script file in the same 'Root' directory. Go ahead and open the main.cs file now. Near the bottom we find the following:
// Scan modules.
ModuleDatabase.scanModules( "modules" );

// Load AppCore module.
ModuleDatabase.LoadExplicit( "AppCore" );
We are telling the engine to scan for available modules in the 'modules' folder we just created in the previous steps. Provided you copied the AppCore module correctly, the ModuleDatabase will find AppCore (and at the moment nothing else since that is the only defined module in the folder) and then in the next line of main.cs we tell the ModuleDatabase to load AppCore. For a better understanding of the module system, please read the Module Manager Guide, especially the sections "Declaring Modules" and "Module Scanning" for more information on what was just described here.
The AppCore module is provided as a default module in Torque 2D to help you save time in setting up basic systems that are needed in every game. Open your 'modules\AppCore\1' directory and open the main.cs file for the module. When AppCore is loaded, the function AppCore::create is run. In addition to some global variables being defined, the main things going on here are initializing the audio system and creating a Canvas. The Canvas is the foundation upon which all rendering occurs. We'll go into more detail on what exactly the Canvas renders in later sections.
At the bottom of the create function is another call to the ModuleDatabase to load not just one specific module but a whole group which share the group name of gameBase.
ModuleDatabase.loadGroup("gameBase");So where are these modules that belong to gameBase? Well, since we only have the AppCore module created so far there isn't a gameBase group just yet. This just sets us up so that we can, in the event that gameBase is created, actually load the group gameBase. You can specify whether or not a module is part of a group within the module's module.taml file.
Review
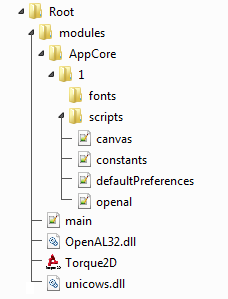
Your directory should now look like this:
What will we need to make a console appear in our window? Just as we began with a module named AppCore, now we will create a new module in order to implement our console. It is important to take note that we only used the AppCore module to get to where we were going, as if it were a link in a chain. Now we are adding the next link in the chain.
So we decided we will make a new module, but what will this module need in order to perform its duty to bring us the console? It will need scripts to tell the Canvas to render the console on the screen and it will also need some actual graphics files to display. We'll want something to represent our scrollbar, arrows, text entry block, background gradient, etc. With this in mind, we will now create a new module for our console:
1 - Create a new folder within your 'Root\modules' folder and name it 'Console'. Within this folder create another folder and name it '1'.
2 - Create 3 folders within your new 'Root\modules\Console' folder and name them 'assets', 'scripts', and 'gui'.
3 - Navigate to 'Torque2D-2.0\modules\Sandbox\1' and copy the module.taml file. Save it within your 'Root\modules\Console\1' folder. The Sandbox module within the T2D 'modules' folder is the module that would normally handle loading up the console within the T2D Sandbox. The Sandbox module actually handles loading up all of your gui elements when you launch the default T2D Sandbox. This is why we are picking it apart to rebuild the console into our new application.
Special Note:
We want to pay very close attention to any files that we copy from our T2D directory and want to use within our new modules. These cloned files serve as templates for us to use to our specifications, depending on how we want to apply our logical idea. We may need to alter the relevant fields within each file we have cloned for our new modules use them correctly. In the module.taml file, we need to change the ModuleId to "Console".
4 - At last we have found our gameBase group that was called to from our AppCore module in Section I. Below we can see that our new module.taml has the field Group="gameBase". By defining that here, our new module is now part of gameBase group. We could just as easily omitted this field entirely and loaded the Console module explicitly (like we do AppCore). By having the Console module be part of a group, we can expand on it easily in future tutorials. Edit the module.taml file to look like this:
<ModuleDefinition
	ModuleId="Console"
	VersionId="1"
	Dependencies="AppCore=1"
    	Group="gameBase"
	Description="A Console GUI for general debugging"
	ScriptFile="main.cs"
	CreateFunction="create"
	DestroyFunction="destroy">
		<DeclaredAssets
			Path="assets"
			Extension="asset.taml"
			Recurse="true"/>
</ModuleDefinition>
The Dependencies that our new module relies on are AppCore=1. Because we will not be using a seperate module just yet to handle our assets, we removed "ToyAssets=1" so that our only dependancy is "AppCore=1". Before moving on, we can see that there is a child <DeclaredAssets> that has been added as well. This tells us where our assets will be stored. They will be stored in "assets" which we created in step 2 above. Also, in order for an asset file to be loaded Extension="asset.taml" tells us the file requires the .asset.taml extension (picture.asset.taml for example). Recurse="true" is important to us here. When set to "true" it allows us to create subfolders within 'Console\1\assets' that are able to be read by the Asset System. This will be important when we create a subfolder here later on in Section III.
5 - Now, we know that a module definition file needed at start up so the engine can find it when scanning the modules folder and when it is loaded we need a script file that contains a "create" function, so the next file we need to create will be our 'Root\modules\Console\1\main.cs' file. Create your new main.cs file and define it as follows:
function Console::create(%this)
{
    // Load additional script files.
    exec("./scripts/console.cs");
    exec("./gui/guiProfiles.cs");

    // Load and configure the console.
    Console.add( TamlRead("./gui/ConsoleDialog.gui.taml") );
    GlobalActionMap.bind( keyboard, "ctrl tilde", toggleConsole );

    // Just a string to notify us the Console has been called to start.
    echo("@@@ Console::create function called");
}

function Console::destroy( %this )
{
    // String to tell us the Console has been called to be destroyed.
    echo("@@@ Console::destroy function called");
}
We decided at the beginning of this tutorial section that we were going to need scripts and gui graphics. We also went ahead and created a 'script' and 'gui' folder in our new Console module to store them in. We are now telling our main.cs to execute our needed scripts in the part of the create method:
    exec("./scripts/console.cs");
    exec("./gui/guiProfiles.cs");

    // Load and configure the console.
    Console.add( TamlRead("./gui/ConsoleDialog.gui.taml") );
We haven't created these yet, so let's go ahead and tie off our loose ends. We're going to need a console.cs first.
6 - The console.cs file can be found in the Torque 2D directory within 'Torque2D-2.0\modules\Sandbox\1\scripts'. Save this in the 'Root\modules\Console\1\scripts' folder. Take a peek inside to see what our canvas is doing. Of particular interest will be near the bottom:
Canvas.pushDialog(ConsoleDialog);This is where our Canvas function calls to push the dialog to the screen. Canvas was initialized by a script canvas.cs contained within our AssetCore directory. We briefly mentioned the Canvas in Section I review so let's cover a few definitions now:
What exactly does the Canvas render?
Basically, content controls. A content control is the top level GuiControl for a screen. This GuiControl will be the parent control for all other GuiControls on that particular screen.
And what about these dialogs that get pushed?
A dialog is essentially another screen, only it gets overlaid on top of the current content control, and all input goes to the dialog. This is most akin to the "Open File" dialog box found in most operating systems. When you choose to open a file, and the "Open File" dialog pops up, you can no longer send input to the application, and must complete or cancel the open file request. Torque keeps track of layers of dialogs. The dialog with the highest layer is on top and will get all the input, unless the dialog is modeless, which is a profile option.
Review
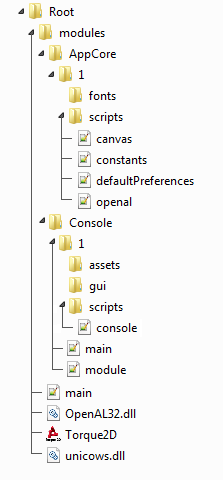
Your directory should now look like this:
When we need to render GUI elements to the screen there are a few things that need to be preconfigured. By taking a look at another small Workflow Diagram, we can easily put this process into perspective:
Canvas --> GuiControls --> GuiProfiles
This shows us the 3 basic elements that are needed in order to render any GUI graphics. At the end of Section II the Canvas was asked by a script to push the dialog ConsoleDialog. ConsoleDialog is the content control that contains the properties for itself and all of the child GuiControls that belong to it. GuiControls are the building blocks of the GUI that define the element structure. To prevent the engine from crashing, all GuiControls need to be assigned a GuiProfile (the last element in the workflow above). A GuiProfile describes the look and formatting of the GuiControls. For anyone with a background in web design, this type of property separation is similar to relationship between HTML and CSS. Even though it is at the end of the workflow chain, it is good practice to define your GuiProfiles at the start of your scripts, which is why this line in 'Console\1\main.cs' is towards the top:
exec("./gui/guiProfiles.cs");Inside GuiProfiles.cs is the default profile from which all other profiles inherit from. Let's get our GuiProfiles.cs and ConsoleDialog.gui.taml from our Torque2D directory so our scripts can use them.
1 - Navigate to 'Torque2D-2.0\modules\Sandbox\1\gui' and copy the GuiProfiles.cs and the ConsoleDialog.gui.taml. Save these in your 'Root\modules\Console\1\gui' folder.
2 - Because GuiProfiles are required for GuiControls to work properly, we will open the GuiProfiles.cs file first to see where our image assets need to be. Throughout the file, we see this line:
bitmap = "^Sandbox/gui/images/...";This tells us that the T2D Sandbox application would load the base gui images from a folder 'Sandbox\gui\images' instead of the normal assets folder. Earlier we declared the 'assets' folder to hold all of our assets within the 'Console\1\module.taml' file. Within our new GuiProfiles.cs file, change every instance of ^Sandbox to ^Console so we can follow the same conventions used by the Sandbox in our Console application. Example:
bitmap = "^Console/gui/images/...";3 - Create a new folder 'Root\Console\1\gui\images'.
4 - With our GuiProfiles.cs file corrected, we can now turn our attention to the ConsoleDialog.gui.taml file that holds the GuiControls in TAML XML format for our console. Inside this file there is only one field that references a single image. Near the top we will see:
Image="@asset=Sandbox:blueGradient">Change this to:
Image="@asset=Console:blueGradient">This just tells the engine to load the image file from our 'Console\1\assets' folder. Remember that we declared our assets folder to be recursive in our 'Console\1\module.taml'. This means that we can add a subfolder within 'Console\1\assets' and assets can still be found within.
5 - Create a new folder 'Root\Console\1\assets\gui'.
Review
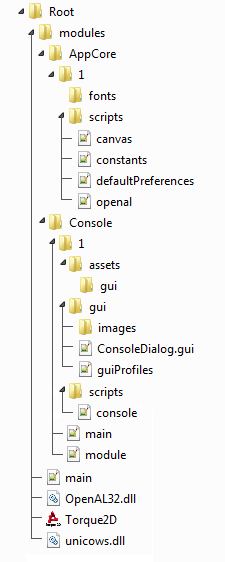
Your directory should now look like this:
Now we have all of our folders and scripts in place. To finally render our console on the Canvas, we just need the image assets that will be used by these profiles.
1 - Navigate to 'Torque2D-2.0\modules\Sandbox\1\gui\images' and copy its entire contents into the 'Root\modules\Console\1\gui\images' folder. The 'images' folder holds most of the images that will be used in creating our Console's gui.
2 - Navigate to 'Torque2D-2.0\modules\Sandbox\assets\gui' and copy the blueGradient.png and blueGradient.asset.taml. Save these at 'Root\modules\Console\1\assets\gui'. Notice that for this image to work it requires both of these files.
A Discrepancy
When copying these files we notice that we are copying images from 2 locations into 2 locations. Why not have them all in the same assets folder? There was a single image that was distinct in that it required not only the image file but an additional .asset.taml file to load. This is because the ConsoleDialog uses a GuiSpriteCtrl, which is a special GuiControl that takes advantage of the asset system introduced in T2D MIT. All of the other GuiControls are more or less directly carried over from legacy T2D and the original Torque GUI system. Here, the image locations are directly defined in the relevant GuiProfile:
bitmap = "^Console/gui/images/...";Remember the difference between the two and all is well:
- GuiProfiles will want to load only image files.
- 2 new GuiControls: GuiImageButtonCtrl and GuiSpriteCtrl were introduced in T2D MIT and use the asset system. They will require the image file as well as an asset definition file. Additionally, when using these 2 objects be sure to declare the location, file extension, recursive option, and dependancy if necessary within the module.taml of the module you are working with.
Review
Your directory should now look the same as the directory at the end of Section 3 above with images added within the correct subfolders. A final image of the directory here was purposefully not included so that you don't rely upon it when placing the image files. It is good practice to remember where your assets are declared and where they should go. The only files we have added in this section are image files or the relevant .asset.taml files.
Congratulations! If you run your Torque2d.exe/Torque2D.app now the Canvas will load, and if you push Ctrl+tilde the console appears! Now you have a barebones AppCore with a Console module. From here you can add whatever you want, while having the console available for command line entry and debugging information from echo() commands.
The workflow diagram shown in the introduction should be much clearer now as to what is going on inside the engine. Now you should truly understand what I mean when I say that you "Have a firm grasp of the obvious." Of course, all of this wasn't so obvious when first getting started with Torque2D!
Save the entire project we have just created as a template for your future projects. It will save you valuable time when trying to get an idea started in the future. If you do find yourself in a spot where you just can't get your head around a particular problem in your project, there is always the T2D Forums to ask questions and receive help: Garage Games Community Forums
While this tutorial has only covered the very basics of implementing a GUI, it has indeed added the console's basic GUI elements. When you open your console you will see a scrollbar, a 'Hide Log' button, and a white box in which to enter your text. In the next part of this tutorial I will go into further detail about GuiControls and GuiProfiles and how to position your GUI. We will also look closer at the Asset System and update our workflow diagram to include the use of an asset module as a dependency. Good luck with using Torque2D!