Getting Started Guide
This guide will take you through the basics of Torque 2d MIT : from obtaining the engine to distributing your work.
This guide is meant for beginners. We will cover basic TorqueScript techniques as well as provide a brief overview of all the concepts that are required to master Torque2D.
By the end of this guide, you will have created a functional but simple game and you should be familiar with all of the important Torque2D systems.
Please note that this guide is based on the master branch of the Torque 2D MIT engine as of 01/05/14. The development branch is updated frequently and might contain new functionality which might make the code of this current guide generate errors.
- This guide will NOT go over the specifics of working with the source code and the different compilers.
- This guide will NOT explain every possible use of each system.
- This guide will NOT explain how to publishing your game to the App store or on other software portals
For in-depth articles on each system, consult the project's wiki, which is constantly being updated by the Torque 2D MIT steering committee. You can find the wiki here : https://github.com/GarageGames/Torque2D/wiki
What you need
-
A version of git, which can be obtained from https://help.github.com/articles/set-up-git. Make sure you follow the instructions on this download page to properly setup your copy of git.
-
If you are working on Windows, you can use Microsoft Visual Studio 2010 or 2012. The Express edition of Visual Studio is free to use and is more than enough for working with T2D.
-
If you are working on Mac or wish to deploy your game to the iOS platform, you will need to obtain Xcode version 4.5.3 or higher, which you can obtain from https://developer.apple.com/technologies/tools/.
-
While TorqueScript can be edited with any Text Editor (Notepad++ comes to mind), we strongly suggest checking out Torsion http://www.garagegames.com/products/torsion. If you are serious about developing with T2D or T3D, Torsion is the way to go! Give it a go, the trial version will last you 30 days.
As Torque2D does not yet have editors, most of your work will be done by manually typing in code. As we are all humans and prone to make mistakes, Torque2D offers an easy way to ensure that your asset files are valid before runtime.
The goal is to create a schema file which can be used by any .XML editor to validate your input when you are editing and creating .taml files.
In any Torque2D project, type in the following lines in your root main.cs file :
$pref::T2D::TAMLSchema = "Torque2d.xsd";
GenerateTamlSchema();
quit();
Run the project once. Remove the lines you've just added.
You should find a file called Torque2d.xsd in your project's root directory.
Using your favorite XML editor (Visual studio, Appcode, etc.), you can now use the .xsd schema file to enable Auto-completion, making it incredibly easier to create assets from scratch without having to memorize every last detail of each asset's format.
We strongly suggest watching the following video for a detailed explanation of the process as well as concrete examples
If you wish to compare your work with the finished program created from this tutorial, you can grab the zipped project folder below.
As an added bonus, we have included an already-generated Schema file for you to use with the XML editor of your choice.
Note that you will have to provide the .exe or .app file to run the program, simply place Torque2D.exe/.app in a folder of your choice and extract the contents of the zip archive into the same folder.
On Windows, make sure to also copy the files OpenAL32.dll and unicows.dll into your folder
Click the link below to download
myT2DProject completed - zip file
Chapter 1. Getting the repository
Chapter 2. Compiling the engine
Chapter 3. Project Planning and Basic Preparations
Chapter 4. Creating a New Module
Chapter 5. Creating and utilizing Assets
Chapter 6. A Primer on the Graphical User Interface
Chapter 7. Creating and using a SceneWindow
Chapter 8. Creating and using a Scene
Chapter 9. Creating and Manipulating SceneObjects
Chapter 10. Creating and manipulating Sprites
Chapter 11. Handling Collisions
Chapter 13. Packaging / Deploying
There are two ways of working with T2D, the easy way and the git way, also known as the right way.
Torque 2d is a collaborative effort; we've given you the opportunity to help us make the engine of your dreams a reality.
As such, learning git will allow you to keep up to date with the latest changes to the engine as well as provide you with the means of contributing back to the project. As an added bonus, git is also a great way to work on code in a non-destructive and organized way.
Simply click here to get the latest master branch in .zip format.
Unzip the repository to the location of your choice and skip to Chapter 2 of this document.
Once you have installed git and performed the basic setup described on the download page, simply follow these steps to get your copy of the Torque 2D engine
-
Visit https://github.com/GarageGames/Torque2D and Fork a copy of the official repository
-
Using git-Bash or your favorite git client, clone the repository
In git-bash, you would type in
git clone git@github.com:your_username/Torque2D.git -
At this point, your local copy will represent Torque 2d MIT's master branch, which is the most stable version.
Since we won't be modifying the C++ source code in this guide, we will keep it as simple as that.
For a complete, detailed tutorial on the subject, take a look at the following link :
https://github.com/GarageGames/Torque2D/wiki/Cloning-the-repo-and-working-with-Git
Here's the good news : In most cases, the engine compiles out of the box, without requiring any additional libraries or setup.
Simply navigate to T2D\engine\compilers and load up the solution file for your preferred compiler.
-
Compile the Release version if you want optimal performance
-
Compile the Debug version if you want the engine to provide some additional information as it runs as well as the possibility to step through code using breakpoints.
Note that the Debug version will run much slower than the Release version, especially when it comes to physics.
Compiling either version will create the appropriate executable file in your T2D directory.
UPDATE: This has been fixed in the development branch! If you're using the Master branch, MacOSX will require the Vorbis libraries to compile. You can install them manually or using HomeBrew which is easier. If you have HomeBrew then just run this command in the terminal and you'll be set to go!
brew install libogg libvorbis --universal
Installing HomeBrew can also be done with a single command and is definitely the fastest way to get around this speed bump.
The only module we need to create a T2D program is called AppCore; note that we are completely bypassing the Sandbox and its functionality.
-
Create a new directory where your new project will reside. We will use /MyT2DProject/ as an example.
-
Create a new directory under /MyT2DProject/ called 'modules'.
-
Navigate to your T2D repository (the place where we've cloned the official repository in chapter 1.)
-
under the 'modules' directory, find the directory called AppCore
- copy this directory and its contents in /MyT2DProject/modules/
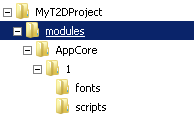
If you did everything correctly, your directory structure should match the following image
![directory structure] (https://raw.github.com/wiki/GarageGames/Torque2D/Getting_Started_images/folderview.png "Your directory structure should look like this")
Copy the following files from your T2D repository root directory to /MyT2DProject/, depending on your OS
All Platforms
- main.cs
Windows
- Torque2D.exe
- OpenAL32.dll
- unicows.dll
- leap.dll
- leapd.dll
OSX
- Torque2D.app
There we go! If you run the .exe or .app, you should get a window set to the default background color.
If you were to create your own game, this is as bare-bones as you can get.
Before we get started on the actual game code, though, we will need to look at our AppCore module first and make some minor modifications.
Open up Appcore's main.cs file and look at the create function.
The first line which interests us is this one :
initializeCanvas("Torque 2D");
This function obviously initializes the Canvas and sets the title of your program's window. Now would be a good time to change it from "Torque 2D" to "My T2D Project" or whatever you like.
Take a look at the following line :
Canvas.BackgroundColor = "CornflowerBlue";
Maybe you like CornflowerBlue, it's really none of our business. You might however be interested to know where to find other color names so you may use them in your own projects.
Navigate to your solution's T2D/engine/source/graphics/colors.cc
You will find all the stock color names in this file as well as they RGBA values.
The last line we will look at loads all modules belonging to the group gameBase :
ModuleDatabase.loadGroup("gameBase");
- ModuleDatabase.loadGroup allows us to load all modules belonging to the group gameBase.
- ModuleDatabase.loadExplicit allows us to load one module specifically.
As we will only create and use one module besides AppCore, we will change this behavior to load a single module.
Change the line above to
ModuleDatabase.loadExplicit("MyModule");
Now, our Appcore module is configured to work with our project.
It is always a good idea to structure your code in a logical manner, even if your project is small.
You should separate functionality into distinct .cs script files and place them in your scripts subfolder.
In this section, we will create our main game module. Every action from now on will occur in your MyT2DProject folder.
-
Under your modules folder, create a new directory. Name it myModule
-
Create two files under /myModule/, named module.taml and main.cs
-
Create three directories under /myModule/, named 'scripts', 'gui' and 'assets'
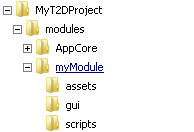
Your directory structure should now look like this
![directory structure] (https://raw.github.com/wiki/GarageGames/Torque2D/Getting_Started_images/folderview2.png "Your directory structure should look like this")
- Open up the module.taml file and type in the following.
<ModuleDefinition
	ModuleId="myModule"
	VersionId="1"
	ScriptFile="main.cs"
	CreateFunction="create"
	DestroyFunction="destroy" />
This is your module definition file. The information contained herein will inform the engine what to load and how to behave.
- ModuleID determines the name of the module that will be used throughout the engine.
- The VersionId states that this is version 1 of our module.
- Scriptfile specifies what file to load in the current folder when the module is initialized
- CreateFunction determines what function will be called when the module is initially created
- DestroyFunction determines what function will be called when the module is destroyed.
In the above example, the engine would load the file main.cs and execute a function named myModule::create();
Save the file and open up your module's main.cs file.
We will need two functions (at first).
function MyModule::create( %this )
{

}

function MyModule::destroy( %this )
{

}
If you notice, nothing here is magic; everything is as we have specified in the module definition file.
Assets are one of the most important aspects of T2D. The Asset system is incredibly powerful yet deceptively simple to use.
An Asset can be anything : an image file, a sound file, a particle effect, an animation, a gui control, etc.
Assets allow you, among other things, to package your game content in modules and reuse this content wherever needed throughout your project.
Download the following image to your /scripts/assets/ folder
![Spaceship Image] (https://raw.github.com/wiki/GarageGames/Torque2D/Getting_Started_images/ship4.png "Download this image to your /assets/ folder")
- create a new text file called ship4.asset.taml
Note that you could call your .asset.taml file however you want; it's just simpler to keep the same name as the image file.
Type the following in ship4.asset.taml
<ImageAsset
    AssetName="LoRez_SpaceShip"
    ImageFile="ship4.png" />
This defines an ImageAsset which we will be able to call from any module in our project by using the nomenclature "myModule:LoRez_SpaceShip".
Exposing our assets to the engine is done in our module definition file, module.taml.
We need to add a DeclaredAssets object as a child to our existing module definition
<ModuleDefinition
	ModuleId="myModule"
	VersionId="1"
	ScriptFile="main.cs"
	CreateFunction="create"
	DestroyFunction="destroy">

	<DeclaredAssets
			Path="assets"
			Extension="asset.taml"
			Recurse="true"/>

</ModuleDefinition>
Take special care to place the > and / symbols in the right place or your module.taml file will not load.
When the module is first loaded, it will scan the assets folder for all files bearing the asset.taml extension and add every asset described in these files to the AssetDatabase.
You can then easily refer to these Assets whenever you need them
    %myspaceship = new Sprite();
    %myspaceship.setImage( "myModule:LoRez_SpaceShip" );
In the example above, we simply create a new Sprite and assign it an image using the Asset we have previously defined.
A tiny little spaceship might not be enough to build a game, though. Luckily, we can use the assets that come with T2D MIT.
-
Navigate to your T2D repository, under the modules folder. Copy the ToyAssets folder into MyT2DProject/modules/.
-
Edit the module.taml file located in /myModule/ and add the line Dependencies="ToyAssets=1"
<ModuleDefinition
	ModuleId="myModule"
	VersionId="1"
	Dependencies="ToyAssets=1"
	ScriptFile="main.cs"
	CreateFunction="create"
	DestroyFunction="destroy">

	<DeclaredAssets
			Path="assets"
			Extension="asset.taml"
			Recurse="true"/>

</ModuleDefinition>
Dependencies specifies what modules are needed by the current one to work properly. This line states that we need version 1 of the module named ToyAssets. Note that this means that the module is automatically loaded when myModule is initially loaded, allowing you to avoid having to call ModuleDatabase.LoadExplicit("ToyAssets");
We are now able to use any asset contained in ToyAssets by using the following nomenclature :
"ToyAssets:Asset_Name"Alternately, we could have added code to myModule's main.cs script file which would explicitly load the ToyAssets module.
Either way, you can easily create your own asset collection modules and use them in your projects in the manner described above.
While we won't be delving deep into the Graphical user interface (GUI) system of Torque2d, we need to clarify a few concepts before we can go forward.
Every item that is part of the GUI system in T2D is derived from a C++ class called GuiControl. Be it a window, a drop-down menu or even a simple button, these are all derived from GuiControl and share the same basic functionality.
In order to exist, though, a GuiControl requires to be linked to a GuiProfile.
A GuiProfile defines the default properties of any Gui Control.
If you create a GuiControl and fail to specify its size, caption and position, the engine will look in the associated GuiProfile for this control and apply default values where possible.
If you do not assign a GuiProfile to a GuiControl, the program will use GuiDefaultProfile by default. If we do not define a GuiDefaultProfile, the engine will refuse to create GuiControls.
First, let's create a GuiDefaultProfile.
-
In the myModule/gui/ folder, create a new file called guiprofiles.cs.
-
Type in the following text into guiprofiles.cs :
if(!isObject(GuiDefaultProfile)) new GuiControlProfile (GuiDefaultProfile);This creates a basic, empty GuiDefaultProfile that will be used whenever we create new GuiControls.
We need to make sure however that myModule loads the file guiprofiles.cs if we want to use GuiDefaultProfile in our program.
- In /myModule/main.cs, add the following code in the MyModule::create function
    // Load GUI profiles.
    exec("./gui/guiProfiles.cs");
We are all set for creating GuiControls!
If you later create new GuiControls and need specific profiles, simply add them to guiprofiles.cs directly. See the Sandbox Module for examples.
First, a little big of disambiguation is required.
At the core of T2D, you have the SceneObject. An example of a Sceneobject would be a sprite, a particle effect, a character, a background prop or an invisible wall.
SceneObjects are contained in a Scene : the Scene determines where the SceneObjects are located and how physics are influencing them.
A Scenewindow is the Gui Control that allows you to render a Scene to the screen.
It is important to understand that a SceneWindow is nothing more than a Gui Control; Resizing a SceneWindow will only resize the Gui Control itself, it will not change the game's resolution or window size. Most importantly, whatever happens to the SceneWindow does not affect the Scene in any way.
You can have multiple SceneWindows in a single project, as demonstrated in the Sandbox's MultiWindowToy that ships with T2D.
-
Under myModule/scripts, create a new file named 'scenewindow.cs'
-
In your newly created file, add the following function :
function createSceneWindow()
{
    // Sanity!
    if ( !isObject(mySceneWindow) )
    {
        // Create the scene window.
        new SceneWindow(mySceneWindow);

       // Set Gui profile. If you omit the following line, the program will still run as it uses
       // GuiDefaultProfile by default

        mySceneWindow.Profile = GuiDefaultProfile;

        // Place the sceneWindow on the Canvas
        Canvas.setContent( mySceneWindow );
    }

    //Note that the SceneWindow's camera defaults to the following values, you could omit them entirely and
    //obtain the same result.

    mySceneWindow.setCameraPosition( 0, 0 );
    mySceneWindow.setCameraSize( 100, 75 );
    mySceneWindow.setCameraZoom( 1 );
    mySceneWindow.setCameraAngle( 0 );
}
The first line of the function asks whether an object called mySceneWindow has already been created.
If we were to try to create a new object with the same name, it might lead to unexpected behavior and lots of headaches. Better safe than sorry!
Take note of this functionality as you will find it often repeated throughout the engine, most notably when it comes to Gui Profiles.
If mySceneWindow doesn't exist, we create a new scenewindow and give it the name mySceneWindow.
new SceneWindow(mySceneWindow);As mentioned previously, a SceneWindow is nothing more than a GuiControl. As such, when we want to fill the screen with a Guicontrol, we call
Canvas.setContent (name_of_gui_control)Once our Canvas displays our SceneWindow, we set the basic camera parameters.
- Add the following function right after the createSceneWindow function
function destroySceneWindow()
{
    // Finish if no window available.
    if ( !isObject(mySceneWindow) )
        return;

    // Delete the window.
    mySceneWindow.delete();
}
In order for our module to use our scenewindow functionality, we need to load in our newly created file.
To do so, open up /myModule/main.cs.
- In the myModule::create function, add the following line
exec("./scripts/scenewindow.cs");This makes the engine load the specified file when we first load the module and allows us to use the functions defined within it.
Since we will want to display the Scenewindow when the game starts, add the following line right after the exec commands :
createSceneWindow();As we have specified in the module definition file, the function myModule::create is called when the module is loaded but what happens when we quit the game? This is where the Destroy function comes in.
In the myModule::destroy function, add the following line
destroySceneWindow();Our SceneWindow is now ready to render!
You can think of a Scene as our game world : All of our SceneObjects exist within the Scene.
You can assign the SceneObjects to different SceneGroups and SceneLayers. There are 32 SceneGroups and 32 SceneLayers, labeled from 0 to 31.
-
SceneGroups : Grouping objects into scenegroups is more useful for collisions and logic. Scenegroups have no effect on rendering. We will talk more about Scenegroups in Chapter 11 on collisions.
-
SceneLayers : SceneLayers are drawn from the farthest (31) down to the front-most SceneLayer (0). Objects drawn on SceneLayer 1 will appear to be drawn 'above' objects on SceneLayer 2, 3, etc.
As we did with the Scenewindow, create a new script file under myModule/scripts called scene.cs
Add the following functions to your new scene.cs file
function createScene()
{
    // Destroy the scene if it already exists.
    if ( isObject(myScene) )
        destroyScene();

    // Create the scene.
    new Scene(myScene);

}
function destroyScene()
{
// Finish if no scene available.
if ( !isObject(myScene) )
return;
// Delete the scene.
myScene.delete();
}In myModule's main.cs file, add the exec command to load our new file
exec("./scripts/scene.cs");Back in the myModule::create function, we will need to create the Scene by calling
createScene();As you can see, this is pretty similar to our SceneWindow setup. As our scenewindow is name mySceneWindow, our scene will be named myScene.
Still in the myModule::create function, we tell our SceneWindow to display our (still empty) Scene
mySceneWindow.setScene(myScene);mySceneWindow now displays the contents of myScene, using the camera parameters we have specified when first creating mySceneWindow.
You will often want to visualize the collision shapes of the objects in your scene, their boundaries, positions and the location of joints.
This can easily be triggered with the setDebugOn and setDebugOff functions
//Enable the debug visualization for "collision", "position" and "aabb"
myScene.setDebugOn("collision", "position", "aabb");
//Disable the debug visualization for "collision", "position" and "aabb"
myScene.setDebugOff("collision", "position", "aabb");
You can choose from any of the following options
- "fps"
- "controllers"
- "joints"
- "wireframe"
- "aabb"
- "oobb"
- "sleep"
- "collision"
- "position"
- "sort"
Now that that our Scene is created (myScene) and is being rendered via our SceneWindow (mySceneWindow), all we are missing are SceneObjects!
Take special note that the current chapter is mostly theoretical. The code in this chapter is simply there to demonstrate the basics of using SceneObjects. We will use this knowledge when we use Sprites in chapter 10.
A SceneObject is the most basic entity you can add to a Scene.
In order to create a new SceneObject, you would use the 'new' command
new SceneObject();Once our object is created, we need to set its basic physics simulation parameters
    mySceneObject.createPolygonBoxCollisionShape( 10, 500);
    mySceneObject.setBodyType( "static" );
The first line will create a Collision box that is the same size as the SceneObject. This is used to determine the object's shape when it comes to collisions with other objects.
The size and shape of the SceneObject do not necessarily have to match the size and shape of its collision shape.
Bear in mind that a ball with a square collision shape might look weird, so make sure to keep things logical.
The second line of the above code sets the physical body of our SceneObject to 'static'
static : static bodies will not respond to physical forces such as gravity and will not move when hit by other objects dynamic : dynamic bodies are fully responsive to physical forces and will bounce off other objects when colliding with them
Once the parameters of our SceneObject are configured to our liking, we need to add it to the Scene :
myScene.add(mySceneObject);Here are some of the basic properties shared by all SceneObjects
- Position : It has a x and y position, allowing you to place it within the scene
- Size : It has a width and a height
- Collision Shape : The collision shape's parameters determine how this object will interact with others in the physics simulation.
- Behaviors : It supports Behaviors, which are modular pieces of game code that can be shared between SceneObjects
By itself, a SceneObject does not have rendering capabilities, i.e. it is invisible! You will rarely create SceneObjects directly except if you need an invisible physical object.
Most toys in the Sandbox project create invisible SceneObjects to act as barriers delimiting the game world. Since they have collision capabilities, other objects will bounce off of these 'invisible walls'.
The following classes are all derived from SceneObject; This means that they all share the functionality provided by a SceneObject, while adding their own specialized functionality.
- Sprite
- CompositeSprite
- ImageFont
- ParticlePlayer
- Scroller
- ShapeVector
- Trigger
Remember that Positioning, sizing and collision handling will be the same for every object derived from SceneObject.
Note that you can choose to toggle debug information on and off for specific objects instead of displaying debug information for the entire Scene at once.
mySceneobject.setDebugOn("aabb");
mySceneobject.setDebugOff("aabb");We will create three main objects in this project.
- A background

- A spaceship

- Some asteroids
As such, create the files background.cs, spaceship.cs and asteroids.cs in myModule/scripts/.
In myModule's main.cs file, remember to exec these files so that our program is aware of the functions they contain!
exec("./scripts/background.cs");
exec("./scripts/spaceship.cs");
exec("./scripts/asteroids.cs");Open /scripts/background.cs and add in the following function
function createBackground()
{
   // Create the sprite.
    %background = new Sprite();

    // Set the sprite as "static" so it is not affected by gravity.
    %background.setBodyType( static );

    // Set the object's center to coordinates 0 0 which corresponds to the center of the Scene
    // Remember that our camera is set to point to coordinates 0 0 as well

    %background.Position = "0 0";

    // Set the object's size. Notice that this corresponds to the size of our camera, which was created in
    // scenewindow.cs. The background will thus cover the entirety of our scenewindow.
    %background.Size = "100 75";

    // Set to the furthest background layer.
    %background.SceneLayer = 31;

    // Sets the image to use for our background
    %background.Image = "ToyAssets:skyBackground";

    // Create border collisions.
    %background.createEdgeCollisionShape( -50, -37.5, -50, 37.5 );
    %background.createEdgeCollisionShape( 50, -37.5, 50, 37.5 );
    %background.createEdgeCollisionShape( -50, 37.5, 50, 37.5 );
    %background.createEdgeCollisionShape( -50, -34.5, 50, -34.5 );

    // Add the sprite to the scene.
    myScene.add( %background );
}
The comments in the code should be enough for you to understand what is going on but notice that when we create the Sprite, we assign the result of the new Sprite() function to %background.
%background is a local variable. This means that it will only make sense within the current function.
In all of our previous examples when creating objects, we gave them a specific name (myScene, mySceneWindow, etc.) so that we could refer to them throughout the program.
With a local variable, we couldn't use %background in our main.cs file; the program would not know what %background refers to and would generate an error. The only place where we can use %background is in the createBackground function; it won't even be recognized in the other functions contained in the background.cs file.
The alternative would have been to use the following code
new Sprite(Background);Make sure to take the time to go through the TorqueScript Syntax Guide to clarify the matter if need be.
Back in myModule's main.cs file, we will create the background by calling our newly-created function
After mySceneWindow.setScene(myScene); in main.cs, type in
createBackground();In /scripts/spaceship.cs, type in the following :
function createSpaceShip()
{
   // Create the sprite.
    %spaceship = new Sprite(PlayerShip);

    // We want our spaceship to move and be affected by gravity and various forces
    // so we set its BodyType to dynamic
    %spaceship.setBodyType( dynamic );

    // Set the position at the center of our Scene
    %spaceship.Position = "0 0";

    // Set the size.
    %spaceship.Size = "4 4";

    // Set the layer closest to the camera (above the background)
    %spaceship.SceneLayer = 1;

    // Set the scroller to use an animation!
    %spaceship.Image = "myModule:LoRez_SpaceShip";

    // This creates a box which so that collisions with the screen edges register properly
    // Calling createPolygonBoxCollisionShape() without arguments sets the box to the size of the
    // sceneobject automatically.
    %spaceship.createPolygonBoxCollisionShape();

    // Add the sprite to the scene.
    myScene.add( %spaceship );

}
Notice that the code is almost identical to the one we've used to create the background. %spaceship and PlayerShip refer to the same object.
As we will want to manipulate the spaceship in other functions, we will use Playership so that we can easily access this sprite throughout our program. Once more, the local variable %spaceship will only make sense within the createSpaceShip function.
Also note that we have used the asset we have created in Chapter 5 instead of the ones in ToyAssets.
After createBackground(); in myModules's root main.cs, type in
createSpaceShip();In /scripts/asteroids.cs type in the following function while paying attention to the comments :
function createAsteroids(%Number_of_Asteroids)
{
for(%i=0;%i<%Number_of_Asteroids;%i++)
{
// Create the sprite.
%asteroid = new Sprite();
%asteroid.setBodyType( dynamic );
// Set the position.
%asteroid.Position = "-40" SPC getRandom(-35,35);
// Set the size.
%asteroid.Size = "3 3";
// Set to the frontmost layer.
%asteroid.SceneLayer = 1;
//Sets the collision shape to a circle with a radius of 1.5 units
%asteroid.createCircleCollisionShape(1.5);
//This function determines how bouncy our asteroids will be if collisions occur
//values between 0.0 and 1.0 should be used in most situations
%asteroid.setDefaultRestitution(getRandom(0.5,1.1));
//This sets the horizontal speed of our Asteroids between 15 and 35 towards the right side of the screen
//Negative values would send them to the left instead
%asteroid.setLinearVelocity(getRandom(15,35),0);
//This will make the Asteroids rotate automatically
%asteroid.setAngularVelocity(getRandom(5,25));
//Here we assign all created Asteroids to SceneGroup 20. More on this in Chapter 11.
%asteroid.SceneGroup = 20;
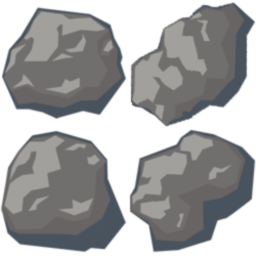
%asteroid.Image = "ToyAssets:Asteroids";
//You will notice that the asset file for ToyAssets:Asteroids defines 4 different images
//in one single file. setImageFrame chooses from one of these images to add variety.
%asteroid.setImageFrame(getRandom(0,3));
// Add the sprite to the scene.
myScene.add( %asteroid );
}
}While the basic Sprite creation process is the same as before, there are several new concepts in this function.
- Notice that the function named createAsteroids now takes a parameter. This means that instead of just calling createAsteroids(), we will use
createAsteroids(20); -
We then have a basic for loop which will repeat %Number_of_Asteroids times. Calling createAsteroids(20) will thus call the creation code 20 times, giving us 20 asteroids.
-
Values contained between " " are called strings. In cases such as a sceneobject's position, we need to specify 2 different values in one string (the x and y positions). The SPC keyword inserts a space in the string, allowing us to use variables instead of writing in specific numbers.
-
the function getRandom(min,max) will return a number between min and max, allowing you to quickly add in variety to any function.
You should now understand what the following line of code actually does
%asteroid.Position = "-40" SPC getRandom(-35,35);All asteroids will spawn at an x position of -40 but will choose a y value between -35 and 35. Remember that our background sprite and camera have a y size (height) of 75 units and that 0 is in the center. Thus, our screen stretches from -37.5 to 37.5 on the y axis
Spawning the asteroids within a span of 70 units ensures that they will be fully visible and won't appear partially out of the screen.
After createSpaceShip(); in myModules's root main.cs, type in
createAsteroids(20);As long as objects have a Collision Shape and a valid 'Body' (created by calling SceneObject.setBodyType), all SceneObjects will collide with each other.
This behavior is fine for simple toys such as those contained in the sandbox but seems a bit lacking if we were to make a full-scale game.
By default, all objects are created in SceneLayer 0 and SceneGroup 0. The default SceneObject will be set to collide with all of the SceneGroups and Scenelayers. You can limit what objects collide with each other by assigning them to different SceneLayers and SceneGroups and specifically setting what groups and layers they can collide against.
When our spaceship collides with other objects, we would like to know about it and execute some code.
In /scripts/spaceship.cs, after the setup code but before myScene.add( %spaceship );, add the following code :
%spaceship.setCollisionCallback( true );This tells the engine that every time our ship collides with something, it will run a function called onCollision.
Imagine if every object in our game were to call the function onCollision. The function would need to contain the advanced collision code for all collision possibilities, making it extremely hard to read and potentially too slow for most scenarios.
The %spaceship.setCollisionCallback function tells the engine to only call the onCollision function which is relevant to the %spaceship object.
Since we have assigned the name PlayerShip to the spaceship when creating it, we can use that name to have functions that will be specific to PlayerShip and not to other objects.
Functions starting with PlayerShip:: exist in PlayerShip's namespace. You might come across this term often during your time with T2D.
In /scripts/spaceship.cs, add the following function at the end of the file
function PlayerShip::onCollision(%this, %sceneobject, %collisiondetails)
{

}
We won't call this function manually in our code, it will be called automatically whenever PlayerShip collides with something.
The function will always receive 3 parameters
- %this : Represents the object which called the function. In this case, the spaceship SceneObject
- %sceneobject : Represents the Sceneobject that our spaceship has collided with
- %collisiondetails : Represents the contact information of the collision.
In our program, the spaceship can only collide with two object types : the asteroids and the invisible barriers surrounding the background SceneObject.
The function onCollision will thus be called whenever we collide with either of these objects.
Let's say we want something cool to happen when we collide with Asteroids but NOT when we collide with the invisible barriers.
Let's walk through the logic and write the function accordingly.
- When we collide with another object, we determine if it is an asteroid or not
We can do this by checking if %sceneobject belongs to SceneGroup 20. Look back at the scripts/asteroids.cs file; all asteroids are set to be in SceneGroup 20.
- Once we know that we have collided with an Asteroid, we want an explosion!

We can create a Particle Effect to play at the location where the collision occurred. We can use the impactExplosion Particle effect from ToyAssets for this.
-
We want to delete the asteroid when it has exploded.
-
We want to create a new asteroid to replace the one that exploded.
Fill your newly created PlayerShip::onCollision function with this code :
function PlayerShip::onCollision(%this, %sceneobject, %collisiondetails)
{

    //If we have collided with an object belonging to Scenegroup 20,
    //execute the code between the { ... }
    //If we collide with something else, do nothing
  if(%sceneobject.getSceneGroup() == 20)
  {
    // ParticlePlayer is also derived from SceneObject, we add it just like we've added all the other
    //objects so far
    %explosion = new ParticlePlayer();

    //We load the particle asset from our ToyAssets module
    %explosion.Particle = "ToyAssets:impactExplosion";

    //We set the Particle Player's position to %Sceneobject's position
    %explosion.setPosition(%sceneobject.getPosition());

    //This Scales the particles to twice their original size
    %explosion.setSizeScale(2);

    //When we add a Particle Effect to the Scene, it automatically plays
    myScene.add(%explosion);

    //We delete the asteroid
    %sceneobject.safedelete();

    //We create a new asteroid just like we did at the start of the game!
    createAsteroids(1);
  }
}
If you run the game now, you will see how ridiculously easy it was to implement our idea.
Don't worry about having to delete the explosion object. Its particle Effect mode is set to KILL, which automatically deletes the emitter once the effect is done playing.
The asteroids could behave better, though. Let's modify their creation function.
We could use a bit more variety in our asteroid sizes.
In scripts/asteroids.cs, replace the line %asteroid.Size = "3 3"; by the following
%randomsize = getRandom(3,10);
%asteroid.Size = %randomsize;
This assigns a random number between 3 and 10 to the %randomsize variable and assigns the value to the .Size property of %asteroid.
Note that usually, we would provide 2 numbers for the size : height and width.
Thanks to optimizations made to the engine, if you enter just 1 number (height), the code will automatically use it for the second parameter (width) as well.
We might want the size of our collision shapes to match the size of our graphics, else you would see objects moving right through each other.
As you may have noticed, the asteroids do not have perfectly circular shapes. We will thus make the collision circle shape take up only 85% of the sprite size. This is not perfect, of course, but it is a quick way to approximate a relatively reasonable result.
Our CollisionShape is currently set to a radius of 1.5, which makes sense as it was half of our original asteroid size.
We will thus simply replace that value with a simple mathematical function.
%asteroid.createCircleCollisionShape( (%randomsize*0.85) / 2);As you may recall, we have set the Defaultrestitution of the asteroids to a random value between 0.5 and 1.1.
%asteroid.setDefaultRestitution(getRandom(0.5,1.1));If you've noticed, the asteroids in our game always seem to slow down and end up drifting slowly in a corner.
To fix this, we will modify the restitution of the background's collision shapes.
In /scripts/background.cs, add in the following line
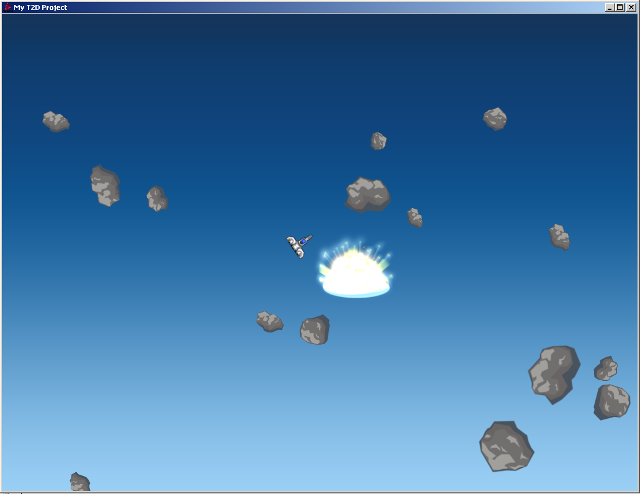
%background.setDefaultRestitution(1);The invisible walls are now bouncy! This will help our asteroids keep momentum and will also make our spaceship bounce back!
![myT2DProject] (https://raw.github.com/wiki/GarageGames/Torque2D/Getting_Started_images/Screenshot.png "This is what your game should look like!")
We will now add basic controls to our program, officially making it a game!
There are two types of controls available to you in T2D
- Mouse and Touch Input
- Keyboard Input
Bear in mind that on iOS, only Touch input is supported. As such, if you plan to make your game cross-platform, make sure to think about how your controls will work on a touchscreen vs. a keyboard.
T2D MIT is meant to be multi-platform. As such, when it comes to input, the main callback functions that are used are tied to the TouchScreen concept and nomenclature.
Touch and mouse input is also tied in directly to the GUI System. Whenever a user clicks a mouse button or touches the screen, the engine will call the input functions on the control that was hit.
We will Not be discussing Right Mouse Button (RMB) or MouseWheel input callbacks in this guide.
The functions for Touchscreen input and Left Mouse Button (LMB) clicks are as follows :
-
onTouchDown (occurs when we touch tthe screen or click LMB)
-
onTouchUp (occurs when we remove our finger from the screen or release LMB)
-
onTouchDragged (is called continuously when you drag your finger across the screen or when you move the mouse while holding LMB down)
all of the above functions take two parameters,
- %touchID, which returns the unique ID number of the event
- %worldposition, which returns the scene's x / y position of our click or touch.
%touchID will be useful to track multi-touch input, as demonstrated in the Sandbox module's manipulation scripts.
First, our SceneWindow object's Gui profile must be modified to accommodate input.
In myModule/gui/guiprofiles.cs, change the GuiDefaultProfile declaration to the following
if(!isObject(GuiDefaultProfile)) new GuiControlProfile (GuiDefaultProfile)
{
Modal = true;
};
The way the GuiSystem is set up, it will only execute input callbacks if a GuiControl has properties Active and Modal set to true.
With our current setup, the SceneWindow object (mySceneWindow) will receive all input events.
In previous versions of Torque2D, you would have added input logic in a function like this :
mySceneWindow::onTouchDown(%this, %touchId, %worldposition)Adding functions to deal with input to the SceneWindow's script file can be cumbersome and would make for a bloated and confusing file.
Note that this functionality is still present in the engine and supported should you desire to use it.
An input listener is an object which will receive all input origianlly received by the SceneWindow. This allows us to approach input handling in a clean and modular way.
In order to keep our program clean, we will create a new file under myModule/scripts/ called controls.cs.
In myModule/main.cs, don't forget to tell the engine to load our new file by adding the following line after the other exec's
exec("./scripts/controls.cs");Add the following code to the end of the function myModule::create
new ScriptObject(InputManager);
mySceneWindow.addInputListener(InputManager);
This creates a new object type, a ScriptObject, named InputManager. The second line adds it as an inputListener on mySceneWindow.
ScriptObjects can be used for just about anything related to game logic. They are NOT derived from SceneObjects and thus do not exist in the Scene.
Since these objects do not exist in the scene, it is very important to keep track of them by using Names or by placing them into Simsets for easy reference.
In function myModule::destroy, add the following line to make sure the object gets destroyed when we exit the game.
InputManager.delete();The advantage of the input listener might not be obvious at first but will get clearer once your program grows more complex.
You can have several input listeners active at the same time but each one will receive all input events from the scenewindow. This means that if you had 2 input listener objects active simultaneously, both InputManager1::onTouchDown and InputManager2::onTouchDown would be called! While this can be a useful technique, this is definitely a more advanced topic and will not be covered in this guide.
To disable an inputlistener, you simply call removeInputListener :
mySceneWindow.removeInputListener(InputManager);We will use onTouchDown's %worldposition to determine the coordinates of our click/touch using the function myScene.pickpoint.
myScene.pickpoint's result will be a list containing all the objects which we have hit. In our program, this would include the background, spaceship and asteroids.
If one of the objects in this list belongs to SceneGroup 20, we will delete it. As you may remember from our Collision code, only Asteroids belong to SceneGroup 20.
As you remember, our InputManager object will be the one who receives all the input events instead of our SceneWindow.
In myModule/scripts/controls.cs, add the callback function
function InputManager::onTouchDown(%this, %touchId, %worldposition)
{

//We assign the list of objects that were hit to variable %picked
%picked = myScene.pickPoint(%worldposition);

//%picked.count is the number of items listed in the %picked variable

for(%i=0; %i<%picked.count; %i++)
   {

    //When iterating through the list, getWord will return item number %i in variable %picked

      %myobj = getWord(%picked,%i);

    //If this item belongs to SceneGroup 20, we delete it
      if(%myobj.getSceneGroup() == 20)
      {
      %myobj.safedelete();
      }

   }
}
If you run the game now, clicking an asteroid will delete it!
The myScene.pickpoint() function will return all objects in the Scene that were hit by our click/touch. You can optionally specify which SceneGroups and SceneLayers to use when performing the pick.
myScene.pickpoint(%worldposition, %SceneGroupMask, %SceneLayerMask);By default, the pickpoint function will return results based on a SceneObject's OOBB. You can tell pickpoint to return results based on AABB or CollisionShapes instead.
OOBB means Object-Oriented Bounding Box -> a box surrounding the object which rotates as the object rotates
AABB means Axis-Aligned Bounding Box -> a box surrounding the object which will not rotate with the object
- See the PickingToy example in the Sandbox for an interactive example of different picking modes
Since an object's OOBB will rotate at the same time as the object, it will make for a better candidate for picking when a user tries to click the object.
Now that you understand the basic logic of the mouse and touch input system, we suggest looking into the Sandbox module of your T2D repository for more advanced examples.
There are two basic concepts to understand about input, binding and Actionmaps.
Binding
A binding is the action of assigning a key or button to a specific command.
For example, "press A to jump" would bind key 'A' to the jump command.
There are three functions to bind a key or button to an action :
ActionMap.bindCmd, ActionMap.bind and ActionMap.bindObj
In our game, we will require an action to be triggered when we press the key and another action when we release the key. As such, we will be using ActionMap.bindCmd.
The function works like this
ActionMap.bindCmd(device, command, makefunction, breakfunction);- device means the keyboard or the mouse
- command is the key or button we want to bind our function to
- makefunction is the function to be called when we initially press the key or button
- breakfunction is the function to be called when we release the key or button
Action Maps
An action map can be seen as a collection of key bindings. This system allows users to easily remap buttons if they are not comfortable with the default keyboard layout initially chosen by the programmers.
At the base of all input is a GlobalActionMap where we define the bindings which will be used throughout the program. The GlobalActionMap's bindings cannot be overriden by other ActionMaps.
For example, a standard GlobalActionMap would allow users to press ~ to bring up the console, press F5 to take a screenshot, etc. These keys would then be unavailable to use by other ActionMaps.
In order to use our own ActionMap, we need to push the ActionMap on top of the GlobalActionMap. Any ActionMap that was last pushed will be the one that dictates what keybindings to observe.
We will place this function in InputManager's namespace for clarity.
In myModule/scripts/controls.cs we will create a function as follows :
function InputManager::Init_controls(%this)
{
//Create our new ActionMap
new ActionMap(shipcontrols);

// Press "a" to execute "PlayerShip::turnleft();"
// Release "a" to execute "PlayerShip::stopturn();"

shipcontrols.bindCmd(keyboard, "a", "PlayerShip.turnleft();", "PlayerShip.stopturn();");
shipcontrols.bindCmd(keyboard, "d", "PlayerShip.turnright();", "PlayerShip.stopturn();");
shipcontrols.bindCmd(keyboard, "w", "PlayerShip.accelerate();", "PlayerShip.stopthrust();");

//Push our ActionMap on top of the stack
shipcontrols.push();
}
In myModule/main.cs add the following code at the end of function myModule::create to initialize our controls when the game starts :
InputManager.Init_controls();Once the game is over, we want to disable the ActionMap. We will do so by editing the function myModule::destroy located in myModules/main.cs, by adding the following line before destroyscenewindow()
shipcontrols.pop();Let's prepare our ship for deep-space maneuvering.
In myModule/scripts/spaceship.cs, at the end of the createSpaceShip function, add the following :
//setFixedAngle prevents the spaceship's rotation from being influenced by Collisions and physics forces
//The spaceship will still bounce when it collides with other objects.
%spaceship.setFixedAngle(true);

//create a new variable and set it to false.
%spaceship.isThrusting = false;
We will set the variable isThrusting to true when the user holds down w (accelerate) and set it to false when the w key is released
Let's start with the most complicated function, PlayerShip::accelerate.
It is important to remember that %this refers to the spaceship. In this function, we could exchange PlayerShip and %this and obtain the same results.
Do not worry if you don't understand the math and physics of this code snippet 100%. Read through the comments and follow the logical outline of the function. It will get clearer when you try the game for yourself.
The schedule function at the end of the accelerate function will call Playership::accelerate continously, until we release the 'w' key.
Scroll to the bottom of your spaceship.cs file and add the following function :
function PlayerShip::accelerate(%this)
{
    //Get the angle of our spaceship. When the ship is pointing upwards, its Angle is 90.
    %adjustedAngle = %this.Angle + 90;

    //When used as a math operand, % refers to modulo (or modulus) operator
    //This function can be read as %adjusted angle = %adjustedAngle % 360;
    %adjustedAngle %= 360;

    //If we are thrusting, shorten our vector
    if(%this.isThrusting)
    {
        //Calculate a direction from an Angle and Magnitude
        %ThrustVector= Vector2Direction(%adjustedAngle,35);
    }
    else
    {
        %ThrustVector = Vector2Direction(%adjustedAngle,95);

        //We temporarily remove the Damping of Linear Velocity to allow full power!
        %this.setLinearDamping(0.0);

        //We temporarily increase the Damping of Angular velocity so that the ship turns slower when at full thrust
        %this.setAngularDamping(2.0);
    }

    //Adding our position to the ThrustVector determines the strength of our thrust
    %MywordX = %this.Position.x + %ThrustVector.x;
    %MywordY = %this.Position.y + %ThrustVector.y;

    //applyLinearImpulse pushes on our spaceship, using %ThrustVector as the impulse vector.
    //The second parameter is the point in the ship's collision shape used to apply the thrust
    %this.applyLinearImpulse(%ThrustVector, "0 0");

    //We are now thrusting, we will set this to false when we release the 'w' key
    %this.isThrusting = true;

    //We create a schedule to repeat this thrust every 100 milliseconds
    %this.thrustschedule = %this.schedule(100,accelerate);
}
Schedules are used throughout T2D projects to execute code at regular intervals or after a specified delay.
There are two ways to call a schedule.
One way is used to call generic functions (i.e. createAsteroids)
schedule(time, objID, function_name, args);- time : time in milliseconds (1000 ms in one second) before the function is called
- objID : an optional ID to add to the schedule to keep track of it. Usually 0.
- function_name : The name of the function to call, without arguments
- the arguments to use in the function call
If we wanted to create 3 asteroids in 1.5 seconds from now, we would use :
schedule(1500,0,createAsteroids,3);Another way to use schedule is to call functions that are linked to an object name or class, like PlayerShip::accelerate in our current game.
We call these schedules a bit differently :
%this.thrustschedule = PlayerShip.schedule(100, accelerate, %arguments);This function will call PlayerShip::accelerate in 100 milliseconds.
To cancel a scheduled function, we would use the cancel function. This is where the schedule ID is important. In the above example %this.thrustschedule (equivalent to PlayerShip.thrustschedule) is a new variable we create that will hold the ID of the schedule.
To cancel our schedule, we would use :
cancel(%this.thrustschedule);Now that we know everything about schedules, adding the functions to turn left and write is going to be incredibly straightforward!
Just like before, we will call turnleft or turnright repeatedly as long as we hold down the corresponding key.
If the angular velocity of an object is positive (>0), the object will spin to the right. If the angular velocity of an object is negative (<0), the object will spin to the left. An angular velocity of 0 means the object is not spinning.
After the PlayerShip::accelerate function, type in these new functions :
function PlayerShip::turnleft(%this)
{
//adds the value of 20 to our current Angular Velocity
%this.setAngularVelocity(%this.getAngularVelocity()+ 20);
%this.turnschedule = %this.schedule(100,turnleft);
}

function PlayerShip::turnright(%this)
{
//substracts the value of 20 from our current Angular velocity
%this.setAngularVelocity(%this.getAngularVelocity()- 20);

%this.turnschedule = %this.schedule(100,turnright);
}
Finally, we add the two final functions that are called when we release the keys.
Note that we use %this.turnschedule in our turning functions and %this.thrustschedule in our accelerate function. This allows us to keep accelerating as we turn and vice-versa.
Releasing 'a' will not stop us from accelerating and releasing 'w' will not stop us from turning at the same time.
Add the following after the previous functions
function PlayerShip::stopturn(%this)
{
//cancels all scheduled turning
   cancel(%this.turnschedule);
//Stop us from spinning
   %this.setAngularVelocity(0);
}

function PlayerShip::stopthrust(%this)
{
//We add Damping to the Linear Velocity, which slows down the ship when the key is released
%this.setLinearDamping(0.8);
//We set Angular Damping to 0 so that we can turn as fast as possible
%this.setAngularDamping(0.0);

cancel(%this.thrustschedule);

//we set isThrusting to false to indicate that we are no longer thrusting.
//Next time we hit 'w', our accelerate function will use a bigger acceleration boost to get us going faster!
%this.isThrusting = false;
}
Voilà! We can now control the spaceship using the keyboard and click asteroids to delete them!
If you have made your own Sandbox toy and want to share it with your friends or other Torque2d users, you only need to distribute the toy module.
To distribute modules, zip your desired module's directory and make it available using an online storage system like dropbox.
Users will simply need to download the file and extract it into their 'modules' folder. It's that simple.
If your module has dependencies other than the standard Sandbox modules, make sure to include the referenced modules as well! If the module cannot find the other modules it depends upon, it will simply refuse to load.
Since you have forked your own version of the T2D engine, you should update your repository with your own code and modifications.
If you feel like your modifications should make it into the official engine repo, you may submit a pull request on the Torque 2d MIT's github page Keep in mind that the T2D MIT steering committee has to review and test all pull requests before integrating them into the engine.
This doesn't stop you from notifying users via the GarageGames forums about your fork!
Users that are interested in your modifications will thus be able to merge your version into their local copies without destroying their work! It is also a great way to get feedback on your work before finishing it.
When you are ready to make your game available to the public, you must make sure to remove all unnecessary material from the distributed package.
If you want to keep your script files from being modified by the end-user, you will need to compile and encrypt your .cs files into the .dso format.
.dso files are compiled versions of your standard .cs script files which are encrypted and cannot be edited. If the engine cannot find a specified .cs file, it will look for the .cs.dso equivalent and load that instead.
First, in your compiler's code, add the following line to the file torqueConfig.h
#define TORQUE_ALLOW_DSO_GENERATIONRecompile your solution.
You will also need to tell the engine to stop ignoring the DSO files in your root main.cs script file
$Scripts::ignoreDSOs = false;What you must keep
- your .exe or .app file, hopefully named something else than Torque2D.exe/.app
- your modules folders
- the .dll files in your root directory if you are on a Windows OS.
What you should remove
- The Debug version of your executable (by default, Torque2D_DEBUG.exe/.app)
- the engine folder (the source code has been compiled in the .exe/.app already)
- any .cs files EXCEPT your root main.cs file.
- all .bat files in your root directory.
- all torsion-related files also located in your root directory.
- The schema file (if you have generated it), by default "Torque2d.xsd"
If you plan to port your project to another supported platform, you will have to compile the engine on that platform specifically.
The beauty of it is that this is the only step required; you can use the same scripts and directory structure regardless of the platform you are on.
The first part of your your journey is over : you should now be familiar with every system that Torque 2d MIT has to offer.
Bear in mind that this is only the tip of the iceberg as the possibilities are as limitless as your imagination...divided by your desire to Google stuff :)
The first step should be to modify this example project to your tastes.
How would you like the spaceship to maneuver? Maybe you'd like different behavior for the onTouchDown function? What about enemies?
With the knowledge you have gained in this guide and the varied toys offered in the Sandbox, you have in your hands the perfect playground to try out your ideas and to learn the ins and outs of Torque 2D and game development.
After this, we strongly suggest reading through the excellent Behavior Tutorial. The Behavior Tutorial will show you how to use Behaviors in your game and is the perfect follow-up to the Getting Started guide.
Should you desire to gain more knowledge of a specific aspect of the engine, make sure to visit the Wiki : https://github.com/GarageGames/Torque2D/wiki
If something isn't 100% clear, do not be afraid to ask your questions on GarageGames' forums : http://www.garagegames.com/community/forums/84
Now it's time to turn that cool idea you have and make it a reality.
Make us proud!